
Likes
Comments
Share


@Highone420
Follow
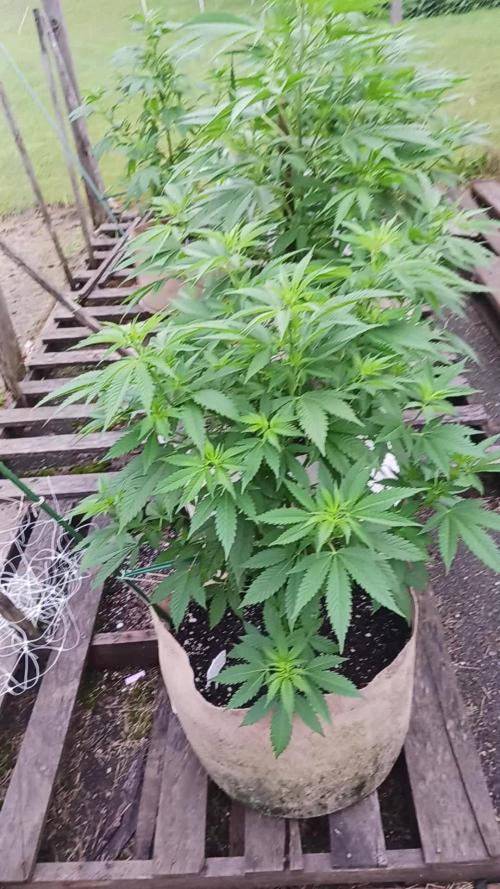
hello fellow growers!
it's the last couple weeks of this run and i couldn't be happier with the results, it's been a learning curve that shoots to the sky,
amazing genetics that helps a lot, resistant and sturdy plants with a lot of terps and easy to grow, it's not hard to get to know them and they will tell you what the issues is and quick!
they will let you know if sum wrong!
they don't like PH flux and high EC (a lot of nutes).
i'd say any of the fast buds line is a great starting plant for beginners but you still have the possibility to really cream these babies out and maximize yields n quality. i'm really happy and can't wait until next run!✅❤️
bless!!
//Highone420

Likes
5
Share


@JohnnyBlaz3
Follow
Still smooth sailing! 😎 they look so good!!! One lady sure stretched up alot compared to the others but they look amazing!!! The Quebec blue is crushing it and will surely be putting out some good flowers!! I will be turning up the light now 5% a day and should be at 100% around the start of week 5. I am so happy currently and hope the flowers do this crop justice.

Likes
9
Share


@horticulturale
Follow
Esta semana han sido trasplantadas al tiesto de 7 litros.
Salen del armario pequeño de germinación a los focos guays de led.

Likes
9
Share

@masterofsmeagol
Follow
6/22 Some pictures didn't upload but that's probably a good thing. As long as the video went up its good. I need to take less pictures. I'm glad I watered the plants in the back with a premixed gallon last night as we didnt get nearly the rain I thought we would. It's small showers throughout the day. The plants are getting enormous. A couple have revegged. Mostly the 10th planet. The others aren't anywhere near as impacted. Boy are some of these stalks thick. I chose to keep a couple plants that could be grown naturally without topping or fimming. I like to see the structure of the tree bit with humidity like this 98%rh it's easy to get botrytis. That's why it's good sometimes to have multiple bid sites so your proverbial eggs aren't all in one basket. But you do end up with a massive cola. I think that mk ultra with the big fan leavescis just going to be one giant bud. That's what it's looking like. Oh and today is the summer solstice. Longest day of the year.
6/23 WATERED EVERYTHING. USED FIVE AND A HALF GALLONS. EVERYTHING GOT AT LEAST A HALF GALLON. Despite the rain we got and the bags still having some heft I decided to water. It's 80 at 9am. It's supposed to he in the upper 90's today and coukd break 100° tomorrow. I hate that the grow bags are black. That's way to hot for the plants. I should find some empty soil bags and wrap the black fabric for a couple days. A sunscreen might help but I doubt much. We'll see how it goes.
6/24 It's 90° at 9am. It's supposed to break 100° amd stay there a while. Up to 106°. Plants looked awesome this morning. I wasn't sure what I'd find. Today is the worst of the days. If it didn't break 100 yesterday it was damn close all day and the girls look GREAT. I WATERED AGAIN TODAY. I USED 6.5 GALLONS TO WATER THE GARDEN. It was nice cool well water too so they should like that. Branches are getting longer and I'm training as the get bigger. I need to put up the trellis but I'm not doing it in this heat.
EDIT: 90° @ 6PM WENT OVER AND AS PREDICTED THE TWO TENS WERE DROOPING. IM WONDERING IF THEY WILL BE ABLE TO FINISH IM THOSE TENS. LAST YEAR I HAD ONE THAT WAS HUGE IN A TEN BUT IT JUST DEVELOPED INDIVIDUAL CALYXS WITHPUT CONNECTING. CHECK IT OUT ON LAST YEARS DIARY. IF THATS THE CASE I SHOULD KIGHT DEP THEM BECAUSE THEYRE GETTING BIG. I WATERED THE TWO TENS WITH ABOUT A HALF GALLON AND I USED WHAT WAS LEFT OF THAT COLD WELL WATER ON THE 10TH PLANET IN THE 30. SHITS LIGHTER THAN USUAL BUT LOOKING PRETTY GOOD. THE REST CAN WAIT UNTIL THE MORNING FOR THEIR WATERING. TOMORROW TOPS OUT AT 85° WHICH WILL BE MUCH BETTER. IM LOVING MY STRAIN CHOICES RIGHT NOW.
6/25 It's super humid out but much cooler. I think it's like 80 at noon time. I had to water the two tens this morning. I didn't really HAVE to but I did. I filled up my watering can that says it holds 1.5 gallons (but it seems like more) and watered the two tens at least a half gallon and focused the rest on the 10th planet in the 30 and the other one up front that gets lighter than the rest. I was fully planning on watering EVERYTHING this morning but I could feel moisture in the soil and they had weight. I'm pretty sure I made the right decision. Especially with humidity so high. Either way I'll check tonight.
EDIT: WENT TO THE GROW AT APPROX 2:30PM. I HAD BO IDEA HOW HOT IT WAD OUTSIDE. IT WAS 87° BUT THE HUMIDITY IS DAMN NEAR 100%! I HAD WATERED SHIT A KOT LATELY AMD WANTED TO WAIT UNTIL THE MORNING. THE TWO 10'S (WITH GIANT PLANTS THAT IM NOT SURE CAN FINISH IN TENS) WERE DRY AND LIGHT. A COUPLE SPECIFIC PLANTS WETE A "LITTLE" LIGHTER THAN THE REST. I MIXED UP THE WATERING CAN WHICHVIS 2.5 AND ANOTHER GALLON. I USED THE WATERING CAN ON THE PLANTS IN THE FRONT. THE CHEMDOG #4 WAS SIGNIFICANTLY LIGHTER THAN THE REST SO I GAVE IT MOST OF A GALLON. THE PLANTS THAT ARE STILL HEAVY ARE GOING TO HAVE TO WAIT LONGER BEFORE I WATER THEM.
6/26 This morning I came over to substantially lighter bags. I watered everything but the 50 with 5.5 gallons of water. Plants amd roots are getting heavier. My intuition told me to water that 10th planet but it was still wasn't TOTALLY dry. This happens a few times a year during hot stretches. It will be fine by the time I'm back. I've also noticed that the pink kush in the 50 (the only one that didn't use ALL new soil) is a substantially lighter green than every other plant in the garden. Boy I'm glad that heat wave is over. It's 67° at 9:30 that's much better. I'll update as I go. I'm still thinking about light depping the 10s.
EDIT: HASN'T BROKE 70 YET AS OF NOONTIME. I THINK I MAY HAVE GONE A LITTLE OVERBOARD WITH THE WATER. TH8NGS LOOK ALRIGHT AMD THERE'S A GOOD BREEZE SO EVEN IF I DID THEY'LL DRY OUT QUICK. SO MUCH GROWTH SO FAST! THE MK ULTRA WITH THE BIG FAN LEAVES LOOKS A LITTLE SAGGY BIT IT WILL COME OUT OF IT. THE 10TH PLANET THAT WAS DROOPING LOOKS A LITTLE BETTER. IT DID REVEG AND IS STEAIGHTENING OUT TROM THAT. I DEFOLIATED SOME SPOTS TJAT LOOKED LIKE SEPTORIA. BUT THERE WERE BURNS AND DISTORTED LEAVES FROM BEFORE SO ITS HARD TO TELL. JUST A COUPLE LEAVES WITH THAT DOT. TIME WILL TELL. ITS PAST TIME TO GET MY IPM GOING ANYWAY. DURING ONE OF THESE COOLER DAYS IM GOING TO HAVE TO PREEMPTIVELY TREAT MY PLANTS. EITHER BT, CAPTAIN JACK OR PLANT DOCTOR IS WHAT I HAVE ON HAND AT LEAST. I HAVE CITRIC ACID AND K BICARB BUT HOPFULLY NONE OF THAT WILL BE NECESSARY. THE WIND IS FAR TO STRONG FOR A MITE POPULATION TO GET OUT OF CONTROL WHICH IS AWESOME. IM MAINLY WORRIED ABOUT THE PATHOGENS.
6/27 Rained last night but I don't think very much. Its much cooler. Went from 100 to 70 in a day. Plants did good to take those fluctuations. They are still SLIGHTLY overwatered with the mk ultra with the big fan leaves being the MOST over watered. There's a breeze today though and it's sunny blue skies. I think showers ate possible tomorrow at 4a.m. and it says showers throughout tomorrow to which sucks. I was hoping to get a couple nice days to dry the plants out. The 10s are light again but the soil is still moist. It's hard when it's so hot to water the correct amount. At least it is for me. Killed a couole moths and a pillar. I noticed the first sign of pest damage so it's time to get out and start the IPM. I'm hoping for no pathogens. I'll update as I go along.
EDIT: IT'S 75° AT 11:30. That mk ultra with the massive leaves still looks overwatered. One of the plants in the 10s looks the same but that one is light but the soil is moist. The MK ULTRA is still holding some weight and the soil is still damp. It's not the AMOUNT of water I've given them that's the problem it's the FREQUENCY that ive HAD to water that messed me up. Going from 70° to 100° overnight for several days kinda messed me up. It's improving though. I lifted it and it doesn't seem TO heavy. The soil is still slightly moist. I hope that I don't get so involved with thinking the plants are overwatered that they are actually under watered. I think I need to increase volume when watering and treat each vacant differently (which I have for the most part). I'm usually very measured and careful but it is what it is. No more water for a little while. Other than thecshowers at 4a.m. and the showers expected tomorrow. Surprisingly the small time I was away allowed the plants to show a pretty drastic improvement.
EDIT #2 WENT BACK DOWN AT FOUR TO CHECK THINGS OUT. THE MK ULTRA I WAS WORRIED ABOUT IS DOING MUCH BETTER. EVERYTHING (SANS ONE IN 10) IS LOOKING MUCH BETTER. I DUG DOWN AND CAN TELL THERES MOISTURE IN THAT SOIL IN THE TEN THATS A LITTLE DROOPY. THATS WHY ID RATHER UNDER WATER TGAN OVER WATER. UNDERWATER AND YOU JUST GIVE THEM A DRINK AND THEY PIP RIGHT BACK. WE ARE SUPPOSED TO GET SHOWERS TOMORROW EARLY MORNING. HOPFULLY NOT MUCH. MY INTUITION TOLD ME TO HOLD OFF ON WATERING THAT PLANT IN THE TEN. THE OTJER IS THE SAME WEIGHT AND LOOKS GREAT. WASNT PLANNING ON GOING DOWN SO UNFORTUNATELY I DIDNT HAVE MY PHONE ON ME.
6/28 Rained hard last nightcand showers all day. Plants don't look to bad off though. I think I wad watering to frequently with not enough volume. That AND the fact that we are having 35° temp swings. That has made it hard for me to keep the plants on any k9nd of a schedule for watering. I believed that plants were overwatered but since we've gotten all this rain some seem to have slightly improved. These are resilient strains and will probably be alright. I took a quick video. I'm REALLY CONSIDERING light depping the two tens.
6/29 It's been maineing out. Overcast and misting. We got hammered on overnight the night before and all day yesterday. I was completely wrong and would've made a fool out of myself if not for mother nature. I guess those plants were UNDERWATERED not OVERWATERED! It was hard to tell though with the 30° Temps swings. Either way I got this shit now. I've killed and seen some birds dart in and grab a few pillars. I see a little bit of pillar damage so plants MAY get a treatment of bt tonight. They're watered and healthy after all.


Likes
47
Share


@Northern_Ent
Follow
Aug 10: Blueberry Pie F1 Fast is doing great. Three weeks now moving her into the garage which is enough, and now I can just leave her in the yard which is easier and scores another couple hours of sunlight per day.
Nice solid start to flowering, and I like the schedule used this year for the force flowering. This strain is delivering on the promise of being big and fast.
Bright sunny day and I’ve got the UV lights on. About five hours today with the UV lights at mid-day. Buds are looking really good.
The bud development after 3 weeks is amazing. The buds got visibly much fatter just today. Compared to some fast plants in previous years, this one is about 2-3 weeks ahead. Very well suited to short season outdoor growing, but partially due to full darkness in the garage rather than just phyto-forcing with the far red light as I did last year. I’m still using the far red light, but putting them in the garage provides more darkness and helps get strong flowering started.
Aug 12: nice fat buds forming quickly, gotta like that.
Aug 14: fast, fast, fast. Flowers are progressing quickly.
Added three tablespoons of a 50:50 mix of Power Bloom and malted barley. Added as top dressing and then watered in.
Aug 16: cool, overcast all day, a bit of rain and smoky so not a nice mid-August day. Rain should help but out some fires in northeast BC, Yukon, and northwest Alberta. maybe. BC needs rain to break their record drought.
#seedsman420growoff
#seedsmanseeds


Likes
12
Share


@BudMunchies
Follow
09/24: flowing away! They are looking good. Water hooked up today. Looking forward to seeing how they progress this week. Purple is coming in! 😀
Likes
60
Share


@MrSpooky882
Follow
The week was completely normal with no problems, I'm more and more excited about the next few weeks 😁 they already smell very, very tasty 😏😍

Likes
59
Share


@Coopmc
Follow
Looking good the 3 in front are a week behind the two in back!
Buy chance 2 should be typ 1 hight THC plants and 2 should be type 3 plants 50/50 THC/cbd
Likes
2
Share


@Mr_Prawn
Follow
Final de la sexta semana, corto la primera con 40 días. El resto están sacando los pelillos marrones, unas mas unas menos.
Parece que falta poco, olor fuerte.
Likes
1
Share

@GrowOpsAnonymous
Follow
Still struggling to get the EZ Feed dialed in.
The APs are looking great. Number 1 is going to be a monster.
The two EZ Feed plants have skinnier leaves and the stems aren't as stout.
Likes
12
Share


@StonedandSteady
Follow
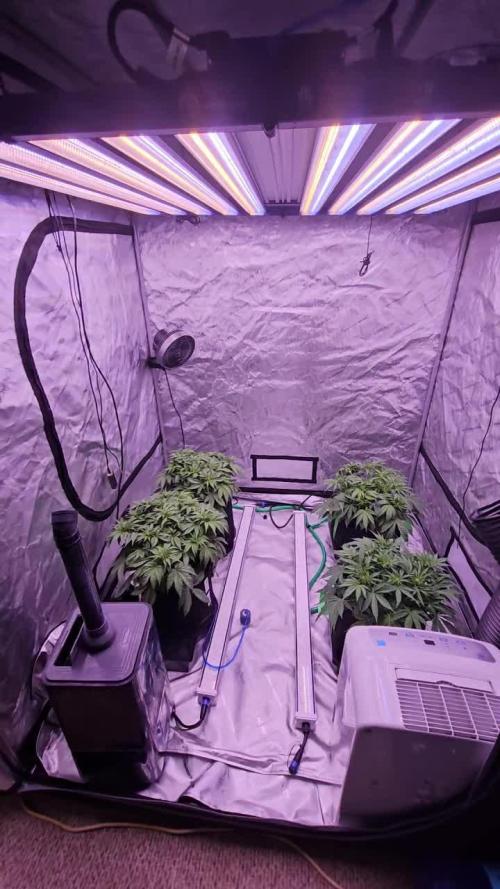
AutoFlowers at 9 weeks of Bloom, Finishing out Great and Glorious as All get Out, 1st week of Veg Update for my #DivineSeeds #AutoBlueberry and these other Outstanding Genetics!
Everything looks Gorgeously Great and looking Beautifully Grown at their 9th Week of Flower! Veg Update on #DivineSeeds #AutoBlueberry #NukeHeads #PurpleBlueberryMuffinCherries-Fem #BubbaKush-Fem and #BlueberryDiesel-Fem breed by Broski #Soluna668 #NoGreedSeeds 5th Feed of #HumboldtCountysOwn
#AutoBlueberry
Origin:Afghani/Thai
Type:50% Indica/ 40% Sativa/ 10% Ruderalis
Flowering:56 days
THC:22%
Harvest:400-550 g/m2
Height:110-150 cm
#AutoWhiteRussian and #AutoMontreal *Fems* breed by Team #DivineSeeds #DivineSeedsSquad #DivineSeedsBreedingCompany Looking Magnificent and Amazingly Great in thier 9th week of Flowers! Thier Growing under the #Growatt600w and in my #TopoLite 24×24×48 Grow Tent! I'm also using #TNBNaturals #TheEnhancer Co2 Despersal Canister and using thier Ph⬆️⬇️ for my Decolinated Tap Water!
#AutoWhiteRussian breed by Outstandingly Awesome Team #DivineSeeds #DivineSeedsSquad #DivineSeedsBreedingCompany
Yo!!! This Lil Beauty popped open in under between 16-18 hours of Germination using this Wet Papertowel Method, this New Heat Mat, Baked potato ToGo Container and Regular Tap Water Helped Tremendously! Heck Yeah Growmies and Growmets!!! Let's Grow!!!
DivineSeeds:
#AutoWhiteRussian
Origin:Afghanistan
Type:Indica/ Sativa/ Ruderalis
Flowering:65 days
THC:24 %
Harvest:400-600 g/m2
Height:100-150 cm
#AutoMontreal breed by Top of The Line Team #DivineSeeds #DivineSeedsSquad #DivineSeedsBreedingCompany
Yo!!! This Lil Beautiful Bean Popped under between 20 hours of Germination using this Wet Papertowel Method, this New Heat Mat, Baked potato ToGo Container and Regular Tap Water Helped Tremendously! Heck Yeah Growmies and Growmets!!! Let's Grow!!!
DivineSeeds:
#AutoMontreal
Origin:Canada
Type:50% Indica/ 40% Sativa/ 10% Ruderalis
Flowering:65 Days
THC:23%
Harvest:550-750 g/m2
Height:120-160 cm
https://divineseeds.net/
https://instagram.com/divine.seeds?igshid=osxe2v7en33v
HumboldtCounty'sOwn:
Email: [email protected]
Phone: (707) 725-4119
Toll free: (866) 872-9434
Humboldt Bottling
Po Box 429 · Fortuna, CA 95540
HumboldtCounty'sOwn Website Link: https://humboldtcountysown.com/
HumboldtCounty'sOwn Instagram Link: https://instagram.com/humboldtcountysown?igshid=1qj809qkkwych
I love and Appreciate Everyone!!! Thanks Again Teams! Cheers Famz!!! Much Props and Much Topz!💯

Likes
12
Share


@evlvd
Follow
Trichomes beginning to fill in and more bud is forming! Got a bit of a burn going on but im trying to resolve before it gets too late. Could be from the ipm soil drench i did along with over feed. Current ph is 5.8 even tho my input is 6.5-7.0. Now i gotta raise the input until everything is flushed out then a light feed to keep up the nutrients.
Processing
Likes
4
Share


@Mr_nugs_lover_David
Follow
I'm not adding no nuts since I make super soil however I'm adding an extra push for her now in flower just once a week using kalong bloom and kalong batboost (extract) she seems to love it,I didn't expect her to produce this beautiful violet nugs she's developing,let's see how beautiful she gets at the end,can't wait guys! 😍👀🌱

Likes
73
Share


@Herbz_Unkraut
Follow
1 plant was very ripe, 1 plant was almost perfect to harvest and the 3rd could take another 1-2 weeks...but it was end of 10th week of flower and i had to go on vacation, so i perhaps choped 1 plant abit too early....still awesome result!


Likes
18
Share


@Greenfox89
Follow
Hello people week # 9 is at the start, unfortunately I can not get the humidity below 40% but we always stay in the 40s, this is accompanied by a temperature of max 26c.
The buds are in production, you can clearly see a difference from last week. The harvest is still difficult to estimate when that will be. I fertilize them as on the BioBizz plan until week 10 and I rinse them for another 2 weeks.
A little tip: if you turn the pots 1/4 circle every day, this simulates different wind directions. The plant reacts differently to it than when it stands still in a place for 10 weeks.
As already mentioned, my rules for autoflowering are: LESS IS SOMETIMES MORE. This helps beginners to take their time to study the plant. To understand the stages of development. Mastering the harvest is only possible through experience.
Thanks for your time and for reading. Your green fox
🦊🦊
Likes
3
Share


@julian100614
Follow
Subiendo como la espuma 🔥🔥
La planta esta empezando a formar múltiples brotes y puntas de muy buen aspecto y color 💪
Aplicamos los nutrientes de forma moderada y poco a poco para no sobrecargar a la planta ya que lleva muy buen camino 👌
Bajamos un 5% la HR y la temperatura la mantenemos como siempre 😉
Hemos sacado del armario el humificador porque con las propias hojas ya crean la humedad justa para su que esten comodas.

Likes
17
Share


@JL420
Follow
empieza la formacion de flores cada vez salen mas pistilos. hay unos pocos que estan marrones… podria ser estres. Los esquejes de hy pro estan mostrando tricomas rapidismo y ya se empieza a notar el tipico olor a limon de floracion.

Likes
44
Share


@Aedaone
Follow
As soon as I got these seeds I dropped them in a bowl of water @10am on April 30th. Planted directly into soil 7pm at sundown on the 30th. I wet the soil before planting. We had good temperature for germination week. The evenings were still lower 60's but the days warmed up above 70 °F. May 1st it was cloudy but 80° F. We had good sunshine on the 2nd. We received a heavy rain in the afternoon and intermittently that night into the morning of the 3rd. Our temps cooled off with the rain and we didn't get above 72° F on the 3rd. Two popped on the 3rd and the last one on the 4th. It was a little wetter than I prefer, but our soil drained well and fastbuds genetics can handle the less than perfect condition. The above listed nutrients were premixed into the soil at the listed rates per gallon of soil.
Likes
10
Share


@Canadian
Follow
Nothing to really say except that they are growing very well Thank you for reading I will continue to update have a happy grow

Processing
Likes
9
Share


@LittleBigTrees
Follow
Turned light to 12/12 start week 6 day 35.
Defoliated the central cola's to allow the sides to catch up.
She's stretching fast at the moment.
I'll start feeding her from week 7
