
Likes
Comments
Share


@R1pp3r
Follow
Realicé la que yo creo será la última poda, quedó un tercio de la parte inferior completamente sin brotes ni hojas.
Próximamente aplicaré guano de ave y hummus para luego regar de forma alterna con agua y melaza

Likes
34
Share


@ILoVeThiSpLaNt
Follow
Meno piante. Non metterò la rete ma topping più varie legature per mandare in fioritura tutte alla stessa altezza.. Speriamo di non sbagliare di nuovo perché tengo particolarmente a tutti questi semi e sarà l'erba che fumero' a Natale🤶Giorno 1/8 ore 4 del mattino messo a germinare 6 semi. 2 Kosher Kush (Reserva Privada) 2 Apex R1(Ethos Genetics) 1 Banana Sundae (Cannarado Genetics) e 1 Rainbow Belts (Archive Seed Bank). Giorno 5/8 ore 4 del mattino nati tutti i semi 😊😋🖐️


Likes
32
Share


@Fatnastyz
Follow
Sad she was ready to be chopped, but excited as hell too! 😁
I have another seed and Im already fighting the temptation to do her again! 🤣🤤
Cant wait to smoke! 💨
Ty for the 💚


Likes
Comments
Share

@Darsilius
Follow
Next week of flowering
Some of girs are preparing for the final ferts
I add more grams and katana dragon force to the tank and now U will see thje magic of SHOGUN !
😁


Likes
4
Share


@LittleBigTrees
Follow
I've been defoliating slowly trying to keep them small due to a house inspection coming up. Once that's out the way I'll put them in bigger pots then switch to flower.
They all outgrew the mutated start and are looking good.


Likes
Comments
Share


@Mnterpteam
Follow
She stretched a little bit more in the last week, everything very healthy.


Likes
11
Share


@Skunkiest_bender39
Follow
Schade um die Schwestern… aber die Damen freuen sich sehr über den Platz bin gespannt wie es weiter geht. Habe noch ein Ventilator unterhalb der Pflanzen platziert. Sollte jetzt endlich auf Zielgerade gehen. Je nachdem was passiert, werden die Damen voraussichtlich in 3wochen geerntet!🐝


Likes
8
Share


@Rickzkittlez
Follow
This one is dedicated to Velvet Moon exclusively.
The other diary is for both strains, that's because I only have one more strain and it's an auto, so I'm not going to make an exclusive diary for her.
Likes
86
Share


@Ageddd
Follow
-------------------------
| BLUEBERRY HARVEST |
-------------------------
After two sunny days it is harvest time !!
- Finally, 16 days of flush -
At first thought, the trimming would be easier compared to my previous plants, but when removing more leaves, more buds appearing too hahaha so it took like 4 hours or more..It is not the most accuurate trimming but i had not much time that day, i removed all the leaves and branches after weighting it all..
Like i said on the last post, im harvesting having in mind my bud preferences (the later the better), weather, humidity and sunlight, so the first of the cloudy/rainy days she was chopped in the moring, attending the principle of thc regeneration at night..
Got to say that, i wasnt expecting such production (8 days until it was well dried), this plant started as the season saver because the Cheese started to flower in march, revegged etc.. and i have been rewarded with this BB, a true genetic portent !! If i could, i would keep her as mother forever ^^
The quality is awesome, she looks more like a WW talking about that coat of thc..
Flavour without proper cure, is deep earthy at first, transitioning to a fruity, sweet one, it is a pleasure to smoke, delicious sweet aftertaste..
Maybe, this is the last year with this awesome climate, because im planning to leave Spain..
Thank you for follow and check !!! I hope you liked the diary :)
Song of the week : Radiohead - Codex
Good Vibes GrowDiaries !!
----------------------------------------------------------------------------------------------------------------------------------------------
000000000000

Likes
25
Share


@pifflestikkz
Follow
Day 36
08/08/24 Thursday
Feed today using de-chlorinated tap water pH 6 with Plagron PK13-14.
Showing her pre stretch and pistils 😍
Day 38
10/08/24 Saturday
De-chlorinated tap water pH 6 today again with calmag.
400ml with run off now.
I will update pictures and videos tonight ✌️💚
Day 39
11/08/24 Sunday
De-chlorinated tap water pH 6 today again with calmag.
400ml with little run off.
Pistils forming in bunches now seeing beginning of bud formations 😍
Day 40
12/08/24 Monday
Feed today, it was warm again so they drank the whole 300ml each so I have topped up another 150ml to see run off to prevent salt build up.
All thriving 😍✌️💚
Video uodate


Likes
33
Share


@valiotoro
Follow
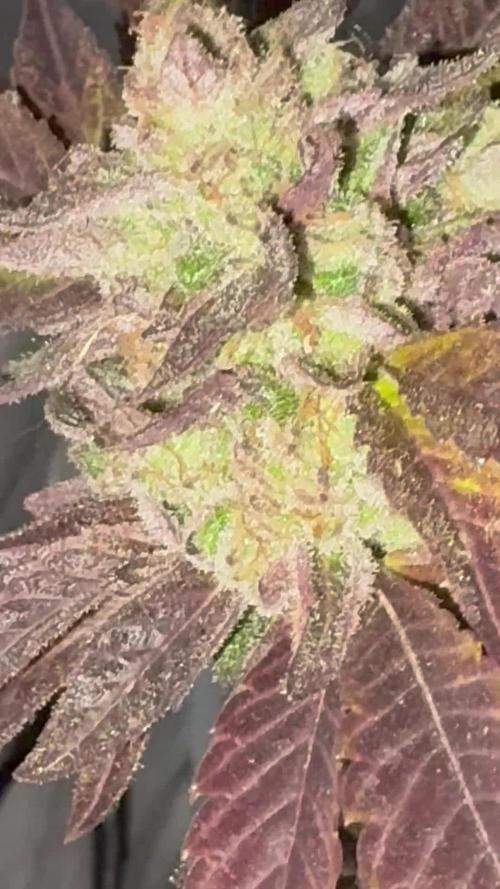
Always rock hard buds💥
Sticky glue👀
The smell is divine & refreshing :
imagine a walk in a pine Forest in Summer with hint of lemon🤤🍋🌲
Moon safari effect


Likes
4
Share


@Alanonthearth
Follow
ENGLISH BELOW 👇
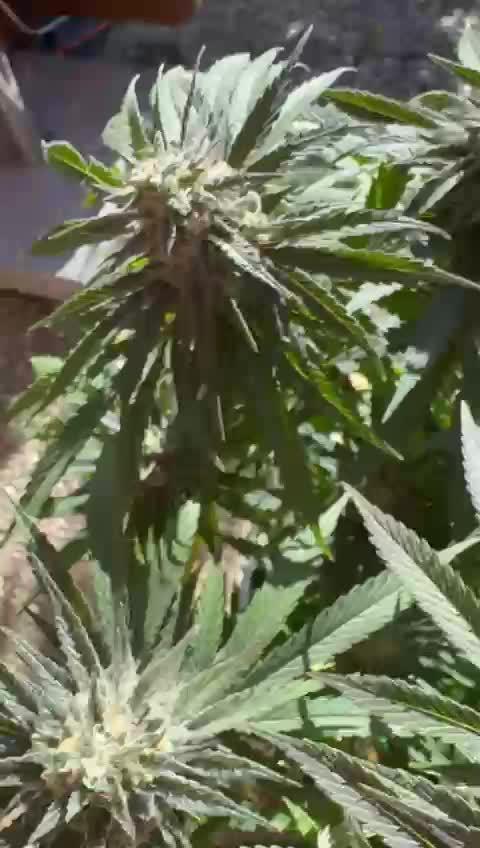
Día 90 en total del clon, pude sacar dos generaciones declones antes de que entre en flora, pero a la primera generación se las comió por la noche un ejercito de hormigas negras.
Es impresionante como la planta se adapta a todos los procesos (incluso clonación y enraizamiento) de una forma increíble.
Cultivo con calendario lunar desde hace unos 10 años y está es la primera vez que veo una planta anticiparse y preparase unos días antes para los cambios lunares.
Muy divertida para cultivar, todas las semanas genera procesos diferentes, lo que hace muy dinámica y muy rápida.
Day 90 in total of the clone, I was able to get two generations of clones before it started flowering, but the first generation was eaten at night by an army of black ants.
It is impressive how the plant adapts to all the processes (including cloning and rooting) in an incredible way.
I have been growing with a lunar calendar for about 10 years and this is the first time I have seen a plant anticipate and prepare itself a few days in advance for the lunar changes.
Very fun to grow, every week it generates different processes, which makes it very dynamic and very fast.
Likes
229
Share


@OrganicNature420
Follow
Germination date 🌱 12/07/2021
Day 64 16/09/2021
Strain 🍁 SinCity seeds Frosted Biscotti
(Biscotti Sundae x Whitenightmare)
THC% • Unknown
💡 Mars Hydro FC4800
• Power draw 480W + 5%
• Max coverage 5 x 5
• LED 2070pcsSamsungLM30B1&Osram660nm
• Max Yield 2.5g / watt
• Noise level 0 DB
• Removable Driver +2m cable
• Daisy chain (multiple lights)
https://marshydroled.co.uk/products/mars-hydro-fc-4800-led-grow-light-samsunglm301b-commercial-greenhouse-medical-indoor-kit 🇬🇧
https://www.mars-hydro.com/buy-fc-4800-480w-4x4-energy-saving-full-spectrum-commercial-led-grow-light-mars-hydro-for-sale 🇺🇸
PROMO CODE • (ORG420) DISCOUNT 👍🏻 marshydroled.com
⛺ Mars Hydro 120 x 120 x 200cm
📤📥 AC infinity 6inch
💧 10lt dehumidifier
❄️ 3.1kw air con system
💉 Nutrients GreenBuzzLiquids
Organic Grow Liquid • 1-4ml until 2wk flower
Organic Bloom Liquid • 2-4ml flower stage
Organic More PK • 2-4ml +wk3 of flower
Organic Calmag • 1-2ml/lt whole grow
Fast Plants Spray • first 3days at night lights off
More Roots • 2-5ml veg +2wks flower
Fast Buds • 5ml +wk2 of veg until 1wk flower
Humic Acid Plus • 2-5ml whole grow
Growzyme • 2-5ml whole grow
Big Fruits • 2-5ml flower stage
Clean Fruits • 5ml flush 1wk
Ph powder
Root Gel
Living Organics
https://greenbuzzliquids.com/
PROMO CODE • organicnature420 15% off ✌️🏼
🥥 Growing Media • Coco Coir
Notes 📝
Just doing her thing 🌱💚 .. temps haven't been no more than 4degrees apart night and day. Thinking of introducing a inlet to help keep humidity down for last week's of flower as i can't get humidity under %40. Would ideally like it to be at %30 during that stage
Early frost signs ❄️❄️❄️❄️❄️❄️
Happy growing fam ❤️🌱🍁👍🏻
Discount codes in bio for Mars and GreenBuzzLiquids 👍🏻

Processing
Likes
27
Share


@Dunk_Junk
Follow
5.5cm of growth from her this week!!
Roots are getting more prominent too.
Still have no idea what I'm doing 😂

Likes
108
Share


@Hydro_Hiebs
Follow
🤗 Hi fellow growers. We are back here to harvest the Northern Lights Auto from Seedsman. She took 11 weeks to finish flower and a total of 15 weeks from seed to harvest.
🌱Growing her was a little tricky as she was finicky at the beginning of flower. She wasn't the fastest auto but she put on some tall colas with some fair amount of resin smelling of sour stone fruit such as a plum.
Chopped her down then dryed for 14 days in a environment controlled room. Then began the trimming process. After a nice manicure the plum smelling buds were then placed in a jar to set cure for 30 days.
There was quite a bit of larf nugs on the bottom skirts that I should have trimmed off during the flowering cycle but sometimes I like keeping them to press into some rosin before my nugs are cured. I find that pressing the flowers with in the first week of the curing process produces the best quality flower rosin
In the end I'm left with a gram and a half of some beautiful Northern Lights flower rosin that tastes and smells like a sour plum and packs a big punch. About a 10% return so not the greatest yield but it sure is some high quality rosin. Keep it mind it was the larf flower and I press at 180°F to preserve as much flavor as I can. I'm after quality and have been achieving that.
Effects - Relaxing, calming, Happy
Yield - 68 g nice nuggets
14 g of larf that went to rosin
Smell - Sour plum Forrest
Taste - Skunky plums
Likes
Comments
Share

@deseed_uy
Follow
En el video se ven unas mind flyer en flora pero al final se puede apreciar el mini cogollito q salio de la north jaja unico registro q hay, la pobre se estancó y nunca creció pero igual la cuide a ver q salia. Un cogollito con gusto a planta pero muy lindos colores jjaja todo es aprendizajeee en este mundo

Likes
47
Share


@BloodBath
Follow
HELP!!! Took these with a macro lens!! I DONT KNOW WHAT KIND BUG THIS IS!!! WHAT ARE THEY AND WHAT DO I DO!?!? SOMEONE HELP!!! ❤️
