


Likes
25
Share


@BudHaks
Follow
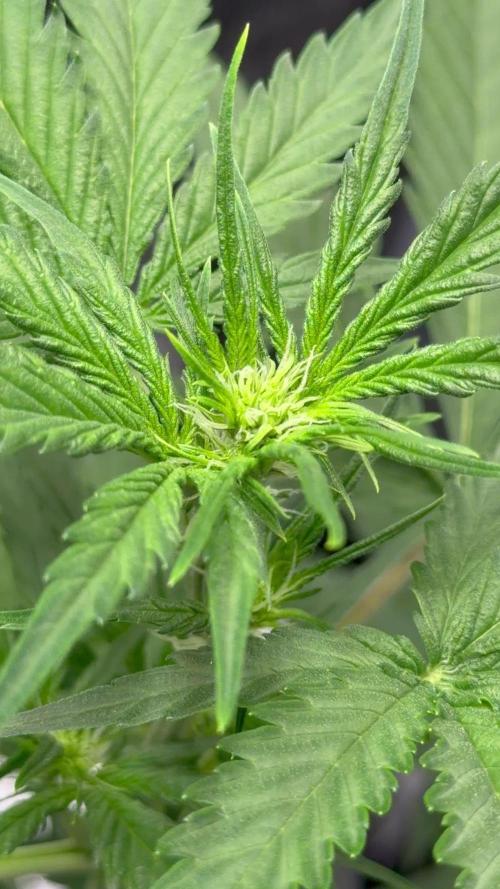
Hey, there peeps!
Apologies for not updating my diary as I have been quite busy balancing non-plant responsibilities -.-!
Anyway, we are now on day 75 since I ordered my equipment and started germinating my seed and day 71 since I placed my seedling in her first Coco pot! She is now a staggering 4 foot 2 - which was overwhelming considering this is my first grow and orginally only cleared out 2/3 of my cuboard but now it uses the whole space but she's coming along so well! I have also added a LED Grow Light Full Spectrum 50W Red COB as I wanted some extra light for the bottom half nuggests.
She is very healthy (I assume from the strong healthy roots) and hasnt shown any major defects other then the initial defects i encountered in week 2-3 and slight light burn on the top cola in week 7 which was from the plant growing so quickly and touching the light, but I did then adjust the light within 2-3 hours.
What do you guys think and how did she get so tall consdiering she is an auto-flower and the strain is meant to be indica domiant?

Likes
121
Share


@NuggetPawn
Follow
Nutrients remain the same, and will continue so until ripening. Bulking has slowed down over the last week, as expected. I am hoping she will give me one last growth spurt, but maybe I am being wishful!
Res was changed on D100, because well, yano, it was its hundredth birthday :)
Pistols are slowly starting to curl, but it appears new ones are still coming through.
A few days ago I managed to climb to the back, there are some heavy nuggets at the back of the canopy that I can't take a picture of, from the door.
I have a feeling I need to buy some more jars 🤞


Processing
Likes
7
Share


@BrokenBow
Follow
Filter sock clogged up again, I just took the whole filter off, I'm not worried about the smell as it's outside in my shed anyway. Still warm and dry out this week, humidifier barely lasts 24 hours and that's just to keep the RH above 40. Trichs developing nicely, few more weeks to go for sure.


Likes
19
Share


@Grow420pice
Follow
Kommen jetzt langsam in die Wachstumsphase.
Beginne leicht mit 2ml pro Liter Root juice.
Hauptlichter auch an, aber mit 50cm Abstand.
Update 15.12.2020
Sie wachsen alle sehr gut.

Likes
14
Share


@eldruida_lamota
Follow
Que pasa familia, vamos con la quinta semana de floración de estas Gorilla Zkittlez Auto de FastBuds.
La tierra que utilizamos que está en la publicación anterior es top crop all mix, aparte alimentamos nuestras plantas con Agrobeta.
Por supuesto el ph se mide en cada riego y se mantiene en 6.2, regando cada 48/72 horas e intentando mantener la humedad un poco alta al principio.
Se ven bien sanas tienen buen color , ya empiezan asomar aromas y el tamaño bueno no puedo quejarme, estas semanas vemos como maduran las flores.
Agrobeta:
https://www.agrobeta.com/agrobetatiendaonline/36-abonos-canamo
Hasta aquí todo, Buenos humos 💨💨

Likes
2
Share


@Kirsten
Follow
26.12.24:
I have noticed light stress on my plants. I had moved the lights further away and increased the light intensity to 70%. Unfortunately that created some issues. Namely severe palour of the leaves.
To try and rectify the situation, I've dimmed the lights to about 30%, staying at the same distance, about 30 inches away. I measured the par levels, after I did this. They should a reading of anywhere between 40 and 150, at the canopy of the plants. They are all different sizes. This seems to have improved the colouring on all plants.
After this evenings watering, I will monitor recovery and increase lighting intensity again slowly. I am also using the light cycle of 21/3, so the plants have many hours more light to absorb, than for example 12/12 or 18/6.
I am pleased with the progress, considering all of my mistakes!
29.12.24:
So I finally gave LST a shot, it's probably a bit too late, however I really want to get the most of the triploid pheno, and I went a little crazy and LST'd all plants except 2, as they're too small.
I did that late last night, this afternoon I was amazed to see the plants turn their leaves back to the light source. I'm glad I overcame my fear of trying it. I'm very excited to see them adapt and progress! 😁 there are videos above with before and after of my LST process.
Thanks for checking out my diary 🍃 ✌️
Likes
2
Share

Likes
8
Share


@vrac22
Follow
Looking really good this week. All the budsites showing pistols now. Feeding her every 2 days now. Upped the nutes aswell for flowering. Still doing lst and abit of defoliation. Strong smell aswell.

Processing
Likes
5
Share


@Mr_nugs_lover_David
Follow
Amazing buds from this amnesia pro, stinky dank nuggets with clasic amnesia fragrance, very enjoyable, very sticky flower that are starting to compact, very happy about this plant, let's see how she keeps developing! 🔝💚❤️💛

Likes
21
Share


@The_La
Follow
I am 2 days into flushing , the buds look nice and frosty and are smelling good , I will flush for 9 days before trimming.
The pictures are not the best in the world and don't quite do them justice . I will get some pics posted during lights out .
This has been the longest grow I have ever done , I really hope she's worth it !
I've taken these girls as far as I can go , by looking at the pictures when lights are of I can clearly see they are finished .
They are turning purple but that's because of the cold climate here and that temps are dropping to 9c once lights are off .


Likes
Comments
Share


@Growedbypepper
Follow
Primera semana de floración de esta chocofresas, se ve completamente sana, ya que pasan del indoor al exterior cuando pasan a floración
Likes
8
Share


@Franz1234567
Follow
increasing nutrient doses, monitoring EC and pH doesn't bear fruit, I think. Training also takes its toll and the girls flourish.
We will continue to feed and observe...
Second half of week brings quite intensive growth. Continue with LST, because need light penetration and some leaves out with same purpose.
What does next days bring? I am exciting...


Likes
1
Share


@DmbTexasRanger
Follow
I’m happy with my canopy. I’m trying my best to sit and watch. Slow season with 1 3x3 waiting for dry back/ feed

Likes
3
Share


@Elguacho420
Follow
Buenas a tod@s... Cuarta semana de estás green poison, van de lujo, van creciendo muy bien y muy fuertes... Ningún problema alguno hasta ahora después de lo ocurrido con las otras variedades... Estás van muy bien, aún les falta crecer y engordar pero ya verán como se van a poner mas adelante 👌🏻🔥
Bueno pues al margen de la putada del problema, seguiremos trabajando duro y aprendiendo cada día más...eso es todo x hoy... Un saludo y buenos humos para tod@s...⚡💪🏻😎⚕️
🇦🇷🤝🏻🇪🇦


