


Likes
10
Share


@HappyHarvest
Follow
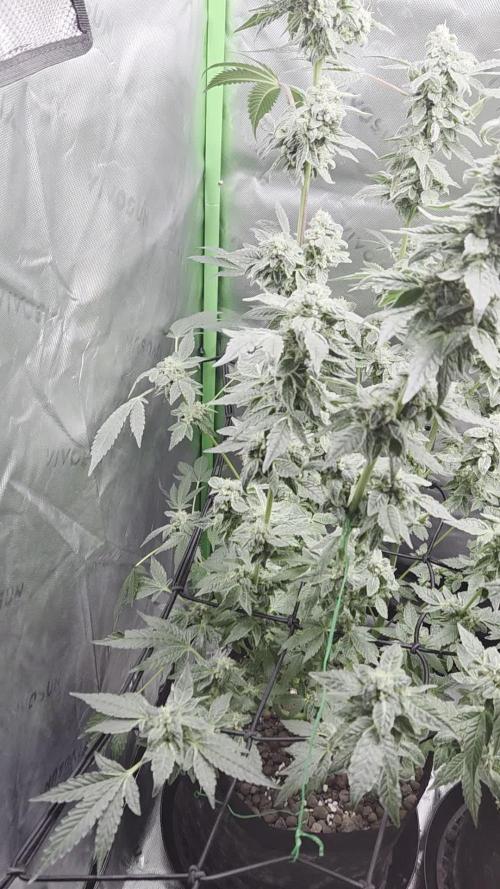
Check out this beautiful plant and the trichome production this week. Stunning! I cleaned up the bottom one more time. I will be top dressing this next week and it will be the last before harvest.
Likes
7
Share

@Samsationalseeds
Follow
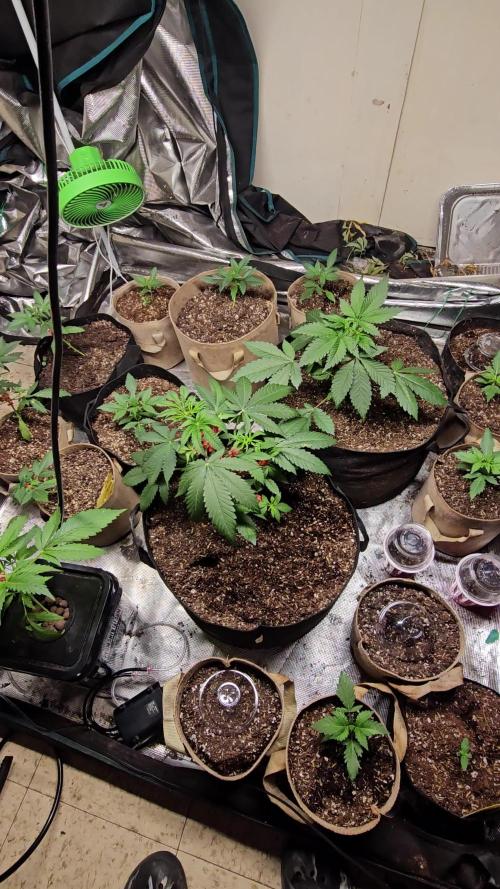
The photos got root bound, but their growth went crazy in less than a week.
If I started the autos february first I started these photos february.Fourth, these approximately have a month to date.
I moved two of the fast bud mix photos out of the remaining three that survived into seven gallon pots to let them grow as big as they can.And I will flip them whenever I get a chance, and once I see how the autos are.
These photos are being grown successfully in reused.Soil, while the autos in the same general area are struggling.A little bit.
Because my audibles are struggling.I think I have focus to turn these photos into a better current grow.And not put these in my backyard, I have another four strains that I will plan for that.
I also plan to start seedlings and give them to my cousin.So he can grow in his backyard, and I think I will create diaries for those

Likes
26
Share


@PedroAndHisPlants
Follow
Day 36:
"Hey everyone!
Just a quick update: I removed a few more leaves here and there and did one last round of LST (low stress training). 🌿 The plants are looking great, and I'm going to let them recover now before sending them into the flowering stage. I'm really excited to see them start blooming in 2-3 weeks!
Also, a quick update on our temperature issue: today, the temperature stayed below 26.8°C, which is great news! However, we still need to find a solution to keep the humidity levels up. Our 360 m³/h exhaust system isn't able to maintain the required humidity level. I've calculated that we need a humidifier that can evaporate 1800ml/h to maintain 60-70% humidity, which would help manage the temperature better.
Does anyone have tips for a good humidifier or other methods to control the humidity and temperature? Any advice would be greatly appreciated!
Day 37:
Hey everyone!
Tomorrow, we're planning to buy some Cal-Mag because we suspect the yellowing leaves might be due to a calcium-magnesium deficiency. We're also going to get a pH test kit to make sure everything is balanced properly.
Do you think this is a good idea? Any tips or suggestions would be greatly appreciated!
Day 38:
Hey everyone!
Quick update: it turns out the yellowing leaves were due to a nitrogen deficiency. We increased the fertilizer dosage today, so the plants should start looking better in 4 to 5 days. 🌿
Thanks for all the support and suggestions
Day 39:
Hey everyone!
Another quick update: after increasing the fertilizer yesterday to address the nitrogen deficiency, it should take about 4 to 5 days for the yellow leaves to turn green again. 🌿
We're already seeing improvements! The plants have grown significantly and are developing a dense canopy once more. It's great to see them bouncing back so quickly!
Day 41:
"Hey everyone!
Quick update: we've removed the bands we were using for LST (low stress training) and are now letting the plants grow freely. 🌿 We plan to keep them in the vegetative phase for about one more week before transitioning them to the flowering phase.
Excited to see how they continue to develop!"

Likes
Comments
Share

@bigsmoke42069
Follow
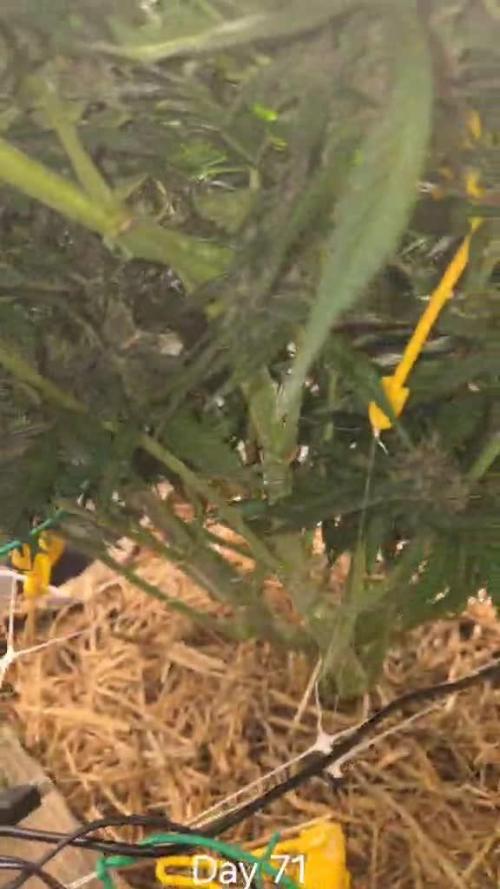
Week 8 (5.2.26 --12.2.26)
10.2.26
Transitioned 1.2x1.2 to only water


Likes
2
Share


@Canaryweed_tf
Follow
Aquí tenemos la primera semana de la GingerPunchAuto de la familia de @Kannabiaseeds. En está primera semana han crecido muy bien y tienen muy buen color, lo que una de ellas tiene un color muy pálido, estoy agregándole nitrógeno haber si se recupera. El resto de plantas están muy bien, buen color, buena estructura... 😍

Likes
15
Share


@greenflipcali89
Follow
Finishing final week before the flip to flower. All three ladies looking great. Swapped out taller legs for plant stand supporting Napali Pink (NPK, 13"), compared to The Bling (17") and Mimosa (15"). I pulled all smaller nodes starting at base and working up to 1/2/3 nodes, trying to maintain a tight node spacing for future bud development. Eliminated sucker branches. Released tension wire holding down NPK to get her to catch up with other two. I should have potted up, but plan to tomorrow (Day 2 of Week 1 Flower) to their finishing size of 7 gal fabric pots. Expecting some excellent root growth, resulting in hopefully bigger buds!
Mimosa - she was the one to have first caught Powdery Mildew, having accidentally left her outside when I transplanted a few weeks ago. Sprayed her down well with potassium bicarbonate/veg oil/Dawn/water solution. Eliminated PM, but some leaves burned in process. Nevertheless, she bounced back well. She is also the tallest in the bunch at 18" tall.
Napali Pink (NPK) - she was added in about a week after the other two; Hawaiian cultivar of Hindu Sun/Kauai Electric/Alaskan Thunderfuck; she is also the most hardiest and was the only plant to not get PM! Attribute that to her tropical roots, making her less susceptible to PM. She is the shortest at 13". Changed out the legs of the plant stand to accommodate and bring her up to same height as others.
The Bling - this one surprised me big-time! I was ruling her out initially, after suffering some bad trauma (her main stalk was damaged), which caused her to grow 3-blade leaves! Weeks passed and she bounced back. She also contracted PM, but not as bad. A very lanky strain, with some weird node spacing. Trying to tighten up by defoliating to top node on all stems. She responded well and has since started to grow normally again, with 7-blade leaves.

Likes
93
Share


@Roberts
Follow
Auto Opium has bounced back from the neem oil treatment. New growth is looking good, and roots look good. She is off in the right direction. Thank you Medic Grow, and Divine Seeds. 🤜🏻🤛🏻🌱🌱🌱
Thank you grow diaries community for the 👇likes👇, follows, comments, and subscriptions on my YouTube channel👇. ❄️🌱🍻
Happy Growing 🌱🌱🌱
https://youtube.com/channel/UCAhN7yRzWLpcaRHhMIQ7X4g

Likes
27
Share


@D33jW
Follow
🚀 Let's fly to another weeK 🚀
🌸 Dozi ZoZi – Breed Bros 🌸
DAY92 / FLOWER 62 / WEEK 13
It was time to cut it down. Drying temperature 19 and 55% humidity.
Only the exhaust fan is turned on at the lowest speed. I think everything is going in the right direction.

Likes
6
Share


@Moss420
Follow
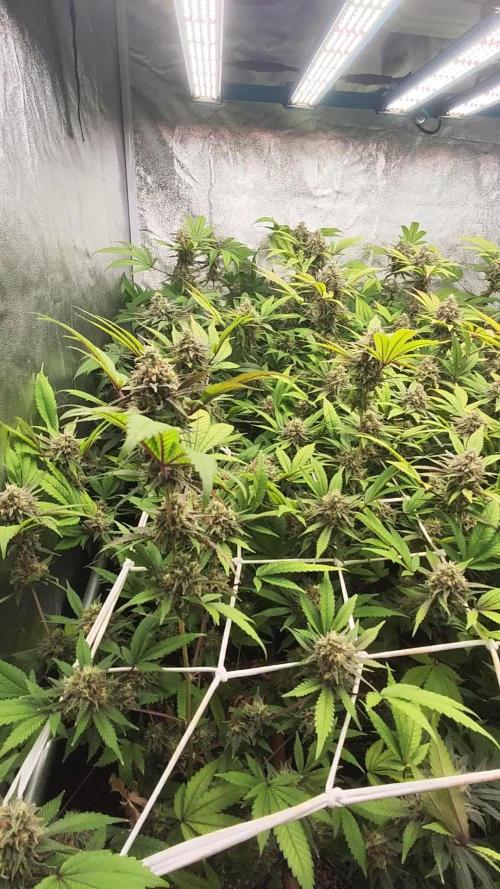
Added the first screen into the tent. Decided to kick Big Mumma out because she just wasn't growing any taller and the other plants were really over growing her.
For the new setup I used kitty litter trays and mesh to sit the plants on - each plant gets its own tray so I can track runoff EC individually and I cut little flaps in the mesh so I can wet vac the runoff. With this setup I shouldn't need to move the plants out of the tent until harvest.
For the scrog I just tied some builders rope around the poles of the tent and tied the trellis netting off with training wire. I've been manipulating the growth just to try and fill out the whole screen, I also gave them a good haircut because I plan on flipping them soon, don't want them to outgrow the tent.

Likes
252
Share


@Tropicannibis_Todd
Follow
💩Alrighty then Growmies We Are Back At it 💩
Well folks we just finished up the last run and so we are back to do it all over again 😁
So what do you say we have some fun 👈And what we got here folks is a Strawberry Blast 🍓 🍓 🍓 🍓
Strawberry 🍓 Gorilla , Strawberry 🍓 Banana 🍌 and there new release 🍓 Ztrawberriez 🍓 from FastBuds
And we also got Strawberry 🍓 Cola from Exotic Seeds
👉 I had realized I had quiet a few Strawberry Strains in my inventory , and I just finished doing the Strawberry Pie , and I liked it so much I figured do them all 😮
Seed soaked for 24 then placed in a tub with paper towels , once it cracked and rooted , placed into its main pot 👌
FC4800 from MarsHydro Lights being readjusted and chart updated .........👍
www.marshydro.ca
👉I used NutriNPK for nutrients for my grows and welcome anyone to give them a try .👈
👉 www.nutrinpk.com 👈
NutriNPK Cal MAG 14-0-14
NutriNPK Grow 28-14-14
NutriNPK Bloom 8-20-30
NutriNPK Bloom Booster 0-52-34
I GOT MULTIPLE DIARIES ON THE GO 😱 please check them out 😎
👉THANKS FOR TAKING THE TIME TO GO OVER MY DIARIES 👈


Likes
49
Share


@masterofsmeagol
Follow
7/11 Got half in of rain last night. Glad I didn't water. Ph of rain water is very acidic. Added supports to the blueberry cheese in the 50. I just used string and went diagonal and attached to the cage. Wrote a ton but it disappeared. Anyway looking at previous diaries I was wrong about senescence. It wad the life cycle of those earwigs that did that to my plants (see other diaries). This soil mix is amazing. These plants gave only gotten like two small feeds of big bloom. I showed my commercial buddy and I'll keep it between us what was said but it made me feel really good. I'm considering either expanding the cage in one direction with some lumber I already have or moving a couple outside tge cage. That way I have more room. He said he's seen plants structurally similar reach huge heights (14f) so I'm just trying to avoid future problems. I at least need to get the trellis on. I hope poor that's food enough. Did a real nice video this morning but nothing wanted to upload and it just uploaded the same one twice. I'll try again and hopfully it will go up. If not I'll put it up tomorrow.
7/12 Dad has surgery this morning. I did a quick video and took some pictures. I need to do some rearranging with the plants and cut a pallet to fit in the back. Then I can put a vertical trellis up. Haven't decided if I'll add on to the cage, remove a couple plants or just rearrange things but I'm leaning towards the later. They will need water again and I'm wondering if I should start nutrients but everything looks so good. By this time on past diaries I'd be losing all my leaves bu now. MI think it wad part ear wigs and part to many nutes. This soil mix is taking these plants through veg. I'll probably do a feeding soon but it will be organic and it will he small like a big bloom or ancient amber. Im leaning towards not using growbig this year as my plants seem to be doing great without it. We'll see. I'll keep this updated.
UPDATE: Went back over and gave plants a full watering. Some were slightly drooping. I was going to add nutes but decided against it as I didn't see any deficiency. So far NO Earwigs! I comed through the plants and I did find a jpn beetle which I happily killed. I mixed up 8 gallons of water and gave it to the 11 plants so it wasn't quite a gallon a plant. I need to rearrange the plants so I have room to move around. I also need to cut another pallet and use the spaces I'm not. Trellis needs to go up.
7/13 I think I've got the watering amount down. Now just to find how often which will depend on weather. I've watered very little this year. They loved that gallon. I was going to use big bloom and kelp me/you but looking at my garden I decided not too. My buddy asked what i was addingvthings for and to wait fir what i added to do what I wanted it to do. I see no nutrient deficiencies so why add anything? I think this soil mixture will get me all tgexway through veg. I dont plan on using much in fliwer either. Definitely good genetics. I really need to cut that palley and move the 1 10gallon to the far back coener. It will open thibgs up so much better. The garden looked so beautiful this morning. Getting very aromatic. I started untangling trellis netting but had to leave. I'll update what I do. Happy growing folks
UPDATE: Went back over as I had a slight intuition that I needed to check the garden. I found and killed at least 7 jpn beetles. That's what's been making holes. They tried to escape and bounced off a tarp but I got it. I went through the interiors and found two pillars. If these beetles are gonna be around I'm ordering a net. I'm also close to positive I'm going to extend my cage in the back a few feet. Things are getting unmanageable in here. My buddy said I'll be having problems soon if I don't do something. I'll document what I decide to do.
7/14 Found ONE jpn beetle in the garden this morning. I can manage those well enough. The birds help too. I check my garden multiple times a day so I manually remove many pests. However I've noticed some thrip damage on a leaf and a leafhopper damage on "A" leaf so there are "some" pests around but not enough to spray shit. A couple wasps were doing there job while I was there. Supposed to get thunder storms after three and tonight. Supposed to get over a half inch of rain tonight. I lifted the bags and decided to hold off and let mother nature take care of it as the bags weren't totally dry. Only problem I really have is space. I AM moving that 10gallon (that's the same size as some 20's) in the back. There's 27in not being used and a few feet the other way. My buddy cautioned me that I'm going to have problems since my plants are so crowded. I agree with him. I spoke with me father and we have most materials to extend my cage four feet in the back. I think that's my plan. I'll extend the structure before the stretch then I can put up the supports. We'll see how this goes.
UPDATE: Went back over to check the girls as I had a feeling I ought to. When I got there I saw that a couple of the blueberry cheese were pretty light (liftng the smart pot) but the others seemed to be fine. ONE 10th planet was light like that and the purple punch in the 10 gallon was as well. Each plant thar needed it got at least a half gallon of water. I'm waiting to see if we get the thunderstorms and the half inch of rain. I watered the MASSIVE blueberry cheese in the 50 but I only gave it 1 pitcher which is like 1/4 gallon or so. Don't know why I even gave it that. Looked fine but the soil WAS pretty dry. Next year I'm giving myself way more room. I was running trying to chase these jpn beetles. This time I have the dawn and water and a measuring cup to knock them in. This ain't my first rodeo. I did notice some bright yellow streaks on a leaf edge and I'm hoping it's not septoria. I doubt it but I have an anxiety disorder and I worry. I hope I can get the cage extended sooner rather than later. It's getting hard to move in there and more importantly I can't take any more plant pathogen problems. I'm considering starting a plant doctor regimen just to be safe.
7/15 Got a bunch of rain last night. No jpn beetles in the garden and not really much damage. I did notice this (I think it's leaf hoppers) that leave those dots close together on a leaf so it appears I've got a variety of pests. I'm considering how to approach this. I mean the damage is very minimal but I don't want it to get out of hand. Another thing I need to look out for is leaf septoria or any other fungal pathogens. I believe that has been part of my problems in the past. I think that's what caused my earlier grows to drop all their leaves so quick. I think I'm being overly cautious but its very crowded in there. With my father just getting out of surgery the girls will need to wait a little bit before before I can extend the cage. I could still cut the pallet and move the 1 10gallon and that would give more room. I rearranged a LITTLE BIT so they have a little more room but I've really got to get this cage extended.
UPDATE: IT Rained so hard I had to pull the car over. We hydroplanned the whole way home. After working ob my house I went to see what the damage would be like. NOT A SINGLE BREAK THAT I COULD SEE. I took a video but since the wifi here sucks I'll have to upload it tomorrow. Walking around in the cage even if I cant get it extended I think I'll be OK. It obviously will open me up to lots more issues but at the very least I can reorganize before I build on. The 10 gal purple punch would fit perfectly in the back and I have a pallet I can cut to fit it in place. Putting that one back and pulling the others forward will be much better than what I've got going on now. I'm also thinking about running an extension cord and putting fans under the canopy or at an angle to keep the wind moving. Just thinking outloud. However after that storm the girls looked as happy as I've ever seen them. All happy praying to the sun, thankful for the much needed rain. Mother nature does a pretty good job with out me messing with it. I've noticed a couple interior lowest leaves turn yellow and die like a nitrogen deficiency but everything else is fine. Also noticed a leaf that looked like a p deficiency but again, it was the VERY bottom leaf on ONE plant. Again the rest of everything looks fantastic. I'll keep an eye out for anymore nutrient deficiencies and if anyone that reads this sees some please let me know. I should've taken stills since they looked so good but I got it on video.
7/16 It POURED last night and throughout the day. TORRENTIAL rain. The branch breaking sheet rain that us outdoor growers learned to fear. My plants aren't trellised currently. I know what I need to do now. I have a pallet to put in the back corner and I'm moving the purple punch in the 10 there. And pulling others forward where there's more room. Then when I extend it (it's gotta be done this week) everything g will be in their proper place and I can just throw on a vertical trellis. I also noticed more (leafhopper) damage on a leaf. Different leaf of the same plant so I'm considering spraying something. I have a number of products but I was trying not to use them. Luckily I have these diaries so I can look back and see certain plants reactions to certain nutes or fungacide/insecticide/nutes and the doses used. I haven't been using much but if my plants will remain cramped I'm going to start the plant doctor. I'm seeing more pillar damage too but BT is super narrow so I'm thinking when I fo spray for pests I might use cap jack and be done with it. Then I can apply the BT in flower if it's necessary. I took a video but I have to wait until tomorrow to upload. I took a quick snapshot though.
7/17 Despite the torrential rain I don't have any breaks. I'm noticing more pest damage though. Another leaf on the same plant had those closely shaped round circles. I forget what pest it is but it's there. Caterpillars are there I'm sure so I may do a preclcentative spray. Just unsure what I'm going to use. I lost a COUPLE very bottom interior leaves that look like they just got used up. After this rain I think think the plants might benefit from a feeding. Probably next water after they dry out. I REALLY need that cage extended. I expressed that today and it should be done this week. I'm looking for pallets today. I have the little one that I can put in the back which will allow me to move the 10 gallon and move the other forward. That will help some but I need more room. I'll update as I go.
UPDATE: GOT A SMALL PALLET AND IT FIT PERFECT IN THE BACK ROW. I MOVED THE PURPLE PUNCH IN THE 10 GALLON ONTO IT. I SHIFTED A BUNCHVIF THINGS AROUND. I ROTATED ON BLUEBERRY CHEESE 180 DEGREES SO IT WOULD FIR BETTER. CROP ROTATION IS GOOD ANYWAY. I TOOK VIDEOS AND YOU CAN NOW SEE THE ROWS MUCH BETTER. 2 WITH 3 and 1 WITH 4. IT'S SIGNIFICANTLY BETTER THAN IT WAS. I CAN GET AROUND ALL SIDES OF EVERY PLANT NOW. GRANTED THE LARGE 50 IN THE BACK IS GOING TO HAVE SOME TROUBLE BUT ILL JUST STAKE IT TO THE CAGE. IT WILL GROW TOWARDS THE SUN ANYWAY. IM SUPRISED I DIDN'T LOSE A BUNCH OF LEAVES AFTER THIS RAIN. MOVING THINGS AROUND AND LOOKING ON THE INTERIOR OF PLANTS I FOUND A COUPLE LEAVES THAT HAD BEEN USED UP. I REMOVED A COUPKE LEAVES THAT HAD DONE THEIR JOB. I'LL UPDATE AS I GO ALONG.


Likes
7
Share


@Drtomb
Follow
Maybe the last week? I'm watching the hairs and plenty of white hairs remaining. Buds don't look "ready", not even worth scoping.
I'm on the flush, was running "Flawless Finish" but switched to straight water.
I'll also be watching the leaves for yellowing as the nutrients begin to be used up by the plant.

Likes
8
Share

@RBG
Follow
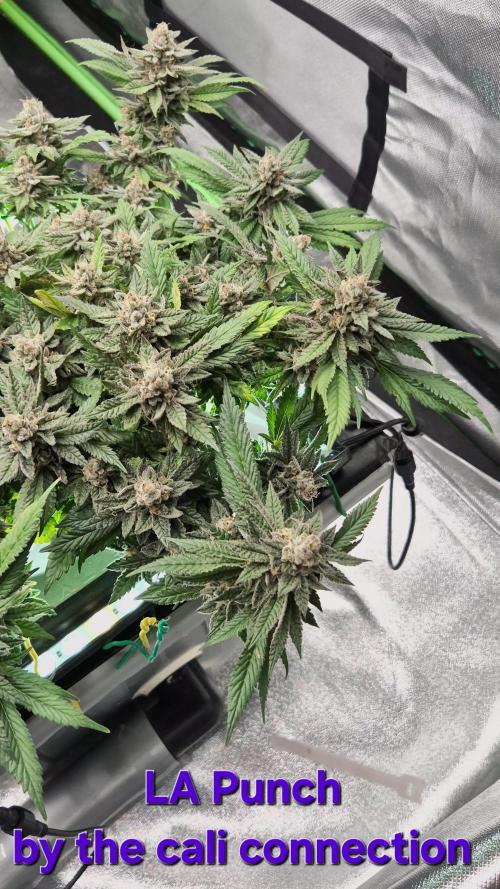
🌿 LA Punch by The Cali Connection 🌿
Week 14
Flower week 8
Flower-day 1
3/12/25
( pisitils showed 25th of October) im timing from pisitils showed but diary runs from 12/12 light flip
No nutrients change today, I'm thinking about 2 weeks or so of feeding, maybe 2 more horti rawk doses before switching out to new millennium winter frost then onto flush with plain water/ph
Not sure, not sure. Maybe even give LA and Grape an extra week to get Bellini over the end instead of pulling a little early or pulling her as shes finishing up.
Next horti rawk dose probably saturday (48hr run ) then dump then new nutrients.
6/12/25
This is currently week7 day 1 flower from 6/12/25 ( pisitils first shown )
8/12/25
Will dump nutrients tomorrow and refill with winter frost, run for 7 days then flush for 7ish days
9/12/25
Dumped nutrients, winterfrost 500ml ( 10ml a gallon) will use for 7 days then flush for 10 or so
Likes
2
Share

@Dameon0803
Follow
This plant way outgrew my expectations!!! She was trimmed back to nothing, and still could've used a better trimming.


Likes
9
Share


@Master_weeda
Follow
Bonjour à tous les padawans et maîtres jedis
Pour moi c'est une première je n'ai encore jamais vu ça le deuxième noeud pousse en siamois il me fait une seule feuille en forme de cône hermétique et j'ai l'impression que il n'y a rien qui pousse à l'intérieur
Du coup il y a de grandes chances que cette plante aura en réalité un seul noeud
Je me languis de voir comment elle va pousser car je la garde jusqu'à la fin 🤞
Le peu d'expérience que je possède démontre que ce sont souvent les meilleures en terme de goût et de puissance ...
A suivre...
Likes
2
Share

@Davesflavours
Follow
Approaching the last week now
She is really starting to frost up lovely


