


Likes
6
Share


@JeyGanesha
Follow
Prima settimana.inizio conta dei giorni..inizia a tirare fuori tutto il suo Power,🤣👍💪

Likes
7
Share

@DogDoctorOfficial
Follow
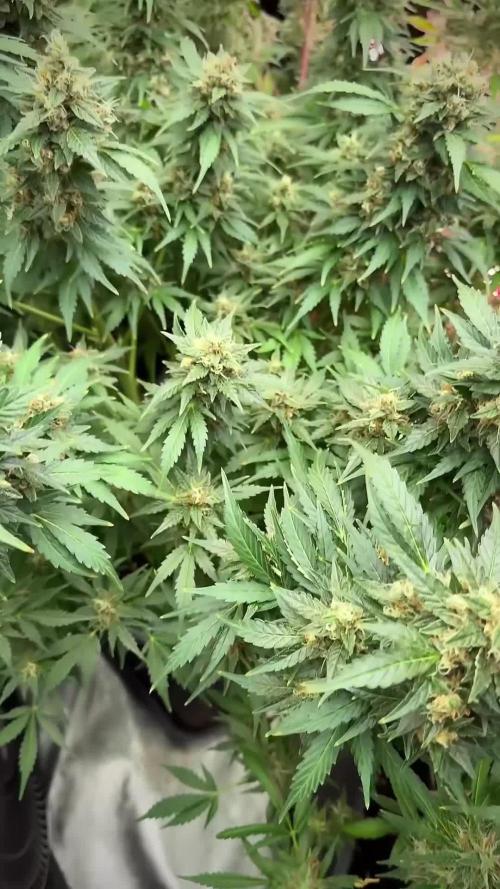
LSD — Week 12
12/12 from seed. Late flower. Full expression. Quiet hands, heavy flowers.
This is the stage where the grow starts asking less from us — and more from our patience.
By now, most of the work is already done.
Structure is built. Feeding has done its job. Environment has stayed stable. Roots have carried the weight.
And now the plant is doing what it was always meant to do:
Finish.
This is not the week for chasing numbers.
Not the week for aggressive changes.
Not the week for “fixing” what clearly isn’t broken.
This is the week for restraint.
For observation.
For letting the plant complete the final chapter on its own terms.
And LSD is doing exactly that.
⸻
Quick recap — how we got here
This run was never about force.
It was about rhythm.
From the start, LSD showed what stable genetics + stable conditions can do when they’re allowed to work without interruption.
No dramatic swings.
No constant corrections.
No overhandling.
No chasing deficiencies that weren’t there.
No feeding for ego.
Just consistent inputs, controlled environment, steady root-zone conditions, and enough discipline to leave healthy plants alone.
That’s what built this finish.
Now, in week 12, we’re seeing the result of every quiet decision made weeks ago:
* strong vertical structure
* dense flower stacking
* steady resin production
* proper late-flower fade
* increasing floral mass
* and a plant that is still focused on ripening, not surviving
That matters.
Because this stage is no longer about growth.
It is about conversion.
The plant is no longer trying to become bigger.
It is trying to become heavier, louder, stickier, and more chemically complete.
And it shows.
⸻
Late flower, properly explained
This is one of the most misunderstood stages in the cycle.
To newer growers, this phase can look confusing.
Leaves begin to fade.
White hairs begin to darken.
Growth appears slower.
The plant drinks differently.
Some leaves curl.
Some flowers swell unevenly.
The plant looks “older.”
And that is exactly what should be happening.
This is not decline.
This is maturation.
Late flower is the point where the plant shifts energy away from expansion and into completion.
That means:
* less vertical push
* less fresh green growth
* slower water demand
* increased resin output
* calyx swelling
* terpene maturation
* pistil oxidation
* nutrient drawdown from stored reserves
The plant is not slowing down because something is wrong.
It is slowing down because it is finishing correctly.
⸻
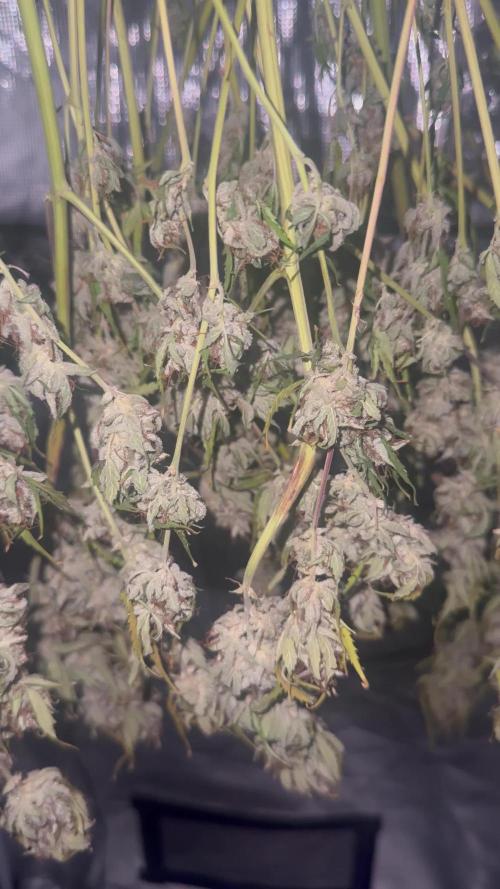
Trichomes — what they are, and what they are not
This is where the real story is now.
Trichomes are not “frost.”
They are not cosmetic sparkle.
They are not just visual proof that a plant “looks strong.”
And they are definitely not just sugar.
Trichomes are glandular resin heads — microscopic biochemical factories built by the plant.
Their job is protection.
They exist to defend the flower from:
* UV stress
* heat
* dehydration
* pests
* fungal pressure
* environmental stress
And inside those tiny resin glands is where the plant stores much of what we care about most:
* cannabinoids
* terpenes
* flavonoids
* volatile compounds
* aromatic oils
So when we say a plant is “getting frosty,” what we actually mean is:
The plant is reaching peak resin production and chemical expression.
That frost is chemistry made visible.
And right now, LSD is deep in that phase.
The resin is no longer just forming.
It is maturing.
That distinction matters.
Early trichomes are mostly clear — immature, still developing, not yet fully expressed.
Then they move cloudy/milky — peak cannabinoid development, strongest active expression.
Then amber begins — oxidation, degradation, and chemical transition into later-stage ripeness.
This is why trichomes matter more than pistils.
More than fan leaves.
More than fade.
Because trichomes tell you what the flower is doing chemically — not just visually.
And right now, these plants are no longer building resin.
They are finishing it.
⸻
The “curl” in the leaves
One of the easiest late-flower details to misread.
At this stage, some sugar leaves begin to curl, claw, or fold inward around the flower.
New growers often panic here.
But in late flower, this is often not a feeding issue.
It is not always heat.
It is not automatically toxicity.
Sometimes, very simply:
There is just too much flower and too much resin sitting on too little leaf.
At this point the plant is carrying weight, stacking density, and coating nearby leaf tissue in resin so heavily that those small leaves begin to tighten, curl, and fold into the flower.
It is a late-stage pressure response.
Part mechanical.
Part environmental.
Part genetic.
Very often normal.
Context matters.
And in this context — dense tops, heavy trichome load, stable temps, no major stress signals — this reads like maturity, not trouble.
⸻
Pistils — why the white hairs are changing
This is another classic late-flower marker.
Those white hairs are pistils.
Early on, they emerge bright white as the flower actively builds and reaches.
As the flower matures, those pistils begin to:
* darken
* curl inward
* oxidize
* retract into swollen calyx tissue
That change from white to orange/brown is not the plant “dying.”
It is the flower aging into ripeness.
Fresh white pistils usually signal active new flower development.
Darkened pistils usually signal that part of the flower is maturing and beginning to finish.
This is why late flower often shows both at once:
* older pistils darkening
* newer pistils still pushing
That is normal.
Flowers do not ripen all at once.
They ripen in layers.
And that’s exactly what we’re seeing now.
⸻
Feeding — why less is doing more
This is the point where overfeeding does more harm than underfeeding.
The plant no longer needs to be pushed.
It needs to be allowed to finish.
Right now the feed is still simple, controlled, and appropriate:
* Pure Zym
* Sugar Royal
* CalMag Pro
* Terra Bloom
* Power Buds
* Green Sensation
Nothing excessive.
Nothing chaotic.
No late-game bottle collecting.
No panic additives.
Just enough to support:
* final bulking
* resin maturity
* metabolic efficiency
* clean finish
That’s the right move here.
And yes — next week is likely the point where feedings begin to step down or stop entirely.
Not because the plant is starving.
Because the plant is done demanding.
That’s the difference.
Late flower feeding is not about force-feeding weight.
It is about supporting the final metabolic steps without leaving excess behind.
The closer we get to harvest, the less the plant needs to be fed — and the more it needs to be left alone.
⸻
Environment — why nothing is changing
This room is still stable.
And stable is exactly what late flower wants.
* 26°C day
* 18°C night
* 60% RH
* ~21°C root zone
* ~18°C solution
* 12/12 unchanged
* CO₂ stable
* watering controlled
And most importantly:
The plants clearly like it.
So we do not change what is working just because we are close to harvest.
Late flower is not the time to start experimenting.
Not the time to suddenly drop temperatures.
Not the time to force stress.
Not the time to chase color.
Not the time to “improve” a stable room.
Consistency is what got the plants here.
Consistency is what finishes them properly.
⸻
Weight gain — where the real growth is now
The plant is not stretching anymore.
But it is absolutely still growing.
Just differently.
This is density growth now.
Mass growth.
Calyx stacking.
Internal swelling.
Resin thickening.
Water redistribution.
Final weight.
This is where flowers stop looking bigger every day — but start feeling heavier every day.
That is late flower.
Less visible movement.
More invisible gain.
And this is where growers who harvest too early lose the most.
Not because the plant looked unfinished.
Because the final weight had not landed yet.
That weight is landing now.
⸻
What to expect next week
Next week is likely transition week.
Not dramatic.
Not aggressive.
Just the beginning of the final slowdown.
Expect:
* less water demand
* slower daily movement
* more pistil darkening
* more calyx swelling
* heavier tops
* continued fade
* trichomes shifting deeper into maturity
* feed reduction or full stop approaching
This is the point where observation becomes more important than intervention.
The job next week is simple:
Watch closely.
Touch less.
Finish clean.
⸻
Final thoughts
This is one of the most beautiful parts of the cycle.
Not because it is explosive.
Because it is precise.
This is where good structure becomes good flower.
Where patience becomes weight.
Where resin becomes chemistry.
Where restraint becomes quality.
LSD is no longer trying to impress.
It is trying to finish.
And it is doing that exactly right.
To everyone following along —
the growers, the learners, the skeptics, the silent watchers, the day-ones, the new names, the longtime supporters, the curious minds, the community, the platform, the sponsors, the believers, and even the doubters:
Thank you for being here.
Week by week.
Plant by plant.
Lesson by lesson.
Almost there.
📡 DELETED @ 1K Please stay tuned.we never quit https://www.youtube.com/@TheDogDoctorOfficial NEW 🙏 Thank you for your patience and continued support.
FOR DISCOUNT CODES AND MORE JUST FOLLOW THE LINK https://website.beacons.ai/dogdoctorofficial
📲 Don’t forget to Subscribe and follow me on Instagram and YouTube @DogDoctorOfficial for exclusive content, real-time updates, and behind-the-scenes magic. We’ve got so much more coming, including transplanting and all the amazing techniques that go along with it. You won’t want to miss it.
GrowDiaries Journal: https://growdiaries.com/grower/dogdoctorofficial
Instagram: https://www.instagram.com/dogdoctorofficial/
YouTube: https://www.youtube.com/@dogdoctorofficial Deleted by Youtube - https://www.youtube.com/@TheDogDoctorOfficial NEW
Vimeo : https://vimeo.com/dogdoctorofficial Under construction stay tuned ⸻
Explore the Gear that Powers My Grow
If you’re curious about the tech I’m using, check out these links:
🔆 Lighting & Environmental Control
• Future of Grow — Advanced LED lighting technology
https://www.futureofgrow.com/
DISCOUNT CODE: DOG20
• Lumiflora — Under-canopy LED lighting
https://lumiflorade.com/
• TrollMaster — Environmental controllers and automation gear (past collaboration)
⸻
Genetics
• Zamnesia Seeds — Genetics used in this project
https://www.zamnesia.com/
⸻
🌱 Soil, Substrates, Boosters & Root Support
• Plagron — Substrates, bio mixes, and supportive products
https://plagron.com/en/
⸻
🎒 Storage, Curing & Preservation
• Grove Bags — Curing and storage solutions
https://grovebags.com/
⸻
📸 Photography Equipment & Tools
(Not sponsors, but part of my creative toolkit)
• Sony A6700
• Sony full-frame macro lens + few more
• Stacking photography workflow - learning
• iPhone (for behind-the-scenes shots)
We’ve got much more coming as we move through the grow cycles. Trust me, you won’t want to miss the next steps, let’s push the boundaries of indoor horticulture together!
As always, this is shared for educational purposes, aiming to spread understanding and appreciation for this plant. Let’s celebrate it responsibly and continue to learn and grow together.
With true love comes happiness. Always believe in yourself, and always do things expecting nothing and with an open heart. Be a giver, and the universe will give back in ways you could never imagine.
💚 Growers love to all 💚
📸 P.S. – The Eye Behind the Lens
All photos in this diary (for now — except for the ones showing the camera, which I took with an iPhone) are taken with a Sony A6700 paired with a Sony full-frame macro lens and a few more.
Photography is part of the story — it’s how we share the fine textures, the glow, and the quiet details that words can’t always capture.
I’ve also started experimenting with photo stacking — a technique where multiple images, each taken at a slightly different focus point, are layered together to create one perfectly sharp image from front to back.
It’s not digital enhancement or AI; it’s pure photography — a way to reveal the plant’s beauty in microscopic depth, from trichome to petal.
You’ll even see a few shots of "ghost me" capturing the shots — camera, lens, setup — because every grow deserves not just to be cultivated, but documented like art.
FOR DISCOUNT CODES AND MORE JUST FOLLOW THE LINK https://website.beacons.ai/dogdoctorofficial
NEW DISCORD - Official Server Invite Link : https://discord.gg/ksjAkA5T74


Likes
12
Share


@PolezGardn
Follow
week four flower everything looks fine so far :D
I water them with 1.5l every 48h
the light I use was set to 100% and it hangs 80cm away from the tops

Likes
8
Share


@Chubbs
Follow
Week 7 update on these big girls. The uniformity on this strain is wild. All the plants look very similar and have stacked great. Still early into flower but the sweet smell followed by the pungent smell of OG. Excited to see how the next couple weeks do. All in all Happy


Likes
3
Share


@Smithsgrow420
Follow
Been I big week for the growth, seen a massive stretch
I’ve been using only water from the fish pond and organic fertiliser.
All seem very happy and heath

Likes
5
Share


@420Hydro
Follow
This will be day one of flower ...gonna run 12/12 starting 7 am lights will turn off till 7 pm until time change then will be 6am to 6pm...also running my Moby dick under 400watt hps next to these ...got it as a freebie from greybeard..have changed res to flower nutrients... Will be fun watching these girls grow .a lot new gear running in this tent so hopefully everything goes good...only running 6inch exhaust fan atm need upgrade to 8 inch later but seems be doing ok in there.. .


Likes
2
Share


@Franco123
Follow
the plants both critical kush and medical mass have sprouted quietly 8 seeds or planted and 8 are germinated i am happy and thank royal Queen seeds of warnings sent

Likes
6
Share


@Northern_Ent
Follow
July 12: looking good. Starting force flowering which is 12 h of darkness at same time each night for 2-3 weeks to initiate flowering.
Doing ten hours of darkness (9:30 pm to 7:30 am) plus a ‘bonus’ two hours by using the far red light for a few seconds before dark which causes the plant to go into dark mode about two hours faster. So, it’s like having a 26 h day with 12 h of dark. This is a great trick if you have daily access to your plants.
July 15: doing fine.
July 18: Mimosa Shot has finally caught up in height to the other plant in the wagon (Sunday Punch EV).

Likes
12
Share


@Desertfarmer
Follow
This is a clone only strain I have been running
for a little while and it never disappoints! Dense buds that stink the whole place up with its earthy, pungent, sweet smell. Not a huge yielder but it makes up for it in resin production. Probably not a good strain for First time growers as it needs topped, trained, and trellised. Overall happy with the way this run turned out lots of main buds, I ended up with 316.3 grams of trimmed nice frosty buds. I also took the rest of the buds (when they were wet)and put them in the freezer for some ff bubble hash. I ended up with 433.7 grams of wet fresh frozen material.
Likes
35
Share


@Mega420
Follow
Day 64 : Week 10, I'm near of the end !! I give her less nutrient to 'wash' her and the last watering will be without nutrient.
I think I will harvest in around 10 days, I can't wait to smoke her after she will have dried 😍


Likes
11
Share

@MadeInGermany
Follow
Hey guys :-)
The lady has developed very nicely this week 👍.
They were planted in their 8 liter pot where they can now really take root again.
Depending on what time is left in the vegi phase, you might be trained :-) .
Otherwise everything was cleaned and checked.
Have fun and stay healthy 💚🙏🏻
👇🏼👇🏼👇🏼👇🏼👇🏼👇🏼👇🏼👇🏼👇🏼👇🏼👇🏼👇🏼
You can buy this Nutrients at :
https://greenbuzzliquids.com/en/shop/
With the discount code: Made_in_Germany you get a discount of 15% on all products from an order value of 100 euros.
👇🏼👇🏼👇🏼👇🏼👇🏼👇🏼👇🏼👇🏼👇🏼👇🏼👇🏼👇🏼
You can buy this strain at :
Clearwater Seeds
Water 💧 💧💧
Osmosis water mixed with normal water (24 hours stale that the chlorine evaporates) to 0.2 EC. Add Cal / Mag to 0.4 Ec Ph with Organic Ph - to 5.8 - 6.5
MadeInGermany
Likes
59
Share


@Rap_a_cap
Follow
Destiny has given me a wonderful climate so far but from the 18th the weather will change completely, precisely in the last 10 days of flowering which fortunately is very accelerated by the anomalous heat, especially at night.
Typical late summer weather here, kinda for weed.
First storm is expected on Saturday, I'm ready to protect them. I've made the last rearrangement of the tent, trying to give more room to the vigorous and overflowing Pineapple Kush so I've rised the roof to 110". The plants are all carefully sprayed with thyme extract to control mites infection, it seems to work, infection is stable from 1 week. I kill manually 20/30 bedbugs a day. During nighttime, maybe a monster grasshopper, is munching some leaves, at this point I don't care, I have to defoliate anyway and these bastards don't chew buds, for now.
She's flowering fast now, I hope she will finish before October rains. Every side branches is thicker as the sister's main branch. Expected harvest time october 1st/2nd week. This will be a hard challenge to complete flowering without mold issues. If she doesn't gave to me at least 2lbs of weed, I'll kill her.
Last 2 week with nutes
Full dose
Water
Half dose
Water
Full dose
Water
Half dose
Happy growing my friends 🙏
Likes
5
Share


@TheGreenDisciple
Follow
3rd time's a charm...Invested in a grow tent and a better light and man can you tell the difference. Week 2 pretty basic, had a little problem...I think I started the Nutes too soon...I backed off them and the plant recovered nicely.

Likes
41
Share


@JacareGrows
Follow
Hey guys.
For this week i upload some videos 1 video per plant.
I am not giving any more the bio nova autoflower supermix, i m thinking on let them going only with water until the end, but lets see.
Plant 5 is close to harvest i think on the end of this week.
Plant 1 and 4 are doing good on flowering.
Plant 2 is slowly flowering
Plant 3 is still in middle of the transition to flowering, is going very slow. I think she probably is blocked because of the size of the pot and light .
When i harvest plant 5 the others will have more space, and i can bend some branches to increase the bud quality.
The big question is, when harvest? its the first time im doing this and i am afraid of doing that wrong.
Hope the videos can help someone to help me :D
I have also made a video of plant 5 on a more close look, not to much quality but for now its what i can get , sorry
28/05 day 69
small trichome update of plant 3,4 and 5. Plant 1 and 2 still on pre flowering
analysing the trichomes, i would say,
Plant 3 and 4 need almost 2 more weeks
Plant 5 - probably only 1 week more, so up to almost week 12
plant 1 and 2 - will take much time as fotoperiodic LOL