
Processing
Likes
Comments
Share


@Budcrack
Follow
New update for week 12, concluding week 8 of flowering:
Hi(gh) Folks! Thanks everyone for your input on my second grow question. I’m going for HighTV’s answer, the SOG with 9x4 main buds. Very nice to get everyone’s input on this, appreciate it!
So another week done! They got their last nutrients Tuesday and on Thursday the 5 early ladies from Hempire got their first round of plain acidulated water. I flushed them a bit on Friday and Saturday to. Now they can dry out for a couple of days. I will flush them for the upcoming week and let them dry out before harvest next weekend. Im counting on them to swell up even further during this week.
As for the rest of the 4 plants from Hempire, 4 from Royal Queen Seeds and 3 from Hy-Seeds, I will treat them as if this is another week 8, and they will get another dose of Flowering nutrients and PK. Then next week I will start to flush them also. I will have 2 full weeks to flush and let them dry out until my planned harvest on Saturday 5 January. I’m not even sure that will be early enough for the 4 RQS’s since they look like they have even more bud-growing to do, before they can start swelling! I will keep an eye on that.
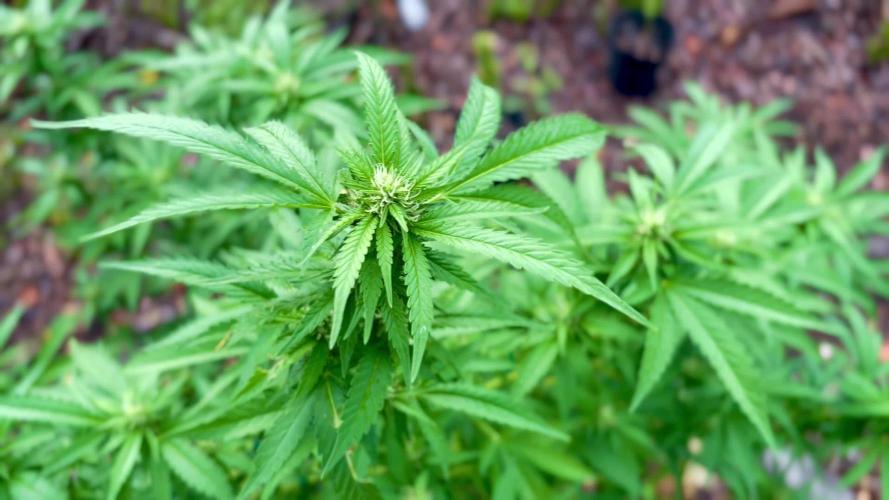
The 5 tall ladies, 2 from Hempire and 3 from Hy-Seeds show the nice thick Kushy buds i’m craving for, can’t wait to see the becoming nice and heavy! On the photos you see the slight diverence between the pheno’s, the left 2 plants grew the popcorn-buds on a stem, and the right ones have nice thick popcornbuds against the stem’s. The other to remaining Hempire plants also show these, apart from the early ladies offcourse. The early birds show a little stretching buds and nice purple colours.
So next week will see the early ladies harvested, I hope?
Look out for my next update and don’t forget to like!
Thanks and see you!


Likes
17
Share


@gottagrowsometime
Follow
9/2/25
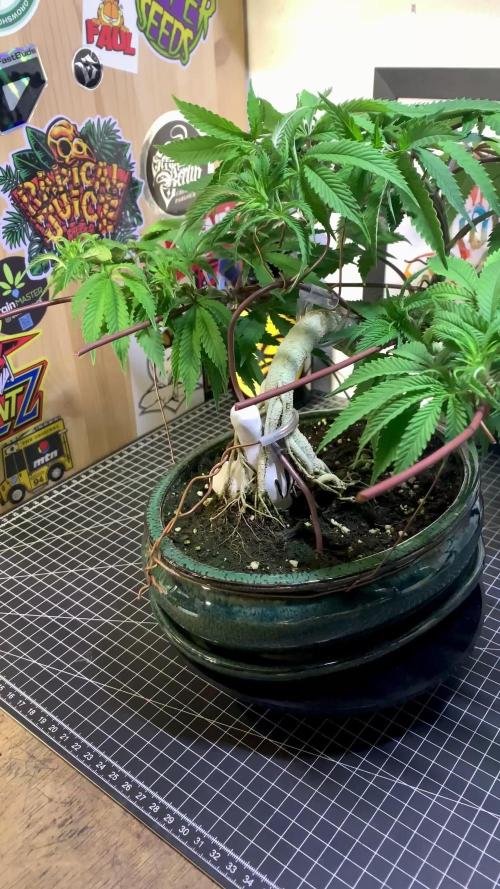
Overall I'm delighted with these. 17 weeks grows for me are few & far between. These 2 phenos had 7 weeks in 2L pots. And were put into a 20L pot of coco/pebbles and gives 10-14 days to recover and were flipped. I purposely grew them this shape as I had to make sure I kept them apart if hit with WPM or anything like that. As grows these long, buds this dense. And running a tent with a bunch of mixed grows from done to days into the start of the 12-12 flip.
I would have liked to run for another week on a 100w light and high doses of UV but because of such a mixed bag of grows in my tents. Running reds/uv just wasn't even attempted.
10/2
She smells absolutely amazing, buds are super big, sticky & very smelly. They're still mainly hard for the moment. And leaves not even limp. So, I removed the big fan leaves to allow air to move around better. They're hanging behind my 100cm2 tent kept out of UV rays.

Likes
37
Share


@GODSGIFT_2005_JM
Follow
For LIQUIDS & NUTES ******GREEN BUZZ NUTRIENTS***** organic.
Also i’m using their LIVING SOIL CULTURE in powder form!
MARSHYDRO ⛺️ has large openings on the sides which is useful for mid section groom room work. 🤩
☀️ MARSHYDRO FC 3000 LED 300W
💨MARSHYDRO 6” in-line EXTRACTOR with speed-variation knob, comes complete with ducting and carbon filter.


Likes
12
Share


@MazzeoN
Follow
Todo viene muy bien, aplicamos LST a todas las plantas, exceptuando a 1 que no se que le pasa, presenta manchas en sus hojas y va mutando las manchas a todos los nuevos brotes.
A la hora de hacer LST, a 1 de las plantas se le arranco una hoja y en otra de los plantas el tallo se quebró muy apenas, esperemos que no las estresen demasiado.


Likes
7
Share


@Cultivatorcarlos
Follow
everything in the second week of flower went well. she really stretched and the buds quickly started getting fat. also every watering i would notice a very strong odor of weed.
december 22nd 2021: gaver her last half of gallon used in last feeding. also nothing was tested. ph tested at 6.6 last feeding and it usually comes out a little higher after a few days.
january 1st 2022 i noticed the first trichomes.
Likes
3
Share

@Organic473
Follow
Fed her some bloom nutrients, she took it nicely.
I will continue to feed her nitrogen into the third week also.

Likes
15
Share

@tsf_homegrow
Follow
🇩🇪
31.1. mal wieder in Form gebracht und einige Triebe entfernt die nächsten Wochen werd ich alle Triebe versuchen auf eine Höhe zu bringen. Und ich muss vermutlich etwas höher mit der Dünger Dosis langsam zeigen sich ein paar Defizite. Aber das sollte sich mit der Zeit regeln. Happy growing💛✌️
🇬🇧
1.31. I've shaped it again and removed some shoots. Over the next few weeks, I'll try to get all the shoots to the same height. And I'll probably need to increase the fertilizer dose a bit; some deficiencies are slowly becoming apparent. But that should sort itself out over time.
Happy growing💛✌️
Likes
4
Share


@Jofflepov
Follow
This strain has character. All three are stretching and growing fast. Next week transplanting to their final pot outside
Likes
86
Share


@TheFoxFarmer
Follow
Week 7 Flower
With this week being her last week of nutrient feedings before flush, I've reduced the overall strength and stopped feeding bud explosion as she doesn't need such high amounts anymore. Nature's candy and molasses are still being added at the same amounts, for optimum nutrient uptake and to also carry on feeding the microbes. They also help with trichome production and increase flavour/aroma.
Her buds just keep on growing and growing and she's forever getting taller and taller, to the point where her tallest cola's are extremely close to growing taller than the light! Only an inch or two to go and she'll surpass the reflector! Although this doesn't bother me in the slightest, because every inch below that, all the way down to the net is nothing but flowers! She doesn't smell too strong at the moment, especially with other strains in the tent giving off different scents, but she's unbelievably huge. She has arm length cola's filled with buds. The fattest parts of a few of her cola's are almost coke can width! She's not going to stop putting on weight and swelling just yet, so I've tied a few more branches up similar to how the yoyo style strings to keep them from flopping all over the Surf Purps. A couple of branches at the back corner are getting pounded by the fan; their flowers aren't showing any damage but there's a few wind burn marks on some fan leaves. Of course this isn't ideal, but I'm unable to move the fan at the moment with another plant being in the way, and there's also no better position in the tent for it currently. It's not doing much damage so I'm not too worried at the moment.
Next week she starts flush! 🚽💦
Thanks for following and happy growing! 🐺
Likes
Comments
Share

@Wenz004
Follow
erste Woche Stretch ist durch und es lief reibungslos.
Umgeswitched auf mein Lieblingsdünger Aptus.
EC schrittweise von 1.4 auf 1.6 gesteigert.
Trinkt aktuell etwas zwischen 2-3 Liter pro Tag, immer gedüngt, Coco halt.
Zuschaltung der Seitenbeleuchtung sofort mit der ersten Blütewoche.
So langsam mag ich meine Sativa😁.

Likes
20
Share


@420DeepGrow
Follow
Gracias al equipo de Royal Queen Seeds, Marshydro, XpertNutrients y Trolmaster sin ellos esto no sería posible.
💐🍁Punch Pie:
Un híbrido monstruoso con un 90% de dominancia índica, ocupa uno de los primeros puestos de la lista de favoritas de Kid Dynamite.
La Punch Pie desciende de la Cherry Punch Pie de Tyson 2.0 y contiene la genética de dos índicas galardonadas: la Purple Punch y la Purple Kush.
Punch Pie tu paladar se impregnará con ricas notas de pastel de frutos rojos, repostería caramelizada y tierra. Luego, pocos minutos después de la primera calada, sentirás todo el poder de este portento. La Punch Pie proporciona un combo 1-2 que se manifiesta justo en medio de los ojos y derrite todo el cuerpo, dejándote en un estado somnoliento, hambriento y apacible.
Produce plantas compactas que alcanzan una altura de 80-110cm en interior y hasta 120-150cm en exterior. Tras 9 semanas de floración, esta señorita robusta crece con fuerza para soportar el peso de sus densas flores, y da cosechas de hasta 600g/m² en interior y 750g por planta en exterior bajo el sol.
💡TS-3000 + TS-1000: se usaran dos de las lámparas de la serie TS de Marshydro, para cubrir todas las necesidades de las plantas durante el ciclo de cultivo, uso las dos lámparas en floracion para llegar a toda la carpa de 1.50 x 1.50 x 1.80.
https://marshydro.eu/products/mars-hydro-ts-3000-led-grow-light/
🏠 : Marshydro 1.50 x 1.50 x 1.80, carpa 100% estanca con ventanas laterales para llegar a todos los lugares durante el grow
https://marshydro.eu/products/diy-150x150x200cm-grow-tent-kit
🌬️💨 Marshydro 6inch + filtro carbon para evitar olores indeseables.
https://marshydro.eu/products/ifresh-smart-6inch-filter-kits/
💻 Trolmaster Tent-X TCS-1 como controlador de luz, optimiza tu cultivo con la última tecnología del mercado, desde donde puedes controlar todos los parametros.
https://www.trolmaster.com/Products/Details/TCS-
🍣🍦🌴 Xpert Nutrients es una empresa especializada en la producción y comercialización de fertilizantes líquidos y tierras, que garantizan excelentes cosechas y un crecimiento activo para sus plantas durante todas las fases de cultivo.
Consigue aqui tus Nutrientes:
https://xpertnutrients.com/es/shop/
📆 Semana 3:
Muy buena semana, he aplicado un riego solamente con agua de manantial para reducir la cantidad de sales acumuladas en el sustrato y se ha notado una mejoria .
Creo que le quedan unas dos semanas por estirar, parece que va a ser una buena cosecha.
Se mantiene un buen control del cuarto de cultivo gracias a @marshydro y @trolmaster.
Mantengo las dosis de 1/3 de nutrientes recomendados por el fabricante.
Potencia del foco 80%
Likes
10
Share


@tokesly
Follow
Germinating with RO Water + Liquid Seaweed. Using shot glass for 48 hours to break open the shell, and a paper towel for 24hrs to grow the taproot. Then transport to Jiffy peat pellets (soaked in 300PPM seaweed + camg) for initial vegging.

Likes
25
Share

@gottagrowsometime
Follow
Welcome to my Purple Haze Autoflower Diary sponsored by MSNL & Xpert Nutrients.
Days 36-48 weeks 6-7 of pre flower day 2-15
Plant is responding really well having 14hrs of light under my FC3000, and I've been using IR to give my fems extra flowering time & this has suited my Autoflowers really well. New nutrients i see huge improvements in all of my Autos not only from MSNL but crop wide. Root Zone increased 3x easily. Been organic/mineral you need to PH to 6.7 for soil. Are ideal 6-6.1 ph in-between coco/soil and you adjust as needed. Really happy with their push for my plants. She has put on a nice bit of height. Her smell is very new to my grows, as I've not grown a purple haze or smoked it in years. Fruity, like a soda, typical PH, can't wait to taste this girl. (She's currently just been taken out of my tent into dry room, I'll hang her in a few hours)
FEEDINGS/DLI
DLI is around 40-41 700-730 ppf over 14hrs with UV-A calculated in. Core NPK feeds have been only 1x every 5-7 days 450-550 ppm, next week I'll start adding there pk /bloom booster. Master root & everything else brings the general ppm per day 7-1000 with enzymes & master root having huge EC change to water. (Note? This is a different kind of EC, bacteria/enzymes & amino acids have a high EC input but aren't counted as core NPK feeds, which have been 450-500 "master bloom parts A+B)
Thanks to MSNL & XPERT NUTRIENTS for their support & sponsorships. Much appreciated.
Shout out to yall for stopping by. I look forward to seen your diaries. Either way thanks for dropping by.

Likes
13
Share


@GreenleafSWO
Follow
Monday
Gave her some enzyme, I think it's supposed to help the plant break down nutrients so we'll see. I'm exactly 70 days from seed, 63 days since I transplant it to the 10 gallon pot, it should be a 10 week auto flower so I'm hoping I'm close to harvest. The flowers are really starting to turn purple now, I suspect its a sign that it's finishing, looks really cool close up!
Tuesday
No work done today, dry day. I think the buds are ripening, that purple is really starting to come out right across the canopy, can wait to see what it's like right before cutting 😀
Wednesday
Gave her 5l of water with 5ml of plagron pure enzyme, I'm checking the trichromes under a glass every day now to try catch the right time to harvest, the buds are so frosty, still clear trics I thunk.
Thursday
Dry day today, its very nearly finished, trics are stating to turn Amber, I reckon I will give it a week more, maybe less and then I'm cutting!
Friday
Just clean water today, nearly at the point of cutting!
Saturday
No work done today, tomorrow is the last watering, its going into 2 days of darkness and then I'm cutting, so much work now so close!
Sunday
OK, so I think I've given it the last watering, I've just turned off the light and I'm going to leave it in complete darkness for 48hrs, then it's cutting time! 😀 I'm going to hang the plant whole, I'm only going remove some of the bigger fan leaves then dry trim, I've read that it's better that way, we'll see

Likes
19
Share


@GrowMo
Follow
As she gets closer to the end these fat dense buds are filling out with a ton of trichomes that are so beautiful some almost look purple when the light hits just right. I can’t wait to try this bud out I’ve been so impatient about this cause it looks so good stay tuned for the chop soon only 2 more weeks!
Fed FloraFlex
B1 B2
3.0ec
6.0ph
No Cal-Mag
Likes
67
Share


@AsNoriu
Follow
Day 76. Last two weakest plants - Strawberry Banana and Orange still going outside. Weed is very resilient plant. I think I will have half ounce from each easy ! Still something ;))))
Stems looks still terrible and dead, hope it won't transform into bud rot. I am leaving for holiday and hope to chop them or bud rot in a month ;))))
If it will be any harvest - I'll do an upload , if not - it's my last record here.
Day 83. Tried to chop them asap some bugs started to attack. Found few larvas and then found this - hard as f@ck , radioactive , neon light pulsing alien EGGS ;)))))
Not bad end of growing career ;))))
Thanks all companies and wonderful platform !
Happy Growing !!!
Likes
66
Share


@UnorthadoxDude
Follow
Start of week 4, roots coming out of pot so have transplanted on day 22 into final pot.
Plant is pushing out node five at the moment.
Update week 4 day 2: A couple of days ago I dropped the PH to 5.8 from 6.3 and have added in Acti-Vera, a different Seaweed Extract fortified with Iron, and starting today Rhino Skin silica. Just look at the difference in the colouration of this plant in under 48 hours... wow.
Update week 4 day 2: I think I've managed to overwater. Not going to water today.
Update week 4 day 4. She is showing the same pattern as KKA 2 days ahead. After repot she is stretching out her main fan leaves, stem is thickening, and new growth appears everywhere.
Day 25.5 flushed with 30l of PH lowered water then fertigated with 5l.
Day 26: Height: 9cm Width: 18cm Nodes: 6
I have named her Bertha
Day 27: H9.5 W19.5 N7
Day 28: Fertigated 2.5l @ 15:00
.
Day 28: Photo and Measure 00:40 H13cm W21cm N7
Weekly growth data:
From 6cm Height to 13cm +117%
From 9cm Width to 21cm +133%
From 4 primary nodes to 7 +75%
Summary: Really good week for Bertha, she hasn't grown at quite the same rate as Karen, but she's not a million miles behind, I think she will have a big week 5.
Day 28.5: I have changed my mind about training and done a little gentle LST. Why? Well I realised I would have trouble with light levels and the younger plants... so I've decided to try and keep the older two from stretching too tall.
I realise this will mess up height measurements but it'll even out.


Processing
Likes
16
Share


@ZackTaylor
Follow
UPDATE:
1-29-18 The GSC are definitely AUTOS. Just added a new fan. Bought a Spectrum King 140W and just moved it in as it's going to be my main FLOWER light.
