The Grow Awards 2026 🏆
Processing
Likes
Comments
Share
@Budcrack
Follow
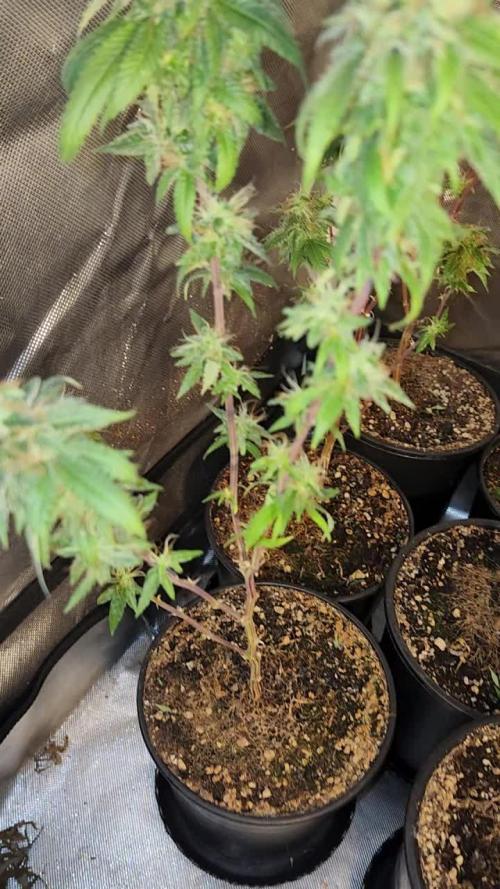
New update for week 12, concluding week 8 of flowering: Hi(gh) Folks! Thanks everyone for your input on my second grow question. I’m going for HighTV’s answer, the SOG with 9x4 main buds. Very nice to get everyone’s input on this, appreciate it! So another week done! They got their last nutrients Tuesday and on Thursday the 5 early ladies from Hempire got their first round of plain acidulated water. I flushed them a bit on Friday and Saturday to. Now they can dry out for a couple of days. I will flush them for the upcoming week and let them dry out before harvest next weekend. Im counting on them to swell up even further during this week. As for the rest of the 4 plants from Hempire, 4 from Royal Queen Seeds and 3 from Hy-Seeds, I will treat them as if this is another week 8, and they will get another dose of Flowering nutrients and PK. Then next week I will start to flush them also. I will have 2 full weeks to flush and let them dry out until my planned harvest on Saturday 5 January. I’m not even sure that will be early enough for the 4 RQS’s since they look like they have even more bud-growing to do, before they can start swelling! I will keep an eye on that. 
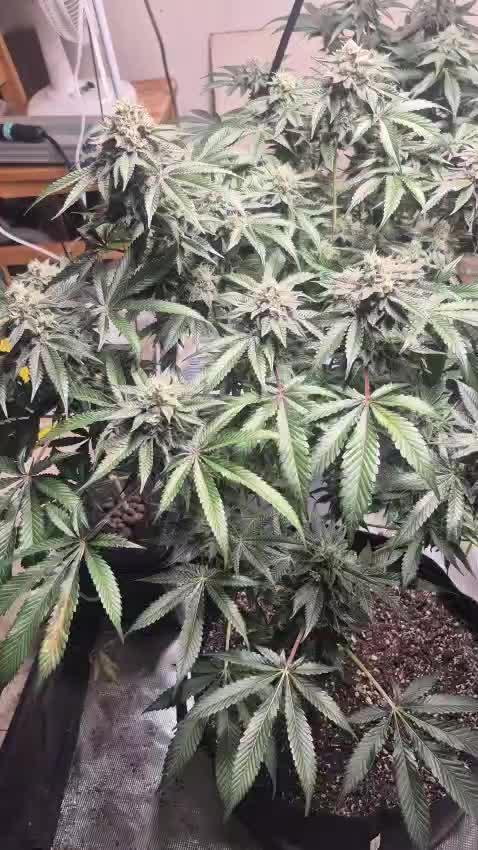
The 5 tall ladies, 2 from Hempire and 3 from Hy-Seeds show the nice thick Kushy buds i’m craving for, can’t wait to see the becoming nice and heavy! On the photos you see the slight diverence between the pheno’s, the left 2 plants grew the popcorn-buds on a stem, and the right ones have nice thick popcornbuds against the stem’s. The other to remaining Hempire plants also show these, apart from the early ladies offcourse. The early birds show a little stretching buds and nice purple colours. So next week will see the early ladies harvested, I hope? Look out for my next update and don’t forget to like! Thanks and see you!
Likes
15
Share
Holy shit we boomin'. I actually had to super crop (i think that's what i did) bc one red poison was getting so tall. I had to pull her to 90 degrees... she's already back reaching for the light - I'm not sure what impact this has on my grow, but I think it will be a positive one. She was going to be insanely tall if I hadn't done this.
Likes
2
Share
12/25 Merry Xmas. The ladies got a priming light feed this morning to get ready to clone in 2 days. Watered on 3 gallons plain water and 3 gallons of the mix the bed was thirsty 12/26 got a priming foliar feed. Very light. 12/27 took all the tops as cuttings for clones 12/29 watered in 3 gallons plain water and 3 gallons of full supplemental feed.
Likes
38
Share
Utopia Haze is a rare heavily sativa dominant hybrid (90% sativa/10% indica) strain created through back crossing Brazilian Sativa strains. This tasty little bud took home 1st Place for Best Sativa in the 2008 High Times’ Cannabis Cup and for good reason – with its potent 18-22% average THC level and long lasting cerebral effects, Utopia Haze is one powerhouse smoke. The Utopia Haze high comes on soon after you finish your first toke, hitting you with a strong cerebral lift that infuses you with a sense of hazy relaxation. Type: Feminised/Photoperiod Cultivation: Indoor/Outdoor Flowering Time (days): 70-75 Indoor Yield (g): Up to 650 Feminised Outdoor Harvest Month: October Feminised Outdoor Harvest Month Week: 3rd-4th week Aroma: Citrus, Woody, Pungent, Mint Effect: Cerebral Lift, Hazy Relaxation, Sleepy Welcome Everyone to the Final Entry of my Utopia Haze Grow ! There is so much to discuss ! I have been extremely busy as of late trying to get this Harvest together, but i am happy to have it here for you now ! I Seriously under estimated the amount of time, help from others, and my own necessary skills to pull this off.. and i still kind of screwed it up lol ! But its worth noting i have never actually done this before and trying to document it during....was extremely hard. It is next to impossible to work an iPhone with rubber gloves on ! First I want to discuss everything step by step so before you jump straight into the comments on how the end product is so small in "quantity" Rest assured i am happy with its"quality"...and thats all that matters to me because Life is a journey not a destination! and i have learned so much from this grow that I couldn't be any happy even if i messed some things up :) But at the very least I hope you read through this entry in its entirety with an open mind and focus more on the process, rather than just the outcome! I ran out of Ice & i was only able to wash three times..(normally I've heard you should go sometimes 5-6 washes) Preparation is Key & things will be much better next round :) Photos 1-22 These are pretty self explanatory but for those of you just tuning in now.. this is what happens to a very happy plant when you don't have the necessary tools to monitor key components of growing cannabis.. Ph, as well as EC levels play a very key role in the outcome of your grow lol that being said I was just able to save this plant by purchasing both tools but that doesn't mean the plant didn't suffer because of the prior events.. This was a Huge reason behind me choosing to turn this harvest into what i would consider "Solventless Hash Rosin" from "Ice water extracted Bubble hash". Pictures 23 The idea here is the process of using "fresh Frozen Cannabis" this has been discussed many a time online on such sites as instagram and here on grow diaries as well.. I personally have Never tried the process so i decided to try it out and make a judgement for myself.. Video 24 The Cannabis has now been in the freezer for 72 hours making it very well frozen.. as you can tell i struggled getting it all into the 25u Screen Wash Bag. One thing of note i would do differently is i will de-stem my next batch as i also believe this played a part in the amount of plant matter that escaped through the sieves. Photo/Video's 25-28 The idea here is "ice water Seiving" & especially with the bags that I am using here that are only have screen material on the bottom portion of the bag it is very important to have spaces in-between the screens to allow the water to pass directly through the screens into the bottom bucket with the least amount of resistance.. because the hash is so extremely temperature dependant if it gets warm on the side of the bag.. it will stick there and not make it to the bottom to become use able product.. 29 You do not need to use as much Ice as i used here lol... the idea is to keep everything very cold..i certainly achieved that but at the sacrifice of using so much that i ended up grinding product and producing "contaminants" but in the end they are just plant matter that i would be smoking when i rolled up my joint either way so.. I'm not super disappointed.. But it should be noted that what you want to achieve here is a Layering effect where you have the wash bag between two small layers of ice while the "water current" washes the Trichomes away allowing them to be separated by the screens setup below :) Before Starting the machine you should allow some time (i.e.;10-12minutes pre soak to allow the product to become saturated) before the first cycle. By video 32 I have just ran out of ice lol.. Video 33-34 Here I have a tip for you.. to separate the screens that you sieve through.. cut 5 gallon buckets to stretch them across nice and tight.. it'll make scooping your Bubble that much easier ! i learned this from the many "Frenchy" videos I have watched :) Picture 35 Here in lays the problem for most people.. drying your hash without loosing vast amounts of "Terpenes" whilst also stay ever vigilant against mold ! Thanks to all those videos I've watched on youtube.. id like to think this was one of my most successful parts of this process.. Things to Note; Terpenes start to seriously evaporate at temperatures 68F or 20C you need to stay as cold as possible whilst bringing the Relative Humidity in the space down into the 40-30% to stay away from that nasty mold ! I used my cold storage room in the basement.. with a dehumidifier running to keep the space at 45% RH & staying at a constant 15c. All while spreading the hash as thin as possible across parchment paper, on top of the white screens with a fan moving air across both sides of the paper. Pictures 36-38 These are some macros i took in the middle of my drying session I fell in love with the colour. Yes i know the black spots are plant material but they will get caught when i bag the hash & squish the oil out. Thing to Note; at this stage it is important to ensure you 'micro plane" the hash down as fine as you can whilst staying weary of the temperature... any "chunks" will hold pockets of moisture.. that lead to potential problems..ie; mold ... Picture/Video 39-41 Successfully planed bubble hash ready to be bagged and Squished ! Picture 42 Ive decided to follow Pedro.. from Pedros Grow Room and double bag to be on the safe side so i don't have any blow outs. So thats One 25u bag inside one 160u bag ! :) Pictures 43 This is almost 3 grams of the bubble hash from above, already melting in the bag.. this is where i ran into trouble again lol things started getting to warm in the house and i was only able to get one of the three squish's i did on video :( things started getting sticky. Picture 44 This is basically just a photo of the equipment I'm using; 3x5 LowTemp Cage in the frame I built myself, with a 20Ton bottle jack. Something to note here is this is an older Lowtemp model with only a single heating zone which is which i have it closed here heating Both sides of the press :) As well as the importance of having adequate pressure on your plates.. my rig is very overkill for the size of hash bags..lol Video 45 Here is the lovely press video.. its didn't quite work the way i wanted either lol my directional folding wasn't quite tight enough for a big "drip" :) &the Press was set to 65°c Photo's 46-50 are pretty self explanatory :) I had a blow out.. but still managed to pull an 80% return from the hash once squished...& yes it tasted amazing :) Was it worth it in the end... that could be debated.. for some..i understand..its not your thing, but for those of us that are interested in making our own concentrates.. free from Solvents... I wouldn't make it any other way :) If even ONE of you reading this diary finds it helpful to reference for ANYTHING.....even if its "what not to do" ill consider it a success ! Thanks again for tagging along on this garden adventure.. its been one heck of a journey ! Much Love from B.C. Canada, Until Next time, Cariboo
Processing
Likes
4
Share
I'm not adding no nuts since I make super soil however I'm adding an extra push for her now in flower just once a week using kalong bloom and kalong batboost (extract) she seems to love it,I didn't expect her to produce this beautiful violet nugs she's developing,let's see how beautiful she gets at the end,can't wait guys! 😍👀🌱
Likes
2
Share
Added Buddy into the feed halfway through this week. Really impressed with these nutrients so far. All plants look happy, healthy and green. This plant is at the back of the timelapses.
Likes
37
Share
@Reyden
Follow
Sto aspettando anche per di raccogliere corbezzolo che sta asciugando da un flush con 5 litri circa di acqua 🚿 fredda (14ºC) e penso di farlo ancora tra qualche giorno e forse una settimana, che bei colori questa ragazza e un profumo molto particolare, sarà una di quelle che terrò stretto anche sono pochi grammi e cercherò di curare il più possibile prima di tirarla fuori dal barattolo! Ora intanto prepariamo il terreno per i prossimi 4 😀 ???
Likes
22
Share
@Rangaku
Follow
Good growth on the wedding glue , not quite ready to be tied down but she’s next on the list prolly at the end of the week . She was transplanted again into her forever home looking to double her size again the coming week . Life’s good .
Likes
13
Share
Es impresionante como han crecido tan robustas son tremendas cepas 🏵️💐 las más grandes son las de @sweetseeds que bellas crystal caldy
Likes
57
Share
Week 8 of flower is in the books and this show is quickly coming to an end. I said last week we had about 7-10 days and I was spot on at the 10 day mark. I was only wrong about the order. The cheese is ready to chop before the rest and the gorilla cookies, cherry Bomb and lemon haze will follow in due course. The cheese is a beast and it’ll take a little time to get it all run through the bowl trimmer. At least the big one goes first. Her tallest colas have foxtailed like mar, despite the late supercrop. You can tell where the sweet spot for the light is at about 10” distance from the canopy. Any closer than that and the tails begin to show prominently. It’s a good example of just how close you can get to these fixtures with a little bit of prior experience. It’s been noted for the next run😎👍😎. The res. is on an h2o2 only flush for the remainder until the rest are ready to come down. Not a moment too soon either - the pollen chucking project has stalled out waiting for these girls to finish and now that we’ll have a little extra room, we can start running our cuts in the aerocloner🤟. Not long at all now folks. Thanks for tagging along through all this. Learned a bunch about this system and we’re back to hardware mode to make some serious improvements for the next run🤙😎. I love hardware mode😉. Background/Repetitive Nonsense The strain line up on this grow is look’n quite saucy 😈. We’ve got 2 FB strains this time around - Gorilla Cookies (seems we always have some GSC cross in the works). Mainly because the colours look stellar and remind me of a sugar breathe we did last year that was 🔥. The other FB is their original Cheese strain... because we already smoked all our cheese... and we really like our cheese...😉. Emerald triangle was kind enough to include a freebie of Lemon Haze. Wasn’t really big on the list but we haven’t done a haze strain to write home about yet so worth a go👍. The last is a Cherry auto from Bomb seeds that we’ve been trying to get to for months. Let’s just hope that she’s not a dud like the last bean. The new digs for this run are courtesy MarsHydro👊. Their 2x4 single grow tent, paired with a shiny new 240w QB courtesy ViparSpectra. These folks were kind enough to discuss a collaboration and as a result, here we are to test out the gear with an inaugural run of autos. Each week, we’ll try to expand on some of the benefits of each, as well as any limiting factors or considerations that need attention when pondering purchase. Already I can say that both are high quality products in terms of overall craftsmanship. MarsHydro 2x4 Grow Tent: Excellent construction in terms of durability. Reinforced stitching on the zippers and corners ensures zero tearing. Conveniently placed screen vents and intake/exhaust ports. The ceiling exhaust port only exists on the right side. Perfect for me but not great if you’re running exhaust from the top on the left side (left side wall port makes up for this however). The aluminum frame is rigid enough to support the weight of the lights and accessories. Once you have some weight in the tent, she’s go’n nowhere and you can assemble and break it down in record time if moving or stashing the grow op. Only limiting factors I’ve noticed is that temp. Control will be an issue for a tent. It just doesn’t have the same insulating ability as a wood cabinet or other permanent enclosed space. No worries, this is offset by a small desktop heater and keeps the environment exactly where desired. The other issue was a production problem - the ceiling vent was accidentally stitched into the corner seams on the assembly line. Again, no real issue - just pulled it out with no damage or fraying to the tent or port👍. Website link here: https://www.mars-hydro.com/grow-tent/buy-mars-hydro-grow-tent-24x48x70-2-x-4-cabinet-closet-grow-box-upgraded-diamond-1680d-mylar-for-sale ViparSpectra 240w Quantum Board: This thing is sleek and slick in terms of design. Closest comparable to it that I’ve seen would be spiderfarmers line of qbs. They feature the same top-o-the-line components and roughly similar spectrums. Where VS takes the advantage is in the convenience of the dimmer nob which is easily accessible and works great at 50% with no strobing👍. The heat sink is also larger which contributes to lower temps. That’s not a good thing in my case but beneficial for most folks. I can already say that this will be a great fixture through all stages of growth. Where I know this light will excel will be in the veg. Stage for sure. Dimming function gives seedlings a much better chance of success with the ability to use lower lighting levels early on and the coverage area on a 240w is great. The average grower will find this panel suitable and fitting to their needs in a 2x4 grow space although I’d suggest 2 units if going any larger than that. The total output in this space equates to about 30w/sq.ft. Which is a decent amount of coverage based on power vs. Growprint. Ideal for veg. Certainly but, in flower - I tend to run closer to 50-60w/sq.ft to achieve higher yields. Again, similar fixtures have performed admirably in the past and while this wouldn’t be considered an “entry-level” fixture, I’d recommend that any grower new to the game not skimp on lighting and start with one of these. The price points are a great value for quality LED tech. These days, so there’s little reason to even consider a lesser fixture👍. I have no detail on limiting factors for this light as yet but have heard that stock branded fixtures don’t necessarily incorporate enough red diodes. I’ve seen no issue myself but confess - I’m no lighting guru. Website link: https://www.viparspectra.com/collections/xs-series/products/xs-series-xs2000 ***8% discount when using code: “ItBudWhisper”*** Happy to have you along for the ride if you made it this far through my opening rant!!😎🤟😎🤟😎
Likes
31
Share
Hey everyone 😀. A lot has happened this week 👍. Flowering day 28 Today 1.2 liters were poured. (See nutrient table for nutrient addition). The humidifier was refilled with an Ec of 0.4. The tent has been cleaned. Flowering day 29 Today the plants and buds were checked for health and cleaned. Flowering day 30 Today was poured again. This mam she got 1 liter of water. (See nutrient table for nutrient addition). Of course, the plant was checked for its vitality 🧐😅. Flowering day 31 The humidifier was refilled a little and the tent cleaned 👍. Days of flowering 32 Today 1.2 liters of water were poured. (See nutrient table for nutrient addition). Fans, fans, electrics have been checked for functionality 😊. Flowering day 33 The plant has been carefully checked for pests, etc. Flowering day 34 Today 1.6 liters were poured, so that it had about 10% drain 👍 For nutrient addition, see the nutrient table. The tent was plastered and rubbed with disinfectant. The buds look beautiful, and already smell extremely tasty again 😍. I wish you a lot of fun with the update, let it grow 🍀 and all stay healthy 🙏🏻 You can buy this Strain at https://www.barneysfarm.com/blue-cheese-34 You can buy the fertilizer at https://www.greenbuzzliquids.com/ Type: Blue Cheese ☝️🏼 Genetics: Blueberry X Original Cheese 👍 Vega lamp: 2 x Todogrow Led Quantum Board 100 W 💡 Bloom Lamp : 2 x Todogrow Led Cxb 3590 COB 3500 K 205W 💡💡☝️🏼 Soil : Canna Coco Professional + ☝️🏼 Fertilizer: Green Buzz Liquids : Organic Grow Liquid Organic Bloom Liquid Organic more PK More Roots Fast Buds Humic Acid Plus Growzyme Big Fruits Clean Fruits Cal / Mag Organic Ph - Pulver ☝️🏼🌱 Water: Osmosis water mixed with normal water (24 hours stale that the chlorine evaporates) to 0.2 - 0.4 EC. Add Cal / Mag 2 ml per l water every 2 waterings . Ph with Organic Ph - Pulver to 5.8 .
Likes
229
Share
Week 8 Hi everyone 😀 I am so delighted with this little grow. Finally upper growth slowed down and buds are getting structure and weight. Have adjusted nutrients and increased watering to approx. 2 liters every 2 days. The aroma inside this cabinet it's very strong. It's smells a little bit fruity. 2 kg active carbon filters doing the job perfectly and nothing is coming out. Will update progress of this week every couple days. 12/09 Day 51 Buds on 2 most developed girls are getting frosty and gaining weight. Due to extreme fast flowering time on this strain decided to start applying final nutrient - Green Sensation from Plagron. Today only 0.5ml per liter but will increase to 1ml on next watering. 14/09 Day 53 Girls got so bushy again and decided to apply selective defoliation and tied some branches to netting. Not easy task if you have only frontal access and can't remove pots out 😅 17/09 day 56 Its the end of week 8 Everything is going well, buds and leaves are covered with lovely frost now. Thankfully have no major issues accept the humidity which can't be dropped below 50%. Stay tuned for upcoming updates. Peace and love ✌️
Likes
7
Share
Vamos familia actualizamos la cosecha de las gelato Olandese de Dutchfem . La verdad que el secado muy bien 7 días en Malla y a los botes, 40% humedad y 24 grados es la temperatura ambiental que han tenido en el secado. Por lo demás de miedo os la recomiendo. Gracias a DutchFem, Agrobeta y Mars hydro , sin ellos este proyecto no sería igual 🙏. Agrobeta: https://www.agrobeta.com/agrobetatiendaonline/36-abonos-canamo Mars hydro: Code discount: EL420 https://www.mars-hydro.com/ Buenos humos.
Processing
Likes
5
Share
@PETEROG
Follow
Hey guys everything is going great with these ladies all 6 germinated and popped up in 3 days after planting 1 of the six shooters is a lot smaller than its sisters so I've order LEMON PIE from FASTBUDS should be here tomorrow to take its place and I'm going to move the six shooter outside so if you would like to see its journey comment and like bellow ⤵️ The only thing I wish I did differently would of been starting these girls under a cfl or a cheap led to stop stretching but lesson learned if anyone has any question's please comment and thank-you all for your support ✌️
Likes
1
Share
LIGHT SCHEDULE CHAGING (12/12) - (DECEMBER, 15) - FIRST PISTIL APPEAR WATERING 7º - ONLY WATER / 0,5L 8º - FERT/ PH 7,0/ 0.5L 9º ONLY WATER/ 0.5L
Likes
16
Share
@valiotoro
Follow
Hello everyone 😎 Week 5 of flower for the strawberry banana auto from Fast Buds 🍓🍌 She grew fast with beautiful green color,for the nutrient 4ml/L terra bloom & 1ml/L power buds next week i will introduce Green sensation at very low doses from Plagron ✔️ Mars hydro SP-6500 70% Have a nice day 😋
Likes
34
Share
@Dunk_Junk
Follow
She is getting close to harvest, maybe in the coming week I will take a few colas off if I see any amber trichomes.
Likes
22
Share
Usually keep in the shed in the evenings but a rather strong edible made me forget that I left the plant outside overnight.. she was covered in dew in the morning and it was overcast so the sun wasn't burning it off. Because of this, I pulled her maybe 1 week too soon but she was almost done so can't complain. Only downside was I lost 30g + to bud rot during drying 😭
Processing
Likes
1
Share
so week 11.. The gorillaz are carrying on beautifully, however I realised having 5 plants sharing one reservoir is now quite a bad idea.. 2/5 of them look to be well into flower, fattening up and some tri's starting to turn cloudy but look like theres still plenty of fattening up to do. The other 3 are now just beginning to fully pistil up so will still be requiring flowering nutes when I should be beginning a flush on the other 2.. any comment or advice on this would be greatly appreciated!? The Stardawgs have basically grown into tennis balls. Such a vast majority of bud sites all the way down look so much larger than I could ever have hoped and i've had to tie some of the buds to the main colas!! I will Be starting the flush this week as most Tri's are now cloudy i'd say around 4/5 currently but more throrugh macros will be taken as the days progress. The only problem i've had is some of the sugar leaves on 2 of the plants have really taken a beating and show some strange signs. I think the LED's aren't to be under estimated and i've battled some burning and what seems to be calmag issues through the grow.