The Grow Awards 2026 🏆 


Likes
14
Share
@ApothecAries
Follow
I used half the recommended dose of Indo products for each plant through this grow. The monkey juice is half recommended making it every week rather than full dose every two. The sticky bandit was fed with it every week at half dose till later on.
Processing
Likes
1
Share
@MG2009
Follow
09/02/2019
Week 5 of flowering, got really sweet candy like smell,almost floral.
Looks like she getting fatter fingers crossed!
Likes
104
Share
@Schnabeldino
Follow
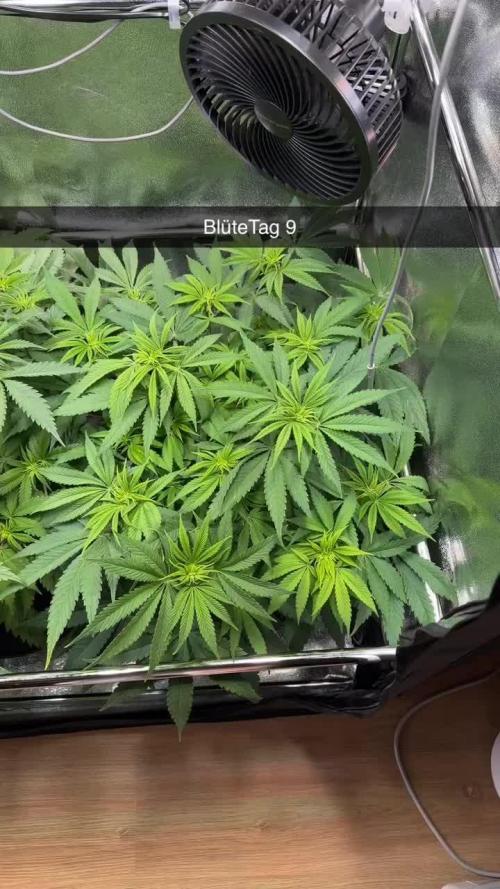
_____ Week 11 | Day 78 - 84 | 4th week of Flower ______
Day 78 & 79🌞
- What should I write... Not much has happened, I leave the plants alone.
- I put my dehumidifier in the tent this week, it starts as soon as the LF rises above 60%. At the moment it is winter with me and the humidity is very low anyway, saves energy
Day 80 🌞💧
- each plant 3 liter
Day 83 🌞💧
- at the end of week 4 I provided them with nutrients again. They have become thirstier and now drink 3 liters every 3 days
____________________________________________________________________________________________
Light - 12/12 h - 560 Watt
- 2x 200 Watt Toplight
- 4 x 40 Watt Lightbars
PPFD - 900 - 1000 µmol
Temp. avg. - 24,4°
Hum. avg. - 58 % RLH

Likes
22
Share
@burnout
Follow
Week 8 of flower. Trichs still mostly cloudy, seeing a couple of amber colors here and there on the bracts.


Likes
15
Share
@Gram_Solo
Follow
Last week of flower 🔥🔥🔥
These 2 are flushing now, flawless finish 2ml pl. They on the 5th day of flush so next we gonna do a dark period for 2 days and then chop and dry for around 11 days.
Smells Amazing! And sticky as fuuuuu
Other 1 has been in the curing jar for about a week
Not long now!
👽👍

Likes
13
Share
@ArtisticGrown
Follow
This week has been great.I'm glad that I was able to pull the plant when I needed to. The weather out here isn't always the best coming towards the end of October. How ever i handle it the best we can. What ive learned to do is wet trim before hang dry. Heres some phots of these glossing nugs. Iknkw ill lose a bitin water weight but im happy none the less. Fire 🔥
This has been a great grow, I learned a lot from Growing out here in new mexico. It was amazing to be able to train these plants 4 into one using training techniques. LST, HST, Defolation & topping all play a roll. It is fun to learn and sharpen my skills.
I hope everyone enjoys my diary.
Thank you so much Divine seeds. I appreciate the free seeds and the friendly community competition 👌
There's a lot of good growers outthere and I wanna learn from all. Much love ❤️ I'll be back with a smoke review soon

Likes
31
Share
@The_Doctor_Green
Follow
Buenas a todos!! Esta semana solo me dedique a regar con agua, la única planta que sigue en pie es la plantada en tierra,las plantadas en macetas se van deteriorando seguramente por algún hongo,pero bueno, con más tiempo subiré esas fotos de esas plantas, una por cierto se quebró y otra se puso toda violeta las hojas y tallos.
Likes
Comments
Share
@Dr_Zauberer
Follow
Day 43-49
Using 60g per l soil. They dont stretch that much. So u can really veg them sooo big in my opinion. I didnt but enjoy anyways!
I think last week i put net in and out. This time it gets in for sure!

Likes
57
Share
@Grey_Wolf
Follow
Looking For A Keeper
cream of the crop seeds purple paralysis
2nd April 2021
First of all ... Phew!!!! That was a long grow!!
I've done all of the Main trimming and have a heap of Jars full of Stinky Buds ready to begin the curing process. 😍😍
It was a challenge growing in new conditions during Summer with Temps often getting above 45 degrees celcius
Thunderstorms and High winds became an issue once or twice and finally the worst part was the Bloody Caterpillars 😣
Those buggers gave me the absolute shits for the last 5 weeks of the plants life .
These plants actually started from clones taken from a Purple paralysis plant that I was hoping to flower last year.
However due to an unavoidable trip away I lost that plant but the clones survived.
So then my plan became to plant them both into a garden bed filled with my soil mix which basically consisted of
locally sourced Red dirt and washed river sand mixed with Cattle manure , worm castings , garden lime and Lucerne mulch.
The Plants thrived thru the summer months and into Autumn and ended up yielding 19 ounces plus Lots of good quality trim.
I love this strain and have definately found myself a Keeper in this one .
I'd really like to get the oppurtunity to try other strains from Cream of the crop seeds and maybe I will before too long.
I wont go into too much more detail about the grow and how it played out , instead I put up some pics
from various stages of the plants progress as they say pictures are worth a thousand words. 😀
Thanks must be said to you all for checking in from week to week and for the likes left I truly appreciate it. 🙏
Well thats the end of my 6 month long diary I hope you liked it and thanks for stopping by 👍👍

Likes
5
Share
@GrowFunMD
Follow
What a world of difference a week can make when growing auto-flowers. I did a lot of maintenance on these girls the last couple of days. See pics and videos. Two of the plants have stretched out nicely. The other three are falling behind, but looking very nice. There is a strong citrus smell happening right now. Smells like I have a tent full of fresh lemons. Started using Big Bud and Bud Candy this past week. Tent 2as getting quite crowded, so I also moved the water reservoir on the outside of the tent. It was very hard to cut a lot of those beautiful buds off the plants, but I think it will pay off. I also got the new Vivosun Grow Cams, so far I like them, but I do have some feed back.

Likes
22
Share
@Mr420
Follow
Day 106 think its ready so cloudy time to chop maybe in a couple of days want more amber Trichomes.
Day 107 turned heater off night time Temps 65° day time Temps 78° see if we can get so nice color b4 chop.
Day 108 nothing. New
Day 109 tomorrow's the big chop day.
Day 110 plant is ready to chop.
Processing
Likes
23
Share
@Gordy
Follow
Week 7(Bloom):
Plant isn’t looking so hot. Not sure what to do really, I think she’s still hungry... I fed her tonight and gave a half gallon of the mixture to her at once. The buds still look really nice, and do seem to be getting bigger. I hope what’s going on with the leaves won’t start affecting the buds.
I upped one of the nutrients this week that by 5ml(BioMarine). I've always kept it at 5ml/gallon, but this week I did 10ml.

Likes
45
Share
@masterofsmeagol
Follow
9/10 Went and shook the plants off. I don't think it rained. I think it's just dew. Plants with ailments seem to be progressing well and it looks like they'll outrun the pathogens. It may not be a banner year yield wise but the quality will be great it looks like. GMO is stacking up real nice. The ones in further flower are swelling more and more everyday. Earwigs MAY be back because I noticed a couple of plants where I left a tiny little branch on the bottom have been lollipopped on tje sherb pie and rather quickly too. I suppose it could be leaves dieing and rotting bit I doubt it. If they are here there aren't many and most plants are too far in flower for them to bother. They eat the lower newly developing shoots. Not big dense buds. Luckily. I noticed some pm on the gmo with pm. Looks like it's time for another treatment of k bicarb. I'll probably do that tonight. I'll keep this updated.
WENT BACK OVER AND DEFOLIATED A BUNCH OF STUFF. ITS TIME FOR ANOTHER APP OF K BICARB. I CHECKED THE SHERB PIE AND IT DOESNT NEED TO BE WATERED. IT WAS STILL VERY HEAVY. IM THINKING I MAY HAVE EARWIGS THAT ARE FEASTUNG ON LOWER BRANCHES THAT SHOULDVE BEEN PRUNED. I NOTICED SOME LARFY SHIT THAT KOOKS LIKE NEW SHOOTS WERE CHEWED. LUCKILY THEY DONT SEEM TO BOTHER DEVELOPED BUDS. ESPECIALLY ROCK HARD BUDS. I'LL DO SOME RESEARCH AND DO SOME FORM OF APPLICATION FOR THE PM SPOTS I SAW AND THE SEPTORIA I KNOW IS THERE. IM SUPER GRATEFUL THOUGH. THESE ARE VERY HARD TO GROW STRAINS AND I THINK ILL KNOCK IT OUT OF THE PARK. Also thinking of switching to cha ching shortly on the toasted toffy and the event horizon that's furthest along.
9/11 I Didn't water anything today because things still seemed heavy. I'm noticing the same thing that happened a few years back. Lower secondary or tertiary branches are getting stripped on a couple plants. They never touch the developed buds they want the new shoots. If IT IS ear wigs they are impossible to fight. I put poison down and d.e. around those plantscand we'll see. It could also be rot from dying leaves. I need to treatcsome of the plants with a longer flowering time with plant doctor. I'm going over today to spend a few hours working in the garden. I'll apply something I just don't know WHAT yet. One event horizon looks like it tried to reveg AGAIN which is super weird . I just see a lot of one and 3 finger leaves. It will probably turn out to be great. The other event horizon looks like its going to be incredible. The toasted toffy is getting close too. Temps only reached 62° yesterday. It took FOREVER to shake these plants off. Time to get the leaf blower out. I'm going to bring my trich scope when I go over today. I wanna look at tgat event horizon. Pistols are retracting on the top flowers. This may be a multiple stage harvest. I'll keep this updated.
UPDATE: WENT OVER AT FOUR AND WATERED. I MIGHTVE BEEN ABLE TO HOLD OFF UNTIL TOMORROW MORNING BUT I HAVE PLANS EARLY MORNING. I ALSO DEFOLIATED QUITE A BIT. BUDS ARE SWELLING CONSIDERABLY. THE SHERB PIE HAS TURNED COMPLETELY PURPLE. IT HASNT HAD ANY FLOWERS ON IT BUT NOW IT HAS FLOWERS BIGGER THAN A QUARTER! THESE PLANTS ARE VIGEROUSLY FLOWERING. I NEED TO CHECK THE TRICHS ON A COUPLE PLANTS AS THEY DONT HAVE MUCH TIME LEFT. AS I WAS DEFOLIATED I NOTICED THAT SOMWTHING HAD STRIPPED FRESH BUDSITES ON SOME LOWER BRANCHES. IN YEARS PAST THATS ALWAYS BEEN EAR WIGS WHICH ARE IMPISSIBLE TO DEAL WITH. THEY USUALLY DONT TOUCH THE BIG BUDS THOUGH. TJEY LIKE THE FRESY SHOOTS. ILL GO OUT AT NIGHT AND SEE IF THIS IS THE CASE. ITS ONLYVHAPPENING ON A COUPLE PLANTS BUT STILL. THE EVENT HORIZON IN THE MIDDLE IS GROWING DIFFERENT THAN ITS SISTER. YOU CAN TELL THE STRAIN IS THE SAME BUT THIS SEEMED TO REVEG (AGAIN) BECAUSE IM SEEING SMALL FULLY DEVELOPED BUDS THAT I DONT REALLY SEE CONNECTING. CRAZY TRICHS THOUGH. IT WILL BE INTERESTING TO SEE HOW IT COMES OUT. I TREATED THE GMO WITH WPM WITH A QTR GALLON OF K BICARBONATE FOLIAR SPRAY WITH A DROP OF DAWN FOR A SURFICANT.
9/12 Shook everything off and then used the leaf blower to try to better dry them. Weather is lookingvyo be good for the next couple weeks. Perfect finishing weather for my two that are furthest in flower. I may have to do a staged harvest. Some BOTTOM branches on e.h. are FAT and have trichs on trichs. I'll have to use my scope. I'm switching to cha ching next feed for the three furyhest in flower. Maybe four. The sherb pie had NO flowers last week but it's exploding with really compact buds. The whole plant turned purple. I need to be careful of botrytis with this weather. I've been pretty good about leaving and removing any dead or dying leaves. Even the plant in the ten is filling out nice. I have SOMETHING (behaving like earwigs) and eating "fresh" shoots. It's like lollipopping the new growth on a couple plants. I'll becstaying at the grow from now forward so I'll go out tonight and see what I found. The poison I put down seems to be gone. Anyway I'm very grateful for what I've got. I'm update as I go.
9/13 It's sprinkling a half hour trom my grow. I think it's supposed to be nice though. I found some botrytis on two plants. Two are so close to finishing that I need to closely watch them. I don't want botrytis. I applied k bicarb to the middle gmo as I saw a spot of pm. I spent a ton of time defoliating. This cold weather has brought the fade much faster. Trichs are looking good.
WENT THROUGH THE PLANTS AND DEFOLIATED A SHIT TON. APPARENTLY THIS EARLY FADE IS NORMAL THIS YEAR. AT LEAST IN ALL MY CANNABIS GROUPS. WENT THROUGH EVERYTJING! STILL HAVE THE MIDDLE EVENT HORIZON I WANT TOO TIE DOWN BUT I DID A LOT OF DEFOLIATION. THIS ALLOWED ME TO FIND A FEW PIECES OF BOTRYTIS. ON MY PLANTS THAT ARE ALMOST DONE. WE HAVE GOOD WEATHER FOR A LITTLE BIT BUT I MAY HAVE REACHED DIMINISHING RETURNS ON A COUPLE. THAT E.V. AND THE TOASTED TOFFY I DONT WANT GETTING WET. THEY ARE TOO DENSE. TRICHS ARE ALL MILKY AND THEYRE SWELLING. IM SLEEPING ON IT BUT IM ALMOST POSITIVE IM GOING TO DO A SELECTIVE HARVEST ON THOSE TWO. IM NOT LETTI G SHIT ROT AND AGTER LOOKING AT THESE UNDER A SCOPE I WOULDS TAKEN THEM YEARS AGO. GMO IS FROSTY AS HELL. EXTREMELY ARONATIC GARDEN. ILL KEEP THIS UPDATED.
Decided to hold off feeding and watering. Defoliated a shit ton throughout the day. Around five I noticed that my shittiest GMO with the yellow leaves had a couple dead interior branches. Upon closer inspection it looked like grey mold. A few tiny buds were destroyed but the branch needed to be removed. Jot any big loss but if it's in the shit that doesn't matter than it's around the shit that does. Found info on event horizon flowering time. Middle of September until middle of October. That could be why I'm seeing coke cans on the bottom branches of that phenome. I've got some decisions to make. I mixed up enough water to water in the morning. I'll mix up feed in the morning. Tje garden has gotten a lot of attention lately. I hope it pays off. I'm leaning on a multi staged harvest of the event horizon amd toasted toffy but we'll
9/14 Hurries morning. Mixed water for this morning last night. WATERED AND FED EVERYTHING (BUT TOASTED TOFFY AND EVENT HORIZON #2 DUE TO THEM BEING CHOPPED SOON.) Everything got a gallon of water and a qtr of food. I had to cut a couple small interior secondary branches on my shottiest GMO due to the appearance of grey mold. I also found some botrytis in both the event horizon and toasted toffy that I plan to take the tops of today. I scoped them and I'm planning to do a staged harvest. Trichs are milky with some amber. Everything is blowing up! I'm not sure what's happening but like it previous years there's a couple plants with leaves dieing near bud sites and an overall yellow appearance. Maybe it's late stage septoria. I cant isolate it due to local laws but if I have to I'll deal with it. Nothing else had anything like that. I hace noticed SOMETHING nocturnal that can eat a small branch and leave it bare. Also eat the small newly forming shoots at the bottom of plants. I shouldve taken off ALL the larfy stuff as it draws bugs but I did things a like different with each plant this year. I'm going to go through the plants again today and I'll update what I decide. Chances are the top half of those two plants are coming down. I'll do a video.
9/15 I'll have to add pics and videos tomorrow. Last night I did a final check of the trichs on event horizon #2 and toasted toffy. Everything looked great so I proceeded to do a "wet trim" outside (ill use the leaf blower to clean up) and cut the tops off the plant. I know this injures tje plant but it also makes them go crazy thinking they are dying and the buds and trichs swell. I had one plant last year I got two harvests off and a bunch of fresh frozen for concentrates. I looked this morning and I madecthe right decision. These plants are DONE. I've got another event horizon but it's not quite there yet. I'm going to leave it as long as I can. If the injured plants pick up pm or something (already had septoria) then the flower will be used for extracts or I'll do a Cervantes wash. I imagine concentrates though. One GMO isn't doing as good as the rest. Yesterday I had to cut three branches off due to grey mold on the stalk. If laws allowed it I'd isolate that plant. Luckily since I spend so much time going through the garden I'm able to find this kind of stuff. The GMO'S look wonderful (even the one with some yellow leaves that I cut the branches off) . K bicarb has kept pm at bay so far. This strain has TONS of trichs. It's like trich on trich on trich. I can't wait to try it. It smells amazing. Sherb pie is completely purple with rock hard buds that smell amazing. It's quality over quantity this year. The big one in the 50 (I think red runtz) is swelling more everyday. I'm going to switch to ch ching soon. The plant in the 10 had TOTALLY SUPRISED ME. I've never grown a plant lime this. It started out with dark purple in the middle now buds are swelling and calyxes are EVERYWHERE! This plant is growing extremely fast! You'll see what I mean when I put the pics and the videos up. I'm not going to do the event horizon harvest until I get both plants and all of both plants. It will be a while before I finish the toasted toffy one as well.
9/16 I'm glad I took those plants. Weather is good but plants were soaked thos morning. I need to go out at night and see what is eating new shoots. Flowers are looking great. I need to do another app of k bocarb sometime. I'm suprised the pm has pretty much stayed with that one plant. That two other GMO's flanking it are doing awesome! Purple, sticky stinky. It's got the whole package. The one in the 50 has some huge flowers that won't require much longer. The one invthe 10 has some time left. This is clearly a sativa dominant hybrid. The buds are swelling like crazy. It went from NO buds to having little purple calyxes to flowers that look like cat-tails! I can't wait to see what rhis year brings. Once I get things dry and manicured I'll give you guys a look at how the first stage of the first harvest went. I'm super happy. Spent a large part of this morning shaking plants by handcand removing any dead leaves or anything that could cause rot then I went over them with a leaf blower. I'll need to water tonight I imagine.
WATERED AROUND 3:00 PM. MY FAVORITE GMO STARTED DROPPING. WATERED EVERYTHING A GALLON EXCEPT I SPLIT ONE GALLON ON THE PLANTS THAT HAD BEEN CUT. IM EXTREMELY TIRED BUT I NEED TO GO OUT AT NIGHT AND SEE IF I CAN FIND EARWIGS CRAWLING UP THE STALKS. WEATHER STILL LOOKS GOOD. BUDS SWELLING PISTOLS RETRACTING AND MORE AND MORE LEAVES DYING. I CANT BELIEVE THE SIZE OF THAT SATIVA LEANING HYBRID IN THE TEN!
Likes
12
Share
@GrowPro3500
Follow
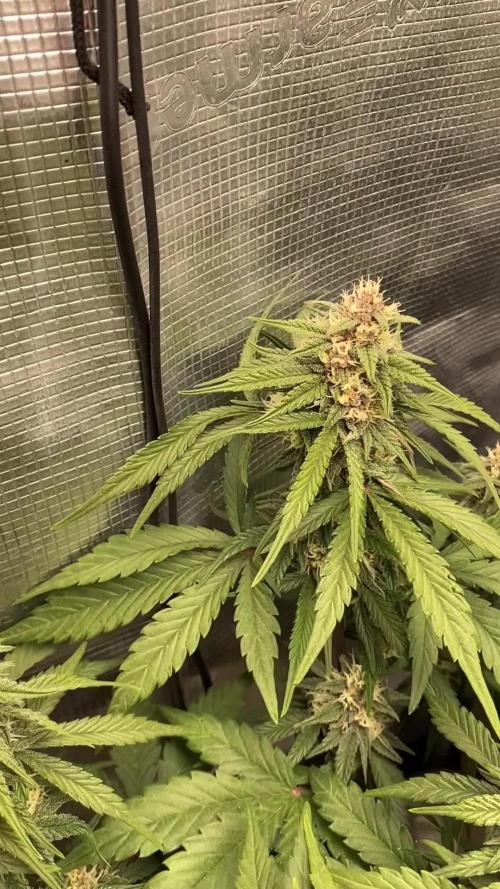
I’m shook — I nearly killed her when she started herming.
A mate was like, “cut the sacks off and give her a chance,” and thank god I listened — these are the densest buds I’ve gotten off autos so far. Fingers crossed she didn’t throw any micro-seeds.
This plant keeps surprising me — spoil her and she acts up, neglect her and she spits out stuff like this. I don’t believe in anything anymore.
Likes
5
Share
@TheGreenDisciple
Follow
Week 10...The plants are looking good! Took out the microscope to look at the trichomes...Starting to get milky but still another week or two before the harvest! Started flushing the plant this week!

Likes
10
Share
@LowzGrowz
Follow
Was Easy Going No Issue
Smaller side but didnt do much just let her go
little over water @ Times from all the Rain was having...
but she handled it

Likes
202
Share
@CrazyHorse
Follow
Hello folks 😇 💪 🙏
This was very busy week for me, so I'm sorry for not updating my adventures like I was doing it in last two and half months 🙃
Original Cinderella and Bruce Banner are on last step before flush, drinking now only regulated water ph 6.2 😁
Purple Lemonade is already in the jar, this is a real hitter. Putting you in that mellow mode in to the sofa 😇
Have a good night, You Lovely Girls Growers 😇 💪 🙏
Likes
71
Share
@ClubRiot
Follow
Zkittlez Feminized by Club Riot Seeds ( www.clubriotseeds.com )
Week 1
0.5L Pot
LED: MIGRO 200 (210W) for Veg. Stage
Canna COCO
Seeds are put at germinated in wet paper towels for 72 hours
Name: Zkittlez Feminized
Genetic: Grape Ape x Grapefruit
Type: Feminized ( Indica Strain )
Indoor Yield: 80 ~ 140 grams/plant ( 15L Pot ) with LST growth technique.
Indoor Height: 70 ~ 110 cm
THC: Very High
CBD: Low
Flavour: Grape , Sweet , Berry .
Effect: Relaxed , Happy and Euphoric.
