
Likes
Comments
Share


@BillMonroe
Follow
Harvest update in 2 weeks or so :)
I wanted to let them go a bit longer but the mildew was going to take over so I chopped the plants and rinsed them in water + H2O2.
Lots of lessons learned ... Lots of bud hanging on the vine. Good luck to everyone


Likes
17
Share


@hachiko
Follow
Finally we arrive to last week, plants seem very healthy, no signs of budrot. I think apart from my humidity issue which is under control now, it all went well, didn't have any insects or deficiencies.
Temperature outside is going up really fast so inside my tent is already hitting the 31c at peak time and I grow during night time.
I will feed a light dose of florakleen on next water and just water at least 2 times more with plain water before harvest, so I may extend this week a little bit.

Likes
17
Share


@Fat_Olsh_Farms
Follow
Day 30. Continuing general Hydroponics maxigro every other watering. Half the recommended dose, til 15% runoff.

Likes
17
Share


@CanadianFillmore
Follow
Flush time for divine storm and mandarin dreams. These ladies are frosty and sticky AF! Just insane how sticky they are and the frost is like light snow, my camera just doesn't do it justice.
The Mars-Hydro TSW2000 has blown me away over the course of this grow. It's definitely a high quality light and has delivered impressive results so far.
Thanks for stopping by growfessors! 👽🌳💚


Likes
25
Share


@GangbudsGenesgdl
Follow
19/01/21. segundo dia de sesunda semana de floracion, hoy le pode algunas hojas grandes para que le pegue mejor la luz en las partes bajas
le aplique un poco de insecticida organico para araña roja encontre algunas hojas con la plaga
22/01/21. hoy se aplico riego con nutrientes organico de Rootz.mx se aplico magnaflor y forzasilicia
MagnaFlor. Estimula la floración.
100% orgánico.
Contiene biocatalizadores que serán rápidamente absorbidos por las raíces de tus plantas. El comienzo de la floración será explosivo.
24/01/21. le puse un poco de insectisida organico por que le e notado muchos acaros araña roja, cierre de semana

Likes
44
Share


@Cogollo_eu
Follow
**Encontrarás la traducción a español al final de la descripción**
From/Desde: 17/05/19 || To/Hasta: 23/05/19
From day/Desde día: 85 || To day/Hasta día: 91
You can find the Money Maker Diary here:
** Podéis encontrar el diario de las Money Maker aquí:**
https://growdiaries.com/diaries/25667-gorillamakingmoney-gorilla-vs-money-m
-----IMAGES & VIDEOS-----
1 - Overview of the main Gorilla with the Man-lining applied
2 - Overview of the Gorilla affected by CO2 excess at root system
3, 15 & 16 - Top candy present in 3 tails, 2 Gorillas & 1 Money Maker
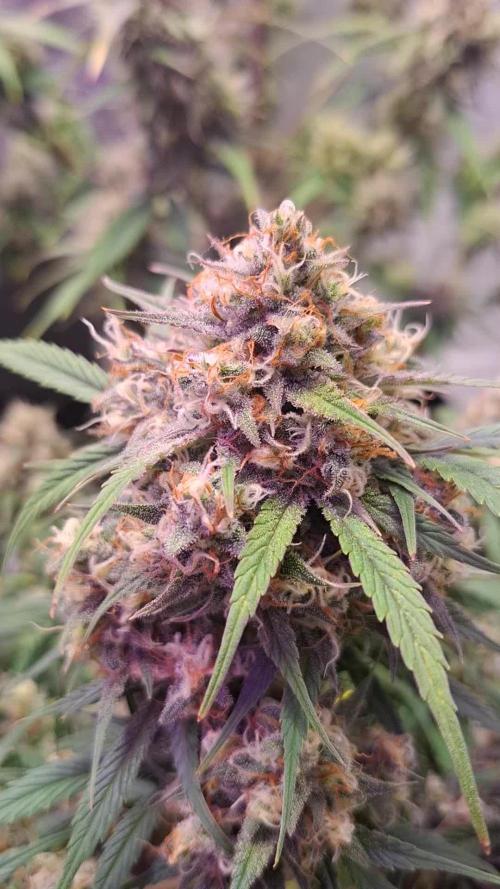
4 - Colorful Trichomes 😱😱😱!!, Yellow, Orange, Red... Fucking Delicious!!!!
-----WEEK SUMMARY-----
The buds still fattening day by day, more than I expected seeing the final thickness of the stems. The next week the branches will begin to bend by the weight and I will have to tie them.
As you can see the crystal concentration in the buds is awesome, looking at them natural they seem much more populated with crystals than in the pictures.
Smell is very intense. All my house smells a bit, but as soon as the door of the room of the plants is opened, the whole house starts to smell intense instantly.
-----WATERING CALENDAR-----
17/05/19 - 1,5 l with All week nutrients -(Senizym, Pk Booster, B52 & Nirvana) @ PH6.4 & 2.4 E.C.
20/05/19 - 1,5 l with All week nutrients -(Pro Active, Rhino Skin, Bloom Stimulator & nutrition) @ PH6.4 & 2.4 E.C.
23/05/19 - 1,5 l with All week nutrients -(Senizym, Pk Booster & Nirvana) @ PH6.4 & 2.5 E.C.
*****ESPAÑOL*****
-----IMÁGENES Y VÍDEOS-----
1 - Visión de la Gorilla principal con man-lining aplicado
2 - Visión de la segunda Gorilla acfectada por exceso de CO2 en el sistema radicular
3, 15 & 16 - Caramelo superior presente en 3 colas, dos de Gorillas y una Money Maker
4 - Tricomas a todo color 😱😱😱!!, amarillo, naranja, rojo... Jodidamente delicioso!!!!
-----SUMARIO SEMANAL-----
Los cogollos siguen engordando día a día, más de lo que esperaba viendo el grosor final de los tallos. La siguiente semana las ramas van a empezar a doblarse por el peso y voy a tener que ir amarrándolas.
Como podéis ver la concentración de cristales que presentan los cogollos no es ninguna tontería, realmente mirándolas al natural parecen muchísimo más pobladas de cristales que en las fotos y ya es decir.
Con respecto al olor es muy intenso, huele un poco toda la planta de la casa, pero en cuanto se abre la puerta de la habitación de las plantas, toda la casa empieza a oler al instante.
-----CALENDARIO DE RIEGO-----
17/05/19 - 1,5 l Con todos los nutrientes semanales -(Sensizym, Pk Booster, B52 y Nirvana) @ PH6.4 & 2.4 E.C.
20/05/19 - 1,5 l Con todos los nutrientes semanales -(Pro Active, Rhino Skin, Bloom Stimulator y nutrition) @ PH6.4 & 2.4 E.C.
23/05/19 - 1,5 l Con todos los nutrientes semanales -(Senizym, Pk Booster y Nirvana) @ PH6.4 & 2.5 E.C.

Likes
2
Share


Likes
12
Share


@NONSENSE
Follow
Hi.
I have good news - my plant began to bloom after 2 weeks of vegetation.
This is good news and you can already see small flowers
The smell is minimal - a little mint with sweet aromas.
All branches are covered with inflorescences. I am very happy with the fast flowering.
Now I will do defoliation of large leaves.
I will add more Blooms and PCs to plant diet this week. i will keep light same 18/6.
PPM: 550 - 650
PH: 6.30 - 6.50
Likes
3
Share


@GingaNinjaGenetics
Follow
She's doing amazing this week. The smell is really starting to come through nicely now and the buds are starting to fatten up. Should be another 3 or 4 weeks until harvest now :)
Likes
6
Share


@CalGonJim
Follow
8/26 Monday morning 12am They are doing good. The camera fell into a plant...so lucky it didn't hurt the plant..that never happened before. My grow is HAUNTED!!!! Dark Devils are doing pretty good. All the others are great. I need more dirt in Blueberry Auto by Seedsman I'll do top filling later this week.
2am got the microscope 👍👍👍👍 I swear she is like a pet and she’s playing dead with her tongue hanging out. It’s hilarious. I’m really enjoying this one. This is gonna be a lot of fun.👻👻👻👍👍👍👍. 11 am I ordered a new microscope!!!
8/27 Dark Devil looks pretty cool. All other plants are doing just great!!
8/28 turned lights up to 52 looking good 4/28 Dark Devil Auto Monster crawls out of Hell!!!! Dark Devil Auto looks like the war boy that figured out Furiosa stole the War Rig. !!!!
I put a light tent over Dark Devil monster. I will need to trim the roots and make sure the trays aren't in standing water. Blueberry is in mostly Perlite doesnt take up water the same.
New microscope nice picture but no zooming in, I got the kind with the wider mouth, narrow mouth is better getting close to plants.... after 2 years I just NOW figured out the plastic cover comes off?? not the lens cap....im retarded there's just no other way to explain it
8/29 She's ALIVE and wow! got some amazing pics a little blurry and shaky but Dark Devil Auto by Sweetseeds is the coolest thing ive seen. Doing the seed surgery worked.
8/30 Some amazing progress on the Dark DEvil. The others are great Medusa F1 is the strongest followed by Gorilla Strawberry. The lights on the right side of the Mars Hydro light dont seem to be as strong as the ones on the left is ill rotate the plants today.
8/31 5 am lights up to 55 Watts. They are doing good. RSQ Medusa F1 showing the strongest so far, not a surprise there! Fast Buds Straw Gorilla taking off strong next. Pink Kush CBD and Blueberry Auto by Seedsman up next and surviving in almost all Perlite. I will put more dirt in when she gets taller. Dark Devil is going steady and very strong just amazing.
9/1 Growing nice now I will top them all above the 3rd node to keep the grow small


Likes
26
Share


@Mr_und_Ms_Lue_Roots
Follow
Herzlich willkommen in Woche 7
Im Moment sieht es sehr GESUND aus ^^ 😀
Der mS- Wert von 0,8 zu Anfang, war schon echt knirsch 😅 Gestern gemessen war der Bodenwert bei 0.7 mS
Daher haben wir die letzten 2 Tage erstmal mit PH- angepassten Destiliertem Wasser gegossen. Trinken tun sie wirklich gut. Düngen tun wir aktuell nicht.
Insgesamt freuen wir uns auf die kommende Woche und wünschen somit allen eine angenehme und erfolgreiche Woche!
VG ✌️
Likes
6
Share


@Beanz2Budz
Follow
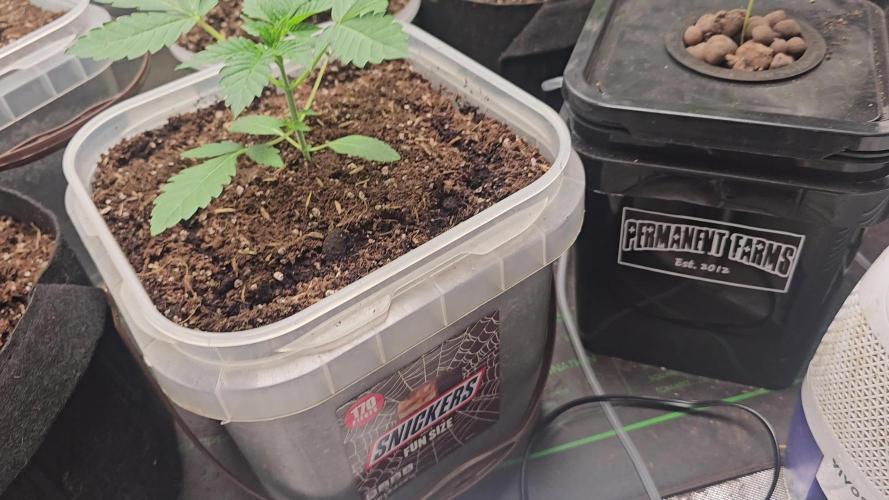
These were brought on from seed planted straight into plastic 1litre containers and keep in the environment for around the first 3 days before transplant into their final pot.

Likes
5
Share

@Chef_LA
Follow
Kaum noch Wachstum nur die Buds werden etwas größer. Leider wieder starker Trauermücken befall. Werde Neemöl verwenden aber denke bis das wirkt habe ich geerntet. Ca. 2,5 Wochen dann müssten sie soweit sein. Die Pflanze mit dem eigen hergestellten Dünger musste ich mit kommerziellen Dünger behandeln da sie doch einige Mangelerscheinungen hatte. Jetzt weiß ich aber worauf ich nächstes mal achten muss.
Ja und jetzt bloß keinen Fehler machen😉
Processing
Likes
10
Share


Likes
21
Share


@BB_UK
Follow
Was supposed to update my diaries yesterday but literally forgot lol #edibles but they’re flowering nicely and stretching as they go! They’re truly loving life under the ts1000 can’t wait to see what the next week brings!
Likes
8
Share


@zombikush81
Follow
11/05/19 # Friends, 50 day of flowering. So far I have not encountered any problems, fantastic genetics .... and I am really excited to see the final result. Thanks to all the friends who follow me .... peace & love
Likes
12
Share


@ItsCannaDog
Follow
Strong smell coming out of the cabinet. We started our flush going to start flushing for 2 weeks and then harvest

Likes
22
Share


@CenturionGrower
Follow
26/07/20 (Sunday)
Plants were starting to exhibit signs of light burn so I switched back to the 75W bulb. SVG never seemed to recover from having it's cotyledon damaged so I decided to take a risk and fed all of the seedlings 20-20-20 nutrients except the D.R. which I thought would've suffered shock, so I just watered it.
27/07/20
Decided to mist the plants with a homemade pesticide mix today because they're readying to be introduced as full time outdoor plants in a week or two so their sun basks are getting longer.
28/07/20
Noticed what looks like new growth from the first true leaves of the SVG, fingers crossed it's making progress.
29/07/20
The new growth from the SVG has split into two on both sides leading me to theorize that it's abandoned it's main stem (for now at least) and started two new stems. All other plants are working on new nodes and are showing a steady growth of .5cm a day. I've decided to revert to the 100W bulb because I believe I've misdiagnosed the light burn.
30/07/20
Today I left them outside for their longest sunbask to this point; 7 of their 18 total hours was provided by sunlight. The SVG now has two new 3-leaf true leaves on each new stem confirming my theory. Also starting to see signs of a minor mite problem on one of the leaves of my TT plant (Though it's new growth that wasn't sprayed with my homemade concoction.)
31/07/20
New growth has already begun sprouting from between the new true leaves of the SVG with no visible progress on the 'abandoned' main stem. Also had a power outage for 2 of the plants 18 hours.
01/08/20
Today the plants again stayed out in the sun for longer than previously making 8 hours in direct sunlight. I've decided to keep them in the grow tent for a further week because when I went to retrieve them the Jam was blown down flat by winds and had started to grow bent towards the light, so I doubt it's stem is ready for that daily beating. I raised the soil level and massaged it back into shape and it seems to be back on track. The D.R. is slowly beginning to bounce back from being stunted in the seedling tray and from it's third node (from the bottom up) of 3 leaf true leaves has turned into 5 leaf leaves. The SVG has made a major recovery and seems to be on it's way to even surpassing the others by the end of the week. The TT is officially the sturdiest of the younger seedlings and it's growing right behind the Jam in terms of node development. All in all this week was an overall success growth wise and I'm looking forward even more to week 3.
Likes
7
Share

@Samsationalseeds
Follow
Week 3 most of the photos are in the plastic containers to grow in before being transferred outside


Likes
25
Share


@XperencdGmanXG
Follow
Well these girls sure have grown since my last update. They are coming along nicely I will have to LST them hard or put them outside, This strain is a monster!.
