Likes
Comments
Share


@Earthling37
Follow
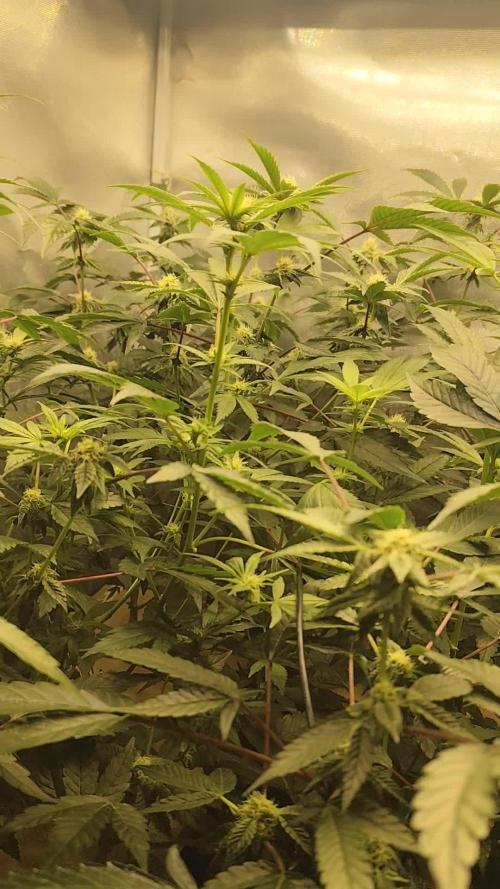
58 Days have passed in flower.
Cheese left, Gorilla Girl right.
The "Just water no pH" experiment has failed me around week 5 of flower.
I have not done anything to keep the soil biology alive so thats probably the issue.
Its all good though, it was fun while it lasted and definitely worth a try.
I have let the soil dry as much as possible and then i watered in a tablespoon molasses per gallon water.
pH'd to 6.6.
I just need atleast 3-7 more days of flower and hopefuly the buds will mature a little more.
I took a snip of the bottom leafs to check for trichomes maturity, those are the weakest of trichomes on the plants.
---1st time growing with FLO - Florian Living Organics.---
They claim that there is no need to pH when watering and that their living fertilizer is the only thing that i will need throughout the whole grow so i only need to mix with soil and just water with plain water.
If this stuff works then it can simplify my future grows ALOT!
Happy growing. 😎


Likes
7
Share


@Dairon
Follow
Día 24 de crecimiento, voy a trasplantar a macetero de 3l para ocupar todo el area de cultivo, haciendo SOG. en pocos días pasaré a floración, previa poda apical para estimular el crecimiento y aumentar la producción, debido a que las sativas del armario de floración van a tardar bastante, voy a experimentar un poco y dejarlas donde están, a ver que sucede al pasarlas a floración y como se comportan bajo luces con un espectro de crecimiento (led citizen 4000K). Cuando trasplante, usaré micorrizas para estimular la vida microbiana del sustrato y pulverizo con acti vera y Alg a Mic para que sobrelleven mejor el estrés de trasplante, buenos humos!!!👌👌😃
Likes
36
Share


@Roberts
Follow
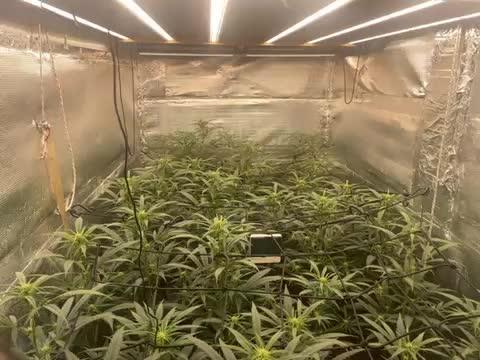
Now 14 days into light schedule change. She has been growing good under the Spider Farmer G3000 light. I am running at 65 percent on the light for the moment. Everything is looking good. She should have some pistils by next update. Thank you Spider Farmer, and Amsterdam Marijuana Seeds. 🤜🏻🤛🏻🌱🌱🌱
Www.amsterdammarijuanaseeds.com
Thank you grow diaries community for the 👇likes👇, follows, comments, and subscriptions on my YouTube channel👇. ❄️🌱🍻
Happy Growing 🌱🌱🌱
https://youtube.com/channel/UCAhN7yRzWLpcaRHhMIQ7X4g
Spider Farmer G300w: https://amzn.to/3S2zvsd
Spider Farmer 10X20 Heat Mat Kit - https://amz.fun/lsa0J
Spider Farmer Amazon Store: https://www.amazon.com/spiderfarmer
Spider Farmer Official Site: https://spider-farmer.com
Discount code: saveurcash

Likes
33
Share


@Belverde
Follow
Welcome growers
We are at the end of week n°3 in flowering for these two BLUEBERRY CHEESECAKE 🍰
The flowers are developing quite well on both and I can already perceive the classic blueberry notes of these varieties..
Even the trichomes are already quite evident 💯
The color of the leaves (the remaining ones) tends to be classic green, without blue-violet hues
I still giving their always organic/veganic nutrients..
And yes...
As seen in the video, the most evident thing these days was a massive defoliation ✂️✂️🍃🍃🍃🍃
Honestly, I never use such an aggressive technique..
This time I decided to practice it on all the plants I have in the garden (10 visible in the diaries + 8 regular all female) out of pure curiosity to see how each of them will react
It's a bit of a controversial method, but it's trying and seeing what happens
Let's hope so 🍀
I immediately start a more massive fertilization..
Next week we will see how they will be 😉
About nutrients 👇
I still giving their always organic/veganic nutrients..
A little bit of silicium (Bionova) / Crescita (Biomagno) / Activera (Biobizz) / Grow vegan (Bionova) / The Missing Link (Bionova) / X-Cell (Bionova) / Bioheaven (Biobizz) , a little bit of P-K 3-5 (Bionova) /Fioritura (Biomagno) / Bloom vegan (Bionova) and now i have introduced Biomassa (Biomagno) and Florastimo (Biomagno)
Basically these nutrients contain primarily NPK in organic / vegan form + kelp extracts, humic and fulvic acids, amino acids, aloe vera, potassium silicate, beneficial bacteria and fungi
Like i usually do with liquids nutrients, a little bit of everything at any watering 💧
See you at the end of the first month in bloom 🌻🌻
Thanks for stopping by 😎👍👍
FC ✌️
🇮🇹

Likes
1
Share


@GreenSunrise
Follow
flowers really packing on weight this week. I've had to tie up supports and stripped off quite a few of the older fan leaves. I've started the flush this week to go with the strain timings. any flush advice would be appreciated.

Likes
8
Share

@carlitoshaze44
Follow
Así es como empezamos la tercera semana,seguimos con humedad alta pero la vamos controlando..
Estos días da buen tiempo la humedad en la calle será mucho más baja así podré meter aire sin tanta humedad..
De momento todo bien en el cultivo ningún problema hasta la fecha.
Ya podéis ver,y comentar sobre algo que veáis que yo no!
Como dicen! Ven veinte ojos mejor que dos!
🖖
Día 12
Último fungicida prevención mutritis,hongos
humedad.
Primer riego foliar hormonas producción de flores.
🌹
Día 13
Nada en especial solo observar si veo algún cambio tras las hormonas,aún no veo grandes observaciones fuera de lo natural del paso de los días.
En el día de mañana por lo que me recomendó el fabricante se verán los resultados a la vista!
Comentar que seguimos con la iluminación al 100x100 de capacidad
Marshydro sp3000 x2
Hero led Ignator t720
Yxo led 60w ir+un espectro completo
En la siguiente semana me llega el nuevo driver de philips para poder conectar la lámpara de IR que pude adquirir a Yxo nuevamente! Lampara led espectro completo + IR 70w .
Me vendrá muy bien para el pequeño espacio de la puerta que necesita más iluminación para poder desarrollar bien esas dos plantas,de la entrada.
La humedad fue cosa del pasado.
Evite el uso de desumificador eléctrico añadiendo varios de sales,deciros que funcionan muy bien no dan un control exacto pero mantienen una humedad interior estable para todo el periodo de floración!
50% de humedad lo demuestra!
Hoy añadi un poco más de sustrato. 110 litros exactamente sobre la cama de cultivo que tenía de topcrop con humus de lombriz,tierra diatomeas y alimentada con npk.
Después de eso tengo en mi cama de cultivo 810 litros de sustrato para mis 44haze. 💐
Saludos
Día 14
Anulado el intractor,ya que el propio extractor mete aire fresco por las rendijas de ventilación..
En lo largo de la noche iré viendo el resultado en datos..
Ya coloque los soportes para la nueva iluminación que en estos días llega su driver de sustitución
E visto que algunas plantas en estos dos días están en 67-70cm..
Ya colocado el sistema de riego para evitar más pisadas en el cultivo ya que algunas se realentizaron por pisar encima de sus raíces..
Le e metido una pequeña poda de bajos para airear más la zonas bajas del cultivo.
Pequeño riego de folacion con remedio de agua azúcar para dos que estaban más estresadas.
Día 15
Hoy era día de regar pero el sustrato aún parece húmedo en gran proporción aplazare el riego.
Día 16
Hoy me acerqué a ver las niñas en caso de que necesitaran algo..
Se ve todo correcto parece que no tienen mucha sed.. llevamos todo el día de alta humedad y lluvia en el exterior..
Las dejaré hoy sin riego también.
El sustrato está bien alimentado.
Mañana seguramente se presente el armario con una plantación pidiendo agua a gritos!! Jejeje.. así comerán con más ganas!,veremos qué tal..
Dia 17
Perfecto,las plantas se han mantenido muy bien para estar el sustrato ,prácticamente casi seco..
Se le aplicaron 32litros a la cama de sustrato con el riego de goteo
Y la humedad se ha mantenido bastante bien .
Una vez termine el riego la temperatura en el armario cayó considerablemente,llegando este a 16 grados.
Una vez se cierra todo vuelve a sus parámetros controlados de 23/24 grados.
Día 18
Hoy es el quinto día de la tercera semana,aplique el riego ayer en proporción de 850ml por planta.
La humedad subió por unas horas a 62%
Después de las 24 horas del riego el área se encuentra en un 55%.. esta noche llegará a el valor determinado de 48/50
Las plantas están desarrollando las formaciones
de flores muy rápido!
En unas semanas veremos!
Likes
15
Share


@YouCannaBlowMe
Follow
Seems to be taking well to being moved to the 5gal pot. Growing a lot faster after the 2nd day in the bigger pot. Watered for the first time since planting in big pot after 5 days with 1L distilled water (Ph 7) mixed with 1/2 tsp. fox farms grow big and 1/2 tsp. big bloom. Since my soil is considered hot soil I wanted to use less than the recommendation on the bottle.

Likes
11
Share


@pegonter
Follow
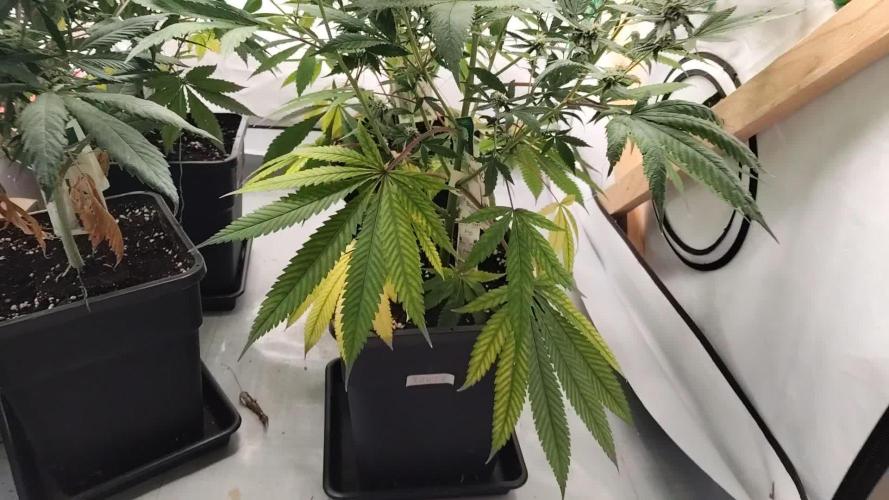
Beginning of week 7 plants faced a severe heat and dryness wave reaching 26°C and 35%hr however irrigation time (and volume) were fast adjusted and the problem was solved. Plants didn't got affected by that as seen.
One of 3 early skunks presenting yellowing on leaves and will be chopped soon. Other 2 might wait some more days.

Likes
6
Share

@Mati_86
Follow
erste mal fast buds mit der rainbow melon aber bin begeistert. werd wieder bei 420 ordern 😀


Likes
39
Share


@Silverback_Guerilla
Follow
10/19:
I fed today. Only one plant has any signs of deficiency..an Orange Sherbet that needs more Mg than everybody else.
Serious stink now! Wow..gonna have to order another carbon filter..
I shot a little video of the soil remediation amendments I'm using these days. This will be the first time I use the Coast of Maine Lobster Compost. I usually use a different brand with added biochar and mycorrhizae, but I wanted to see what all the fuss is about the efficacy of lobster compost.
Recipe:
About 50 gallons of soil, previously flushed with TPS Liquidsoil to re-establish the microbial population.
1 cu ft - Coast of Maine lobster compost
15 lbs - Earthworm castings
4.5 lbs - Microgrow granular inoculant
4 lbs - Bokashi
4 lbs - Dr Earth Veggie, Tomato, and Herb organic fertilizer
2 lbs. - Nectar for the Gods - One Shot granular fertilizer
2 lbs - granular humic acid plus molasses
1/2 lb - texas greensand
1/2 lb - azomite
1/2 lb - dolomite
10/20:
Halle Berry(Blackberry A) is getting soooo fat..maybe 20" in circumference!
I spotted another couple of nanners on the Strawberry Pie and decided to leave them to do their thing..might be some very interesting hybrids as a result.
It occurs to me that it's almost time to start germinating the next batch of beans...👍
10/23:
Fed them and rotated the edge plants. Switched to Cha Ching.
10/24:
Halle Berry is foxtailing a bit ever since I upped the wattage in the tiny tent. She's fading nicely..I'll probably flush her towards the end of next week.
I started germinating the next batch of beans today, so I'm gonna need these bitches to hurry the fuck up now..
10/26:
Fed them and rearranged a little bit. I dialed back the ONE, increased CaMg and Sweet & Sticky. I flushed Halle Berry with 8 gallons of warm water and LiquidSoil. She's ripe, but I'll let her go another few days.


Likes
54
Share


@rhodes68
Follow
1/29 Week 5
Nothing but the kind of problems I asked for, some white tips that mean an increase of runoff is needed.
Half expected to see this as I have been varying the amount as a learning experiment. Will up to 20% for a few days
In addition will be reducing nuets slightly keeping cal-mag as is until reason to change presents itself.
Will be kind of boring the next couple of weeks at least till they get into the big tent.
1/30 Aeryn now at 15 inches
Runoff at 40% and nuets reduced to lower pot EC
Ive tossed out my old bottle of Cal-Mag I think its turned on me as these white tips did not appear until it was folded into the feed.
Just no way this dose of nuets is causing the tips to show burning.
2/1 Major defoliation last night at lights out.
Removed perhaps 25-40% or leaf mass on all plants to allow them to stay in the tent another two weeks.
It was time to learn the process anyway, took a compromise path to doing it, some recommended taking more some less, hey sounded good to me.
Plants doing very well after defoliation except for those aggravating white tips, going to be reducing Cal-Mag again to 1ml/gal and keep CT at 5ml/gal taking C-M to zero based on what I see.
2/2 Dropped Cal-Mag from feed, want to see if that has anything to do with those white tips.
Runoff is at 40-50% ppm out under 900 so dam if I know. Will continue to defoliate as we go when something pokes its head where it does not belong.
Otherwise they are beautiful, good job so far Fast Buds. 👍
2/3 man they recover fast, removed a few fan leaves that poked their heads where they shouldnt.
Add Si to feed tomorrow for stem strength
Not comfortable leaving these in veg for two more weeks, just asking for problems. So...
Plan for flowering:
Flipping this weekend so new week will still be veg.
Removing one plant from the Moya tent to the Flowering tent to relieve space pressure as both tents will be set to 12/12 and just flower them all.
Should have space in Moya to cover the few days they are in there with just three plants, have a bout 18" of light hang to work with.
Thinking of moving Aeryn as she is largest and most likely to cause issues.
Just not sure what the stretch is going to be 😳
2/4
The white tips were absolutely caused by the Cal-Mag, considering the doses and PPM that is puzzling to say the least.
Adding Si for a few feeds to get em ready for flowering as I have no idea how these are going to grow so heading off some potentials.
Plants hit 20" over night still flipping in a few days


Likes
8
Share


@SmallCannabisDojo
Follow
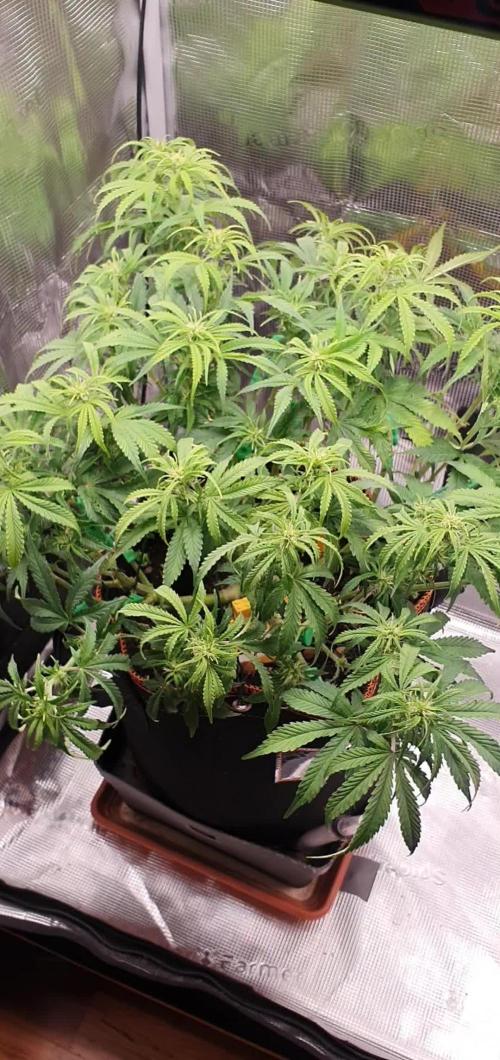
Day 49: She is back on
Day 51: She keeps pushing strong. Ive used some LST to even out her height. Also defolaited a bit every day and removed some lower bud shoots.
Summary of how I got her back:
The problem I have identified was slight overwatering and too high temperatures. Thats why her leafs hang down in veg, and are now cupping a bit in flower. Unfortunately I cant get the temperatures down much. When possible, im decreasing the lights during the day, and increase them at night while pulling cold air. Current night temperatures are around 15C, but I only reach arround 23C with 60% rh in the tent. This should be fine, but the leaf temperatures are probably a bit higher. I also hang the light as low as possible right now since that also helps with the temps. I keep the lights at about 45%, which results at 20h at a dli at roughly 38. A bit of an increase in the night times will hopefully push this to 45 overall.
Also fed her today with 1 silica | 1,5 calmag | 2 grow | 1,5 micro | 1,5 bloom. She took 2,5 l of water.


Likes
63
Share


@Kitties_and_Colas
Follow
~_~_~_~_~_~_~_~_~_~_~_~_~_~_~_~_~_~_~_~_~_~_~_~_~_~_~_~_~_~_~_~_~_~_~_~_~_~_~_~_~_~_~_~_~_~_~_~_~_~_~_~_~_~_~_~_~_~_~_~_~_~_~_~_~_~_~_~_~_~_~_~_~_~_~_~_~_~_~_~_~_~_~_
08/25/21
😸First week of veg!! (kinda).. out of all those seeds we have 2 little guys growing...both plants are small for their age and it was a real chore getting them to sprout, we tend to keep a super close eye on these especially come flower, but we're super excited to see what will result from our cross...as always, we'll update midweek..thanks for reading folks and happy growing!! 😽💨🌱💡
~_~_~_~_~_~_~_~_~_~_~_~_~_~_~_~_~_~_~_~_~_~_~_~_~_~_~_~_~_~_~_~_~_~_~_~_~_~_~_~_~_~_~_~_~_~_~_~_~_~_~_~_~_~_~_~_~_~_~_~_~_~_~_~_~_~_~_~_~_~_~_~_~_~_~_~_~_~_~_~_~_~_~_
08/29/21
🐱 These plants are growing painfully slow, i've never really seen anything like it, they look healthy just premature for their age.. we'll keep them going a little while longer, they might just be slow starters.. thanks for reading! ❤️💡🌱
Likes
13
Share


@GrowerGaz
Follow
The plants had water week one and most of week , then at the end of week 2 I added a little Elite 91 roots to the feeds. I started these outside and have repotted them today into 5 litres pots, premixed with some Greenhouse Feed Biogrow . They also came inside today and sit under by 100w Quantam board easygrow miracle.
About the genetics
Mr X Kush is from Plantformers a breeder and great guy from just outside Amsterdam , it is a mix of Platinum OG and Durban Poison.
Kmintz from a Ripper Seeds a cross of Kush Mints and Zkittles. Sounds legit. Both strains I need to try. These were gifted by Organic Earth in Maastricht, a nice shop . They also gave me
Papaya x THC bomb from Purple City Genetics in Oakland USA. Papaya x (Purple Urkel x THC Bomb)
OGKZ is an OGKB x Zkittles from Humboldt seeds a breeder that always seem to bring the frost and terps in my past experience.
Finally Cuppa T is a regular cross my friend made from UKORG Disco Biscuit and Connoiseur Gentics Purple Cheddar


Likes
1
Share