


Likes
10
Share


@nonick123
Follow
🚀 4 clones de Blueberry Pie F1 Fast seleccionados por @stacksfarmz - https://www.instagram.com/stacksfarmz/
🚀 Breeding by @seedsmangenetics - https://www.seedsman.com/eu-en/blueberry-pie-f1-fast-feminised-seeds-sman-blpi-fast-fem
💦 BioTabs 15% DISCOUNT code "GDBT420" biotabs.nl/en/shop/ @biotabs_official
🌱Substrate PRO-MIX HP BACILLUS + MYCORRHIZAE @promixmitch @promixgrowers_unfiltered
💡2 x Mars Hydro FC1500 EVO Led Grow Light (2024 NEW FC 1500-EVO Samsung LM301H 150W LED) - https://marshydro.eu/products/fc1500-evo-led-grow-lights/ - https://www.amazon.de/dp/B0CSSGN5D8?ref=myi_title_dp

Likes
26
Share


@pifflestikkz
Follow
Day 22
22/07/24 Monday
Nothing new to report. Starting to see them beautiful fans appear that's all 😁✌️
Day 23
23/07/24 Tuesday
Feed today, giving them straight all nutes Inc flowering nutes.
I will update the dose as they grow and develop a bigger hunger.
(Not sure what's wrong with Overdose #2, bit mutated, we'll see how she gets on 😅)
Video updates 👌💚
Day 26
26/07/24 Friday
De-chlorinated watering pH 6 with 5ml calmag to 5L water.
Watered each with 250ml and had small run off.
I will continue to feed/water with small run offs to help prevent salt build ups.
Video update.


Processing
Likes
4
Share


Likes
11
Share


@Bthumb
Follow
She's very close, great smell. Fade is coming in hard, getting lots of purple in the top 3 colas.

Likes
20
Share


@TheGourmetWeed
Follow
Nice plants
2 totally different phenotypes, as one was already harvested, and the other isn't even half way of flowering after 10 weeks.
Nice trichome production, great fresh and fruity smell, this plant is a pleasure to smoke in the end of the day.
Dried her upside down hanging in a tent I have for the purpose, at 25c, 30%RH -
Only removed fan leaves, no manicuring, been doing that as I smoke, noticed the bud lasts longer and with a better smell and you end up saving loads of time.
Really happy with this smoke, smells like proper weed. Maybe was the best time I dried and cure(ing).
Only problem is that I'm smoking more as it's so tasty ahaha.
Good stuff, thumbs up!
PS - I'll start looking for the "original" Zkittlez to try out and check the differences between them.
Update: 12 April 2021 - Chopped down Plant #2
So, finally Saturday I chopped her down. She looked now ready and delicious, although I only notice yesterday how many seeds she has allover the place. She hermied in front of me without noticing, not good at all and need to start looking much better and in detail into the plants.
Feel like an idiot now.
Anyways, it was a full week!
Emptied the grinder collector and pressed it down a little, makes a very nice smoke, light but pleasant, the kind of stuff it keep you going all day without the dumb effect.
From all trimming made the bubble hash. Got a little too green as the 220micron bag's stitches slightly opened letting some contaminants in the final mix, hence the green color.
This was a hit. in opposition to the grinder stuff, this sent me straight to the moon, really heavy stone effect, even thinking was hard. Reminded me those afghan/ moroccan balls we used to get back in the early 2000's.
The weed itself it's still drying so the smoke report will be updated in there.
715g of fresh cut plant is good, let's see the potency and the seeds. Might turn it all into bubble hash, if I see it'll be an hassle to remove seeds.
On an earlier bud I've cut and dried, smoked it and you can see pure white ashes in the bong. Ain't that a beauty?

Likes
9
Share


@TiRobotProds
Follow
Parfait elle se comporte bien les bourgeons gonfles énormément. Une odeur fruité se dégage de la tente.Les engrais bio RQS organic sont excellents elles font un super travail sans excès ni de carence. Rajout de guano au dessus du terreau pour l'explosion floral ☠️☠️ a bientôt pour plus d'informations.

Likes
11
Share


@giglia976
Follow
i am starting to harvest the ladies,i already harvested 5 of them and each one is better then the other,the last is absolutely incredible,i like taking them when there about 40 percent amber,and boy oh boy they are better then what i expected,i am toking as i text because we all know when we run out ,you better do what you can,so im looking at my first ladie i harvested and she was just dry enough to smoke ,i like to cure them for awhile but if im out,lol so i rolled one and im zoomen,i cant imagine how good all these ladies are gonna be,yeeeeee haaaaaaa,i got 7 oucces of dence bud from the most recent and three before her.i have 12 to go,im in heaven,thank you weed gods.stay high friends

Likes
40
Share


@BudXs
Follow
Bruce Banner is turning into the Hulk!!!!!!!!! Holy shit, what a strain. This will be a massive harvest on some very large buds. The frost is here and the bloom booster is in the daily fertigation regiment. Looking for these things to really fatten this week. Smell is strong and earthy so far, just the way I like it.
Check out Med in Tropic growing the fast version of this strain outdoors in the Amazon

Likes
7
Share


@jojopfoh
Follow
Such a beautiful and bushy lady. Lots of buds and wonderful stacking on the buds So sticky and frosty. The buds are solid
Likes
64
Share


@MadeInGermany
Follow
Hey guys :-) .
This week I will use LST again, and everything radically shorten 🙈.
Not because I want to, but because I still have to save some time and height because there is still no space in the bloom chamber for 35 days 😂.
It grows great so far, and as with the last grows it is beautiful with it 😍👍.
I wish everyone a nice week 🍀🌱.
Type:
Blue Gelato 41 Clone from Mother
( Barney‘s Farm )
☝️🏼
Genetics:
Blueberry x Thin Mint Girl Scout Cookies x Sunset Sherbert
👍
Vega lamp:
2 x Todogrow Led
Quantum Board 100 W
💡
Flower Lamp :
2 x Todogrow Led
Cxb 3590 COB 3500 K 220 W
💡💡☝️🏼
Earth:
Canna Terra Professional +
☝️🏼
Fertilizer:
Canna Terra Vega , Canna Terra Flores , Rizotonic , Cannazym , CANNA Boost , Pk 13 / 14 ,
Canna Cal / Mag , Canna Ph - Grow ,
Canna Ph - Flores
☝️🏼🌱
Water:
Osmosis water mixed with normal water (24 hours stale that the chlorine evaporates) to 0.2 EC. Add Cal / Mag to 0.4 Ec Ph with Organic Ph - to 6.0
💦💧

Processing
Likes
12
Share


@2Stones1Bird
Follow
Checkout my Instagram @smallbudz to see the Small budget grow setup for indoor use, low watt, low heat, low noise, step by step.
30/01/2020 - One more week to go ! Trichomes still transparent.
01/02/2020 - Gave her 1,5l RO water

Likes
47
Share


@blazin_skywalker
Follow
This week I've been focusing on continuing to bend each secondary branch into its final position. I am doing this slowly by making small daily changes, pulling each of the secondary branches away from its adjacent partner.
As the tertiary branches grow out, I'll be guiding them out around the net basket.
I am in awe of the strength of this plant! 💪
Day 41 - Shaping the Canopy!
Our 8 branches have grown out a bit, and it's time for us to take the next step in the mainline!
Today we're bringing back the handcuffs 🔗 for a little more bondage action. 😉 Using the same technique as before, I am attaching all the new branches to its adjacent fan leaf in an attempt to gently begin guiding our canopy closer to its final shape.
I'll stop back in after a day or 2 to re-anchor all the branches once more, making sure that they're nice and spread out and level with one another.
Thanks for following along, growmies! This has been so much fun! 🤓😁💜

Likes
33
Share


@AshBrand
Follow
6/27/21 - I’m just feeding and letting the plants flower. So far so good! For a first time grow I think I did pretty well but it’s not over yet ;)
6/28/21 - They look great! I bumped up Cha Ching to run until final flush. Hopefully that will help make it a little more frosty. They are sticky to the touch and smell great.
6/29/21 - Some branches fell over from the weight of the bud. I had to tie them up to the light. See the bottom of the plant in the pic above. :)
6/30/21 - Most of the plants keep falling over. I have to tie them up with string to the light. Buds look great!
7/1/21 - More of the plant fell over but I tied everything up so it’ll be supported. I shouldn’t have to tie anymore branches.
7/2/21 - They look good! Lots of buds. More than I initially thought. Oh well, looks good!
7/3/21 - Day 42 of flower. Getting very close to start a flush. I’ll use sledgehammer a couple times then water from there on out. They look on track! I haven’t had any deficiencies or any discoloration. No pests either.
Likes
62
Share


@masterofsmeagol
Follow
I DID A PREVENTATIVE SPRAY OF BT THIS WEEK BUT I DON'T REMEMBER EXACTLY WHICH DAY. I THINK I MIXED AT 3 OR 4 TBSP GALLON WITH SOME DAWN. BONIDE BRAND THURACIDE.
8/30 Fed two gallons to the garden. Watered before and after the feed. Defoliated what was dead. Its scary seeing so many leaves go but energy is shifted to the buds. Buds are ripening but on one mislabeled mystery seed and the wedding cake they look far behind the rest. Wondering how they could possibly finish in the 6 to 8 weeks I have left. If needed I MAY be able to put something in the garage at night. I'd have to RIP the bag out of the ground though which wouldn't be good. I mean some of the plants are pushing ten feet but we use it for heavy equipment. So foggy this morning. Horrible weather. Still fighting PM, possible lockout and ear wigs. We will see how it goes. I'll continue weekly treatment for the pm and I'll find something for the earwigs. I'm hesitant to use the Spinosid in flower.
8/31 Rained last night. Surprise, surprise. Talked to a few other growers and consulted my last year's diary. I had a couple early pheno's last year but things seem on schedule. It's amazing the amount of growth that can happen in a day. Even my ice cream cake has small flowers. Time is running short. Probably six to eight weeks max growing time left. I hope everything finished up nicely. I need to continue monitoring PM and pests. Considering spraying preventative BT tonight. Yesterday I saw the biggest pile of powder mildew and leaf septoria on a tree an hour from my grow. It literally looked like snow flakes on leaves then someone dumped a bag of flour on it. This gives me some perspective and gratitude that the TINY spots I'm treating could be much worse. Weekly treatments until harvest. Hopefully BT or diy green cleaner tonight for earwigs and worms (if they are there).
9/1 Watered thoroughly. Leaves still yellowing. I hope it's senescence. Still need to continue treatments with BT and potassium bicarbonate. Sunny day but rain tonight. Need to add more supports for heavy branches. Will update as I go.
9/2 Rained all night and it's still raining. I'll update when the rain stops. Went back over and added a couple higher supports and defoliated a shit ton. Spent two hours in the garden last night. Too tired for pictures.
9/3 Fed two gallons to the garden and upped Kool bloom to a full tablespoon. I'm thinking about using beastie bloom then cha ching as I have them both. I'm a little hesitant. Wondering what others thoughts are on those products. I plan to spray either tonight or tomorrow with another helping of potassium bicarbonate to help with the WPM. To be honest it seems to work great. I just don't want to go overboard. I wish you guys could smell the pictures. Shits getting fun now.
9/4 Had a torrential rain storm with massive wind. No damage. Buds are getting huge. Had to add a few more supports this morning as branches were hanging. If I had room I'd do a second vertical trellis. Unfortunately I do not. I AM able to run string across the cage though which really helps things higher up. I need to put some pictures of my stalks. Legit bigger than soda cans. I wish you guys could smell my pictures. Re-checked all cameras and everything is working good. On high alert. I'd be very surprised if anyone even attempted to rob me but you never know. That's why it's 24/7 supervision until Croptober.
9/5 Lots of sun yesterday but if course it rained last night. Buds are progressing at a rapid rate. Leaves seem to be dropping to soon on the blueberries. I need to do another potassium bicarbonate treatment tonight. Branches are really getting heavy. I'm hoping all this rain doesn't cause bud rot but so far so good.


Likes
26
Share


@Sickone
Follow
Ab geht es in die 2. Woche
PPFD wert wird auf 225-250 hochgeschraubt
Lux wird von 7k auf c.a 8.500 - 9.000 in 18H angepasst
Lampenabstand bleibt vorerst gleich da die Blätter sich meiner Meinung nach hervorragend ausprägen.
Temperatur wird Tagsüber zwischen 25 und 27 Grad maximal gehalten bei einer konstanten Luftfeuchtigkeit von 65%+
Heute am dritten Tag der Woche habe ich mich dazu entschlossen die Ladys in ihren finalen Topf zu Pflanzen, da mir dies öfters geraten wurde und ich leider diesen Fehler von Anfang an hätte vermeiden sollen.
- Falls ich nochmal zu Automatik greife, werde ich diese direkt in den finalen Topf geben -
Gute 48h nach dem Umtopfen ist ein deutlicher fortschritt am Blattwerk zu sehen, meiner Meinung nach haben sie das Umtopfen bisher gut überstanden

Likes
7
Share


@HeavyHead
Follow
Nutrients and water this week ;p
Starting to really get a sweet berry like smell to the room :)
Will be dropping temps slightly at the end of this week.

Likes
5
Share


@CannaBossBizz
Follow
My First diary.
First time growing Fastberry bay Fastbuds.
Hyped af.
Hope for a big plant.
Maybe you'd Like to follow this grow.


Likes
2
Share

@IceGenetics
Follow
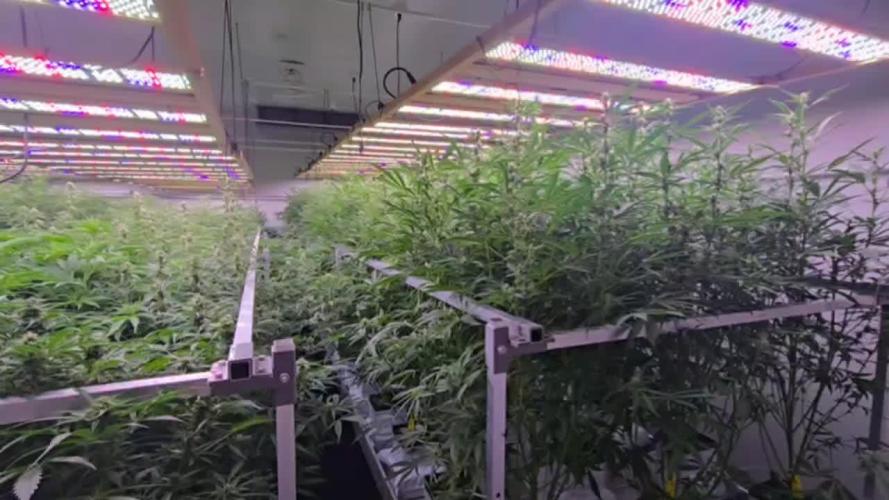
Today, on day 57, the plants have gained height and transitioned to the active flowering phase, with their height now around 100–130 cm.
Nutrient concentration is 850 ppm, room temperature daytime up to 26°C, nighttime up to 22°C, CO2 concentration up to about 850 ppm, and humidity at 50%. The light schedule is 18 hours of light and 6 hours of darkness. PPFD — 700.
Nothing was changed in the parameters. The plants continue to gain mass.
They've grown even more. Growth is good, height already exceeds 125 cm.
Visually, there are no deficiencies or burns; the bushes are developing very vigorously and absorbing their 850 ppm well without salt buildup.
We did defoliation, removed a decent amount of leaves, probably 20 kg wet. We'll send them for extraction. The plants have spread out a lot in width, branches are already closing the passages between tables, jungle 😁.
Big rastafari to everyone, Raizap brothers! 😝