
Likes
Comments
Share


@organicman
Follow
harvested
hb2,ww1,ob3-2nd,gc1,ww2,bg1,bg3,bg4,sp1,hb2,bg2-2,ob1-2
see all results in fotos
____________________________________________
light- and watering schedule: see photos
now:
12 plants
2 x Auto Orange Bud > Dutch Passion (early80's)
2 x Haze Berry Automatic > Royal Queen Seeds (2018)
2 x Auto Bubblegum > TH Seeds (late 80's)
2 x Original Auto BubbleGum > Fast Buds Company (late 80's)
1 x Strawberry Pie Auto > Fast Buds Company
1 x Gorilla Cookies Auto Seed Stockers (2015)
2 x Auto White Widow x Big Bud > Female Seeds
setup + strategy:
18 seeds
3 x Auto Orange Bud (early80's)
3 x Haze Berry Automatic (2018)
3 x Auto Euforia (late 90's)
2 x Auto Bubblegum > TH Seeds (late 80's)
2 x Auto Bubblegum > Fast Butts (late 80's)
2 x Strawberry Pie Auto
1 x Gorilla-Cookies Auto (2015)
2 x Auto White Widow x Big Bud
setup:
18 x gronest 2 liter
60 cm x 120 cm x 180 cm (2 x 4) growtent
4 l humidifier
25 watt axial fan
15 watt clip fan
ro-filter
bath room with a 50 watts room fan (-> carbon filter not necessary)
...and a lot of odds and ends.
grow strategy:
max yield by stressing with:
1. tiny shoes (2 l fabric pots standing on 3 plastic rings (4 cm) for max oxygen)
2. tiny growspace (18plants on 0.72 sqm)
3. many strains (8 strains)
4. annoying neighbourhood (mixing old - i.e. bubblegum (late 80's) - with young- i.e. hazeberry (2018) - genetics)
5. no stress by light or food or water
6. unintentionally too much food
plus:
- no lst - no hst - just leaf tucking
- positioning bigger strains (euphoria, orange bud, haze berry) or just bigger phenos on less intense light spots (end of tent + edges)
- music-rotation: 24 hrs reggae (for sativas) - 24 hrs classicals (because it's scientifically proofed) - 24 hrs traditionals from the hindukush region (for the indicas)
max efficiency (min electricity - max yield):
- light: 23 h on - 1 h off
- keeping the distance of 18" (45 cm) and dimming to the right par (lux) - value depending on growing stages (see sheet: beginning 185 par ( 10000 lux/100 watt )/end 340 par ( 18000 lux/175 watt )) => ends up in approx. 170 watts in average over max 15 weeks
temperatur management:
- using approx. max. half of what the lamp can do keeps temperature low:
my tsl 2000 is pulling max. 360 watts of the wall - i need only 175 watts, results in less temperature than using a 175 watts lamp
- adjusting the temperature by using a humidifier outside of tent:
blown in humidity is soaking degrees and is transported out by fan, works much better than doing the same with pure air
summer extreme: no humidifier: 36°C / 35 rh - with humidifier: 29°C / 65 rh
works for 1-2 weeks of real hot summer days, no mould, no signs of stress in two summers
germination:
seeding in waterglass
spraying "basic"-water: ro-water (22 ppm) + calmag to 180 ppm every 4 - 8 hours until sprouted
man versus fungus gnat:
5 days before seeding i'm running the tent with "basic"-watered pots as if there were plants inside - led on, fans on, humidifier on. Fungus gnats coming with the soil might take the chance to come out now for breeding. i'm waiting with a 9 mm rifle. in the past i found 6 gnats in 2 of 8 x 50 l biobizz lightmix bags coming out of the soil. i could eliminate every single gnat successfully ;)
rotating harvest:
the little ones will be harvested completely when ready. at this point only the top branches of the big ones will be cut...and the new (basic-watered) pots of the new grow will move into the tent. 2-3 weeks later the secod half of the big ones will be cut and the second half of the new grow will move in...
nutes:
biobizz / soil: biobizz lightmix
bloom,grow,topmax,activera,algamic
+ aminopower instead of bio heaven (too expensive)
individual feeding schedule/once a week:
veg: 200 - 600 ppm
bloom: 600 - 900 ppm
water:
ro-water with:
veg: 100-150 ppm calmag
bloom: 150 ppm calmag


Likes
75
Share


@Dedon
Follow
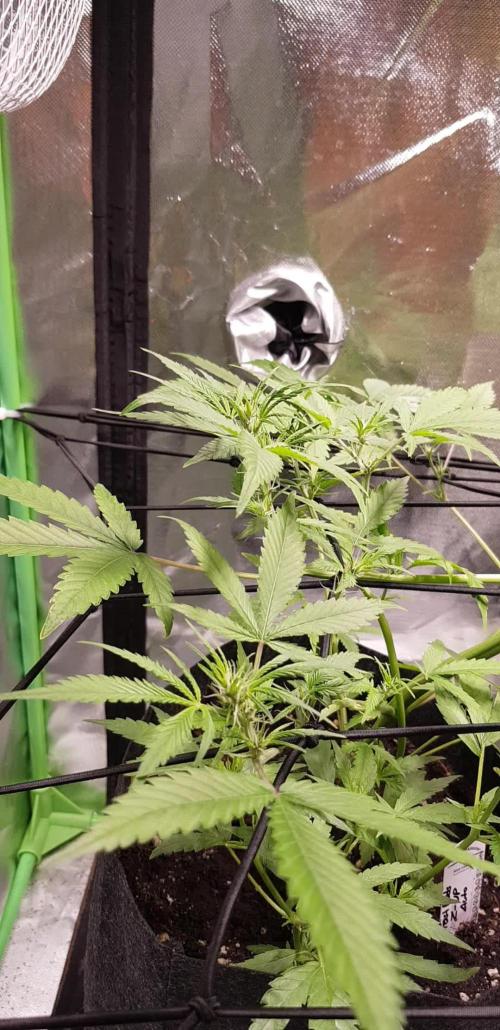
Hi everyone !
it's the end, a bit sad for these ladies, but happy to taste my own production and i hope i can be self sufficient
i learn a lot from this first experience, and i want to thanks all people who support me 🙏. I have a goal for the next session, keep a healthy plant / root system until the end 💪 thanks for all the advices.
if i can leave a feedback and some advice for my next grow and for people who are interested by this method :
- NEVER use a (too big ) rigid frame if you can't walk around your plant. you need full access to remove leaf, cut some branch, etc ... and check plant/root health during the whole session.
- For NFT Setup, Change the nutrient solution frequently and if you are a beginner and don't know how to keep a healthy system,
Don't take risk ! and change the solution each week or 10 day MAX, "you are not a wizard Harry !"
- Oxygen is life ! Oxygen is life ! Oxygen is life ! Oxygen is life ! Oxygen is life ! Oxygen is life !
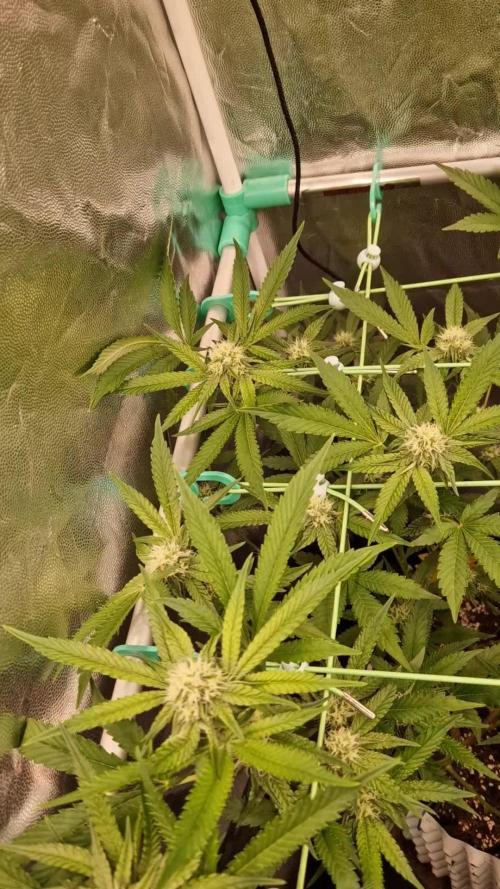
- Don't try to make too big buds. with a 400W HID & cooltube, buds are correct 40cm from the top, after 40cm, bud are fluffy, popcorn bud 😕 so i think i'll keep only 40/50cm for plant who are under the light, 30 for plants on the edge and cut everything lower.
- Check water consumption daily ! the better way to know about plant health : 1:
- Thanks for support and see you on next grow 😁
- Here's your potatoe & a timelapse from 2018/11/02 to 2019/01/06 ( 4115 photos / 60 Go )


Likes
60
Share


@SooSan
Follow
12/12 + 47 jours
Vu qu’il y a 16 plantes mais que sur growdiaries on ne peut mettre que 8 variétés j'ai divisé en 2 diaries pour le bas de la tente
1️⃣
🏠 90x60x90
☀️ FC-E 4800 => puissance a 80%
🍁
1x Black Bomb / Philosopher Seed
2x Amnesia Lemon / PEV Seeds
1x Blueberry / PEV Seeds
1x Blueberry / 00 Seeds
1x Wappa / Paradise Seed
1x Dark Phoenix / Green House Seed
1x Quick Sherbet / Exotic Seeds
1x Mango Cream / Exotic Seeds
1x Banana Frosting / Sensi Seed
1x Hindu Kush / Sensi Seed
3x Fast Mix / Sweet Seed
📎 https://growdiaries.com/diaries/122084-grow-journal-by-soosan
📎https://growdiaries.com/diaries/124052-grow-journal-by-soosan
2️⃣
🏠 30x60x50
☀️TS1000 => puissance a 100%
🍁 4x Quick Sherbet - Exotic Seed
📎 https://growdiaries.com/diaries/122080-grow-journal-by-soosan


Likes
14
Share


@MG2009
Follow
12/22/2021
Starting the over night soak in H2O2 water, then onto soil mix to finish germination.
Soaking in H2O2 and water, about an ounce h2o2 mixed with .500ml spring water. It aids in breaking down seed shell, and sanitize seeds at the same time. I will sow directly into soil as breeder suggest.
12/25/2021
All I5 seeds sprouted in water little 1-2 mm tap roots, potted into small cups and reppot as necessary, should get 100% germ rate if I don't hurt them tiny tap roots putting them in soil.
12/28/2021
Lemon OG 100% germ rate, Biscotti Skunk 4 of 5, Grape Skunk 4of5,and I will take the blame if others don't take because of miss handling, so very happy with the germination rate I'll give it 100% Thanks @QCS for given me the opportunity to grow your genetics.🙏🏻
Ps.
ROJI OGS will go next round I'd like to do them alone I think she will be special.
Biscotti Skunk
Biscotti Skunk Cannabis Seeds Feminized
With a noteworthy lineage, Biscotti Skunk is a mix between the Cookies variant and Kush on one end, acting as the base layer for flavors and effects, while the Skunk addition rounds it off beautifully on the other end, creating Biscotti Skunk a totally unique marijuana strain.
This strain works good indoors or outdoors it produces nice big buds. The flowering period for her is 8 to 9 weeks Outdoors this plants will be ready to harvest at the beginning of October, and offer yields of around 700g per plant in ideal conditions.
The effects you can expect from Biscotti Skunk strain are relaxation with a good creativity boost, followed by a gradual energizing body feel.
A bud with a very complex flavor profile, this indica-leaning hybrid Skunk come from planting 50 Skunk F2 seeds and one of the fenotip came out looking like this. We liked the strain so much that we have finally duplicate the strain.
Grape Skunk is one of those tangy, tropical smokes. Her flowers give off the unmistakable scent of tropical citrus, with some accents of grape.
THC levels is between 20% and 24%. Grape Skunk is a large producer under optimum conditions. A dense cannabis plant with pink purple colors.
Growing Grape Skunk cannabis is easy and great for first time grower. This strain is also great for relieving stress and anxiety, as well as reducing chronic pain, nausea, and insomnia.
Lemon Og Kush Cannabis Seeds Feminized
This strain joins the OG Kush genetics, with strong Indica and physical effect, cross with a Skunk plant which has a very distinctive and special lemony flavor.
The result of this crossing between these two robust genetics a plant with similar structure than the OG, average internodal distance, columnar structure that can branch a little more if the plant has enough space and substrate. Still, it mantains the average height of the OG Kush , producing lots of flowers in relation to its average size.
Production can reach 550g/m2 in about 8-9 weeks , which will allow us to harvest our plants before the rainy season arrives, without worrying about molds: it is a mold resistant marijuana strain.
Regarding the flavor, it huge amount of resin and terpenes will release a strong fuel and lemon smell, which is noticeable even when we smoke, reaching every corner of our palate. Moreover, its effect is very medicinal , ideal to eliminate nausea and stimulate appetite, deeply relaxing both body and mind.
It's obvious I get regular seed at this point. But feminized information was all they had on website,assuming it's all the same.

Likes
14
Share


@GoldenWeedGrower
Follow
D85/F41 - 24/06/23 - She's almost ready, I think I'll start the flush soon
D86/F42 - 25/06/23 - Temp is still too high, I'm trying to refresh the environment with air conditioning
D87/F43 - 26/06/23 - First Thricomes Video. I'm going to start the flush today and I'll arwest next WE
D88/F44 - 27/06/23 - Flushing
D89/F45 - 28/06/23 - Flushing
D90/F46 - 29/06/23 - Flushing
D91/F47 - 30/06/23 - She's ready. Tomorrow I'll cut her


Likes
7
Share

@OttomanEmpire
Follow
12 July 2025
Haven't had chance to water this girls 10 days but they still keep going. Impressive
Lost the motivation since notice someone else visiting my spot. Not sure how to deal with it. Might chop this girls before finish.
Please share your opinions💡

Likes
27
Share


@Ksouth1
Follow
Last week went well. She is coming along nicely. Starting to show hairs and is stretching now. I have been doing a lot of lst training and supercropping to make it as even as possible. Removed some fan leaves blocking bud sites. Doing that has made for a beautiful wide plant with a very even canopy. It should allow for even light/ energy uptake by the plant which should create a bunch of better, fuller buds. It altogether should increase the yield a decent amount. Pruning the bottom growth in the next week or so to concentrate energy towards the tops. Until next time happy growing to everyone!


Likes
9
Share

@GERGrowDesigns
Follow
Welcome to Flower Week 1 of Fast Buds Z-Up Auto
I'm excited to share my grow journey with you from my
FastBuds Project . It's going to be an incredible ride, full of learning, growing, and connecting with fellow growers from all around the world!
For this Project , I’ve chosen the Feminized Auto strain Z-Up :
Here’s what I’m working with:
• 🌱 Tent: 120x60x80
• 🧑🌾 Breeder Company: Fast buds
• 💧 Humidity Range: 60
• ⏳ Flowering Time: 8-9 Weeks
• Strain Info: 29%THC
• 🌡️ Temperature: 26
• 🍵 Pot Size: 12
• Nutrient Brand: Hy-Pro
• ⚡ Lights : 600W x 2
A huge thank you to Fast Buds for allowing me to try my Best with this amazing collection from Automatic and Photo Strains they managed to Sponsore . Big thanks for supporting the grower community worldwide! Your genetics and passion speak for themselves!
I would truly appreciate every bit of feedback, help, questions, or discussions – and of course, your likes and interactions mean the world to me as I try to stand out in this exciting competition!
Let’s grow together – and don’t forget to stop by again to see the latest updates!
Happy growing!
Stay lifted and stay curious!
Peace & Buds!
Processing
Likes
4
Share


@Mr_nugs_lover_David
Follow
I'm not adding no nuts since I make super soil however I'm adding an extra push for her now in flower just once a week using kalong bloom and kalong batboost (extract) she seems to love it,I didn't expect her to produce this beautiful violet nugs she's developing,let's see how beautiful she gets at the end,can't wait guys! 😍👀🌱

Likes
15
Share


@TheCaliph
Follow
After transplanting these are the plants who suffered more; Tangie#1 is very sad and small, with lower leaves turned yellow and burned at tips, maybe some potassium deficiency, also present in Tangie#2 but less

Likes
59
Share


@JeyGanesha
Follow
Gente,sono arrivato alla 6 settimana di fioritura,per fortuna sto riuscendo a debellare sto cazzo di ragnetto rosso...e tutti i fiorellini maschi che stavano spuntando...al momento sembra che non stiano più facendo sviluppare,ne nannars ne fiori completi di Maschio......il che è buonissimo 😋...spero riuscire a portare a termine bene la mia terapia, altrimenti mi ritroverò (ma di molto nellaCACCONA...MERDA!!!)..MA no! sono positivo e quasi sicuro che sarà buonissima 😋
Likes
11
Share


@Badassxwar
Follow
OKAY!!! I followed everything I had learned from others I know, and studying non stop for months to do this right. I saved up money to get my equipment and I decided to give it a try. I found this site looking at pictures of amazing buds from so many different people and watching so many grow videos and always dreaming of having a good grow like I've seen people can do.(just never in person) I had no idea how this was gonna turn out. But.....
It's looking killer!!! Honestly best looking smoke I've ever seen!(in person) And I cant wait to see if it can live up to its aromas and mouthwatering looks!

Likes
17
Share

@TrickzGrowz
Follow
Servus Moin!
Die Bluzcotti riecht wieder genau so wie ich sie in Erinnerung habe. Da läuft mir jetzt schon das Wasser im Mund zusammen.
Likes
54
Share


Likes
6
Share


@Kendoda
Follow
The heads are starting to swell now , the lowers are looking undeveloped still. I might do a little defoliation to let in some more light next week.
I’ve noticed the first bit of change in a couple of the old lower fan leaves this week. At this stage I’m not too concerned. Buds are frosty, sticky and dank smelling.
Likes
26
Share


@Rock_n_Roll_Randy
Follow
DID SOME MORE MAJOR DEFOLIATION SO THE LIGHT CAN PENETRATE THE BOTTOM BRANCHES. NOT MANY LEAVES LEFT LOL. CHECK EM OUT NEXT WEEK TO SEE THEM HOPEFULLY EXPLODE
FINALLY STARTING THE PHOTOPERIODS AND I HOPE MY TIMING IS GOOD FOR CHOPPING THE AUTOFLOWERS..........SEEDS PUT INTO THE SOIL ON JUNE 22ND.
RUNNING OUT OF ROOM IN THE 8X8 TENT SO I PUT ALL THE PHOTOPERIODS IN THE 5X5 WITH A TSW2000. SOME FAN LEAVES ARE BIGGER THAN MY HAND NOW.
SORRY TO EVERYONE WHO TRIES TALKING TO ME....I STILL CANT TALK TO ANYONE BECAUSE I TRIED CHANGING MY EMAIL ON HERE AND IT MESSED EVERYTHING UP. I CANT LIKE ANYTHING OR COMMENT ON ANYTHING. THE WORST IS I CANT JOIN CONTESTS
STRIVE NUTRIENTS IS THE BEST IVE EVER USED. A MUST TRY AND I BUY IT MYSELF. GOT A SAMPLE LAST YEAR AND ITS SO GOOD I BOUGHT MORE. ITS A 2 PART POWDER NUTRIENT THAT DISSOLVES IN MINUTES AND YOU MIX THE SAME STRENGTH OF THE 2 PART NUTRIENTS FROM WEEK 2 UNTIL THEY ARE FINISHED (BESIDES THE FLUSH), NO MORE BULLSHIT OF SWITCHING TO BLOOM FERTILIZER. THATS MY FAVORITE THING BESIDES THE RESULTS.
CHECK EM OUT AND BELIEVE EVERYTHING YOU READ BECAUSE ITS NO BULLSHIT, AWESOME FRIENDLY AND HONEST PEOPLE
Likes
9
Share


@R_Dub
Follow
Easy week, began with CalMag and began LST, at this point FoxFarm 1 and 2 and Recipe420 #1 have been topped, not topping Recipe420 #2 just LST. FoxFarm #2 is showing droopy leaves (it's going to get worse) the first sign of a lockout I think.
