


Likes
16
Share

@AestheticGenetix
Follow
Since this will probably be her last week. I may upload the end of the week as well into this. As of today 10/16 she is day 56 or 8 weeks of flowering total

Likes
17
Share


@Herbz_Unkraut
Follow
Defoiled all overlaying leaves again
Increased lights to setting 3/4


Likes
14
Share


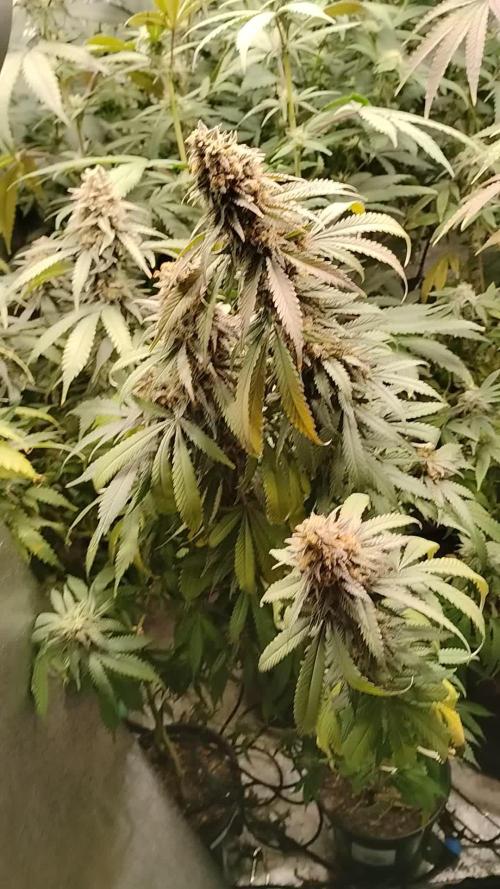
@Farmerted
Follow
This little plant pushed through until the end without too many issues. Smells good and produced smokable bud for sure. Overall I am pretty happy with it for all the abuse it took in 200 ml of dirt. Looking forward to my next diary as well. Thinking I will do one with the Apple Betty and mimosa evo clones I just took.
Likes
37
Share


@Roberts
Follow
Candy is doing good. She was topped today and the first node removed. She will be lst as she reaches out more. Everything is going well. Thank you Divine Seeds, Athena, and Spider Farmer. 🤜🏻🤛🏻🌱🌱🌱
Thank you grow diaries community for the 👇likes👇, follows, comments, and subscriptions on my YouTube channel👇.
❄️🌱🍻 Happy Growing 🌱🌱🌱
https://youtube.com/channel/UCAhN7yRzWLpcaRHhMIQ7X4g.


Likes
15
Share


@pifflestikkz
Follow
Day 1
30/12/24 Monday evening.
Started the seed off in de-chlorinated tap water and calmag 3ml to 5L pH 6.4.
I will use this water for the rest of the week as sprays and transfer water.
Day. 2
31/12/24 Tuesday
Seed has sunk 🙌
Transferred now to paper towel, sprayed with same water. Covered. Left in cupboard 24hrs untill tap root emerges ✌️
Day 3 Wednesday
01/01/25 nothing yet so left for a further 24 hours.
Day 4
02/01/25 Thursday
Tap root just emerged! Seed only just cracked. Will leave a further 24hrs for a sustainable tap root.
Day 5
03/01/25 Friday
Tap root has reach 2/3cm and now been potted up in a 1L pot with cannaterra pro, added perlite, added cococoir, and dynomyco, all watered yesterday to dampen off. . Sprayed top soils today to settle in seeds.
Day 6
04/01/25 Saturday
Seed has emerged to top of soil level 😁
Moved all seedlings into the auto tent so they can catch the 600w dual hps.
Day 7
05/01/25 Sunday
The seedlings are here 🙌
She made it through the first week, onwards and upwards 🚀💚
Seed casing will pop tonight I think.
Light spray with de-chlorinated tap water and calmag. Covered with dome.
Picture update 📸💚
Likes
10
Share


@GuniGugu
Follow
D67 removed ScrOG and repeated LST on left plant so lower buds will get more light. There is not enough space in tent to do the same with the right plant.


Likes
4
Share

@RatmanJR
Follow
August 10th. 57 days post flip.
Clones:
Clones have been growing very very well. Can confidentially say they are no longer stretching.
I no longer have to move them away from the light. There are some tops that are burning but I’m not even worried about it. It’s only a few tops and it looks like I will be getting plenty of bud.
I’m expecting another 8 weeks of flower at this point. Decided it was about time to give another shot of nutes. Gave them craft blend, bug 6, some potassium, some epsom salts, cow cal 24, and some recharge. I also changed them to an 11.5 to 12.5 light to night cycle. Doing this to better mimick their home environment.
The tops growing above the lights are really really happy about the supplemental lighting I added. Seem to be responding very well.
So far plant number 2 and 3 have a bud structure I like. Closer spacing and seem to be better overall for indoor growing. Plant number 4 seems like an absolute monster meant for the outdoors and has the more spear like sativa spacing. At this point I’m just waiting to see how they fatten and how they smoke before I chose my female.
I’ve already begun looking at potential candidates for my male hunt to cross my lucky candidate with. I think I might go with something like biker kush from karma. I think that will help tighten up the structure of whatever female I decide to chose. Let me know what you guys think I should hunt for this things mate!
Parents:
Parents have been growing very well. Low light intensity coupled with fabric pots so they can air prune along with no night cycle leading to stunted roots has allowed me too keep these things in these tiny pots for going on 24 weeks.
Going to continue to give nothing but water. Might give some casings or a tad bit of craft blend but for the time being they seem healthy. Watering every 2-3 days.
Thank you guys for following and god bless!

Likes
11
Share


@Nutrient_gro
Follow
I can tell she’s starting to stretch, I saw the hairs forming last week so this may be week 2 flower, I’m pretty new to this.
Likes
4
Share


@Green_Thumb
Follow
How the time has flown by. She completes her flush this week and will start her dry, Sticky, smelly and buds are thick. Extremely happy with how she handled these last few weeks! Excited to taste her.


Likes
31
Share


@Densko
Follow
Medusa 3/5 is now also starting to grow fat flowers.
I started giving her a small dosage of green sensation.
I noticed this plant has more indica leaves instead of sativa/ruderalis on the lower growth. Im curious to see the development of smell and buds compared to the others.
It suffered a bit from dought and heat stress, anoybody have an idea what the cause is of my leaf damage?
Likes
3
Share


@WeedForceOne
Follow
So that's the last week. Cut them, did some basic Fan leaves trim and hanged them up. Now its drying time. Temps are around 18-24c and humidity 50-60%. I do not weigh them wet so i will post final harvest results next week.


Processing
Likes
33
Share


@Weird_Jimmy
Follow
✋Wk12:Trichome Hunting and Changes in diet.
👉The week has shown to be not just the usual fun of having cannabis in the flowerings stage, but also the frustration of having cannabis in the flowering stage. The fun is the funky stank that hits me in the face as I open the tent each time, then gazing at the magical flowers as they get plumper and fuzzier. The frustration comes from the seemingly slow motion pace the plants are taking as I dream of harvest day.
👉The 3 gallon plant has reduced its volume of liquid it consumes. However, I have only slightly reduced the total volume of solution given each time. I have kept the EC around 1.3. The run-off has climbed quickly between fertigations, and I have done a couple of H2Only irrigations. The runoff EC spiked on the last day of this week. I did another H2Only irrigation followed by regular nutrients. I have seen issues on the upper leaves that could be nutrient related, or maybe light stress, perhaps its moody and hates me for not spending more time with it. I have been keeping the lights at around 17” from the top of the main cola. The lights driver is turned fully on (light is rated at 150W). Its counter intuitive to me that the light would be causing light stress since its only 150w. I would think a much more intense light would cause that or one kept a lot closer. So I have pulled the light to its max height. I may dial back the driver a tad. The buds are getting very bulky and are very dense. I hope they stay that way and not foxtail like its tent mate is doing.
👉The one gallon plant is starting to fade. Its larger leaves are mostly yellow. I take the yellow leaves when they begin to dry up. Some just fall off when touched. I’ve done some extensive trichome hunting and have only spotted only scant few ambers. Most are still clear, but there are lots of cloudy ones too. Very hard to differentiate if they are in the direct light of one of the grow lights (or any led light). The led light makes them all look cloudy, but indirect light shows most are still clear. I will continue checking each day for the status of the trichomes. I will harvest when almost all are cloudy with only a few clears remain. I have kept its solution volume at 1.5l at the low range EC of nutrient solution. I have also given a couple of H2Only irrigations to lower the EC runoff. The buds are sort of fox tailing but look very much like the breeders picture on the product page. The cola are long and getting bulky, but probably not very dense. They are super frosty and the calix’s are getting very large, much like the gorilla glue I grew was. The aroma of the funky stank is strong enough to be smelled outside (I vent outside). The up close smell is different than the tent smell…still creamy sweet caramel…so weird to me…I can’t wait to try it…in like 8 more weeks…sigh. I will harvest the plant when it says its ready. Almost there.😷


Likes
29
Share


@Spliffing_Around
Follow
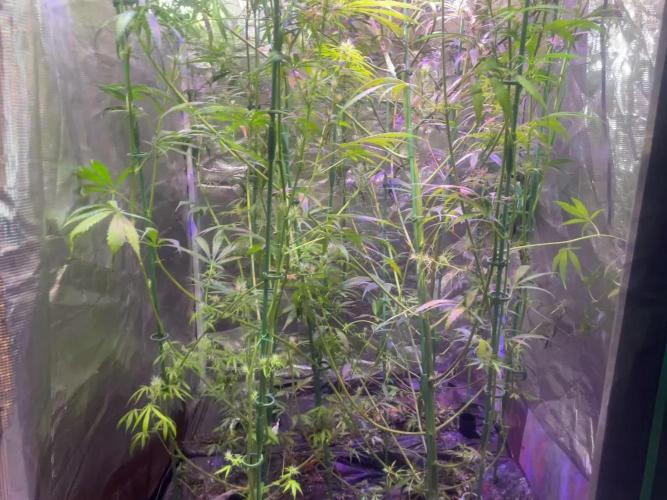
Now they are a bit bigger , this is the start of week 2 , now day 19 in real time from germination.
I would appreciate any help to maximise the yield.
I feed around 500-600 ppm. How much should the drain be ? I have to plants struggling, one had 500 run off , should I give nutes or flush them more ?

Likes
293
Share


@Ju_Bps
Follow
Hello growmies 👩🌾👨🌾🌲🌲,
👋 No more burning this week, using nutes again.
Buds start to bump and are more and more frosty ❄️❄️
💪 Will do a big defoliation next week ✂️✂️
💧 Give water each 2/3 day
2 l Water Only
2 l Water + Bloom + Green Sensation + Sugar Royal (3 + 1 + 1 ml/l)
PH @6
💡Mars Hydro - FC 3000
50% 13 cm
Mars Hydro Fan kit
Setting 8
Have a good week and see you next week 👋
Thanks community for follow, likes, comments, always a pleasure 👩🌾👨🌾❤️🌲
Mars Hydro - Smart FC3000 300W Samsung LM301B LED Grow Light💡💡
https://www.mars-hydro.com/fc-3000-samsung-lm301b-led-grow-light
Mars Hydro - 6 Inch Inline Fan And Carbon Filter Combo With Thermostat Controller 💨💨
https://www.mars-hydro.com/6-inch-inline-duct-fan-and-carbon-filter-combo-with-thermostat-controller
Fast Buds - Gorilla Cookies FF🌲🌲
https://2fast4buds.com/us/seeds/gorilla-cookies-fast-flowering