
Likes
Comments
Share


@Roberts
Follow
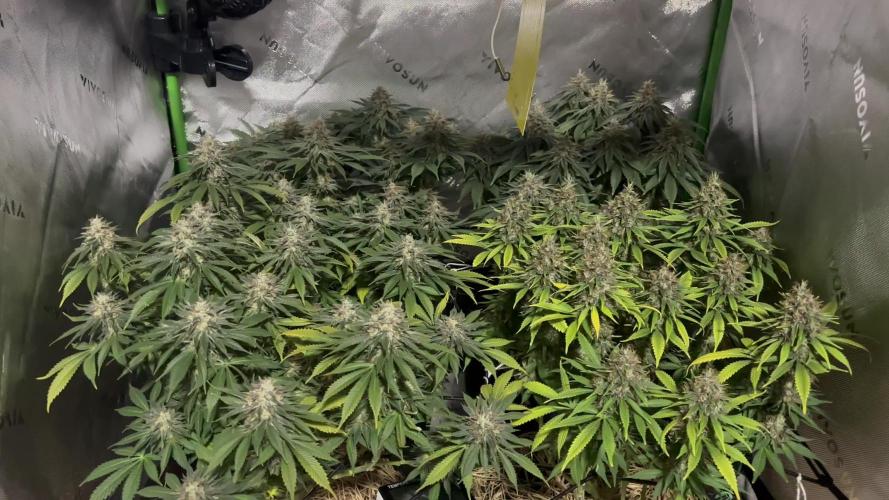
Gorilla Glue from AMS is doing great under the Spider Farmer G3000 light. I just changed light times to 12 hours today. So let the flowering phase start 💐. I think I am past most my previous issues. My feed is pretty strong already. So I am not adjusting it yet. I will be going into more of a potassium rich diet while trying to reduce nitrogen levels once stretching is done. I defoliated today and will again more aggressively in 2 weeks. I wanted to open it up for the stretching in hopes it stays more in a bush or more even canopy. I will likely have to hst them if they stretch a lot. Time will tell of course. Thank you Spider Farmer, and Amsterdam Marijuana Seeds. 🌱🤜🏻🤛🏻🌱💪🏻❄️🌱
Www.amsterdammarijuanaseeds.com
Thank you grow diaries community for the 👇likes👇, follows, comments, and subscriptions on my YouTube channel👇. ❄️🌱🍻
Happy Growing 🌱🌱🌱
https://youtube.com/channel/UCAhN7yRzWLpcaRHhMIQ7X4g
Spider Farmer G300w: https://amzn.to/3S2zvsd
Spider Farmer 10X20 Heat Mat Kit - https://amz.fun/lsa0J
Spider Farmer Amazon Store: https://www.amazon.com/spiderfarmer
Spider Farmer Official Site: https://spider-farmer.com
Discount code: saveurcash

Likes
4
Share


@stolen_cheese
Follow
No fertilizer this week and probably next week, only tap water.
Removed some of the leaves blocking flowers.
The bruised banana stretches really strong and is really thirsty, the other 3 are still pretty compact


Likes
2
Share

@mTuff
Follow
Três das quatro plantas estão com sementes, acabei colhendo uma delas e as outras três vou colher semana que vem :(, para minha sorte eu tenho um lindo clone da única que não se tornou hermafrodita :(, foi muito difícil controlar o clima não sei aonde errei

Likes
2
Share


@BONGAPPETREATS
Follow
What’s up y’all!!??
Week 9 got me getting antsy I can’t lie. The trichomes are very milky white. The leaves are turning a deep green and a few of them even turning purple.
This grow is in a tent with a photoperiod which has just began flowering. For that reason the light cycle is 12/12 which isn’t ideal but I gotta work with what I have. I’m not expecting a crazy amount out of this grow because of the light cycle change but I think it’s doing well for the circumstances.
I’m expecting a 12 maybe even 13 week finishing on this plant. The light cycle it’s on does slowdown the flowering stage just a bit.
I have some lower branches which have popcorn nuggets. It’s not much so I’m not going to worry about cutting them. Especially not this late in the flowering stage.
I find myself watering / feeding every other day. Maybe every 2 days.

Likes
11
Share


@GREENPHOENIX6262
Follow
*Week 2 flower 02/12 - still running 18/6 for now but will begin 12/12 within a week or so - 2nd and last round of defoliation - increased water feeds to a gallon and a half daily with nute feeds twice a week*
Processing
Likes
3
Share


@BigHickory357
Follow
So.... another week has come and gone, all the while this medicine keeps growing...
Mexican Airlines #3 is a week plus a few days behind the other 2, because I sprouted another liberty bean to fill the tent. MA#3 "seems" to be a "different pheno" than #1 & 2. My reason for this observation is that MA#3 color is just slightly different than 1 & 2!.. Her green for #3 is not as deep a green, but very healthy and vibrant! I wonder how she'll play out... I have very high hopes and expectations for all 3 of these.
This week I continued with the LST as well as gentle trimming of fan leaves to allow light to the bud sites.. I probably be more aggressive than I am in this. Also attempting the "bend & hide" of the fan leaves. Really trying not to stress this sativa too much...
Still getting that beautiful Ganja smell mixed with the flower and herbal smells from my companion plants.... it's very nice...
Mexican Airlines #3 is not showing any trichomes yet, no worries it's only her 1st true week of flowering. MA#1 has the most so far (which is expected) as she has always seemed a faster grower.. MA#2 has them but its still minor.. no worries the babies are growing
I still havent added any extra "nutes"!... As I am using FoxFarm Ocean Forest as well as "KIND Hot Soil" (look this up! Wow!). The soil is jammed packed with organic goodness! I cant say enough how great the plants grow in this and how simple it is....
Still watering as needed, using only RO H2O, alternating between "light" and "heavy" waterings..
I love reading your comments and tips, so please post them.. Please follow my diaries as well as me in general...
Thanks,
BigHickory357
Likes
9
Share


@Chronicbastard
Follow
Ok.i said I wasnt going to top them but that was apparently a lie.lol.these girls are a little slow going due to some training issues.im sure they will really start to stretch this week.they are both pretty healthy.no real issues yet,besides these tiney bugs that came back.i really need to stay away from soil.i might look into going hydro.im pretty irratated about this.i have used neem oil ,and some of the bushdoctor.its been to ne avail though.if anyone has any suggestions or tips on mediums to use that wont get bugs please message me asap.


Likes
4
Share


@AustinRon
Follow
OG 4Q24 Flower Week 7
Orangegasm (Fem) [ IRIE Genetics ]
12/12 @ Bolt (Day 21)
Germination: 20 November 2024
#3A Earliest Harvest Date: 9 February 2025
#3B Latest Harvest Date: 19 February 2025
_________________________________________
Start of Week: [Wed Jan 22,
2024 CR2 4Q24 43:F:6:1]
End of Week: [Tue Jan 28, 2024 CR2 4Q24 49:F:6:7]
OrangeGasm Fertigation:
- MAX: EC: [ 2.4, mS]
- LightIntensity MAX: [ 850, µMol/m2/s]
______________________________________
__
Wed Jan 22, 2025
OG 4Q24 43:F:6:1
- [x] R&R Each Drip Ring Assembly (Assure NO Fertigation/Bio Build up)
Runoff
- Amount: [ .5, l]
- EC: [ 3.8, mS/cm]
- EC∆: [ 1.2, mS/cm] # Danger!
Refresh Res (Filtered, pH’d Tap Water)
- [x] Amount: [ 2, gal]
- [x] Primer A&B: [ 35, ml]
- [x] SLF-100: [ 10, ml]
__
Thu Jan 23, 2025
OG 4Q24 44:F:6:2
Refresh Res (Distilled Water, pH: 7, EC: 0.0)
- [x] Amount: [ 2, gal]
- [x] Primer A&B: [ 39, ml]
- [x] SLF-100
Runoff
- Amount: [ 1.2, gal]
- EC: [ 4.3, mS/cm]
- EC∆: [ 1.6, mS/cm] # DANGER
__
Fri Jan 24, 2025
OG 4Q24 45:F:6:3
Runoff
- Amount: [ 0.3, gal]
- EC: [ 4.1, mS/cm]
- EC∆: [ 1.4, mS/cm] # DANGER

__
Sat Jan 25, 2025
OG 4Q24 46:F:6:4
Dump Res
- [x] Remove Chiller and Fertigation Pumps
- [x] Dump and CLEAN Reservoir, Note Sediment
- [x] Detach Main Feedline
- [x] Clean Chiller Pump
- [x] Clean Fertigation Pump
- [x] Dry ALL Components
- [x] REASSEMBLE When Dry
- [x] Clean 1/2” Fertigation Mainline
Watered In Primer A&B, CalMag Fuel, Silica Skin
- Amount: [ 1.9, l]
- EC: [ 2.7, mS/cm]
Refresh Res w/ Full Hydro (Primer A&B, Silica Skin)
- [x] Amount: [ 4, gal]
- [x] EC: [ 2.7, mS/cm]
- [x] Primer A & B: [ 73.1, ml]
- [x] SLF-100: [ 40, ml]
Runoff
- Amount: [ 0.25, gal]
- EC: [ 4.1, mS/cm]
- EC∆: [ 1.4, mS/cm] # DANGER
__
Sun Jan 26, 2025
OG 4Q24 47:F:6:5
Refresh Reservoir - 2 Gal, EC: 2.7
- [ ] Check, R&R Fertigation Manifold Filter as Needed
- [x] SLF-100: [ 10, ml]
- [x] Primer A & B: [ 40, ml]
Runoff
- Amount: [ 1.25, gal]
- EC: [ 4.2, mS/cm]
- EC∆: [ tbd, mS/cm]
__
Mon Jan 27, 2025
OG 4Q24 48:F:6:6

Watered In Primer A&B, CalMag Fuel, Silica Skin
- [x] Amount: [ 1.9, l]
- [x] EC: [ 2.7, mS/cm]
IPM
- [x] Spray sides - cover Air holes of Airpot
- [x] Spray tops of pots to drench
- [x] Dr. Zymes, 28ml/quart @ 85°F
- [x] APPLY Mosquito Bits to Top of Containers
Runoff
- [x] Amount: [ 1.5, gal]
- [x] EC: [ 4.9., mS/cm]
- [x] EC∆: [ 2.2, mS/cm] # *** Plants Should Be Fried!
Need to R&R Pre-Filter again. Fan Flow significantly diminished.
__
Tue Jan 28, 2025
OG 4Q24 49:F:6:7

Replace ACI Pre-Filter
- [x] Remove Plants
- [x] Disconnect Irrigation Emitters
- [x] Remove and Rinse Drain Tray
- [x] Drop Front of Light
- [x] Remove & Replace Pre-Filter
- [x] Verify Airflow (Make sure we don’t need to change the carbon in the filter)
- [x] Raise front of light to run position
- [x] Replace Drain Tray - Reposition Shims
- [x] Replace Plants AS THEY WERE
- [x] Replace Emitters
- [x] Verify Irrigation
Runoff
- [x] Amount: [ 0.5, gal]
- [x] EC: [ 4.8, mS/cm]
- [x] EC∆: [ 2.6, mS/cm] # *** Plants Should Be Fried!

Likes
7
Share

@GERGrowDesigns
Follow
Welcome to Flower week 5 of Sweet Seeds Mental Rainbow F1
I'm excited to share my grow journey with you from my
Sweet Seeds Project . It's going to be an incredible ride, full of learning, growing, and connecting with fellow growers from all around the world!
For this Project , I’ve chosen the Feminized Photo strain Mental Rainbow F1 :
Here’s what I’m working with:
• 🌱 Tent: 120x60x80
• 🧑🌾 Breeder Company: Sweet Seeds
• 💧 Humidity Range: 50
• ⏳ Flowering Time: 7-8weeks
• Strain Info: 22-30%THC
• 🌡️ Temperature: 26
• 🍵 Pot Size: 16
• Nutrient Brand: Narcos
• ⚡ Lights : 600W x 2
A huge thank you to Sweet Seeds for allowing me to try my Best with this amazing collection from Photo Strains they managed to Sponsore . Big thanks for supporting the grower community worldwide! Your genetics and passion speak for themselves!
I would truly appreciate every bit of feedback, help, questions, or discussions – and of course, your likes and interactions mean the world to me as I try to stand out in this exciting competition!
Let’s grow together – and don’t forget to stop by again to see the latest updates!
Happy growing!
Stay lifted and stay curious!
Peace & Buds!

Likes
4
Share


@4F1M6
Follow
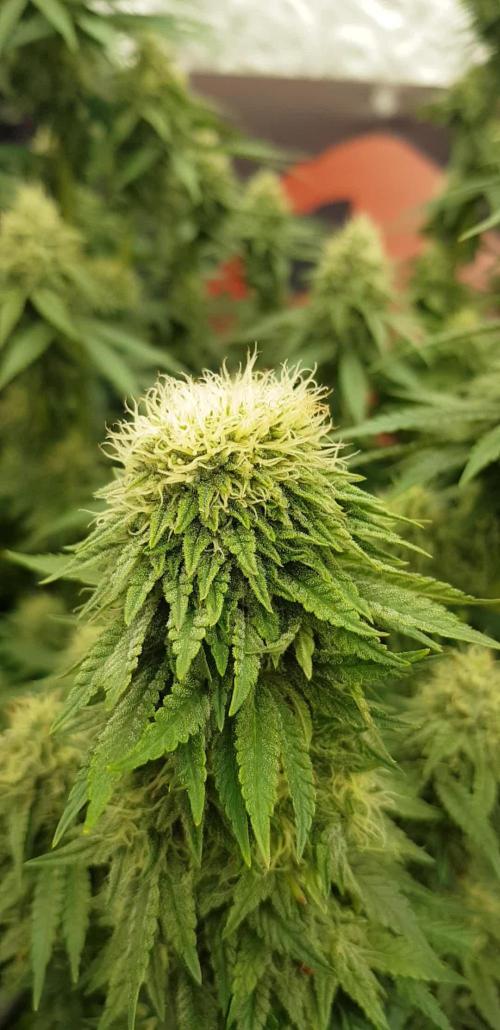
Buds are really putting on weight! Frost is in abundance. Colas have really gained defined shape and structure. The aroma is getting intense. Full blown bloom is a wonderful thing.
Just watching as the sexyness gets more defined. We have hit the major bulking phase.
Do to the new phase of growth the feeding has once again changed. I added bud golem to the mix. To get every drip drop of flowering vigor this lady has to push. Really gives that extra umph for the bulking phase. Will eliminate that last bit of grow outta the mix next feed. Than ride that mix to the flush. Until next update . Happy growing and stay lit fam.

Likes
52
Share


@Any_Zenin
Follow
Tag 50: Gegossen 15% Topfvolumen, Wasser PH 6.5 + 1ml/L CalMag + 1g/L Green House Feeding Bio Enhancer = 2..7L NL pro Topf, anschließend noch einige Blätter entfernt.
Tag 51: Nur ein paar Triebe und große Blätter runter gebogen. Der Duft wird intensiver und die Pflanzen haben ordentlich Wachstum was Größe und Blattmasse angeht. Gestern habe ich 2 Cannatrol bestellt ich hoffe die kommen bis zur Ernte an.
Tag 52: Gegossen heute aus Zeitmangel nur 1,7L NL pro Topf, Wasser PH 6.5 + 1ml/L CalMag.
Tag 53: Heute alle Pflanzen in ruhe gelassen.
Tag 54: Gegossen wieder nur 1,7L NL pro Topf, Wasser PH6.5 + 1ml/L CalMag.
Tag 55: Es kam heute ein neues Flexi Tray von Nutriculture an 1.50m x 1.50m damit konnte ich mein zu kleines Tray ersetzen und alle Pflanzen haben wieder genug platz.
Tag 56: Blütetag 20, alle Pflanzen haben heute ihr Lollipopping bekommen und wurden zusätzlich im oberen Teil ein wenig entlaubt, dazu habe ich noch einige LST Drähte umgesetzt. Anschließend wurden alle Töpfe mit 1.7L NL gegossen, Wasser PH 6.5 + 1ml/L CalMag. Eine ganz gute Woche das einzige was ich nicht komplett weg kriege ist der meiner Meinung nach durchgehend vorhandene CalMag Mangel, vllt liegt es auch an der BioBizz Erde beim nächsten Run werde ich definitiv eine andere benutzen.

Likes
39
Share


@Hazecat_420
Follow
Se realizó una defoliación en la parte más baja y en las 2 hojas más grandes de la parte superior para que pudiera entrar de mejor manera la luz a los brotes más pequeños. Se aplicó Voodo Juice para las raíces y Top Bloom para la floración, ya todas tomaron de buena manera el cambio del fotoperiodo. Seguimos 👽 ...


Processing
Likes
1
Share


@CityFarmer
Follow
Hello everyone,
These girls are still flowering!!! Been giving them water thinking they would finish soon. Let's see what happens this week
See you guys next week 🤘🤘🤙🤙👊👊👊


Likes
35
Share


@Compassionate_Gardener
Follow
At the beginning of week 2 the plants have grown fine, but also developed some yellow leaf-tips, which I assume is from the amount of light they receive. Therefore I decide to hang the both LED-fixtures higher. The LUMATEK ZEUS PRO 600W is now at 75 cm distance and the two SANlight Q6W-Gen.2 are at 90 cm distance from the top of the clones of CANNALOPE HAZE from DNA-GENETICS. The humidity inside the HOMEBOX-tent is kept permanently at 60% during veg. The grow-controller GROWBASE PRO from GROWCONTROL does a GREAT job in keeping a constant environment inside my growtent. As a precaution I put up some yellow sticky traps against fungus-gnats and also hang sachets with predatory mites from KOPPERT (=Thripex PLUS) on every plant. This will prevent spider-mites and thrips to invest my tent, since the predatory mites will eat them right away. I LOVE BIOLOGICAL TREATMENTS and decide on it every time instead of using chemicals, because I grow my own medicine here and dont want ANY CHEMICALS on my cannabis! 👍😎 At the end of week two I slightly increase the light intensity again, by adjusting the dimmers of my LEDs. The Lumatek is now set to 50% dimm-level and the SANlights are running at 60%. Until now there is not much difference to see between the two sides, all plants are healthy and doing well.
Likes
76
Share


@Papa_T
Follow
Oye amigos!!! Es la semana dieciocho!! Vamos a ver!!
Sunday - Day 120
6 October 24
Watering day, 5 litres of dechlorinated tap water.
- Base water 5 litres - 60.4 PPM
- Add 5 ml Cal-Max - 294 PPM
- Add 5 ml Supermax - 336 PPM
Final - 5 litres at 6.46 PH at 337 PPM
Runoff - 0.8 litres at 6.48 PH at 1,110 PPM
- A few more leaves have fallen off on their own.
- This rate of fade is perfect. All those leaves should be used up by the end.
Wednesday - Day 123
9 October 24
Watering day, 5 litres of dechlorinated tap water.
- Base water 5 litres - 61.1 PPM
- Add 5 ml Cal-Max - 258 PPM
Final - 5 litres at 6.50 PH at 258 PPM
Runoff - 0.6 litres at 6.48 PH at 1,070 PPM
- She’s fading a little more.
- On track ti’ll the end.
Thursday - Day 124
10 October 24
- Just a day under the lights.
- Slowly continuing to fade.
- All is looking great.
- She’s just recently started giving off some really nice odours.
Friday - Day 125
11 October 24
- Just a day under the lights.
- Few more leaves have fallen off.
- We’re doing it!!
Saturday - Day 126
12 October 24
Watering day, 5 litres of dechlorinated tap water.
- Base water 5 litres - 61.1 PPM
- Add 3.75 ml Cal-Max - 210 PPM
- Add 1 tsp seaweed extract - 332 PPM
Final - 5 litres at 6.41 PH at 345 PPM
Runoff - 0.7 litres at 6.21 PH at 1,120 PPM
- About an other dozen leaves have fallen off on their own.
Well here we are at the end of week eighteen. Definitely nearing the end of this grow. Join us next week to see how she finishes off. Vamos a ver juntos bendejos.


