
Likes
Comments
Share


@Stickygreens420
Follow
12/19/2022: Chopped the Strawberry Gushers today. Not much to update on the other two. Still fading and starting to show a small amount of amber tricomes for both. Hope to get a couple more weeks out of these.
12/20/2022 (day 87 from germination): gave both 1 liter of water mixed with ThermX-70, FishShit, coconut powder, and BuildABloom.
12/22/2023: another watering about one liter for the two remaining - Orange Bubblegum and Newberry. Mainly used a neem cake and mosquito bit tra, with some ThermX-70. There are very few fungas gnats again, but still trying not to let them get out of control again. Both plants are seriously fading, but still not enough amber tricomes to harvest yet. Would still like to go another week or two, but I will be scoping daily at this point. The smell of both the plants is insane. The Orange Bubblegum smells like Orange arm pits, and the Newberry still smells like fruity pebbles, with some funk as well.
12/24/2022: gave each plant 1 liter of water with ThermX-70 and some mosquito bit tea, which I question if it is doing anything for the gnats. They seem to be getting worse again. The only thing that really seemed to knock the population way down was the nematodes, but with only about a week left, I'm just going to deal with these little fuckers. Ordered more nematodes and rove beetles for my 3x3 grow I plan to start very soon.

Likes
6
Share


@eldruida_lamota
Follow
Que pasa familia, vamos con la segunda semana de floración de estas Papaya sherbet feminizadas de fastbuds.
Vamos al lío, de las 3 plantas, me quede con 2 por espacio, siempre pongo alguna semilla de más por si no abriese alguna por no perder ese hueco del indoor.
También se trasplantaron a su maceta definitiva, en este caso de 7 litros, que el mismo trasplante provocó un shock, que también fue solucionado inmediatamente.
El ph se controla en 6.2 , la temperatura la tenemos entre 20/22 grados y la humedad ronda el 50%.
Hasta aquí todo, Buenos humos 💨💨💨

Likes
Comments
Share

@A-C-H
Follow
Ich werde einen Komposttee zubereiten ich finde, dass ihm Nährstoffe fehlen.

Likes
16
Share


@Festerus
Follow
The stretch is over and sites are all in and now it’s transitioning over to real bud development instead of just those pistils :)
Sorry if I blend a couple of the pictures in the wrong week, I took a progress photo about every day lol. So far she has been great and smooth sailing, I had to raise my light a little, I believe it was getting some light sickness that under the LED looks like a significant burn, but in natural light she’s pleasantly green :) the light I have is a prototype my boss has made for him out of 9 180w cobs, with the glass diffuser, it’s a beast!

Likes
73
Share


@Roberts
Follow
Cookies and cream auto is growing really good under the Medic grow mini Sun-2. She is starting to develop some good sites for her future colas. Everything is looking really good at the moment she got some defoliation done today and any little bits trying to grow on underside removed. She is ready to go. Thank you Medic Grow, and MSNL Seeds. 🌱🌱🌱🤜🏻🤛🏻
Thank you grow diaries community for the 👇likes👇, follows, comments, and subscriptions on my YouTube channel👇. ❄️🌱🍻
Happy Growing 🌱🌱🌱
https://youtube.com/channel/UCAhN7yRzWLpcaRHhMIQ7X4g


Likes
14
Share


@Aircoholic
Follow
When I got into the room one day before I scheduled the harvest, her branch collapsed under the weight of the buds. Not surprising, the buds were massive and dense! This is one of the best problems to appear during a grow, could never be mad at a plant for lack of strength to support the massive buds. I decided to view it as a sign from the plant, that it's done, it had enough, so the harvest happened a day early.
Her buds were too tall for my DIY Cooler and since the buds were so dense, it wasn't easy to get to the stem to cut it and since the buds were covered in trichomes, the gloves were super sticky.
The genetics were pretty amazing to grow, super happy plant with amazing growth - thank you, @Exotic_Seed for the seeds! 🙏


Likes
9
Share


@TiRobotProds
Follow
Fait son chemin tranquillement, les conditions sont bonne hydrométrie 60-70% température varie entre 19°et 27degrés.

Likes
6
Share

@GorkedOut
Follow
Total life in days: 87
Days flowering: 61 days (8.71 weeks)
Days drying: 7
Dry weight: 201.2 grams (7.19 ounces) * for all 4 plants combined
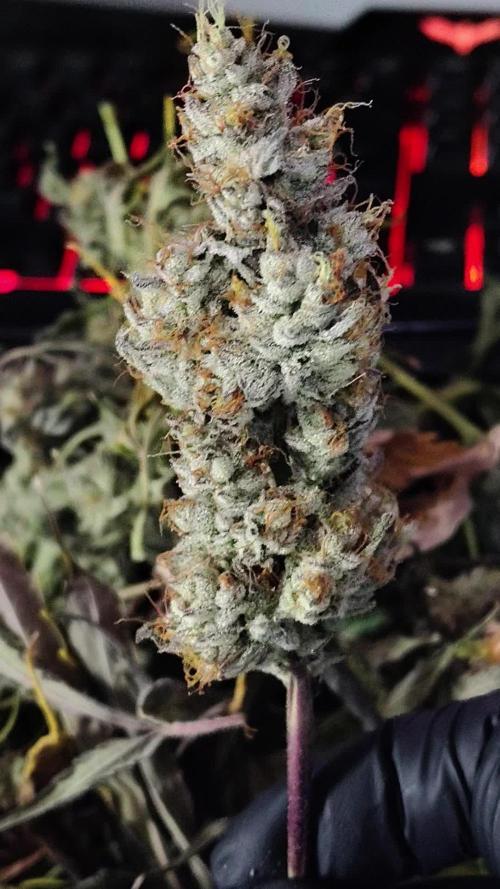
One of, if not the most beautiful plant I've grown. Smells great, and looks even better. Can't wait until it cures. Definitely growing this again.
Incredibly impressed with Kannabia

Likes
Comments
Share

@Doncuero
Follow
Tanto CHeery Lemon como una AK ultra , apartir de la semana 9 ya las plantas entran en los 63 dias. Y empiezan a cerrarse. Lo que es recomendable empezar a regar una ultima dosis con comida y ya solamente agua hasta la fecha de corte.
Likes
3
Share


@Fat_Olsh_Farms
Follow
Day 29. Going into pre flower. Expecting a big stretch like my last run with Twisted Trees. Alien Moonrocks by them is the best weed I've ever grown.
Likes
18
Share


@Staffedition
Follow
Привет друзья. Моей растихе сегодня 137 дней
Всё утеплил. Отопление сделал. Девочек своих отогрел)
20.10 перевёл свет в режим 12/12
Начал применять LST технику на 19 дне, а 18 августа добавил ДЕФОЛИЗАЦИЮ
С 20.08 ДЕФОЛИЗАЦИЮ
С 20.08 LST технику
На сегодняшний день влажность 54%
5.09.2023 заметил высокий Ph 7.9
С 48 дня Ph не ниже 5.8
На сегодняшний день Ph 6.0
Начал кормить с 60 дня Canna Terra Vega
PPM 870
Всем мира и добра!
Не забудь поставить лайк❤️, если понравилась как прошла неделя
И читайте наш TELEGRAM: https://t.me/smail_seeds
#Smail_Seeds 😀
Likes
24
Share


@Leeyum
Follow
My apologies on never giving a smoke report. I ran into a situation where I had 2 weeks to move across country. I don't like to include untrue data to my expectation/ perceptions.
Likes
13
Share


@Prozak
Follow
the strain is really strong ,
low temperatures resist , 3 weeks around 12/16º graus and steell growing wel
nice new colos between week 4/6 in flowering.
really good strain to manipulate! 5 stars * * * * *

Likes
Comments
Share


@KovaiGrows
Follow
°25/06/25°
Day 15, plant on the right is doing good, showing it's next node already and is showing beatiful colors.
The plant on the left is having some troubles and i think its because i maybe overshot the Phospor.
If anyone has tips on what certain grow issues mean, by all means tell me how to!
Getting them ready maybe on day 20 to move them to a bigger pot! Maybe ealrier if i sense that the rottse want more space, i'll check the soil tomorrow.
°27/05/2025°
I repotted the plants and saw that the roots were already grinding the sides! No extra nutrients cause they still young and i use solid nutrients inside the soil mix right now. Still don't know why the right plant is acting up like that, i don't have enough experience or knowledge.
°28/05/2025°
Nice and steady growth on both of the plants, the right one doesn't look good but seems to grow well and adapt easily inside the new soil! Sprayed water on the borders of the soil to make the roots seek for food a.k.a. growing roots.
°29/05/2025°
I don't know what i'm gonna do with the left plant.... She is miserable but still growing altough she is 1 extension slower than the right plant. The right one is still thriving, no discoloration on the leaves no burned marks so everything is going smoothly!
°30/05/2025°
I took these pictures at 2:30 AM on the 31st because i was only then home from work.
I decided the left one could grow some more but leave it as it be and the right one had her 5 and 6 node so i topped her at 3 and 4. Pushed down on the fan leaves of 3 and 4aa for little LST after the HST of topping!
Likes
15
Share


@Bread_n_Buds
Follow
And here we are in full swing. We have only reached day 19 and our Wurlz F1 Hybrid is truly very very competitive.
It grows well, regularly, the internodal distance seems average but we're waiting for another couple of floors to rise, as you can see for a day 19 we're in great shape... You'll say similar reviews, and guys the F1s are very similar, the differences will come soon with the beautiful buds.
We're keeping our fingers crossed because there's no word soon but our f1 Hybrids seem to keep what our trusted breeder says.
As feeding we are giving the Plagron Alga Grow 2 ml/l.
Come on gentlemen, I can't wait to see the flowers.
So seeds of all brands, in addition to these great F1 Hybrids and the entire Zamnesia line, fertilizers and everything related to the world of cannabis, you should buy them from the best online store in the sector www.zamnesia.io
Wurlz F1 seeds specifically
https://www.zamnesia.com/10669-zamnesia-seeds-wurlz-f1-automatic.html
Site Description
ZAMNESIA SEEDS - WURLZ F1 HYBRID AUTOMATIC: EFFECTS TO LEAVE YOUR HEAD IN A WHIRL!
As the end product of combining Runtz with Watermelon Candy, Wurlz F1 hybrid Automatic showcases a reliable, uniform, and, above all, easy growing experience. The resulting buds offer mind-blowing flavors and soothing effects, making Wurlz F1 Automatic more than worthy of being on your radar.
GROWING WURLZ F1 HYBRID AUTOMATIC
As an autoflowering strain, it takes just 9–10 weeks for Wurlz F1 Automatic to move from germination to harvest. Fortunately, there's very little required other than a bit of maintenance along the way. This is partly due to the F1 genetics that make this strain robust and uniform, resulting in plants that reach a similar height and provide a similar (large) yield. Moreover, Wurlz F1 Automatic is highly resistant to disease, pests, and other ailments.
Reaching heights of about 65–80cm, Wurlz F1 Automatic is not an overbearing plant and can fit into smaller spaces with zero fuss. Once ready to yield, growers have the potential to see a return in the region of 450–500g/m² indoors and 50–150g/plant outdoors.
AROMAS, FLAVORS, AND EFFECTS OF WURLZ F1 HYBRID AUTOMATIC
After Wurlz F1 Hybrid Automatic wows you with its easygoing growing experience, the best is yet to come: the smoke test. Teeming with terpenes, this cultivar offers a fruity and candy-like flavor tinged with just a little bit of pine for good measure. In terms of effects, Wurlz F1 Automatic is bolstered by 24% THC and a finely tuned array of cannabinoids, making for a soothing, physically relaxing, and, in larger amounts, couch-locking high. So settle in with some of your favorite friends, snacks, and movies; this is relaxation at its finest.
As for fertilizers, I'm doing a small comparison experiment to finish off the fertilizers I had at home, it's not 100% indicative, it's only on two specimens but given the stable genetics I decided to try to compare the results of Plagron Vs Aptus , both excellent brands which they will certainly produce beautiful plants which are already of excellent stable genetics. In the next few weeks the comparison will be more evident now the seedlings are still very small and just potted.
So seeds of all brands, in addition to these great F1 Hybrids and the entire Zamnesia line, fertilizers and everything related to the world of cannabis, you should buy them from the best online store in the sector www.zamnesia.io
Processing
Likes
15
Share


@donovanliam
Follow
Everything is going great I'm more worried about the chocolate haze. Mango haze. White widow they arent as big didn't start with the same nutrients but ive altered them to be the same hopefully they'll speed up
Likes
18
Share


@valiotoro
Follow
Hello everyone week 2 of flower has passed for this Strawberry Gorilla auto 🍓
Spider Farmer SE7000 80%
have a great day and wish you all happy growing 😎👨🌾🏻


Likes
27
Share


