The Grow Awards 2026 🏆 


Likes
Comments
Share
@Chubbs
Follow
420 Fastbuds
FBT2306 Week 5
These two have gone into flower absolutely amazing. The flower sites are showing up beautifully. Over all haven't done much on these besides giving another defoliation and lollipoped them taking off the lower nodes. Should allow them plenty of light through flower and air to prevent moisture build up at pot level. All in all Happy Growing

Likes
1
Share
@BlaBlaGrower
Follow
End of the third week. There are no shortages. Plants are developing well.
:)


Processing
Likes
3
Share
@Sunday_Grower
Follow
Really happy with the rate of growth. Both plants responded well to training and have bushed out pretty well. Going to let them stretch out from now on. God's Vagina has finally shown she is a female! Both plants are now growing at roughly the same speed.


Likes
Comments
Share
@HOME_GROWBOOK
Follow
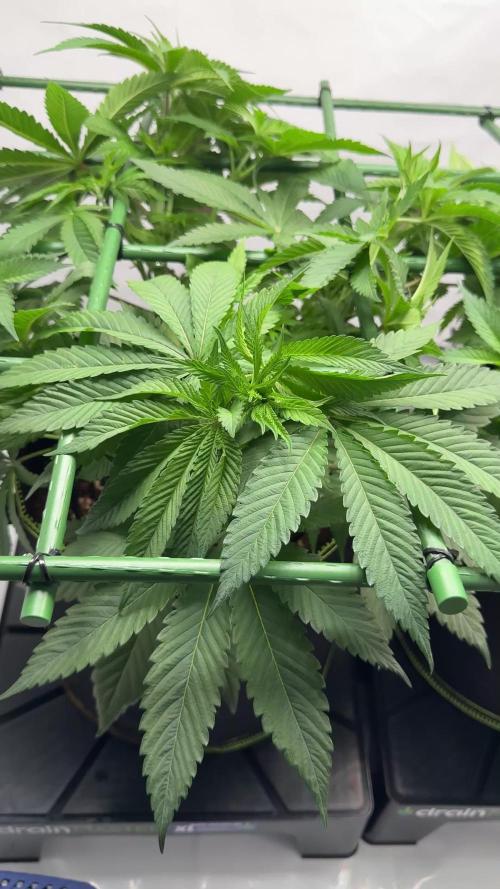
Die Pflanzen stehen in voller Vitalität und nutzen die letzten Tage der Vegetationsphase optimal aus. Das ScroG-Netz ist mittlerweile fast vollständig gefüllt, und beide Sorten – 24K Gold und Gelato 33 – zeigen ein harmonisches, kräftiges Wachstum.
24K Gold treibt sehr aktiv und reagiert hervorragend auf das wiederholte Biegen und Umlenken. Ihr Wuchs bleibt offen und gleichmäßig, die Seitentriebe haben sich stark entwickelt und schließen das Netz zügig. Die Blätter zeigen ein gesundes, sattes Grün – keine Spur von Stress oder Mangel.
Gelato 33 wächst kompakter, mit dichter Blattstruktur und kürzeren Internodien. Durch das präzise LST-Training entsteht ein flacher, gleichmäßiger Kronenaufbau. Beide Pflanzen profitieren klar vom ScroG-System, das für optimale Lichtverteilung sorgt.
Die Tropfbewässerung läuft stabil mit mehreren kurzen Intervallen am Tag.
Düngung aktuell bei Canna Coco A + B → 6 ml/l, pH ≈ 5.8, EC ≈ 1.5–1.6.
Beide Pflanzen reagieren positiv auf die stärkere Nährstoffgabe und zeigen kräftige Blattadern sowie zügige Entwicklung.
Klimawerte:
🌡️ Temperatur 25–26 °C
💧 Luftfeuchtigkeit 60 %
💨 Kräftige Umluft und konstante Zirkulation
In den kommenden Tagen wird das Netz noch ein letztes Mal nachjustiert, bevor die Lichtphase auf 12/12 umgestellt wird. Ziel: gleichmäßige Blütenverteilung über die gesamte Fläche.
Beide Strains sind optimal vorbereitet – kompakt, stabil und voller Energie für den anstehenden Stretch.

Likes
18
Share
@Grower_Of_Persia
Follow
my dry and cure style is this:
4 days of hanging upside down to get water activity lower to around 0.6 in 50% humidity and 26 C temp (i know its a little high but we are in a hot summer right now and i cant get it lower even with air conditioner) and then after 4 days of drying i remove leaves and stalks, trim buds and move them to jar for the rest of their life :D . and in the first 4 days of curing i open the jar door and let hem get some fresh air in the jar for about 5 minutes and close the jar door again, after 4 days of curing like that buds are smokable but they will get better as they getting cured about 1 month.
buds are one of the hardest as fucking rocks type of buds! very dense , compact , sticky , smelly , amazing at every aspect
growing stage was 56 days and flowering stage was 75 days total (harvested tops at day 64th)
the total weight of dry buds was : (plant #1 & #3 top buds 56 G + lower buds 22 G ) 78 G + (plant #2 top buds 47 G + lower buds 18 G ) 55 G + (plant #4 top buds 120 G + lower buds 67 G ) 187 G = 367 G
Likes
3
Share
@CanarianGrow92
Follow
Week 2 under the TS1000, another week to go and the girls will start flowering 😁 excited about all these yummy fastbud strains!
The next week i will add another TS1000 to this girls as my other grow will finish!
Likes
4
Share
@I_Identify_As_A_Dan
Follow
Week 14 for 9lb Hammer
They are doing a little better with less heat but stems arent really fattening up whatsoever. Hopefully they get bigger before flower time.
Likes
17
Share
@RunWithIt
Follow
Her leaves are being leached of all their nutes. We are approaching the end of this plants journey within the next week or two. Molasses and plain bottled water seem to be doing her great.

Likes
98
Share
@Tropicannibis_Todd
Follow
💩Holy Crap We Are Back At It And Loving It💩
Growmies we are at DAY 21 and she's just killing💀it👌
So Shit , I gave them just a tad to much nutes 👈 But I have since fixed it
So I'm starting to pull her over and do some low stress training 🙃
Lights being readjusted and chart updated .........👍rain water to be used entire growth👈
👉I used NutriNPK for nutrients for my grows and welcome anyone to give them a try .👈
👉 www.nutrinpk.com 👈
NutriNPK Cal MAG 14-0-14
NutriNPK Grow 28-14-14
NutriNPK Bloom 8-20-30
NutriNPK Bloom Booster 0-52-34
I GOT MULTIPLE DIARIES ON THE GO 😱 please check them out 😎
👉THANKS FOR TAKING THE TIME TO GO OVER MY DIARIES 👈
Likes
9
Share
@GERGrowDesigns
Follow
Welcome to Flower week 9 of Zamnesia Kalini Asia
I'm excited to share my grow journey with you from my
Zamnesia Project . It's going to be an incredible ride, full of learning, growing, and connecting with fellow growers from all around the world!
For this Project , I’ve chosen the Feminized Photo Strain Kalini Asia :
Here’s what I’m working with:
• 🌱 Tent: 120x60x80
• 🧑🌾 Breeder Company: Zamnesia
• 💧 Humidity Range: 35
• ⏳ Flowering Time: 7-8weeks
• Strain Info: 22%THC
• 🌡️ Temperature: 26
• 🍵 Pot Size: 16
• Nutrient Brand: Narcos
• ⚡ Lights : 600W x 2
I would truly appreciate every bit of feedback, help, questions, or discussions – and of course, your likes and interactions mean the world to me as I try to stand out in this exciting competition!
Let’s grow together – and don’t forget to stop by again to see the latest updates!
Happy growing!
Stay lifted and stay curious!
Peace & Buds!

Likes
42
Share
@FlorChaquena
Follow
Semana 11 - 03/01 al 10/01
*Cuarto Menguante 09/01*
.
04/01: hoy desate todos los hilos y regué. Creo que ya es momento de dejar que la planta fluya. Las ramas ya están cubiertas de brotes. y la punta se ramificó lo suficiente. Influyó en la decisión de desatarla el hecho de que las ramas se estaban marcando en el nudo y me pareció bueno que descanse estas ultimas semanas vegetativas. Al ser mi primera vez no quiero arriesgar mucho. Me preocupa la parte climática. Esta armándose pequeñas tormentas con vientos muy fuertes.
05/01: hoy aplique 1L de agua con dos tapitas de jabón potásico de forma foliar. Aparte regué el suelo. Mucha vitalidad y buena salud.
06/01: hoy aplique Top Veg de Top Crop. 3ml x 1L de agua. Fueron 20L con los que regué.
09/01: hoy regué luego de 3 días sin regar. Le puse bastante agua. Luego de ver el crecimiento que esta teniendo, decidi ponerle malla. Esta semana tratare de comprar y colocarle. Quizá le ponga una malla ahora y otra a los 50cm para que contengan los cogollos.

Likes
18
Share
@lino06000
Follow
06/08/22 1 er jour de la 7eme semaine hormis la chaleur tout va bien, elle font en moyenne entre 80 et 100 cm et consomme 500ml jour sachant que je met le même programme de nutrition a tous le monde.la weedding glue étant la plus homogène elle ont le même gabarit et poussent a l'identique jolie a voir maintenant qu'elle se densifie.la weeding cheesse cake quand a elle sur les 3 une a eu un peu de mal a démarre la floraison mais elle et repartis comme Usan Bolt .sinon rien a redire ma préférée. maintenant la gorilla cookie que dire a part du bien costaud ,belle ,résistante, pas haute, pour l'instant cet elle qui a les plus beau et gros fruits hâte de voir la semaine défile.😁
09/08/22
je viens de passer a l'eau pour rincer je préfère lui mettre une semaine de plus de rinçage que ce que l'on ma préconiser, malgré les grosses grosses chaleur elles ont bien tenus merci @fastbud.
elles sont vraiment résistantes car j ai eu des pousser de quelques heures a 39% malgré cela elles évoluent bien la défoliation c'est faite plus naturellement que par moi la cheese cake et formidable pour les petits espace car peu de végétale .l'odeur commence a être plutôt forte et je trouve que cela fais une jolie foret en vu général, pour une 465w je trouve que ma lumatek zeus 465 pro 2.9 m'offre une belle culture pour l'instant la fin approche doucement.
12/08/22 demain derniers jours de la 7 em semaines elles ont pris des couleurs et un coup de chaud 40% hier soir je m'estime vraiment chanceux de ce que sa donne pour ma 1 er culture .
la semaine prochaine il pleut les température baisse magnifique


Processing
Likes
13
Share
@Cheesefarmer420
Follow
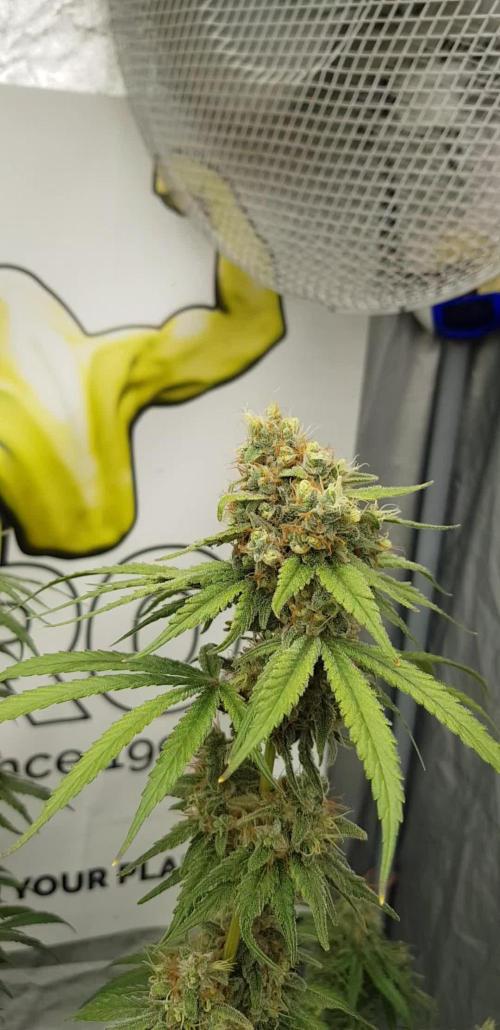
This plant has a solid stench of pure ripe lemons. So much aroma and color in every bud, purples, to dark green, to lime green, to solid frost. This one definitely a fun strain to watch grow and tend too for the last few months. She’s definitely a hungry girl, seemed to be the only strain out of the three that accepted and thrived with full feed nutrients. Would definitely recommend this Strain to someone For a nice uplifting day smoke, also seems to do me good for some pain and stress relief.
Likes
9
Share
@KannaGrowing
Follow
Estamos en la última etapa del cultivo.
Eliminamos la dieta de fertilizantes y regamos con Canna Flush, para lavar las raíces.
Bajamos la potencia lumínica al 50%.

Processing
Likes
1
Share
@DocChronic420
Follow
A major week for filling the trellis. And a premature lollipopping, normally wouldn’t do them till it’s week or two into 12/12 however I needed to hold the greenhouse plants indoors for a couple more weeks to ensure no frost damage will come to my crop due to no supplemental heat nor is the greenhouse sealed yet.