Likes
Comments
Share
@Reyden
Follow
La tenda (4x4) è in fioritura da circa 2 settimane e la SF2000 lavora a pieno regime riuscendo a coprire bene e in maniera efficace praticamente ovunque, ho trasferito la Purple OG Punch di SSSC che è l’unica autofiorente e mi stava crescendo troppo in altezza per stare nell altro box e quindi aggiungerò lei in questo diario!😄💥🎬💚 Tutte le Gorilla 🦍 sia di Zamnesia che di RQS sono state defogliate nelle foglie più gialle e con carenze, le 3 piante di Seeds Mafia invece continuano così cercando di recuperare le altre in altezza…ora le Gorilla 🦍 sono tutte a 1.800 EC mentre le 3 di SM sono a 1.600 EC, la PPOG è a 1500 EC. Ci vediamo presto con altri aggiornamenti e grazie di essere passato! Grazie Spider Farmer ancora per questo LED SF2000, questo nuovo modello fa veramente la differenza e le piante crescono in maniera ottimale!!! 💯🙌🌱
Likes
36
Share
Day 91 - No water for 6 days - White pistils apparent - Watered ONLY - Vibe: 😳 "What happens to a dream deferred? Does it dry up like a raisin in the sun?… Or does it explode?" — Langston Hughes
Likes
9
Share
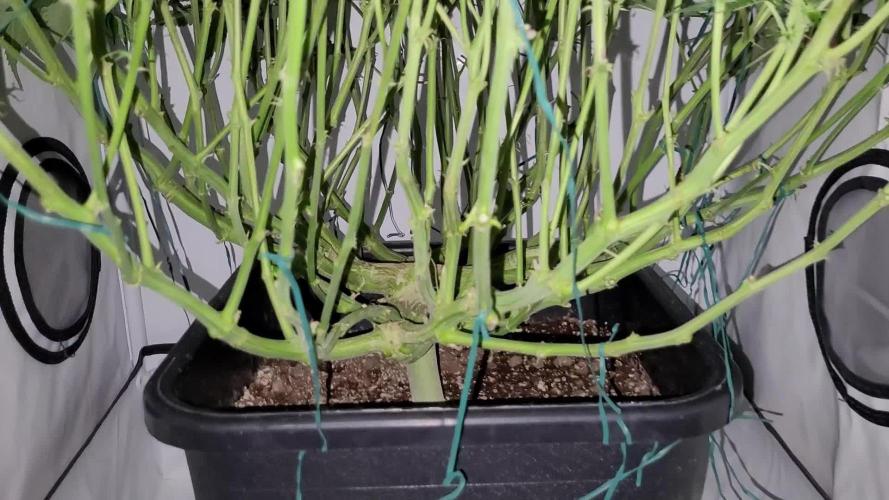
It's been great.. upgraded their tent, girls are stretching fairly but not excessively. I remove lst tie downs before flowering [experiment] but had to redo to maximize light penetration, previous topping and lst created a lot of bud sites Happy growing guys..
Likes
37
Share
@RFarm21
Follow
Boas growmies! O gráfico representa a nutrição misturada em 2,5L de água da Royal Gorilla 1. 03/08/2021 - Alimentaçao das Royal Cheese's (4L): EC = 0,74mS; pH 6,1 -BioGrow - 5,5ml; BioBloom - 3,5ml; TopMax - 4,5ml; BioHeaven - 5ml; Activera - 2ml; Calmag - 1,2 ml; Alimentação Royal Gorilla2 (2L): EC = 1mS; pH 6,1 - BioGrow - 2ml; BioBloom - 2ml; TopMax - 1,5ml; BioHeaven - 2,5ml; Activera - 1,5ml; Calmag - 1,5 ml; --------------------------------------------------------------------------------------------------------------------------- 05/08/2021 - Alimentação Royal Gorilla 1 (2,5L): EC = 1,12; pH 6,3 - BioGrow - 3,5ml; BioBloom - 3ml; TopMax - 3ml; BioHeaven - 3,8ml; Activera - 3ml; Calmag - 0.6ml Alimentação Royal Cheese 1 e 2 (4L): EC= 1,10; pH 6,3 BioGrow - 6ml; BioBloom - 4,5ml; TopMax - 4ml; BioHeaven - 5,5ml; Activera - 5,5ml; calmag - 1ml; Alimentação Royal Gorilla 2 (2L): EC =0,98; ph = 6,3 -BioGrow - 2ml; BioBloom - 2,5ml; TopMax - 1,5ml; BioHeaven - 2,5ml; Activera - 2,5ml; Calmag - 0,7ml
Likes
7
Share
@Hommero75
Follow
End of the 3rd week for the Purple Lemonade. I did some LST on her and she just got fed Goldleaf feterlizer. It's been a slow process with ups and downs. I encounter a few issues, but she's still hanging in there. Hopefully week 4 is better. I still got faith in her.
Likes
49
Share
@deFharo
Follow
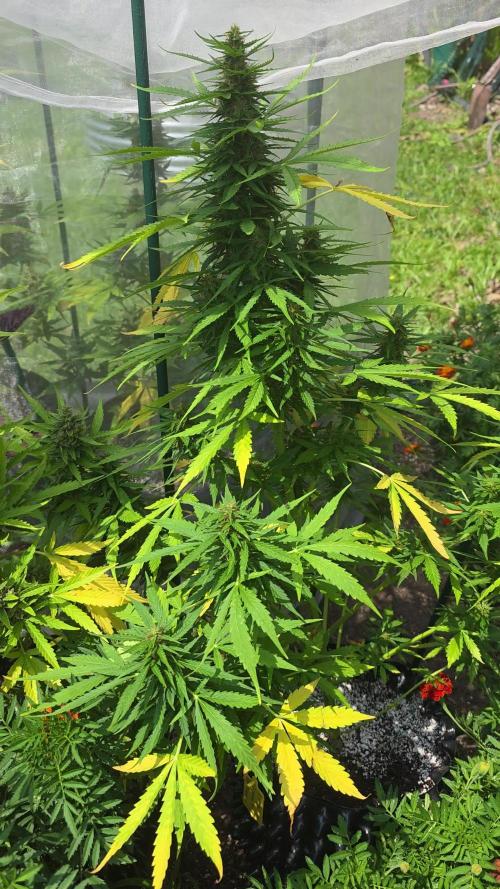
Hola cultivadores de marihuana ✋👨‍🌾🌲, bienvenidos a la semana de corte, a las quince semanas de vida, esta cepa auto floreciente, colorida y con dominancia índica, ha pasado a mejor vida en mis mallas de secado. - He cultivado esta cepa con dedicación y esmero, en una maceta air-pot de 6l, con ataduras en las ramas y tallo, en una mezcla de sustratos ligeros con minerales, sustrato activado con microbiología autóctona recogida en los bosques vírgenes de mi región. -La he alimentado con macro y micro nutrientes solubles creados con fermentados anaeróbicos e hidrolizados propios, creados en casa, con microbiología, elementos orgánicos y minerales. -Le he dado mucha y buena luz, 10h de luz interior, más otras 10 horas de luz exterior y cuatro de obscuridad, siempre ha llevado sombrero (mulch), con mucha materia seca que ha dado de comer a la microbiología y ha mantenido niveles de humedad altos en superficie, lo que ha facilitado la vida microbiana y la creación y mantenimiento de las raíces adventicias desde el primer centímetro de sustrato.... 💧🌞👨‍🌾 Definitivamente no tengo suerte con las chicas de color... o no las entiendo? 🤷‍♂️ He cultivado varias cepas coloridas y todas me han regalado momentos bellísimos, pero luego al envejecer, pierden mucha y rápidamente su antigua belleza, como también el caso de esta cepa, y yo me quedo insatisfecho. Este cultivo ha cumplido, pero por poco, el tiempo de cosecha está dentro de lo que el productor anuncia, pero la planta no desarrolló colas como yo esperaba, acusó carencias tempranas, que no se corrigieron a pesar de mis esfuerzos, los brotes florales demasiado esponjosos y con demasiada hoja entreverada, aunque la gran presencia de tricomas es evidente en todas las colas... esperaré al humo a ver que pasa. De momento secando durante una semana y después esperé al menos otra para dar una valoración más acertada del humo. Hasta la cosecha... SALUDOS A TODOS, GRACIAS POR LEER!! 🖐️👨‍🌾🌞💧 ================================= 🙄☮️👇🙏👌🤛👍👉👉👉❤️💜❤️👈👈👈🤜👌🙏👇☮️🤩🖐️🏻 =================================
Processing
Likes
29
Share
Hope yall had a good week! The girls sure did. Everyday I take a peek and do my daily watering and they're bigger than the day before. Upped the PPM's to ~400 this week, kept the pH at 6.0, and upped the Calmag. Also picked up "B-52" for some root health. Gonna use it on some other plants in the house as well (I grow veggies hydroponically year round). The plants are starting to give off an odor if you smell them up close, pretty neat. Work was a bitch this week so I missed one day of watering, flushed the plants and seems no damage done. Don't wanna make many mistakes like that but its bound to happen. Here's my boring daily notes for those interested. Have a good weekend and I'll see ya next week. ------ 9/8/2020 - Now that the plants have a proper root system and a stronger stem, I aimed the clip on fan at the plants on low. Humidifier is getting annoying to fill everyday, looking forward to when i can dial it down a bit. PPM - Inflow: 350 - Outflow: 423 pH - Inflow 6.0 - Outflow - 6.1 10/8/2020 - / PPM - Inflow: 350 - Outflow: 440 pH - Inflow 6.0 - Outflow - 6.1 11/8/2020 - /Missed/ 12/8/2020 - forgot to water yesterday (16 hour shift). Went about 18 hours between waterings. The coco was kinda dry so I flushed it first with ph 6.0 water (120ml) - then watered the usual amount (75ml) The outflow numbers were acceptable so no damage done hopefully. PPM - Inflow: 398 - Outflow: 460 pH - Inflow 6.0 - Outflow - 6.0 13/8/2020 - / PPM - Inflow: 390 - Outflow: 454 pH - Inflow 6.0 - Outflow - 6.1 14/8/2020 - Bought b52 by advanced nutrients. Suppose to assist root and stem growth, got it really cheap at the hydroponics store. PPM - Inflow: 398 - Outflow: forgot to test pH - Inflow 6.0 - Outflow - forgot to test 15/8/2020 - Final day of the week, wiped down the walls and bottom of the tent w/ vinegar&water solution. Cleaned the humidifier. Going to be topped early next week. Wife's digging the grow so far so good brownie points ;). See yall next week PPM - Inflow: 402 - Outflow: 446 pH - Inflow 6.0 - Outflow - 6
Likes
3
Share
Another week for the first-time sailor. I started doing LST as I'm a beginner unfortunately my lack of skill took 3 leaves but the plants apparently did not feel the stress as they continue to grow and with the birth of new leaves. This week reduces the space for watering before 7 days to 5 days the growth is good but as everything in life can improve but I am happy with my performance and learning from my failures.
Likes
25
Share
Ghost Train Haze — Harvest / Trim / Cure Part 2 — Trimming, Resin & First Cure First of all, once again, sorry for dividing this harvest into three different parts. But honestly… there was just no way to fit this entire experience into one single update without rushing it. This run became something special for us. So instead of throwing everything into one giant report, we wanted to slow things down and give each phase the attention it deserves. Part 1 was about harvest day itself — especially the frozen plant and the preparation for the future ice water hash runs. Now in Part 2, we focus on the monster of the room. The big Ghost Train Haze girl. The giant. And damn… she was beautiful. ⸻ The Giant Finally Ready After drying slowly and patiently, she finally reached that moment every grower waits for: the stem click. Not bending anymore. Not soft anymore. That perfect dry snap telling us she was finally ready for trimming. And honestly, seeing this massive plant hanging there fully dried was already rewarding by itself. Huge flowers. Dense structure. Long spears everywhere. Frost absolutely covering the plant from top to bottom. At this point, we brought out the Trim Bin, got comfortable, and of course… Mr. Baggy joined the session too. Because trimming alone is trimming. But trimming with the homies becomes part of the memory. ⸻ Trimming This Beast Once we started separating the branches and working through the flowers properly, one thing became immediately obvious: This plant was ridiculously frosty. And I mean ridiculously. Possibly the frostiest plant in the entire room. Every touch released resin. Every nug felt sticky. Scissors getting glued together constantly. Gloves turning darker and shinier minute after minute. The flowers themselves came out incredibly dense and compact too. Heavy in the hand. Proper weight to them. Not airy at all despite the sativa influence from Ghost Train Haze. And visually? Beautiful. Silver-covered calyxes. Orange hairs fading perfectly into the resin layer. Chunky flowers with that classic “don’t squeeze too hard or you’ll ruin the trichomes” feeling. This girl truly felt like a reward after the full cycle. ⸻ The Trim Bin Surprise One thing we absolutely loved during this trimming session was watching how much resin naturally collected inside the Trim Bin. By the end of the session, the amount of loose trichome heads sitting underneath the screen was honestly crazy. No dry sift machine. No mechanical shaker. Just trimming. And still… A beautiful golden layer of resin waiting for us underneath. Of course, finger hash also started building up naturally while trimming. Sticky gloves. Sticky fingers. Sticky scissors. The classic signs of a happy trimming session. Then came one of our favorite moments of the day. ⸻ Playing The Drums — Moroccan Style At the end, we decided to have some fun with the trim itself. Using the dry material almost like traditional Moroccan drum-sifting techniques, we gently worked the trim leaves and remaining material to knock off even more trichomes. Simple. Relaxed. Traditional-inspired. And honestly? It worked beautifully. What we collected afterward turned into a gorgeous little hash bar that looked and smelled incredible. We didn’t even bother weighing it. Sometimes not everything needs numbers. Some things are simply for the experience. For the ritual. For the future session. For curiosity. For enjoyment. And this one definitely earned its place for later tasting sessions. ⸻ Final Dry Weight After everything was trimmed, cleaned, and separated, the final dry flower weight from this single plant came to: 294.9 grams dry Honestly? We’re extremely happy with that. Almost 300 grams from a single plant in this run is something we can absolutely appreciate. Especially considering this entire project was: * 12/12 from seed * Minimal training * Minimal intervention * Natural structure * Mostly observation and guidance Just letting the plant express herself while giving her the right environment. And she rewarded us massively. ⸻ Storage & Cure — Different Approaches Once trimming was done, we started organizing the curing process using different storage methods. This time we decided to split the flower between: * Glass jars * Metal Zamnesia containers * Grove Bags Each one has its own purpose and philosophy. Glass Jars The classic. Simple, reliable, proven for decades. Perfect for manual burping and personally controlling the curing environment yourself. They also allow us to visually inspect the flowers easily during cure. ⸻ Metal Containers The Zamnesia metal containers feel more protective physically and also help reduce light exposure completely. They feel solid. Clean. Almost laboratory-like. A very nice option for preserving flower while keeping things discreet and protected. ⸻ Grove Bags These are probably the most modern approach we tested in this run. The idea behind Grove Bags is that their “TerpLoc” technology supposedly regulates humidity internally while allowing gas exchange in a controlled way. The theory is that they naturally maintain flower within the ideal curing range around: 58–62% RH without constant burping. So now we’re extremely curious to compare all three methods later during the smoke review phase: * Does one preserve terpenes better? * Does one keep the flower softer? * Does aroma evolve differently? * Does cure quality actually change? We’ll definitely revisit this in Part 3. ⸻ The Frozen Plant — Flower Comparison After finishing the main giant plant, we also trimmed and cured the material that came from the frozen/hash-focused plant from Part 1. This was important for us because we wanted to compare: * Flower from the “normal dried” plant vs * Flower from the plant intended mainly for extraction And surprisingly? The terpene profiles feel extremely similar. Same family. Same identity. Same Ghost Train Haze soul. Maybe slight differences in intensity or texture, but overall the profile remained very recognizable between both plants. Which honestly gives us a very good feeling about the future hash quality too. The frozen plant itself ended up giving: 58.5 grams dry Plus whatever was already separated and reserved through the frozen material process itself. So overall, absolutely worth it. ⸻ Macro Photography & Focus Stacking During all this, we also continued working on our macro photography experiments. Some of the photos shared in this update were actually focus-stacked images made from: * 112 photos * 96 photos * 33 photos For people unfamiliar with focus stacking: Macro photography has extremely shallow depth of field. When you photograph trichomes closely, only tiny portions stay in focus at once. So instead, we take dozens — sometimes over a hundred — separate images with different focus points and merge them together afterward in software. The result is a final image where the entire flower or trichome field becomes sharp at the same time. It takes time. It takes patience. But honestly, we love the process. Because cannabis truly deserves to be appreciated up close. ⸻ Trimming Timelapses We also recorded trimming timelapses so people can better see the workflow behind everything. Not just the glamorous final nug shots. But the actual process: * separating branches * cleaning flowers * resin building up * trim collecting * the mess * the rhythm * the work itself Because behind every beautiful cured flower, there are hours of patience nobody usually sees. ⸻ What Comes Next — Part 3 The next and final report will focus on: * Full smoke review * Cure evolution * Drying process explained deeper * Flavor profile * Terpene expression * Effects * Overall experience with Ghost Train Haze * Personal reflections after living with this cultivar That final report will close the entire Ghost Train Haze journey properly. ⸻ Thank You And as always… Huge thanks to everybody who stopped by this journey. To the breeders behind these genetics. To the companies making nutrients, LEDs, gear, and tools possible. To the platforms that allow growers to share their passion openly. To the community members constantly supporting each other. To the OG followers. To the new followers. To the silent viewers. To the growers. To the curious people. To the skeptics. To the lovers. To the haters too. If this grow made somebody stop scrolling for even a few seconds and appreciate the plant differently… that already means something to us. From grower to growers. See you all in Part 3. 📡 DELETED @ 1K Please stay tuned.we never quit https://www.youtube.com/@TheDogDoctorOfficial NEW 🙏 Thank you for your patience and continued support. FOR DISCOUNT CODES AND MORE JUST FOLLOW THE LINK https://website.beacons.ai/dogdoctorofficial 📲 Don’t forget to Subscribe and follow me on Instagram and YouTube @DogDoctorOfficial for exclusive content, real-time updates, and behind-the-scenes magic. We’ve got so much more coming, including transplanting and all the amazing techniques that go along with it. You won’t want to miss it. GrowDiaries Journal: https://growdiaries.com/grower/dogdoctorofficial Instagram: https://www.instagram.com/dogdoctorofficial/ YouTube: https://www.youtube.com/@dogdoctorofficial Deleted by Youtube - https://www.youtube.com/@TheDogDoctorOfficial NEW Vimeo : https://vimeo.com/dogdoctorofficial Under construction stay tuned ⸻ Explore the Gear that Powers My Grow If you’re curious about the tech I’m using, check out these links: 🔆 Lighting & Environmental Control • Future of Grow — Advanced LED lighting technology https://www.futureofgrow.com/ DISCOUNT CODE: DOG20 • Lumiflora — Under-canopy LED lighting https://lumiflorade.com/ • TrollMaster — Environmental controllers and automation gear (past collaboration) ⸻ Genetics • Zamnesia Seeds — Genetics used in this project https://www.zamnesia.com/ ⸻ 🌱 Soil, Substrates, Boosters & Root Support • Plagron — Substrates, bio mixes, and supportive products https://plagron.com/en/ ⸻ 🎒 Storage, Curing & Preservation • Grove Bags — Curing and storage solutions https://grovebags.com/ ⸻ 📸 Photography Equipment & Tools (Not sponsors, but part of my creative toolkit) • Sony A6700 • Sony full-frame macro lens + few more • Stacking photography workflow - learning • iPhone (for behind-the-scenes shots) We’ve got much more coming as we move through the grow cycles. Trust me, you won’t want to miss the next steps, let’s push the boundaries of indoor horticulture together! As always, this is shared for educational purposes, aiming to spread understanding and appreciation for this plant. Let’s celebrate it responsibly and continue to learn and grow together. With true love comes happiness. Always believe in yourself, and always do things expecting nothing and with an open heart. Be a giver, and the universe will give back in ways you could never imagine. 💚 Growers love to all 💚 📸 P.S. – The Eye Behind the Lens All photos in this diary (for now — except for the ones showing the camera, which I took with an iPhone) are taken with a Sony A6700 paired with a Sony full-frame macro lens and a few more. Photography is part of the story — it’s how we share the fine textures, the glow, and the quiet details that words can’t always capture. I’ve also started experimenting with photo stacking — a technique where multiple images, each taken at a slightly different focus point, are layered together to create one perfectly sharp image from front to back. It’s not digital enhancement or AI; it’s pure photography — a way to reveal the plant’s beauty in microscopic depth, from trichome to petal. You’ll even see a few shots of "ghost me" capturing the shots — camera, lens, setup — because every grow deserves not just to be cultivated, but documented like art. FOR DISCOUNT CODES AND MORE JUST FOLLOW THE LINK https://website.beacons.ai/dogdoctorofficial NEW DISCORD - Official Server Invite Link : https://discord.gg/ksjAkA5T74
Likes
36
Share
6/26 day 43 of Flowering Frosty Buds, amber pistils 🤤 Only couple of weeks until they ready for harvest 💪🏻 Plant 1: most frostiest of them all (left in tent Plant 2: Balanced overall Look with frosty parts and even amber (Center of tent) Plant 3: most amber colored and dark green with frosty parts aswell (right spot in tent) Just great to have such variety ❤️
Likes
70
Share
All feeds with nutes use either a whole ratio or combination of "Veg Mix" and "Bloom Mix"concentrates DILUTED in water until a total ppm of add in is reached using a (Total Dissolved Solids)TDS Meter measured in PPM (parts per million). The "Veg Mix" concentrate will eventually be added in smaller ratios and "Bloom Mix" concentrate what will eventually replace the "Veg Mix" concentrate entirely with the ppm and ratios listed when I feed. Veg mix recipe is on week 3. Bloom Mix recipe is on week 5. Day 28 Just a quick update for this morning since I had to move the ties a little. LST, I now have them above the 3rd node branches. Stats are normal and the growth tips are turning upward now. Stats 73F/ 63% RH /IL Vent at 33% - Lights also same as before 345ppfd highest, 330 center, and 315 at lowest. No need for adjustment. She seems to be taking the training well. Day 29 Water day - checked last night and decided it was time again - Water by weight again so no runoff to measure at about 4 cups. (4 days since last feed by weight) 13lbs even par is 15lbs 4oz so I prepared 2lbs 4oz of water. Tested my meter and discovered it needed calibration (the temp is off and cant be calibrated - so I used a trusty meat thermometer. started with 4ppm and added 300ppm of epsom and vegmix ph balanced to 6.34 at 69.8F - then splashed with H2O2. Poured around roots and splashed the stem base - sprayed some on the leaves and use the whole amount. Had to adjust lights now to be brighter so I brought them down to 18.5" and ppfd is now 375highest 360 center and 345 at lowest. VPD is normal at 1.0 with 73F /63% RH /33% IL Vent - fans are pointed to directly now as the leaves are starting to get rough feeling - so I moved them a bit to blow less directly Training is doing good nice upward turn on the training (making small LST movements with the ties other than than... just letting it make new branches. Day 30 Checked PH and got 5.0 on my meter(+1.25 tested differential = 6.25) Stats normal too - 73F /64% RH /33% IL Vent - Lights at 385highest 370 center and 355 at lowest Removed cross ties since they are no longer needed to hold the fan leaves- training still looking nice as the new nodes are formed with 2nd node leaves growing already. Day 31 Identified an issue this morning - went back through my pictures, identified the start, looked at the day before, and noted my changes that I took notes on at that time. Went to google to diagnose a few possible hypothesis and am now testing with a treatment. (suggestions from more experienced growers welcome) This morning the issue was brown spots on the older fan leaves. Mostly just the left fan leaf. Seems to have started 2 days ago (day 29) when I changed the lights and fed her. When I fed her, I left water droplets on the leaves instead of drying them off after a short time (I had been drying them with a tissue after a wet pic. The fans were also adjusted after the lights were dropped closer as well. Hypothesis: I think the water was magnifying the light and caused light stress at the those spots. I dont think the wind of the fan had much to do with it other than they helped dry the leaves faster as noted by the water being completely gone by the time I took pictures later that night for measurements. Test: Raised my lights to a max of 350ppfd (from 385 highest reading this morning) Had to adjust fans again since they rest on my lights. Will observe looking for improvement over the next few days. ... another possibility was given to me by Guru @Roberts (thank you) as it possibly being a ph issue locking out calcium. So I thought I might test ph and then try diluted cal/mag in a spray if my soil is too low (also looked at pics and seen VERY close similarities in my pics and those) and so on that advice, I tested/calibrated my soil meter (it FINALLY calibrated for me!)I found my soil was avg of 3 readings at 5.153 (5.08,5.09,and 5.29) NOT GOOD - potentially locking out most all nutes. I weighed out about 2 cups of purified water with and added about half ml of CalMag, ph balanced the water to 6.5 at 69.7F (my research shows Calcium lockout starting at 6.3 or lower) and splashed with H2O2 - I poured most around the base and sprayed the leaves too. I made sure to use the whole solution by pouring the last of the solution in the spray bottle over the stem and stem base. EOD follow-up Found a possible calcium blockade in my ph and on my leaves (of which are now starting to curl so I placed my fans on oscillate to ensure they aren't doing more damage) --- fully documented now. otherwise measurements are now documented too. -- second node is starting to pull away from the last top so I will be looking to top again (3rd of possibly 4 total) and then HST and bind in a new spot Day 32 Doing a morning and evening check her now while I see this issue resolved. So far no sign of improvement since last night - might have gotten worse in comparison (will check pics side by side today) but I think because it's a immobile micronutrient so it should take time to stop then reverse. So in the mean time I am doing a slurry test as a 2nd test for my soil before I treat it. I took soil from 3 different spots and made sure I got some from about 4 inches deep in each spot (ensured calibrations were still good with buffer tests) 1st test is a PH meter tested directly in the soil. After using the 2 cups of 6.3 yesterday I got 3 readings today = 5.47, 5.32, and 5.5 to avg 5.43 - (yesterday's readings prior to treatment were 5.08, 5.09, and 5.29 to avg 5.153) - still far below the normal 6 to 7 for soil and the requirement of 6.3 and above for calcium to enter roots. suggesting again lockout. So while I am checking the plant conditions I also looked at the new nodes - 2nd node is starting to pull away from the first, but not quite enough to top yet - thinking I will be able to top tomorrow evening - should be able to correct the ph tonight, so I can see if there's results in that by then as well. I also set the fans to oscillate last night, so here's a video for that now. Measurements, ppfd, and vpd will be in tonight's check-up Day 32 So I started this evening by testing the run off with 2 meters, 5.7 and 5.67 - prepared 1 gallon of 7.5 ph water and splashed with H2O2 (checked with both meters) Before flushing, I documented the leaves again - still curled and look very dry but they still have some flexibility with them - they dont seem to getting any worse so the spray may have gotten enough to the leaves most affected. The new nodes and growth tips seem to be okay but not growing as fast as they were. That would still mean that the soil needs treatment before the roots begin to die off and I end up with stunted growth overall. SO I flushed the whole gallon and noted the runoff from the sides and bottom. I then tested the soil directly with 3 readings 5.95, 5.8, and 5.73 for avg 5.826 and tested the runoff water with 2 separate meters for 5.91 and 5.85 Not sure if I should feed dunk in 7.5 still or just use that number on the next feed in like 3 or 4 days. will discuss Other than that ppfd highest is 360, 350 at center, and 330 at lowest. VPD was 1.0 with temp at 74F /63% RH /33% IL Vent Growth tips could be ready to top again tomorrow night, but I would like the get the ph taken care of first. Day 33 Started the day by noticing the lower branches seem to stop turning and the next level branches seemed to have finally turned but nearly as fast as the first. (Noticed them having a start yesterday) Newer branches dont have any signs of issues. So the plan today is to make Bloom Juice for later. Feed Dunk with 100% Veg Juice at a ph of 7.3 test runoff and ppm. Top the 4 nodes and remove the lower leaves. Calcium issue or not, that was always the plan with main-linning the plant. However, because of the health issues, I dont think I am going to go past these 8 colas - rather instead I will simply stop here and do some HST to set them how I want them to grow and let her recover and finish her veg for about two or three weeks. Dunk had 300ppm of Epsom, Veg juice, in a little over 3 gallons of purified water. I had 7.4 ph and splashed with h2o2. I pushed the entire plant into the water and soaked for a few seconds. Drained by hanging the pot up for about 10 minutes and the stream started dripping instead. Checked the runoff with 2 meters 6.01 and 5.93 with 2580ppm. Then I topped all four nodes and removed the fan leaves from under my mainline. I used LST to finger press the new branches apart into the direction I plan to move them to get the nodes powering up. Next I will wait for a day to do HST on those new branches. Tonight I will simply let her rest. VPD still at 1.0 - 73F /63% RH /33% IL Vent - Lights are at 365 highest, 355 center, and 335 lowest. No need to measure for growth now as I dont plan to top anymore Day 34 Early entry to day for HST the morning after topping. So I started off the morning checking stats and health. PH levels are still low. 3 soil meter tests 5.41, 5.41, and 5.44 for an avg of 5.42 - kinda at a loss here but can only monitor now. VPD and lights are mostly the same - 74F /63% RH / 33% IL Vent - VPD not relevant today as the settings are the same and I am using HST to change the plant position. leaves are noted for future reference - all four lower fan leaves have signs of calcium deficiency but not progressing nearly as fast as the first two did, so I think my attempts via higher ph water and feed may have helped. (I know the microbes in the soil are supposed to help get past ph issues , but mine seem to not be heathy) HST used a cuticle rod from my wife's nail case and a paint stick to press the rod against the branches and smash the inside of the elbows I want to bend. LST I then cut 4 strips of garden wire at the same length, hooked the ends like candy canes and aligned them about 1/2 inch above the new node and into the soil. From the side they look level but have the leaves now facing sideways. They will turn in a day or two.
Likes
Comments
Share
@UglyEart
Follow
They seemed to drink a lot this week, the environment is stable, and the girls seem to be having a blast. I've checked them throughout and all appeared to be female. Happy growing growmiees
Likes
31
Share
Einfach erstaunlich was die Genetiken von SuperStrains drauf haben. Bin echt begeistert wie riesig die Buds werden. Und es ist immernoch kein Ende in Sicht!
Likes
15
Share
@MG2009
Follow
03/18/2021 Flowering is starting!
Likes
1
Share
Day 1 in flower. The last clones from this company. But 4 in the garbage.
Likes
11
Share
This week was full of new growth! I switched the ladies to their bloom nutrients for the first time and they seem to love them. The budlets are getting bigger every day and the ladies are looking beautiful! I hope everyone has a Happy New Year! Be Safe and stay green! 🤙🏾
Likes
14
Share
@tuzeus
Follow
So this is the Start of week 9, today is day 57 of flower. Strain is supposed to have 8-9 weeks of flower. Before I started I was thinking of 10 weeks of flower. Let’s see how the week is going. I took some trichome shots but they are not ready yet. I’m thinking of 2-3 weeks left. I will use Athena fade for the last 2 weeks. Maybe I will change to that in the next week. I keep my humidifier running so I have a constant 40-45% of humidity, max 50. Cheers.
Likes
24
Share
Apple Betty Seedlings 🌱 are doing great! They are looking very healthy and happy. #1 was slow from the get-go but she has been building steam and is doing well. Routine this week was was just checking the humidifier every morning, and spritzing with my spray bottle x2 daily (very small amounts) starting at the base of the plant, but also making sure to get the exterior edges to allow those roots to be searching for water. Changed the light cycle to 18/6 around day 7, and also adjusted my BloomPlus BP 2500 to have 140 watts at the wall. Didn’t lower the light as the increased wattage seemed to slow down the stretch they initially had. Still using my small 250 watt heater behind my intake fan to draw some heat in and keep the tent nice and cozy, even during lights out (about 75-76 *F) By day 14, I started to water with a measuring cup, still using my 1 ml of Sensi Cal/Mag extra. Watering only about 1/4 cup of water all around the pot, and will wait until the soil is dry’ish (the old finger poke) before I start to increase the watering amount gradually. No nutrients yet, but I will be using the Advanced Nutrients- Grow, Micro and Bloom along with the Sensi Cal Mag extra. Happy Gardening 🇨🇦❤️🌱😎💨