
Likes
Comments
Share


@EastCoastGrowShow
Follow
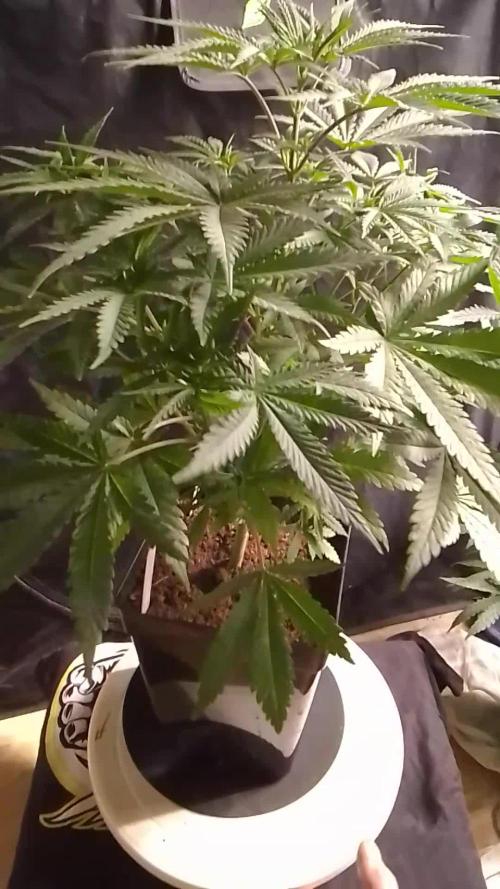
We are going to continue on with tying and tucking and spreading. I cannot wait to see what suprises this strain has, as I get the feeling her true colors will be wild.
This week I also show the HydroHalo system I have installed to better assist with watering these girls under the net.
There is a 5 gallon bucket with lid as resivior, tubing, T fittings x2, valves x2, a small submersible water pump, air pump with hose and air stone in the resivior to keep it aerated.

Likes
38
Share


@Tesla
Follow
We're almost there. There're some amber trichomes, just a few.
I'm gonna wait a few more days to harvest it.
It smells nice! :)
And there's sign of nuts deficiency, and some light purple tones.


Likes
9
Share


@b_C6969
Follow
Day 74
Harvest time!
She didn't have the best start at life, lost a major limb/side stem early on (my fault, too aggressive with LST), and got a bit stunted from stress I think.
Flushed twice (once was to get her out of being stunted, it worked).
Probably could have left it another couple of days as some of the lower buds were still maturing, not many though, and i needed to get her out of there so I could turn the extractor fan down to bring the humidity up for the young plants. I'm really happy with the result, especially after the small disaster that was Zkittlez (which im pretty sure was actually CBD lemon as its not potent at all).
Not a big yield, would have been a lot bigger had she not lost a limb. I'm not too worried though, quality over quantity right? im pretty certain this is the best stuff i've grown so far, 5th times the charm huh? Trichomes are about 80-90% milky and 10-20% amber, first plant i've actually let get amber, so yeah, finally grew something right lol.
No nutes for about 2-3 weeks before chop, and yeah 2 flushes, so im hoping it'll have a nice taste.
Oh, and i didn't water for 3-5 days before harvest, which could explain why she's so light (not a lot of water weight), visually looks similar to the harvest, size-wise, yet a good 60grams lighter, will be interesting to see what the dry weight is. I'm gonna throw out a guess of 38gms.
Even though she has a great smell, its not very stinky while drying, nor was it in the tent. you have to touch the buds to get any scent, pretty handy tbh.
Currently drying in my wardrobe with a fan blowing underneath (not touching the buds) for airflow.
Happy!
EDIT: not the best trim job, im not very well at the moment so just wanted to get it done. plenty of trim that im going to use to make pain relief balms/lotions
Likes
121
Share


@BudBoutique
Follow
Welcome to Bud Boutique Grow Diary - really appreciate all your love and support :)
Dont forget to check out my other current grows!
🗓️ THE END:
- After 14 Day of drying with around 15-16°C and 60% rh its finally time - LETS TRIM
- beautiful fruity smell while trimming
- bud full of Trichs all over (shinning like diamonds)
- Curring them in Grove TerpLoc Bags
- Watch out for my upcoming smoke review!
Thank you for staying with me - This wonderful Journey finally come to an end. The next run is waiting already 💚
___________________________________________
--- 🌱 Strain ---
🏷️ CALIFORNIAN GOLD by Paradise Seeds
https://www.paradise-seeds.com/feminized-cannabis-seeds/californian-gold
---💡 Lighting ---
💡LUMATEK ZEUS PRO 600
https://lumatek-lighting.com/zeus-600w-pro-29/
--- 🥗 Nutrients and Feeding
* 🍸 PLAGRON Algae Baseline grow/bloom + Additives: Power Roots, Sugar Royal, Pure Enzym, Silic Rock, Power Buds, Green Sensation
* 📅💪 baseline grow/bloow: 4ml/l & additives: 1ml/l each
https://plagron.com/de/hobby/produkte
--- 🏭 Grow Setup ---
* 🏠🌿 Indoor: Homebox 120x120x200cm (4x4)
* 📐🌀 PrimaKlima exhausting Fan 1180m3/h (running on 60-80%) & Can Light Filter 800m3/h & 1x Fanbox 1x Dyson fan for Air circulation
https://primaklima.com/de/shop/ventilatoren-de/ec-ventilatoren/pk160ec-tc/
https://canfilters.com/products/filters/
All Likes and comments are highly appreciated!!!
don't forget to check out my Instagram: budboutiquee
- Bud Boutique

Likes
39
Share


@GrowWiththeBro
Follow
Half gallon nute feed.
Trichomes still a little glassy. Dense budding 👌🏾. 60-65 days for both ladies will open the window.
Flushing soon.


Likes
48
Share


@PapaNugs
Follow
Another good week generally speaking. The girls are drinking a lot but nothing crazy. Things are wrapping up here in this tent shortly.
This girl is hanging in there. I know she needed nutrients but didn't get much. I hope she does well as she finishes up. Not much longer!
Dimmed to 80%
Here are the lights details:
Medic Grow Mini Sun-2 150W LED
Model: MN150-022
Spectrum mode: V1
Efficacy: 2.8 umol/J
Thanks for stopping by!
You can find the light on Grow Diaries:
https://growdiaries.com/grow-lights/medic-grow/mini-sun-2-150-watts
You can find the light on Medic Grow's website:
https://medicgrow.com/

Likes
80
Share


@Chuckd502113
Follow
So far I harvest the top half of the plant and its 71 grams dry and the next part i harvest is 53 grams wet, @exotic_seeds and their Black Haze is growing great in the apotforpot super soil!!! Its been a super easy grow so for and it all has to do with the genetics and soil, the buds are deep purple and covered in trichs and orange hairs, the smell went down a lot in drying but should come back with the cure. I know some of the pics look out of focus but i purposely picked them if you look you can see why.

Likes
23
Share


@ILoVeThiSpLaNt
Follow
Ho tolto due Crystal Candy XL e la Grape Rolex v2 al giorno 70 da seme.
Le due Crystal Candy XL 91gr e 105gr mentre la Grape Rolex 108gr.
Le prossime tre Crystal Candy XL verranno tolte
tra due giorni quindi al giorno 79 da seme dopo 10gg di soluzione finale Advanced Nutrient.
A settimana prossima con qualche foto in più 🖐️💪
Likes
57
Share

@BudBoutique
Follow
Welcome to Bud Boutique Grow Diary - really appreciate all your love and support :)
Dont forget to check out my other current grows!
🗓️ This Week:
- Day 52: the end is near
- Day 53: Trichomes check from #1 and #2 - looking super good almost all cloudy, a few amber and clear. perfect point to chop
- Day 54: this one is finished, let's chop them both #1 & #2 !! ✂️✂️✂️
- both phenos got still super purple beautiful leaves
- now its time to dry inside the tent at about 60%rh and less than 20°C/68°F trying to get it even lower for the next 10-14 days
Thank you for still staying with me 💚
___________________________________________
--- 🌱 Strain (Sponsor) 🌱 ---
🏷️ PEACH GIRL by Art Genetix
https://www.artgenetix.world/product-page/peach-girl
--- 🥗 Nutrients and Feeding (Sponsor) - (APTUS Ambassador) ---
🍸 APTUS: full nutrient schedule extreme
-- Regulator, N-Boost, P-Boost, CaMg-Boost, K-Boost, Allin1 Liquid, Startbooster, Topbooster, Enzym+ every feeding
-- Fulvic-Blast, NutriSpray as Foliar each once a week
🔗 https://aptus-holland.com/
--- ♻️ Grow Control (Sponsor) ---
TROLMASTER: TENT-X + LM14 Light Adapter to dim/sunrise/sunset lights + Temp & rH Sensor all remote on App
🔗 https://www.trolmaster.eu/
--- 🚿 PetraGrow (Sponsor) ---
CannaFogger Foliar Spray
🔗 https://www.petratools.com/product/petragrow-cannafogger-atomizer-new-mini-fogger
--- 🏭 Grow Setup ---
💡LUMATEK Zeus Pro 600
* 🏠🌿 Indoor: Homebox 120x120x200cm (4x4)
* 📐🌀 PrimaKlima exhausting Fan 1180m3/h (running on 60-80%)
* 🌀 Can Light Filter 800m3/h & 1x Fanbox 1x Dyson fan for Air circulation
🔗 https://lumatek-lighting.com/zeus-600w-pro-29/
🔗 https://primaklima.com/de/shop/ventilatoren-de/ec-ventilatoren/pk160ec-tc/
🔗 https://canfilters.com/products/filters/
All Likes and comments are highly appreciated!!!
👨🌾 don't forget to check out my Instagram for daily educational content: budboutiquee
- Bud Boutique


Likes
12
Share


@KenZo0
Follow
It was a great and enjoyable experience.
Although my light was low, I got a good result.
My light was 120 watts.
In the first week of growth, my plant was uprooted
It stopped growing for a week and then
Powerful continued to grow


Likes
21
Share


@sonymatrix
Follow
Meine Frau musste gießen. Leider alle ertrunken. Deshalb alle nochmals neu. War aber nicht schlimm. War ja nur 1,5 Wochen alt. Jetzt neue und sehen gut aus. Lets start again.💯
Problem war auch die Kartontöpfe. Trocknen sehr schnell aus. Jetzt Kunststoff.

Likes
6
Share

@Pompeyblue
Follow
All going great
A I've left to do it's thing
B I've FIM and is going fantastic
C has been topped
Apologies for missing a week but I've been fighting pneumonia
Likes
63
Share


@AsNoriu
Follow
Day 126. Really day 90 from seed, part of Control Garden.
Amazing how they Bulk, 3 weeks of veg only, crazy strain !
If i ever wanted anything from this strain, she was like "Let's do it ! "
8 sisters were amazing, now i used last two biggest beans and those had no training, no light, nothing, but went into absolute overdrive smells amazing, branches hard to hold while trimming ...
Love them, maybe this time taste will be better, different nutes used ...
Its so funny to hear branches slowly bending and cracking under own weight with no support left ... Amazing sound for grower ;))
Control Garden is an absolute success even with Strawberries hermie part ..
Cure day. 250 g total. Insane for 3 weeks veg, one cola lost to budrot, no direct light and early harvest which led to a bit airy Monster Bulk buds, she could make 150 easy without budrot and one more week of flower ...
Will update on night shift ;)
Day Unknown. Decided to try out finally last girls for diary records, but ...
After a month of intense cure buds got angly/pyramid type forms ... ?????
Any idea ?
First two weeks moved at least twice a day.

Likes
9
Share


@DeepRootsGrowTrees
Follow
TRIPLE G by ROYAL QUEEN SEEDS
Week #7 overall June 12th-18th
Week#6 Veg
This week she was topped she doing well after being supercroppedstem starting to get thicker and she's looking good. No issues this week.
Stay Growing!!
Royal Queen Seeds TRIPPLE G
Likes
37
Share


@MG2009
Follow
7/31/2018
Wow 2 weeks since update?hmm.
Well #1 is in training still getting Wide, about 36 sq feet..6x6 area, tops starting to stretch, I think. Feeding Tomato 🍅 tone 3-4-6 maybe a slight boost of high p guano to help transition to flowering in next week or two, we'll be at 10hours of dark. And flowering will commence.👍
08/04/2018
Pre flower starting,post some pics soon. Got the little booster i mentioned above it is Fox farms big bloom as I said a slight boost.
#5 is definitely different from other plants, she is super stinky and sticky as hell, when stripping leaves. Took 3 clones for future testing.
Likes
6
Share


@XanHalen
Follow
Dec 12:
Growth has been good, leafs started yellowing as I tried a regular watering as opposed to a feed, and they did not take well to it. I’ve read that it’s good to incorporate waterings between feeds, but 24hr later noticed a bit of yellowing on the lower section, 48hr post watering even more yellowing.
Dec 18:
Going with feed only and yellowing has halted, stretching has officially begun. No adverse effects from the short term nitrogen deficiency (that’s what I narrowed it down to). Playing with budsites to maintain an even canopy, and as soon as I see stretching halt, and fattening begin, I will up the bloom nutes.
Dec 20:
