
Likes
Comments
Share


@AERO_Grower
Follow
1° Semana- Aeroponía - Crecimiento lento, pero luego mejorando las condiciones de crecimiento para las raíces, ya que al inicio la luz traspasaba a través de la arlita y la tapa del tarro, afectando el crecimiento, por lo que en el día 4 se realiza el pintado con pintura para evitar el crecimiento de patógenos.
---------------------------------------------------------------------------------------------------------------------------------------------------------------------------------------------------------------------
1st Week- Aeroponics - Slow growth, but then improving the growth conditions for the roots, since at the beginning the light passed through the clay and the lid of the bucket, affecting growth, so on day 4 I painted it to prevent the growth of pathogens.


Processing
Likes
13
Share


@Hawkbo
Follow
Day late on the update, pics/vids were taken on time tho just been a crazy week of harvests and trimming and keeping up with these. I transplanted all of them into 1 gallon bags 4 days ago from today. I linked up with Rain Science Grow Bags on Instagram and got them to offer all my followers and friends a discount of 10% off entire order from their site with the code ' bangdang ' so if anyone is in the market for a pot upgrade use that code. I got them in the mail 3 days after I ordered. Reason I went with Rain Science is because they offer identical air flow for rapid growth as the radicle bags, just using a different material and a tighter knit so water doesnt flood out the sides during feeds and when you pick these up when the coco is dry, it wont fly all over the tent like with the radicles. They're the optimal bag for autoflowers especially.
Likes
8
Share


@Antarctic
Follow
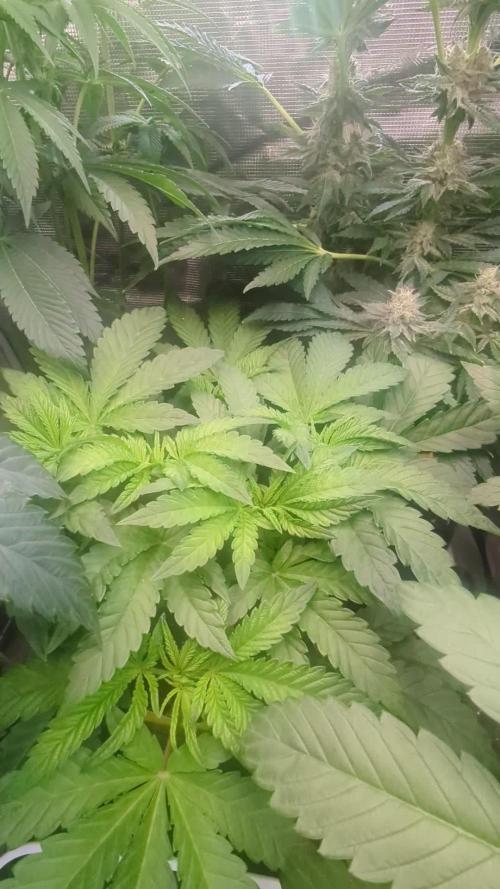
31.07.2025 – 06.08.2025
🌸 Week 3 Flower — Bud stacking begins! 🌸
This week was a turning point — stretch finally slowed down and the plants are now fully focusing on bud formation. The tent started getting really humid due to the extra leaf mass and transpiration 🌿💦. That’s when I realized: a dehumidifier is a must. Without it, RH would climb over 70%, which is dangerous at this stage.
Temperatures are still steady (27°C day / 20°C night), but now I’m working on dropping humidity to ~55–60% for safer flowering.
Nutrient-wise, I reduced nitrogen even more, focusing on PK boosters and bloom nutrients. Bud sites are stacking nicely, pistils are shooting everywhere 🧡, and the first serious trichome production has started ✨.
Mistakes from earlier (too much IR, uneven light distribution) are still visible on some plants, but overall the crop is healthy and vigorous. Next week should be the start of real frost explosion ❄️.

Likes
27
Share


@Mr_weed_pt
Follow
Last day of light today next 2days will be of darkness and then I will harvest all plants. They are looking good and strong smell . Cheese buds are hard as rocks and the ogkush smell sting diesel smell. Very happy with this grow..


Processing
Likes
2
Share


@Pauwela
Follow
8/11 day 21 girls looking real good at 18" to 20" tall, in grow box with lights on at night, out in the sun during daytime hours

Likes
3
Share


@Jointjourney
Follow
This week, the plant continued to develop with no major issues. However, signs of a magnesium and calcium deficiency have started to appear, which may require adjustments in the nutrient schedule with Calmag. The plant was watered once with clear, pH-adjusted water to maintain a stable environment. A mild yet distinct aroma has also begun to emerge, hinting at the plant’s unique character as it matures. Overall, growth is progressing well despite the minor nutrient deficiencies.

Processing
Likes
26
Share


@TheCannaProphet
Follow
Week 2
7/26- All the girl's are doing great. I had to use some horticulture wire to prop up a couple of the girls that got a little 'top heavy'. Giving 12oz water ph'd to 6.3-6.5 as needed 2 hours after 'lights on' around each plant, and every other day in the saucers (1/4g/ea) to allow the medium to
wick it up and stay moist. Temp's running 72-81deg with an average RH of 55-60%. I'd like to have the RH a bit higher but the girl's seem to be doing fine at the present. 😎Ordered another HLG 650R with the supplemental UV Bar to replace the two SunSystems 315 CMH's....should be a game changer! 💪 Also have an AC Infinity 6" exhaust system w/controller on the way to replace the Hurricane 400cfm fan I'm currently running along with another TerraBloom 6'x24" carbon filter as my current filter is losing efficiency.
7/27- Watered today ph'd to 6.4 with 2 tbsp/gallon unsulfured molasses added. I split 2 1/2g between the eight girls by pouring 12oz around each plant and then dividing the rest in their saucers to be wicked up. Temp's, RH and CO2 all on point!
7/28- Light watering today with straight non-chlorinated water ph'd to 6.5. Growth is looking great across the board. Even the late starters, Seedsman Zkittles #1 & #2, are coming along nicely! All the ladies are averaging in height between 2 1/2' - 3 1/2" and should be getting ready to explode as their root systems become more established and are able to start taking in more nutrients. Fans are running 24/7 to strengthen the stalks....they're gonna need it to support the buds these ladies will be sporting in a couple months!
7-29- Watered all through the bottom today with straight .5g non-chlorinated water ph'd to 6.3. Temp's, RH, CO2 and VPD all on point. Unhooked carbon filter from hose as it's losing efficiency restricting exhaust air flow. Girl's all growing STRONG especially the #1 Seedsman Gelato OG in Fox Farm/Nature's Living Soil mix and the FastBuds Purple Lemonade #2 also in the Fox Farms/Nature's Living Soil mix with the Seedsman Gelato OG #2 in SOHUM soil is getting close. I appears the two girl's in SOHUM soil are not quite as tall as the others but are leafing out well and are stocky with close node spacing.....hmmm?
7/30- Lift checked all the pots and gave 2 1/2g straight non-chlorinated water ph'd to 6.4 with 2 tbsp of unsulfured molasses added. I split the 2 1/2g evenly between all eight giving 20oz through the top and the remainder in the pans to be wicked up. I turned up the HLG 650R to 400w at the wall and kept the height the same. My AC Infinity Cloudline T6 exhaust and new Terrabloom 6x24" carbon filter came today, as did the UV bar from HLG for the HLG 650R that'll be here on the 3rd.....CAN'T WAIT!!! All the girl's are really doing well and starting to begin 'gettin it on'! All are healthy and running between 3-4" tall. Side note: While installing the new exhaust fan setup on of my pooches sneaked in the room and munched off a half of a shade leaf on the #1 Purple Lemonade....she's definitely got good taste!😆 In the process of installing the AC Infinity fan I relocated it and the filter to the left side of the tent and re-routed the cold air intake hoses so that both enter the tent at the bottom and are positioned at either side of the tent. I setup the AC Infinity which is a breeze, set all my high/low limits and alarms and let here run! Temperatures now are running 72-81 deg. and RH is remaining stable @ 55%, CO2@800ppm. All in all a good day!😎👍
7/31- Water looks good on all the girls. I'll just top water lightly today with straight de-chlorinated water ph'd to 6.5. The AC Infinity is really a 'game changer' as temp's are now staying in a stable range without having to adjust the settings on my Ideal Air 14k BTU AC unit...niceee! All my ladies are finishing up their second week like champs and I'm looking forward to the next few weeks as when their root systems reach the 'super-soil' they are going to hopefully have some explosive growth. I'll also be evaluating all of them in the coming week to determine candidates for topping and LST to begin.
8/1- The second HLG 650R came today! I tidied up the tent before installing the 650R: moved EXHALE CO2 bags-one on each side, vacuumed, took care of any loose hanger cords and re-positioned the three thermometers/hygrometers. I installed the second HLG 650R w/UV bar in the tent and set both lights to 400w @ the wall and have both boards centered, level and hung @ 36" from the soil. These lights are AWESOME! I checked temp's on the boards & drivers after they were running for 4 hours: 98deg on the drivers and 94deg on the board...pretty freakin sweeet! Gave the girl's a day off from water as they all looked GTG and are all getting ready to really turn on! I plan on hitting them early tomorrow morning with a good watering. Temp's-RH-VPD all on point for this week. I've been continuing to run the humidifier set @ 60% RH and I'm going so far as to ph the water going into it to see if it makes a difference as my well water runs 7.8ph @225ppm dissolved solids and I hypothesized that as the plants were absorbing the moisture from the air it might be beneficial to have that moisture at the correct ph.....we'll see I guess!

Likes
5
Share


@Ziocannabis
Follow
Va tutto bene, credo che siano meno di 20 giorni e dovrebbero entrare in prefioritura nel giro di qualche giorno altro
Dovrei eliminare qualche foglia parasole?? O lascereste così?!


Likes
8
Share


@XanabaGrows
Follow
These plants were started their flush 3 days ago, continuing to flush today & I will be chopping them down in a few days depending to the trichomes.
a couple of these plants' leading bud site were bent over to bring down the lighting closer to the surrounding bud sites.
Hoping for a nice size harvest for my first grow!


Likes
1
Share
@PapaTerps
Follow
Wizard Fuel - Wizard Trees
Day 63 - Watered with 3L of RO tap water with nutrients, mixed individually, in order and then pH'd to 6.3! She has made some great progress this week, stretching to almost 1m tall, she has also developed her buds sites really well - she isn't too bushy considering she was topped, and she has really impressive internodal spacing, which is going to make this grow so easy, as she won't require too much maintenance! She has been really really thirst this week, requiring 3L of watering every two to three days, but this is to be expected given she has six or seven main stems 💪 She was lollipopped last week and that has allowed her to focus on her canopy, so yeah, just letting her grow for now🙏

Likes
5
Share


@Orelgrow
Follow
Malheureusement j'ai perdu une féminisée du nouveau mixpack de chez Fastbuds et une autre qui ne se porte pas très bien qui vont être remplacée par des auto ( gorilla coockies + mimosa cake)


Likes
8
Share


@Garbagegrower
Follow
First time growing inside. I always just throw my seeds in the spil when I grow outside told myself to do the same here.
Put the seeds maybe 1 to 1.5 inches into the soil and put 1.5 ozs of water on and around the seed. Also had domes on my 1/2 gallon pots to keep humidity high.
Had my lamp at around 12 inches from the pots. Once they sprouted they stretched a bit so I out my lamp down to 8 inch and they stopped growing. I'll probabky stsrt at 6 to 8 inches next time and see what happens.


Likes
9
Share


@Cultivators_Dream
Follow
Week 6 was another good week for my lady. She has started showing some discoloration on some leaves at different sections of the plant so I'm thinking it came from my battle with fungus gnats, ( little bastards 😠 🤬), I had to use a good bit of neem oil and FF Force of Nature Spray so I think it burnt the leaves a little because PH is good and keeping all solutions ph'd so I truly don't know what else it could be.. But I gotta say FastBuds really have great strains man I mean this lady is just packing on the pounds and her growth is just stunning daily 🙌 😍 👌 👏 I honestly love growing it. Will be checking out more FastBud strains
1/4 The size that this lady has gotten in just a few days is nuts its been 4 days since I added the Recharge to her and in that time the growth is ridiculous 🙄 😀 she's gonna be a pretty good yield and buds are going to be perfect 👌 😌
Likes
6
Share


@jaydee702
Follow
The 2 cuttings of my Tiny pot bubba cheesecake on there second topping. these girls look good and im super cropping for strong stems to hold all the main tops.
Likes
77
Share


@ctm_dzagi
Follow
We continue training. Due to the fact that 10th day is failed because i didn't prevent left branch of the 1st pair escape, the trunk gradually twisted in the opposite direction. With the help of tent pegs formed a bush. In the video you can see the general plan and the picture from different angles.


Likes
23
Share


@Organic_LarF
Follow
High GD community,
Week 6,
Wonder pie doing fine. She keeps her tempo steady, not really fast, but she keeps developing. Some of the side branches starting to take form and first lining is a fact.
Ive removed 9 leafs, so te center gets more open for the small branches trying to come up.
I think i should cut the internodes that are up and down, but i only cutted the one underneath. If anyone is convinced its better to get rid of the upperone 2, please comment. I do thinl it might cause problems in a few weeks, bcs it will grow up instead of out to the sides, so, hormone regulation will change, slow down the outgrowing buds and extra pump up these internodes.
Enough rambling about that, lets talk about the plant intirely, bit by bit she starts to look like something i have in mind.
💦👨🔬
Just spraying ph 6.2water and 1 feeding this week. 3 waterings this week, 1 with nuts.
Thats it for this week boys👨🌾 and girls👩🌾,
Grow safe buds and feel free to check out my other ladies doing fine, 🌿🌿🌿
🙏🌿🌿🌿🙏