


Likes
52
Share


@UnorthadoxDude
Follow
Hello all and welcome to the much anticipated beginning of vegetation for these five Epsilon F1 Autos from Royal Queen Seeds.
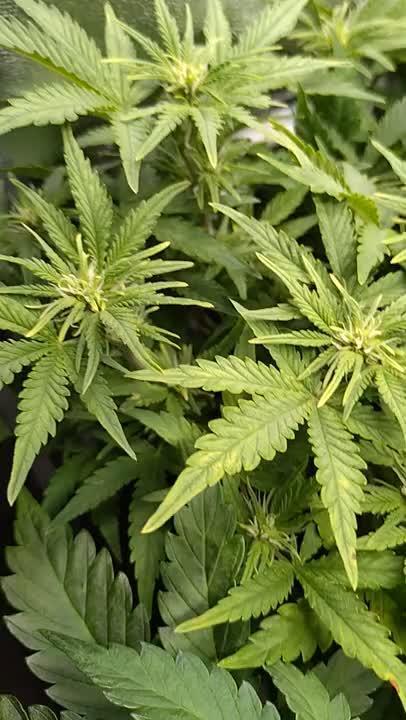
Allow me to introduce Ally, Normani, Lauren, Dinah, and Camila. All five girls have pushed put their 2nd node (3 fingers) and node 3 is on the way out. I expect all five girls to take off from here, and so the next seven days are going to be big.
I will start fertigation today.
For comparison purposes the Day 1 here means Day 1 of veg. For Ally, Normani, and Lauren this is day 11 since breaking ground, for Dinah day 10, and for Camila it is day 9. For the rest of this grow I will increment days from here but it's really easy to work out days since breaking ground as it is a simple matter of day + 10, 9, or 8 respectively.
Day 1: Fertigated 2l.
Day 2: Right ok. Can you actually believe this response in 24h? The poor girls were STARVING. Wow look at the change in color! Wow look at the growth!! Ally is most advanced, Camila least. It is fascinating so see them develop! They are growing faster and faster now.
So let us talk about the elephant in the room a little bit. Phenotypes. At the moment there is absolutely no evidence to suggest that this crop will be anything other than uniform. Nevertheless there are some clear differences in some of the girls. So let's have a look shall we:
Ally (center), Normani (closest to the middle purple basil), and Lauren (opposite side to Normani): These three girls are not quite identical, but it is a pretty challenging game of spot the difference.
Dinah: Okay so Dinah is coming in noticeably darker than her sisters, with a little more tendency to claw, and with quite a bit larger and more angular serrations. Her first leaves are also a different shape.
Camila: Little Camila had a twin, but I killed her with some overzealous tweezing before I realised what I had. She came in with only one cotyledon, and she came in last. Her first leaves are quite different to the rest of Fifth Harmony. She is also showing slighty more narrow leaves. She is lastly also very slightly more pale than her sisters.
Are these phenotype differences? I mean in terms of the environment, feeding, watering, substrate, temperature, light, airflow... well these girls are all in the same pot, so unless I am particularly haphazard in my mixing and fertigation (which I can assure you I am not) I do not think it likely that these ladies have significant enough environmental difference to account for these quite clear visual differences. I am absolutely fascinated to continue to witness this, and it has only now occurred to me what a great privilege it is to be able to grow the world first F1 cannabis hybrids, and what an astounding honor to be one of the very first hobby growers to do so! The fact that RQS made this happen by not only supplying the seeds and other merch and goodies, but also sending expedited international shipping so as to fit within my arbitrary timescales is almost unbelievable. When these guys (on their website) say that it is their belief and mission to forge the path to worldwide legalisation, they are not hollow corporate whispers, it is their core of being. Cannabis everywhere is truly blessed to have such a worthy and proactive ambassador. Bravo RQS!
I have adjusted the timer such that the main tent is now getting 20/4 upped from 18/6. After monitoring DLI at 18/6 for a week I am unhappy with the overall level but because of the varying heights of the plants I am limited in what I can do in adjusting the light height. Some areas were only getting 20 DLI. So I have rearranged to have the taller plants on the edges and the lowest in the middle and doing it this way all plants are getting between 35 and 50 DLI at 20/4 - although one or two cola tips here and there are getting 55. Will monitor for a week.
Day 3: Well look at this growth again!! These ladies have responded to feeding really well. Fertigated 3l.
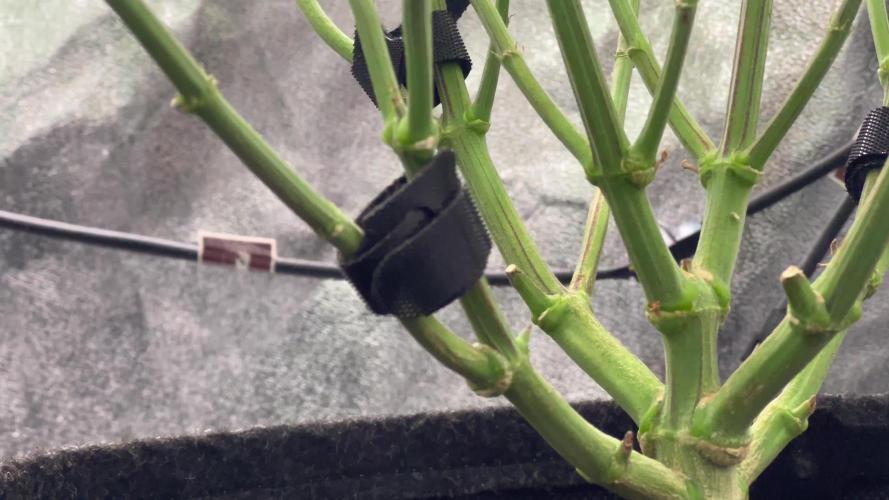
Day 4: Growth is accelerating fast, these ladies will be ready for their first training soon. I am starting to formulate an idea what to do. I am thinking of topping Ally and LST on the rest.
Day 6: Fertigated 3l. Ladies growing fast now. Will soon be time to start training. However! The secondary nodes are developing strongly. Hmmm
Day 7: Fertigated 3l. Defoliated the three fingered leaves from Ally and tucked the five fingered under other plants.
End if week summary: Well when they said "hybrid vigour" they were not joking. Look at day 1 and day 7 side by side after approx 6 days into veg growth. Wow.

Likes
Comments
Share

@PhinolaGreen
Follow
7. Woche Sie befindet sich mitten in der Bloom. Letzte Woche hatte sie Probleme mit Calmag und dann hab ich bisschen gegengesteuert. Soweit sehen die Ladys gut aus 😃 👍🏻

Processing
Likes
67
Share


@CommanderCannabis
Follow
Organization was the word for the week. I organized the leaves on Daphni by cutting some old fan leaves and low level leaves. I organized my CO2 injection procedure. CO2 tank to REGULATOR thru SOLENOID connected to TIMER every two hours with lights on. I also organized the power strip in the back with cable ties and sleeves. Finally I had to organize my way out of a FUBAR situation when the oxigenating device in the RainForest 66 Reservoir stopped working. I will have some words to say to Katie in customer service for sure. I got a standard oxiginator and a disk shaped air stone and use that now to keep the water healthy. Daphni is staring to bud more on the lower nodes and the progress so far looks good. Knock on wood. Since i turn the exhaust fan off when CO2 is injected i dont really need the heater so I took it out. Have a great week.

Likes
16
Share


@eldruida_lamota
Follow
Esa familia, siento actualizaros tarde pero esta es la última semana de crecimiento de las Blueberry cheese de zambezaseeds.
Estos ejemplares están bastante sanos y vigorosos el color que tiene es un verde intenso, eso es bueno,siento las fotos con el foco pero es que es cuando abro el armario.
Agrobeta:
https://www.agrobeta.com/agrobetatiendaonline/36-abonos-canamo
Mars hydro:
Code discount: EL420
https://www.mars-hydro.com/
Bueno las maximas de temperatura no superan los 25 grados y las mínimas no bajan 19, así que no me puedo quejar.
Los niveles de humedad también son los correctos van entre 50%/60% de humedad relativa.
Por supuesto el Ph lo estamos dejando alrededor de 6.
Hasta aquí es todo poco más la verdad ya con ganas de empezar la floración , buenos humos 💨💨💨

Likes
2
Share


@Ninjabuds
Follow
My three Bubble OG plants are looking fantastic, especially that tallest one! It's reaching for the sky and makes me think the others might have a little sibling rivalry going on. I can't wait to see how huge it gets.
Likes
9
Share


@BudXs
Follow
One of two turned out to be a herm. Fucking autos. No matter how flashy the packs, no matter how many clicks a company gets, you cant escape the instability of products rushed to market
First and last time I grow this strain, easy choice.
Save your money, grow photos

Likes
22
Share

@Wondrej
Follow
🌿 Week 12: Symphony of Growth (Flower Week 7)
We’ve officially entered Week 7 of bloom, and the energy in the tent has shifted. The plants are no longer growing tall for the light; they are focusing all their remaining power into hardening those colas and finishing the resin production.
🎼 The Vltava Ritual
I’ve introduced a new element to the grow this week. Every morning, as the lights roar to life, I play "Vltava" (The Moldau) by Bedřich Smetana. They say plants react to vibrations, and what’s better for a flow of life than a classic masterpiece? It’s become a ritual—the rising sun of the LEDs accompanied by the rising strings of the symphony. The girls seem to love the high-class treatment!
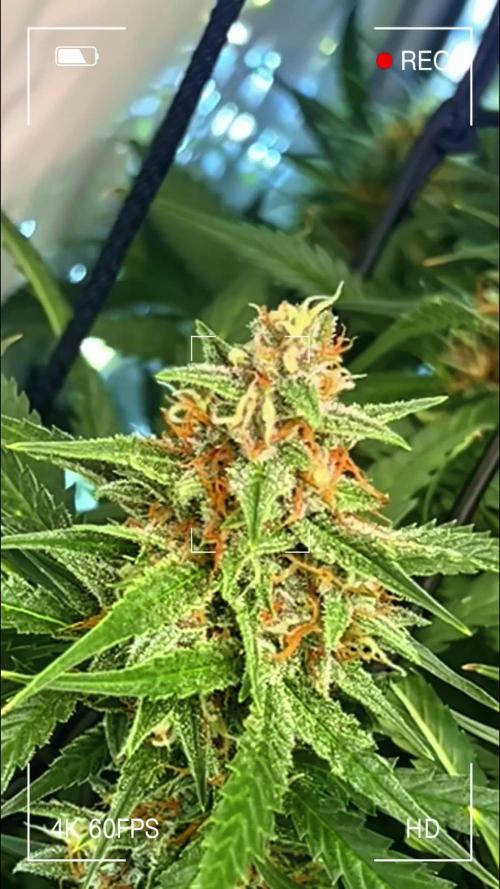
❄️ Status: The Final Ripening
The Banana Purple Punch Auto is looking world-class. The frost has moved from the buds onto the sugar leaves, and the density is getting serious.
• Trichome Report: I'm seeing a sea of milky white heads. We are very close. I’ll be watching for that first 5-10% of amber to decide on the final flush.
• The Fade: The nitrogen yellowing we discussed last week has progressed, which is perfect. The plants are naturally depleting their stores, ensuring a clean, smooth smoke without that "chemical" green taste.
🛠️ Maintenance & Environment
• Defoliation Check: The air is moving freely through the canopy after my previous heavy leaf-stripping. No signs of moisture traps or stagnant air.
• RH: Kept strictly at 40-45%. In this stage, humidity is the enemy.
• Smell: Overpowering. A thick, sweet, fruity scent that hits you the moment the tent zips open.
Update- week 8 is finishing and that smell is insane, but trychoms are not even cloudy yet 😜😜😜
One love growmies 💚🇯🇲
Wondrej


Likes
13
Share

@ohcibi
Follow
Due to issues with my ISP, I can't upload photos or videos right now. Like, I could upload slowly but then I always get errors from th website.
Grow is continueing to thrive. Both Ryu and Ken now have proper Buds growing at their tops and internodes are closing up as well. Kens biggest top bud is 3x4 centimeters. So I'm really looking forward to harvest within the next two weeks. I might be forced to harvest but more on that, when time arrives.
Update: I managed to upload my photos by some public WiFi. Enjoy friends!
Likes
45
Share


@masterofsmeagol
Follow
October 3rd. I've got to take some pictures and do my harvest reports. I did better quantity wise than I thoughtvi would. Quality is better than expected as well. I have everything else curing. I have some buds in a bucket that aren't MANICURED to my liking but good enough to cure. I've got some stuff hanging but its just going in a bag and to the lab for extracts. Let's talk about the girl that's still out there. Weirdest plant ive ever grown. Ive showed felliw growers and one said it looks like a reveg but it's not. Those pistols were already there. There are no rounded leaves or leaves with three fingers or one finger. Everything else is normal. I cut a bud off yesterday. The very bottom branch and it was thick and full. It's strange the bottom branches seemed to fill in butcthe colas havecthe outline of a two liter soda bottle bur looks like a string of pearls. Just foxtail. Even the buds that are thick still have foxtailing. The tips of the buds are skinny and I thought they might be dieing. I louped it and it is just a dark purple with trichs on top of trichs. My buddy that owns a dispo told me ge thinks it's a mutant. It's like calyxes on top of calyxes. Trichs are milky with some amber. It rained last night. I shouldve followed my intuition and took it. Oh well. It looks OK this morning. I've had to cut ONE piece of rot of this plant. My buddy said this is a perfect plant to wash. I don't give a shit about the structure or what it looks like. It's just my medicine. I'll try it before I throw it in a bag that's getting shipped to the lab. I'll try to keep this as updated as I can however this is a super busy time and I gave a lot going on so it will be a few days before I got my harvest reports done.


Likes
13
Share


@NordicClosetGrower
Follow
Finally received a couple of humidifiers to test from the local shop. These shitty low cost humidifiers will not really do, I can only have them on non stop until the water runs out. If I connect them to a sensor that switches them off, it won't go back on because it doesn't have a mechanical switch, I have to press on each time.
Still, let's see if this helps my poor dry leafs a little bit


Likes
27
Share


@420DeepGrow
Follow
Gracias al equipo de Zamnesia Marshydro XpertNutrients y Trolmaster sin ellos esto no sería posible.
💐🍜 Cosmic Noodles:
Orgullosa descendiente de Alien OG y Rollercoaster Haze, la Cosmic Noodles ofrece cosechas excelentes y una experiencia de fumar fragante. Esta variedad es muy potente, tiene un 25% de THC y produce efectos intensos y duraderos. Edificante y relajante, fumar Cosmic Noodles catalizará un colocón cerebral energizante que luego disminuirá hasta convertirse en un relajante colocón corporal.
Aquí se pueden detectar las influencias de ambas cepas parentales y las flores son notablemente cítricas, con la lima en primer plano. También disfrutarás de notas especiadas y terrosas con delicados matices florales.
🌻🚀 Consigue aqui tus semillas:
https://www.zamnesia.com/10777-zamnesia-seeds-cosmic-noodles.html
Código Descuento 20%: ZAMMIGD2023
💡TS-3000 + TS-1000: se usaran dos de las lámparas de la serie TS de Marshydro, para cubrir todas las necesidades de las plantas durante el ciclo de cultivo, uso las dos lámparas en floracion para llegar a toda la carpa de 1.50 x 1.50 x 1.80.
https://marshydro.eu/products/mars-hydro-ts-3000-led-grow-light/
🏠 : Marshydro 1.50 x 1.50 x 1.80, carpa 100% estanca con ventanas laterales para llegar a todos los lugares durante el grow
https://marshydro.eu/products/diy-150x150x200cm-grow-tent-kit
🌬️💨 Marshydro 6inch + filtro carbon para evitar olores indeseables.
https://marshydro.eu/products/ifresh-smart-6inch-filter-kits/
💻 Trolmaster Tent-X TCS-1 como controlador de luz, optimiza tu cultivo con la última tecnología del mercado, desde donde puedes controlar todos los parametros.
https://www.trolmaster.com/Products/Details/TCS-1
🍣🍦🌴 Xpert Nutrients es una empresa especializada en la producción y comercialización de fertilizantes líquidos y tierras, que garantizan excelentes cosechas y un crecimiento activo para sus plantas durante todas las fases de cultivo.
Consigue aqui tus Nutrientes:
https://xpertnutrients.com/es/shop/
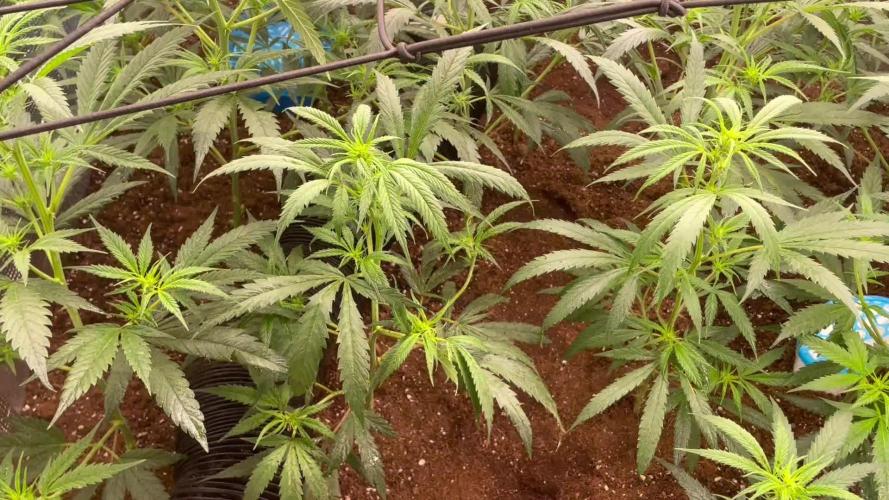
📆 Semana 5:
Comienzan a formarse los cogollos, las hojas se llenan de resina cada dia y el olor es bastante fuerte. Parece que ha terminado de estirar. Practico una defoliación intensa para airear los futuros cogollos y dejar mas espacio en el cuarto de cultivo.
Agrupo de nuevo las macetas en su lugar optimo para asi rellenar por completo la carpa @marshydro.
Me quedé algo corto de nutrientes pero estoy muy contento con los resultados, cada vez le voy encontrando mas su punto optimo. Siempre es mejor quedarse corto que pasarse.
Likes
7
Share


@Wygroillas
Follow
Week 3 hitting 4th in flower. Lost some old photos so can't go back. The tent is smelling glorious.

Likes
17
Share


@Naujas
Follow
She is much prettier than she was a week ago :) I remembered that I have my first grow light, which is more compact and it will give me more space, so I changed my light, now the girl's side branches get light too:) I add a lot of video memes, because I really want to win Iphone16 pro ;) and those who don't take risks don't drink champagne:) good luck to everyone.
Processing
Likes
2
Share


