
Likes
Comments
Share


@Mett420
Follow
Un po’ di problemi con la lampada, il bulbo non era di qualità e momentaneamente con il bulbo lumatek si spinge effettivamente come volevamo.

Processing
Likes
18
Share


@Cannibalgardens
Follow
The way she grows is very nice I like it the leaves are broad and the smell from her already is just so dam good skunky. The plant being transplanted helped and now she has just took off. I'm starting to do LST and bending her over very hard it's going good so far. The plant can take a lot and I'm loving the genetics can't wait to see how she goes next week ...cheer canna fam

Likes
Comments
Share


@Uneasy
Follow
Towards the end of the harvest, mold developed due to high temperature and humidity. I lost about 30% of my harvest. The buds did not fully mature. Despite all the setbacks, we managed to get a harvest.

Likes
13
Share


@Rob691
Follow
D-70 : Chaco Haze. They just look amazing, even 1/4 is very small (about 40cm). At this stage she should be 60 or 70 cm high... Anyway, the flowers are doing great. I really hope the will continue to grow. I dream of a grow room full of flowers between 1 and 1.4 m high ! Still 8-9 weeks to go, so they have time :)

Likes
20
Share


@eldruida_lamota
Follow
Que pasa familia, vamos a añadir la octava semana de floración de estas Apple Fritter de RoyalQueenSeeds, empezamos con la temperatura que la tenemos entre los 21/25 grados, la humedad está entorno al 50%, el ph está en 6.2 , el foco actualmente lo tengo encendido 12 horas y la potencia es al 100% de lo que da el foco.
También añado la gama de nutrientes de Agrobeta, que no falla, sin duda de la mejor alimentación que hay para tus plantas.
Las flores estan tricomandi
Muy bien y se están formando buenas flores, estas semanas acabarán de madurar.
Mars hydro:
Code discount: EL420
https://www.mars-hydro.com/
Agrobeta:
https://www.agrobeta.com/agrobetatiendaonline/36-abonos-canamo
Hasta aquí todo, Buenos humos 💨💨💨
Likes
4
Share


@Jahrulez
Follow
AAAAh Fastbuds, End of WEEK 11 Beginning of week 3 and shes BIG.
The beginning leaves are a biut fucked up but the new ones look great so thats nothing rll that worries me.. had it often on the first few leaves but ittl grow out of that.
Everything going great :D

Likes
33
Share


@Smokwiri
Follow
Plant recovered pretty good after ph problem, too much enhancer i think
Light is doing its job good as you can see.
Nutes at low levels...

Likes
2
Share


@Easygrower
Follow
Hello growers day 22 with the hulkberry auto what can I say but wow this girl is really taking off the stem and branching so thick and strong very impressive in 22 days I see her first pistols yesterday so iv added biobizz top max / bio heaven 2ml of each to the mix the 4 other girls I have in 6.5l it’s are doing well 2 of them are just like the 1 in the 11l pot doing very well but 2 are abit slower all in all a very good week iv also been trimming the lower big fan leafs through out the week just to help them breathe thay are growing some big ones so snip them off that’s all for this week be safe and happy growing
Likes
64
Share


@Ju_Bps
Follow
Hello happy Growers!
This week was better than early,
I've founded few very litle banana spend the week,
I will continue to check this week,
Harvest will be in 2 or 3 weeks, I hope can take situation under control untill harvest.
If banana start to be too big, I'll remove the branch.
If no, buds start to be compact, Nice sweet smeel and sticky,
Probably my last fertilizer week, after I'll start flush
Plant start to take less water, sign harvest for soon :)
Have a good week my friends
Likes
25
Share


@Belverde
Follow
Hi guys, thanks for stopping by here..
Smell awesome for this two leady, not ultra resinous but very very sticky...
I love the structure of the buds😍..
Now they are at day 54 from 12/12..
Only water..
The bigger one I think it's fine for harwest in the next five/seven days..
The "smallest" one in seven or more few days..
Can't wait to dry cure and smell the aroma come out from the jair ..and also vape too and get super stone😎🤣..
See you next week...
Harwest day..
Bye ✌️
I hope you can see all three video because I can always see only the first one..

Processing
Likes
11
Share


@MR_FASTBUD
Follow
Week 5 buds are getting fat!! Starting to get excited.. continuing lst and defoliation!
Likes
18
Share


@DeepRootGrows
Follow
This plant was one of my favorites to date, it was a perfect grow. She was so easy, she never showed any bad signs on her leaves, always was super happy. I accidentally topped her at about her 4th week or so when I was inducing LST on her. Didn’t even phase her whatsoever, she just branches off and did her own thing, I got her under a screen and the magic started happening, she bubbles up and came out with an crazy amount of flowering points. The amount of flowers she showed and then the color she showed during her fade weeks was unreal, her colors reminded me of something you’d see during fall season when leaves are changing outside. Super colorful and extremely sticky. I had to change my gloves and clean my scissors every few branches, a problem I never mind having. This is one of my top plants I’ve grown today, with the color and the size of the nugs it was a flawless grow. I tooted my own horn on this one to myself. 5 ounces is a stellar result and I’ll take that on any grow. I couldn’t recommend this strain enough and will definitely be in future grows for sure.
Thanks for stopping by growmies, I hope to see you in my future diaries!
Likes
37
Share

@GermGrowFox
Follow
28. März
Die Purple Punch sieht schon ziemlich fertig aus ☺️
Die neuen Lampen sind jetzt auch drinnen. 2x vertikal und 2x horizontal. Werde vermutlich nächsten run alle horizontal ausrichten.
Gibt sonst nicht viel zu berichten :)
Likes
1
Share


@Guerrilla_grower777
Follow
06/08/2025 20:15
Good climate but one day in the middle of the week had 2h of heavy Rain with some hail(FUCK) that damaged one branch of the frostbanger
Gorilla z bumping and frosting all good
Frostbanger unbelievable how frost It can be on her very first days of flower,this Will be frost and a banger😂
Apricot auto and Coco milk now transplanted ,had some problems bringing them here that's why they look sad
Fucking boars this place Is so dangerous right now


Likes
20
Share

@TheGourmetWeed
Follow
Nice plants
2 totally different phenotypes, as one was already harvested, and the other isn't even half way of flowering after 10 weeks.
Nice trichome production, great fresh and fruity smell, this plant is a pleasure to smoke in the end of the day.
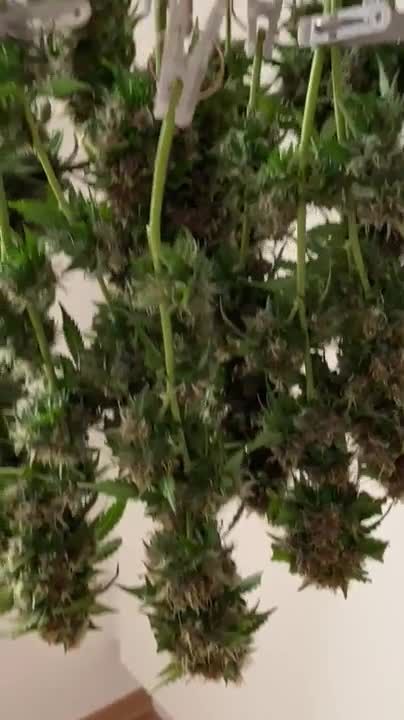
Dried her upside down hanging in a tent I have for the purpose, at 25c, 30%RH -
Only removed fan leaves, no manicuring, been doing that as I smoke, noticed the bud lasts longer and with a better smell and you end up saving loads of time.
Really happy with this smoke, smells like proper weed. Maybe was the best time I dried and cure(ing).
Only problem is that I'm smoking more as it's so tasty ahaha.
Good stuff, thumbs up!
PS - I'll start looking for the "original" Zkittlez to try out and check the differences between them.
Update: 12 April 2021 - Chopped down Plant #2
So, finally Saturday I chopped her down. She looked now ready and delicious, although I only notice yesterday how many seeds she has allover the place. She hermied in front of me without noticing, not good at all and need to start looking much better and in detail into the plants.
Feel like an idiot now.
Anyways, it was a full week!
Emptied the grinder collector and pressed it down a little, makes a very nice smoke, light but pleasant, the kind of stuff it keep you going all day without the dumb effect.
From all trimming made the bubble hash. Got a little too green as the 220micron bag's stitches slightly opened letting some contaminants in the final mix, hence the green color.
This was a hit. in opposition to the grinder stuff, this sent me straight to the moon, really heavy stone effect, even thinking was hard. Reminded me those afghan/ moroccan balls we used to get back in the early 2000's.
The weed itself it's still drying so the smoke report will be updated in there.
715g of fresh cut plant is good, let's see the potency and the seeds. Might turn it all into bubble hash, if I see it'll be an hassle to remove seeds.
On an earlier bud I've cut and dried, smoked it and you can see pure white ashes in the bong. Ain't that a beauty?


Likes
5
Share


@CannaIGrow
Follow
This plant seems to have grown much denser and better than my first plant. I just got the ac infinity ventilation setup with controller 69 for my 2x2, still trying to learn, hopefully grow #3 goes even better. Stay tuned
Likes
21
Share


@ArtisticGrown
Follow
Loving this week! A week of healing and growth. Topped some side branches on the og kush plant in middle. I’m still stumped if I should top again? Or just let me veg for a few more weeks??? Using water in between nutritions. Made a mistake with one of the plants tied down. I loved the other pot it was tied too and almost ripped the plant in half! Oh man!! But she’s tapped and I’m recovery now! Super excited for the growth and learning! Loving how things are! Happy growing friends “ been a couple days sense last updated og kush is doing better healing ❤️
Processing
Likes
5
Share


@jardineiroBud
Follow
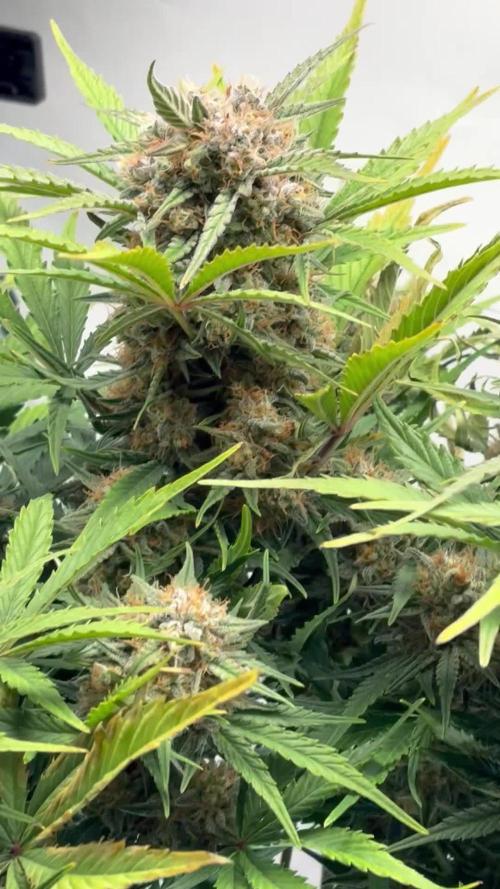
Need a microscope to check better tricomes. I'm in doubt if is ready or not
Likes
20
Share


@R3LOADABLE
Follow
5/7-D1...beautiful weekend to grow. Each new week will be on Saturday. I will be updating along the way multiple times per week. Giving averages for my conditions.
D2-wonderful week of sun is scheduled in the forecast. Lightly misting and keeping the roots moist. A little water every morning should do the trick. Plant is looking healthy otherwise. Not able to care and maintain like my other plants but I'm hoping for an impressive yield without any training techniques.
D3-very windy today, avg temp 81f.
D4-hot and humid today. Avg temp 80f. Gave a little misting at the base to keep moist.
*reached 90f today...woah
D6-high of 93 today. Giving the base a good moisten each morning, afternoon and evening, as it has been so so hot
D7- misted the base this morning, will continue to moisten when dry. First week down, probably 9 more to go.
Likes
25
Share

@eldruida_lamota
Follow
Vamos familia de vuelta actualizar todo, estas Casey’s rollex O.G. Están a pleno rendimiento, y es que esta última semana han cogido buena altura y las flores ya empiezan a formarse.
En su segunda semana de floración es lo que podemos apreciar.
.
La humedad esta al 45% la temperatura está entre 21/24 grados , y como siempre el ph , ya que es de lo más importante,está en 5,8/6,0.
.
AgroBeta:
1 ml x L Flowering black line , vía radicular.
0,2 ml x L Beta shark, vía radicular.
0,3 ml x L Tucán , vía radicular.
1 ml x L Génesis, vía radicular.
0,1 ml x L Betazyme, vía radicular.
0,05 ml x L Gold Joker, vía radicular.
0,2 ml x L Silver, vía radicular.
.
Hasta aquí todo familia 🕸️ , un saludo y buenos humos fumetillas💨💨💨.
