
Likes
Comments
Share


@hi_bengal
Follow
Everything in the 2x2 is looking good! Started some LST to open the plants up and get light to all the lower spots. Humidty around 60 to 65 percent bottom watered for the first time in the earthbox. Filled it up until it ran out of the overflow with Springwater. Will water again when chamber goes dry to prevent any root issues so far I am loving the earthbox!


Likes
53
Share


@gottagrowsometime
Follow
Welcome to my 1st DWC diary. Drop a like if you'd like me to visit your diary. Either way thanks for dropping by. 🍻
Super lemon Haze, was actually meant to be Super Lemon Haze Auto. The seed bank sent me these instead by mistake. Was asked to send them them back but decided to go ahead and keep these. I'm going to run these on a full Terra Power line up. I'm a bit concerned about root rot and bad bactria and all but I have nutrients to counteract this and break down dying roots. I feel obligated to run a full DWC enzyme grow as I have all these great nutes and 2 Sep buckets. So I'm gonna run this as a enzyme living grow and the other is a toss up for enzymes.
This plant is 80-100cm so I think mainlining this 1 will be the way to go, or not, I'll be mainlining the soil/coco SLH so maybe I'll leave this 1 to be a massive bush not lollipop needing to be done I reckon. Looking forward to getting this going. Gonna read through all my nutrients and pick the best enzymes and make sure I do it right. Will be starting her on a light diet as soon as she shows some leafs. Very small amount like 3-500ppm.
1/5/22 VD1 she has popped and was started on a light mix. I just added some distilled water to my mix for my soil terra power grows and added 1/3 extra water. No need to PH it. By adding mystical green it stabilizes PH and when water gets taken up it should still hold your set PH from start to beginning. This is something every1 needs to get that uses DWC or get something similar that helps keep PH in set level in 15L or a wk later in 5L. The PH should still be the same. In other nutrients this isn't the case. When the water is taken with the nutrients the stabilizer is left behind to keep the PH stable but this all depends on you keeping your water level and nutrient level up as it goes down while your plants eat. That's why ppl get massive PH/EC swings when your
The 3 Nutrients above were just for seedlings. They were left in the rockwool as they would have been left in the soil. They aren't been used since she showed face today.
2/5/22 5x bigger than yday. Looking small on top, she's growing a little to fast by the looks of it. (Not enough energy on the surface to support root growth) she only came out of the shell yday was about .3cm out of the rockwool. Bout 1.5cm now.
4/5/22 Decided to put her on the root stim La Calavera. Aka Voodoo juice. I found a chart saying I should be giving it.
6/5/22 So, it's begun. I've created a negative pressure environment, 1st time, let's see if it makes an impact. On wk 3 onwards I'll be running the intake extraction for 5mins every 30mins and I'll have 2 co2 bags up. If the RH becomes a problem or temp I'll put the extraction/intake back on 100% of the time. The extraction fan/intake is set at a ratio of 2 to 1. (100% extraction 50% intake) making a negative pressure environment, best way to show you have done this, the walls in your tent should cave in lightly
Same Day: Okay, so this my last update. Going to run fans the same right up until flower and then I'll be sealing up my tent and adding 2 co2 bags. And will be adding a dehuimifier and setting at 45% it checks every 30mins and if it's gone up it'll turn back on and bring down to 45 or set RH, so no co2 will escape. The temp will be bordering 30-33c and then when they go into their rest window they'll be transferred to to a negative pressure environment with low temps and 45-50%RH. I'll only be able to do this for the 3 weeks of pre flower. And maybe some more, it depends how hard the dehuimifier will be working, but i want dense buds and only way to improve that is by introducing Co2 and then a negative pressure cold environment for terps. Then I'll be putting them back into full negative pressure environment and the Co2 will be useless, again all depends how it's gonna affect my bottom line. That and I only have 2 intake fans. I'll be going into detail about my Co2 adventures the week before I'll be prepping them to be able to withstand high temps, so I'll gradually bring up the temps the last wk of veg 28c max and that way when I push it to 30-32c in pre flower she won't stress as much, I'll have to add frozen water bottle or set up a copper chiller pump to run into my DWC tanks, as it's only for 3 wks I think I'll stick to the frozen water bottles, if I can't maintain 78f 20c in my buckets I'll build my own chiller that'll run copper pipping into cold water and then into my tanks and recirculate it.
Thanks for reading, this is the last update for this week other than pics/video..
gottagrowsometime


Likes
8
Share


@roxdan
Follow
They are maturing nicely! There are some brown patches on leaves which I think was caused by overfert, so I've lowered the dosages a little bit. I think that I was giving them too much calmag, since all other Biobizz products are below 50% recommended.
I'm hoping to harvest the BD and the SD in 2 weeks, let's see.

Likes
6
Share


@Ninjabuds
Follow
Runts might be small, but it's got a big personality. It's the second biggest seedling I have so far, and those leaves – they're totally unique. Runts is growing like a champ, and I have a feeling it's going to be the star of the show this year.
Last week was awesome! I finally got around to giving all my plants a little upgrade – I repotted them into some bigger homes. They're all looking so happy and healthy now, it's crazy. I can't wait to see how much they grow this year!

Likes
2
Share


@Vet4weed
Follow
The harvest window was calculated to start next week. However, I've been monitoring the trichomes under a microscope and the majority of top buds had a nice mix of amber triches, I had to begin harvesting a week early.
This week I began harvesting the topmost buds only in order to allow the lower ones to continue to develop and mature. We certainly had a few hearty colas, with a number of well defined buds throughout all three plants. Next week we will harvest the remaining as initially estimated.


Processing
Likes
10
Share


@Anonymous_buds
Follow
Kicking ass this cheese went outside and brought back inside

Likes
17
Share

@Madd_Rez
Follow
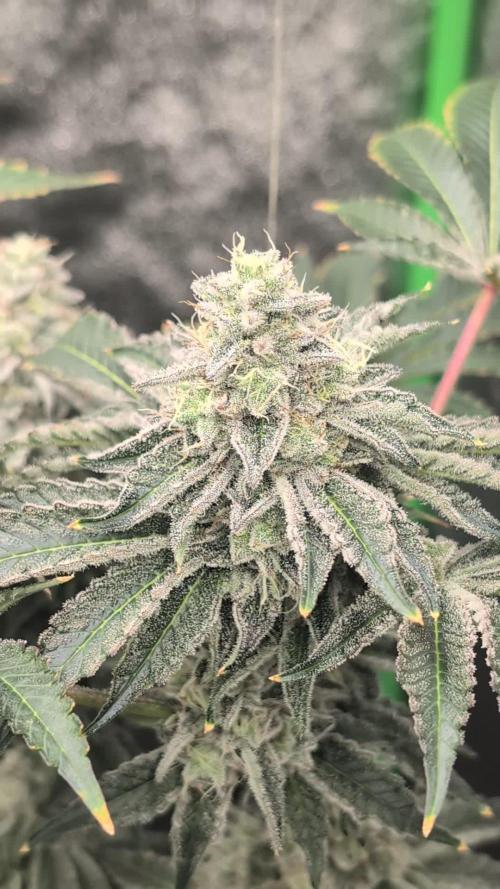
Super frosty in here, wow. Sour Diesel is all I smell but it's much sweeter. Started winding down on N today. We'll see how they do!


Likes
19
Share


@A_Rolling_Stoner
Follow
The one in the middle is struggling a little, but I'll just keep it and see how it turns

Likes
30
Share


@Velk1
Follow
This week was spannabis Barcelona had such a great time met some great people and Made some good friends I also managed to get my hands on some fire genetics from a buddy who hooked me up from the states and was also judging the monsters cup! Even got to sample the entry's man that was some dope smoke and chill can't wait till October in Madrid 👌🏾🙌🏾

Likes
143
Share


@Tropicannibis_Todd
Follow
👉Alrighty Then👈
We are back this week and they are killing it 👏 😎 🙏 zero issues 😀
👉So we are now starting our second week of Flowering and the stretch is on , the Black Domina is just Crazy 🤪
I've now started to implement my nutrients plan for full Flower ..... 👈
😳So I will be showcasing just 3 this round even thoe I am growing 7 plants 😳
👉Black Domina From Weedseedsexpress 👍
👉Permanent Marker From Weedseedsexpress 👍
👉Sleepy Joe OG From Weedseedsexpress 👍
The other 2 are repeats cause they are pure fire 👈 You can view these 2 in the 👉Summer Classic Diary 💪 Had issues with the Banana Biscotti germination, so it's way behind and also the extra seed I popped
👉Purple Oreoz From Seedsman 👍
👉Persian Pie From Greenhouseseeds 👍
👉Banana Biscotti From Seedsman 👍
👉Gorilla Cookies From FastBuds
Soil by Promix
Nutrients by Cronks
Lights by MarsHydro & Vivosun
Well this should be fun 🙃
Thanks to all my growmies out there for stopping by its much appreciated 👈
👉Happy Growing👈

Likes
Comments
Share


@Lynx_361
Follow
08.07.2025
Flowering day 9 and rooting day 9. Both, flowers and roots show up now.

Likes
7
Share


@Lacremelabs
Follow
The flora has started, and I increased the amount of MKP while reducing calcium nitrate. PPM is slightly above 1000, nearing 1200. The pH remains between 5.8-6. They are in that phase of substantial daily growth, hoping for a bountiful harvest. I'm still defoliating and tying them.
Likes
7
Share


@KannaKullektiv
Follow
Hiiigh friends 🙌
Welcome to week 5. 😍
The pretty ones have gained a lot of mass and have grown big and strong. This means they are continuing to train diligently.. 😊
See you next week. 👋
Arturo for KannaKullektiv
🙏
Likes
5
Share


@GrowDr
Follow
Day 16 : trichomes are starting to really show on newer leaves
Day 18 : starting to smell really good & stretch is continuing. Cultivar might stretch more then average.
Day 20 : Still stretching, nodal spacing is ok.

Likes
Comments
Share


@AmniZombie
Follow
Week 5 with the 40L pots and first week of flowering.
The plants filmed at the end they where from a diffrent tent but i put them inside my big tent to finish their flower period, they where grown in 11L pots whole veg & flower period.
The main grow that this post is about are 40L pots. I just had to show the buds in the 11L pots ;)


