


Likes
25
Share


@Grower_Of_Persia
Follow
my dry and cure style is this:
4 days of hanging upside down to get water activity lower to around 0.6 in 50% humidity and 26 C temp (i know its a little high but we are in a hot summer right now and i cant get it lower even with air conditioner) and then after 4 days of drying i remove leaves and stalks, trim buds and move them to jar for the rest of their life :D . and in the first 4 days of curing i open the jar door and let hem get some fresh air in the jar for about 5 minutes and close the jar door again, after 4 days of curing like that buds are smokable but they will get better as they getting cured about 1 month.
buds are one of the hardest as fucking rocks type of buds! very dense , compact , sticky , smelly , amazing at every aspect
growing stage was 60 days and flowering stage was 70 days total (harvested tops at day 63th)
the total weight of dry buds was : top buds 174 G + lower buds 55 G = 229 G
my overview of strain with details:
the seeds:
unfortunately i only got 1 seed cracked out of 5 so i will not know how much this genetic can get different but at least i got the chance to grow once of this wonderful strain
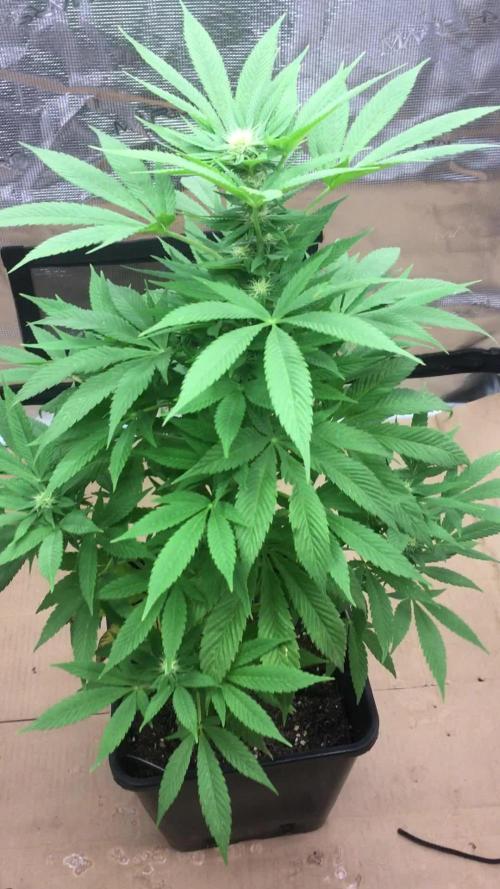
the plant :
in every stage you can ensure that you are dealing with a high level plant ,
she will get big so you have to control her height LST and SCROG highly recommended , will grow very well with tick stalks and big fan leaves , has good resistance for stress and will respond very well to stress trainings , she really has gorilla power in herself ,
fresh buds on plant :
buds are very compact and dense even from start , fresh blossoms smells like pineapple and mango , 2 different shades of sweet smells like you hold 2 junks of pineapple and mango in your hand and you smell them together, she is a trichome and resin factory , very very sticky , very oily , strong smell
dried buds:
very compact and dense , hard as rocks , has dark colors with purple hues inside it , it smells sweet
smoke :
very smooth and sweet like lollipop , pineapple , mango like , after 2 minutes it'll kick in and you'll get higher and higher with every breath , has a strange and especial high mind high mostly

Likes
Comments
Share

@Earthsower
Follow
At the end of the 3rd week of bloom the Dough Boy feminised is coming along with pistols appearing all over the plant. The leaves are stable green and the stem is a healthy green. The growth spurt has slowed down with the Dough Boy only gaining 2cm growth this week. The lady will be fed only as required. I will check the E.C level with the next feeding. She stands at approximately 62cm tall
Likes
Comments
Share

@blaze_fpv
Follow
start of week 5 flower | having minor deficencied but nothing crucial | smells insanely like permanent marker already

Likes
470
Share


@PurpleWorship
Follow
The Queen is definitly in good shape, and look stronger days after days... The leaves have a better color, not that lime green anymore, thanks to the rempoting in a 30L pot with fresh All-mix from Biobizz :)
There is a HUGE amount of bud sites, this is incredible. I'm trying to defoliate,, but I'm to the point buds making shadow to other buds... So I'm doing my best, removing what can be removed.
Lot of leaves showing trichomes, even big ones, It's also verry impressive... I will definitly be abble to make some hash out of the trim.
I never did that before, so that's a new process I need to learn. I will probably set the trim to the freezer and see this later.
I'm providing only 50% of recommended dose of Bio-grow and bio-bloom for now. I'll increase the dose slowly with next feedings.
Day 98 : Saw a dammmmn thrips. Only one, but the plant is so big that it's definitly impossible to check everywhere. I really wonder how he can survive in this trichome amazonia 😅
I applied Bio-bizz leaf coat on the plant, I hope this will keep thrips under control. But at this stage, there is nothing I can really do.
But the plant is strong, I'm sure she's going to win this fight ^^

Likes
20
Share


@TheGourmetWeed
Follow
Hey guys!
So, finally Saturday I chopped her down. She looked now ready and delicious, although I only notice yesterday how many seeds she has allover the place. She hermied in front of me without noticing, not good at all and need to start looking much better and in detail into the plants.
Feel like an idiot now.
Anyways, it was a full week!
Emptied the grinder collector and pressed it down a little, makes a very nice smoke, light but pleasant, the kind of stuff it keep you going all day without the dumb effect.
From all trimming made the bubble hash. Got a little too green as the 220micron bag's stitches slightly opened letting some contaminants in the final mix, hence the green color.
This was a hit. in opposition to the grinder stuff, this sent me straight to the moon, really heavy stone effect, even thinking was hard. Reminded me those afghan/ moroccan balls we used to get back in the early 2000's.
The weed itself it's still drying so the smoke report will be updated in there.
715g of fresh cut plant is good, let's see the potency and the seeds. Might turn it all into bubble hash, if I see it'll be an hassle to remove seeds.
On an earlier bud I've cut and dried, smoked it and you can see pure white ashes in the bong. Ain't that a beauty?


Likes
34
Share


@Weedeep
Follow
Well the grow was very pleasant, she got amazing structure an look of the buds, very frosty and amazing smell...so thank you Mephisto genetics you did insane job. i have ordered few seed from Mephisto but they lost i guess(((coz i have not receive them. So thanks guys for support and helping me for this grow all GD Family,Luv you all!!! Peace

Likes
4
Share


@Finsfan
Follow
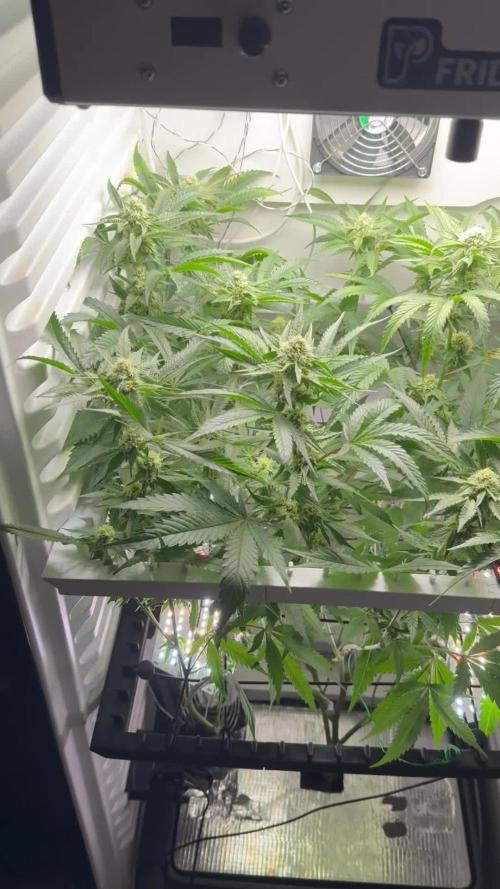
Finally in full flower mode. Ready to start putting on some serious size. I turned the lights up to 80% a couple days ago and they both are taking it well. No light burn yet that I notice.
I'm not sure if I should start bringing the lights closer at 80% or keep the distance but instead
Increase power to 90%. Going to feel it out as we go. Happy so far for sure.
Update: increased light to 100% . No lead burns or weird looking leaves yet.. Just bulking up and very thirsty!
Doing a nutrient/nutrient/water feeding schedule now.

Likes
25
Share


@Esoteric_growing
Follow
Had problems with ph swing on this run and a faulty ph meter caused extra issues but overall it bounced back well. Moral of the story is always have a spare ph tool lol


Likes
15
Share


@Zorro123
Follow
I added a second LED which works with more purple/red light additionally to my full spectrum white light to give the buds more the wave length they prefer.
Seems like the new light pushes them to spread and elongate their branches, especially the main stem.


Likes
260
Share


@SlowpokeFuegobud
Follow
🐒 🍌 🌴🐒 🍌 🌴🐒 🍌 🌴🐒 🍌 🌴🐒 🍌 🌴🐒 🍌 🌴🐒 🍌 🌴
Welcome to week 6!! 😘
DAY 38
Watered with pH-ed water + humics + fastbuds + growzyme + bigfruits + vitalize 💧
DAY 40
Foliar spray with Nutrispray 💦
DAY 42
Watered with 1ml grow + 3ml bloom + 2ml roots + 3ml humic + 4ml growzyme + 3ml calmag + living organics topdressing 💧
FLOWERINGGGGG!!! 🌺 🌻 No joke, they all pre-flowered (all 4 strains) 4 days after receiving the valerian extract for the first time (also the much younger Donkey!!).
You can get the Fastbuds from Green Buzz, it contains valerian extract. 💚 🌹
Thanks, my growmies for visiting and reading and commenting, I love reading your comments! Mwah! 😘
Thank you, @Kannabia, for sponsoring this grow, aaaaand for the amazing gift pack! 😍 I hope to make you proud! 🧡
Special shouts out to my fantastic sponsor @GreenBuzzNutrients! Thank you for trusting me with your awesome products, I'm a longtime fan! 💚 🙏 Green + juicy growmie hugs to my Greenbuzzers!! 😘
Grower Love everybody!!!11 💚 💚💚💚💚💚💚💚
Wishes do come true, they just take a lot of time sometimes.. ✨
If you wish to try Green Buzz Nutrients, there's a 25% discount code hidden down there in the week comment somewhere.. 😎
__________________________________________________________________
https://www.kannabia.com/en/feminized-cannabis-seeds/monkey-grease
Monkey Grease
At Kannabia Seeds we have put all our effort into bringing out our own feminized Monkey Grease, a cross between Monkey Grease x White Widow, focusing above all on giving it its own personality in flavor and aroma (frankly unmistakable).
Its own personality
At Kannabia Seeds we have put all our effort into bringing out our own feminized Monkey Grease, a cross between Monkey Grease x White Widow, focusing above all on giving it its own personality in flavor and aroma (frankly unmistakable) and, of course, in Highly demanded characteristics, such as high resistance to diseases and pests, and adaptability to all types of growing conditions, making it close and easy to grow to the widest possible range of growers. The result is a really powerful and versatile indica-sativa marijuana seed, with a powerful relaxing effect, ideal for those moments when you want to disconnect from the madding crowd.
Cultivation of Monkey Grease
Which cultivation method would be most appropriate for this variety? Good question… and one that is easy to answer. Its versatility and adaptability make it a true all-rounder, with remarkably uniform results, whether you choose SOG, SCROG, hydroponics or guerrilla growing. Moreover, we invite you to experiment and play, varying the techniques from moment to moment, and to draw your own conclusions. We are convinced that in all cases, apart from minor variations, the results will always be optimal, giving remarkable yields and in a short time.
Attention should be paid to its high bud production, which can be fat, dense and heavy, although its sturdy branches are able to bear heavy loads without major problems. If you are a fan of extractions, our Monkey Grease is also optimal, given its high production of caramelised resin.
If it is already amazingly productive indoors, this variety excels on its own merits outdoors, where it can easily reach 200 cm in height, and can reach between 700 and 800 grams per plant.
It is therefore an easy and grateful plant, which demands little from its gardeners, making do with simple basic care, and with little or no propensity to develop diseases or mildew, or to attract pests (despite its striking aroma!).
Taste and effect of Monkey Grease
Our Monkey Grease stands out first and foremost because of its powerful, strong smell, which is hard to camouflage. A penetrating aroma that unfolds, in a balanced way, on the palate in the form of a wide range of spicy and sweet flavours, reminiscent of wild honey, nougat and cinnamon, and distant notes of milk chocolate. A delicious treat to be savoured calmly, without haste, as a preamble to its pleasant effect: extremely relaxing and narcotic, powerful, ideal for meditation and moments of introspection and meditation.
Don’t be in a hurry with Monkey Grease. It can be your perfect ally to treat those stress and anxiety problems, but for that you must let yourself go, surrender to its charms, especially if you are inexperienced.
________________________________________________________
Setup:
60x60x180 cm Zelsius
Greenception GC4 128W
4 Cluster OSRAM + CREE LEDs (380, 455, 630, 660, 720, 760nm)
6400k (cold-white to cover the basic load during the growth)
2100k (warm-white to cover the basic load during the blossom)
The module groups can be switched individual as follows:
⬤ Module I: growth 1x 32 watt
⬤ Module II: full spectrum: 2x32 watt
⬤ Module III: Bloom: 1x 32 watt
⬤ Module I is optimized for the growth phase. A relatively high amount of blue and white support a dense growth.
⬤ Module II suits for the growth as well as blooming phase. Optimal plant light full spectrum.
⬤ Module III is optimized for the bloom. A high portion of red and an additional infrared push.
Green Buzz Nutrients https://greenbuzzliquids.com/
❗ Use code GD42025 for generous 25% discount (for orders of minimum 75€) 💚
Plagron Growmix
Carbon Active Granulate 240cm³/h
tab water pH 8 - EC 0,25 with Calmag to 0,5
Advanced Hydroponics pH minus Grow + Bloom to pH 6.5 💧
🐒 🍌 🌴🐒 🍌 🌴🐒 🍌 🌴🐒 🍌 🌴🐒 🍌 🌴🐒 🍌 🌴🐒 🍌 🌴

Likes
11
Share


Likes
19
Share


@Ganjagrandaddy
Follow
Day 9 above soil: Well they survived their 1st week above the soil and are looking fairly happy among the other girls in this Fast Buds fun grow. I have a clear front runner with #3 of the girls being the most developed and certainly the largest of the entire crop.. All factors bed
sides medium are the same within the room and the environment is the best control I have had for any of my previous grows so there shouldn't be any "better position" or best of the nutes situation here either. Genetics obviously plays a big role but her speed is above what I expected and even faster than her sisters. They have had their 1st coco feed today and have been given a few waters throughout the week with the biosys tea. I have no real concerns on these triplets and see them growing nicely at the moment. The slight pale issue is not bad on these three so let's see what they can do when they get that organic gold into their stems.
Likes
24
Share


@Sleestacker
Follow
Started her (Betty) 1/3/22 when I was drinking and pissed that one of my double grapes 🍇 seeds didn’t pop. I’m trying to start 2 new autos every month so I can get a cache of bud stored up.
Betty shed her helmet on 1/7/22 and looks like a lil banana 🍌 she’s so cute

Likes
51
Share


@homerjgangia
Follow
Sweet Seeds Runtz XL Auto
Variety: SWS88
Indica: 47,1%
Sativa: 52,5%
Ruderalis: 0,4%
THC: 17-25%
CBD: 0,5%
Interior production: 400-550 g/m²
Foreign production: 50-175 g/plant
Harvest Interior / Exterior: 8 weeks from germination
Height: 60-120 cm
Equipment:
Mars Hydro ts 1000 (veg-bloom)
Custom growbox 60x60
Biobizz nutrients (Veg & Flower)

Likes
8
Share


@MMVSS
Follow
Almost Ready to incorporate fish into the res to feed the Few roots hanging out! Cover crop coming in nicely! Seedlings looking super happy! Can't complain so far so good can't wait to start Feeding fish!!!
Processing
Likes
10
Share


@StarletBud21
Follow
Woop happy with how the grow is coming along had fun trimming the girls down shitting myself at the same time though😝 still on an 18/6 schedule as I didn’t want to over stress the plants following defoliation and scrog .
Scrog setting up wasn’t too bad hope I done it right 😅 the screen is slowly becoming very green haha .. I’ll keep looking around on the web to widen my knowledge but for now it seems all is good my plan is to switch to 12/12 starting week 6 and around this time I should look into adding bloom to feed the autos as I’m sure they’re in pre flower stage right now but if ever in doubt I shall ask
Some cool photos to look at as well
Happy growing ☠️

Processing
Likes
5
Share


@AgroCultiveta
Follow
Semana 12 de los esquejes y su primera semana de floración, en realidad llevan 9 días de flora.
Hago los riegos 1/1, uno solo con agua(EC: 0.4) y el otro con los fertilizantes.
En los riegos estoy utilizando Sensi cal-mag para llegar a una EC base de 0.4 y luego aplicar los fertilizantes.
Regulo el PH con los reguladores de BioBizz.
Por lo demás todo va bastante bien, las dos plantas van con buen aspecto y sin posibles carencias, espero que todo siga así.
Seguimos con todo la flora!!
Cualquier recomendación será bien recibida!!