The Grow Awards 2026 🏆 


Likes
Comments
Share
@Kitties_and_Colas
Follow
~_~_~_~_~_~_~_~_~_~_~_~_~_~_~_~_~_~_~_~_~_~_~_~_~_~_~_~_~_~_~_~_~_~_~_~_~_~_~_~_~_~_~_~_~_~_~_~_~_~_~_~_~_~_~_~_~_~_~_~_~_~_~_~_~_~_~_~_~_~_~_~_~_~_~_~_~_~_~_~_~_~_
❤️💡🌱😽💨
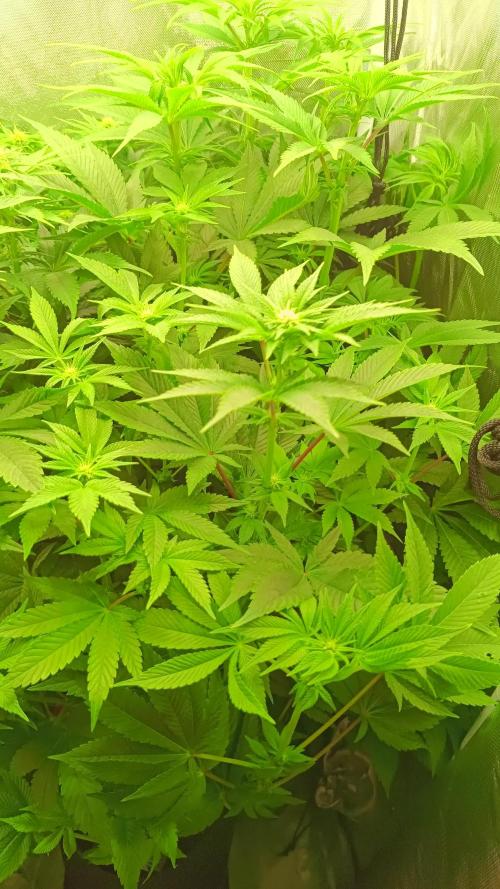
We finally got our calmag order, these girls were begging for it..the color is a little limey on 1:2 but she should be just fine.. plants are praying a lot, i take this as a good sign. Buds are forming fast and given the node spacing I think they'll be nice and long.. We removed most the top fans and cleared the bottom 1/3 growth from all plants this week, light penetration is awesome , we're still at 75% power with the Solux 350 but this seems to be more than adequate for now (we're trying to keep power consumption low between 4 active tents to avoid anymore power issues).. The Solux 350 is surprisingly cool, i genuinely thought we would be fighting heat with driver inside but is as cool as all other tents in the room.. not too much else to report, its been a great week!..Thanks as always for dropping by and happy harvests folks!!
⚡Hortibloom/Solux 350⚡
Specifications ⚙️:
Diodes: Samsung LM281 Pro / Osram DR (1,440 total)💡
Driver: Inventronics 350 watt🔌
PPF: 1015 μmol/s ☢️
PPE: 2.9 µmol/j 〰️〰️
Lifespan: 50k+ hrs ⌛
Weight: 14.3lbs lbs (6.5kg)
Veg Coverage: 5 x 5 ft 🌱
Flowering Coverage: 4 x 4 ft 🌼
-Uses an aluminum heatsink (no fan), quiet while operating 👂⬇️
-IP65 waterproof ratings, tolerant to high humidity grow environments 💦
-May be daisy-chained via RJ14 and managed from a single controller 💡~💡~💡~💡~💡
🌎 https://hortibloom.com/products/solux-350-led-grow-light
~_~_~_~_~_~_~_~_~_~_~_~_~_~_~_~_~_~_~_~_~_~_~_~_~_~_~_~_~_~_~_~_~_~_~_~_~_~_~_~_~_~_~_~_~_~_~_~_~_~_~_~_~_~_~_~_~_~_~_~_~_~_~_~_~_~_~_~_~_~_~_~_~_~_~_~_~_~_~_~_~_~_

Likes
12
Share
@CheeRz
Follow
Lady runtz has started to form buds. I'm more than happy with the growth so far. Meanwhile I'm having problems with the height. I'll probably have to remove the fan and charcoal filter from the tent to make more room at the top.

Likes
14
Share
@MillennialHippie
Follow
Had some issues with mold forming in the bottom part of the pot”1L water bottle”. So I thought I should make a couple of new ones. For what so ever reason I started stabbing the bottom of the new empty bottle and stabbed myself on the hand😀.No comment. I think this is a result of an experiment I did to check the drainage of the pot. I’ll water a very little bit and let the girls to use all of the water near their old soil. I’ll also wash the old soil and let it dry in the sun. Gorilla looks kind of bothered these days. Hope the changes and the change of the fan's volume ,from 2 to 1 non direct,help. Thanks for reading. I’ll keep you updated for the health of the girls. After that do you think I should take out the tent and transplant into 6,5L a bit earlier?

Likes
10
Share
@StickyFingah420
Follow
Ganadora del primer lugar en la categoría autofloreciente de la copa Litoral de Los Poetas en Chile.🏆🥇
Definitivamente en mi top 5 de preferencias ⭐️⭐️⭐️⭐️⭐️
Una genética muy estable, ya que es segunda vez que germino de estas semillas y se expresa exactamente el mismo fenotipo; tonalidades hermosas y caractericas, frutos muy apretados y macizos cubiertos de una capa de tricomas lo que le da una visual espectacular.
El aroma en frasco es una mezcla de frutilla ácida y tierra con un fondo dulce 🤤 es realmente exquisito. En la fumada se repiten gran parte de los aromas pero menos dulce y más cremoso y especioso, detodas formas es un humo genial que querrás fumar todo el día..

Likes
150
Share
@FrenchxFarmer63
Follow
Cette semaine à était très riche en engrais naturelle et en eau !!!!
*Fumier de vache pour les différents apport qu'ajoute cet engrais au fil du temps ,
*Marc de café ,
*Purin d'ortie ,
*Peau de banane
*Cendre de bois
Arrosage tous les jours en petites quantités pour aider à assimiler tous les apports donné
Et voilà que c'est demoiselle ont pris un coup de speed pour la poussée , obligé de continuer le palissage encore à ce stade... Ça grandit , ça grandit !!
Nous sommes fin Juillet , je suis dans l'attente que les jours réduisent pour le passage en floraison naturel grasse à la nuit...
Je ne sais pas si je dois procéder à une grosse défoliation pour les feuilles du dessous sur le principe d'un "Lollipopping" , qu'en dites vous ??
Des avis ?
Des questions ?
Des choses à dire ?
C'est toujours intéressant de discuter sur les différents mode de culture !!


Likes
29
Share
@DreamIT
Follow
Sponsored by:
ORIGINAL SENSIBLE SEEDS-💡VIPARSPECTRA💡-💐GREEN BUZZ LIQUIDS💐-🛠️WEDRYER🛠️
28/7 this beauty is growing monstrously. the two lower branches have divided themselves into two apical ones, very nice to see, very particular. these days it will be cut to see how it behaves in cloning and will be put into flowering early next week. Yeah!
2/8 grows really luxuriant! beautiful and with a scent of orange in the background. I can't wait to see it in bloom
__________________________________________
Personal advertising (contains affiliate links)
__________________________________________
🦄Highest quality seeds since 1992, a real guarantee! (no affiliate link)
✅https://bit.ly/Originalsensibleseeds
__________________________________________
Did you know that Green Buzz Liquids fertilizers are 100% vegan? A complete line of products ready to give the best to each of your plants! Visit the site and see my journals to see how they work 🦄
🤯 And with the code "dreami t" you will immediately receive a 15% discount on your purchases
✅https: //bit.ly/GreenBuzzLiquidsPro
__________________________________________
👀 Are you looking for a good lamp to start with? 👀
🌞Viparspectra has something more than the others, take a look at their site.
⏩ Use "GDVIP" for an extra discount or "DREAMIT3" for an extra 5 %% discount
👀 Search for it on Amazon
✅Amazon USA: https://amzn.to/30xSTVq
✅Amazon Canada: https://amzn.to/38udUVe
✅Viparspectra UE: bit.ly/ViparspectraUE
✅Viparspectra USA: bit.ly/ViparspectraUS
______________________________________________
🌈 Tired of blowing on your weed hoping it dries quickly? Check out the Wedryer website! You will find a well-made accessory that will help your weed dry in just 8-10 days without the annoying risk of finding mold or other annoyances! (no affiliate links)
✅https: //bit.ly/Wedryer_
______________________________________________
📷🥇Follow the best photos on Instagram 🥇📷
https://www.instagram.com/dreamit420/
Backup
https://www.instagram.com/dreamit4200/
🔻🔻Leave a comment with your opinion if you pass by here🔻🔻
🤟🦄💚 Thank you and good growth 💚🦄🤟


Processing
Likes
12
Share
@Mistertemps
Follow
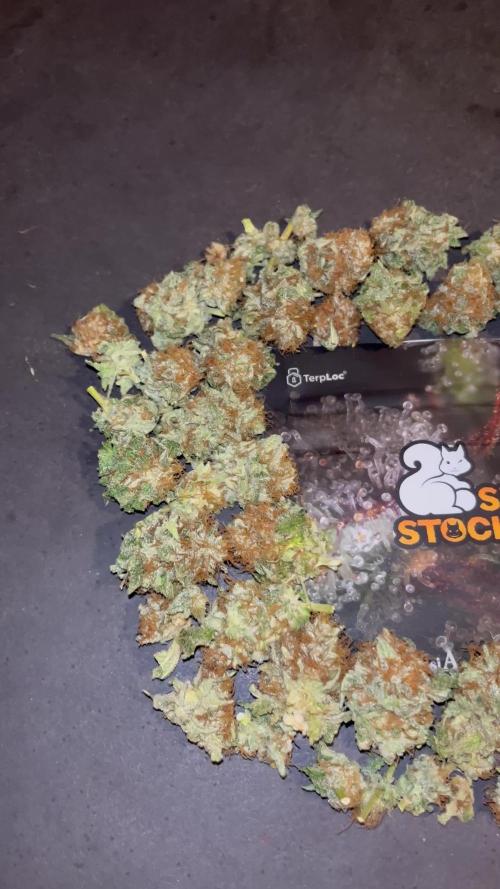
I had a really great time growing these girls. The question regarding smell went out the window when they were drying!!! I had move my carbon filter and fan out the tent and in the living room. The smell was leaking out the apartment!! I’ve only sampled one of the 5 sisters. Who look so different. But all have the same smell for the most part. Gonna cure them all for the minimum 2weeks and see what that does tobyhe smell and taste also potency. Back to sample test very smooth smoke it was a tiny bit greeny in flavor. And a heavy delayed effect. Like boom my eye are low and heavy. It was great!! 😂😂😂 THANK YOU EVERYONE FOR ALL THE COMMENTS, ANSWERS, AND LIKES! Can’t wait for Round 2!!! Gorillazkittles, gelato.og, GDPxGushers, GELATOxGushers. All from this time!!! Stay tuned! 😎00

Processing
Likes
20
Share
@Sugarnugolia
Follow
Started doing some light defoliation a bit each day on the very low level offshoots and any big leafs blocking main bud sights.
Looking back I should have done a bit more earlier on as these are very heavy and leafy plants.
At the start of the week my light was at 55%, on 13 Nov I put it to 100% to see how they react. I will monitor to see if they are ready for it but they really took off this last week.
My one plant in the back left always appears droopy compared to the others because the leafs on it are so big it weighs down the whole plant.
The plant in the back right was always janky and I considered not even growing it. The seed came through a few days later than the rest and I almost wrote it off. Figured I would use it as an experiment and try and learn from it instead.

Processing
Likes
93
Share
@Ferenc
Follow
Week 16. This is the final week. I will harvest this girl on Sunday as it is ready. I have already tried some and it is very nice, strong, it makes my body relaxing, my limbs are easy. Lovely strain and very strong, this is good medical stuff. As it can be seen it is full of flowers, and a lot of THC. From tomorrow ( Friday) I will not give any water because Sunday it will be harvested. Friday: Last day of watering. Saturday: Tomorrow is harvest day. No water for the plant. I will be back tomorrow.

Likes
3
Share
@eldruida_lamota
Follow
Venga familia que ya viene la cosecha de estas semillas mistery de Seedstockers, que ganas que tenia ya de darles machetazo.
Que locura de variedad , me encantó cultivarla , aún con la plaga de trips que sufrí aguantaron y sacaron unas flores alucinantes.
Las flores aparte de piedras, se ven resinosas.
a sido una genética con la que disfruté bastante, por el momento no puedo dar muchos más datos sobre este proyecto pero aquí resultados.
Agrobeta:
https://www.agrobeta.com/agrobetatiendaonline/36-abonos-canamo
Mars hydro:
Code discount: Eldruida
https://www.mars-hydro.com/
Hasta aquí es todo , espero que lo disfrutéis, buenos humos 💨💨.
Likes
2
Share
@Grilla
Follow
I’m not 100% done collecting all the data. By the smell of it, this plant will be one of the dankest plants I’ve ever grown. More to come.
Tuesday, September 5
I have the nugs in jars right now. Hopefully I didn’t let it dry too much. Right now the humidity is at around 52% but I think if I move the jar around a bit I can them to sweat a bit more.
Likes
2
Share
@youdan
Follow
inizia l'ingrosso, gli odori sono fantastici, la grandezza e adatta alle settimane cresciute, ho aumentato la fertilizzazione e ho avvicinato le lampade.

Likes
23
Share
@adam_pawloski87
Follow
This week has been great ,today is day 78 and the girls are just doin their thang , 1 looks ready for flush already and the rest look about another longer then flush for them aswell,, can’t wait to see how these girls finish out over the next couple of weeks 😍!! Y’all keep them eyes peeled an stay tuned for next week! Peace love an positive vibes to y’all Cheers.💨💨💨
Likes
15
Share
@NaturalMystic
Follow
Days. 99 F15 Lolipoping!
Days.102 F18 Bad news!. My medium raise to PH 7.0 but now no sign of any problem fast producing bud form. ☺️i will give her ph5.8-6.0 for next watering thank you all advice from my grow question. THANK YOU <3

Processing
Likes
2
Share
@Justrite
Follow
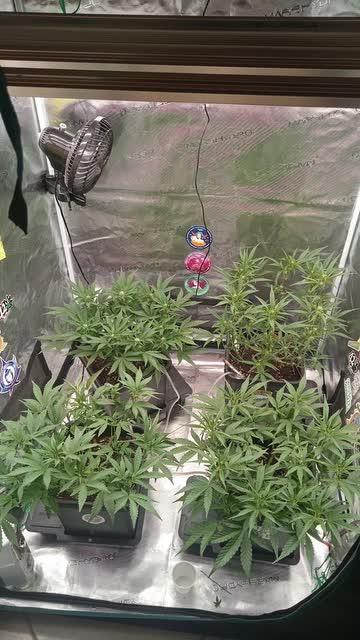
Working temps up slightly and increase light intensity.
Quite please with this quantum board led so far whilst in veg .
Nutes upped slightly but bearing in mind I have a little amount of light mix soil at top of pot when rock cubes got put in the bigger pots
Still feeding over the top of pot to eatable roots before hooking up the auto pot system .
All seems in check so far apart from a little water drip damage on the young leafs from doing a folair sprey in the begging of this run .
Still undecided weather to go for topping at the 6th pair of sets and remove the bottom set for my usual 5pairs and top n top
or to get them growing on a side ways lean for a lower stress impact throughout the veg .
Any thoughts and comments on this would be good regarding what would yeild better

Likes
44
Share
@Cogollo_eu
Follow
**Encontrarás la traducción a español al final de la descripción**
From/Desde: 05/04/19 || To/Hasta: 11/04/19
From day/Desde día: 43 || To day/Hasta día: 49
You can find the Money Maker Diary here:
** Podéis encontrar el diario de las Money Maker aquí:**
https://growdiaries.com/diaries/25667-gorillamakingmoney-gorilla-vs-money-m
-----IMAGES & VIDEOS-----
Video 1:
Complete week 7 in 2 minutes (Original frame rate modified), i used something composed by me playing with Logic Audio, please don't blame me 👉😳👊
Video 2:
Complete growing stage plus some flowering days in 2 minutes
Photo 3:
Additives used at day 5, all but Iguana
Video 13:
Overview video of the Gorillas and the Moneys
Photo 14:
Nutrients & additives used on day 9, again all but Iguana
-----WEEK SUMMARY-----
Finally I decided to Switch to 12/12 the first day of this week, and at the end of the week i will leave the SCROG mall fixed. As you can see it's not a tru SCROG as the man-lining plant is taller than the others and there's also height differences among it's colas. In the other hand i'm very happy on how the plants are distributing themselves after i removed the training structures. I removed those structures to prevent more stress to the plants, as they have recieved a hard training and i want to give them a breath and also grow as they like.
You can see how many vegetation they have, it almost cover the 85-90% of the tent, in the middle of flowering week 3 i will perform a massive defoliation.
This week i can see how the Gorilla with the main-lining is developing more defined and taller colas than the other plants, let's see how they evolve in some weeks.
Also this week i will apply the last foliar irrigation, just to help them a bit.
-----WATERING CALENDAR-----
05/04/19 - 1.250 ml with all week nutrients -(Foliars, Bloom Stimulator & Bloom Nutrition) @ 1.1 E.C. PH6.4
- Foliar application of 250 ml of water with (Foliar Nutrition & Plant Vitality+) among the 4 plants
09/04/19 - 1.250 ml with (Sensizym, Bloom Stimulator, Bloom Nutrition & bud Ignitor) @ 1.4 E.C PH6.4
*****ESPAÑOL*****
-----IMÁGENES Y VÍDEOS-----
Vídeo 1:
Semana 7 completa en 2 minutos (Frame rate original modificado), he usado algo que he compuesto jugando con el logic audio, disculpadme por esto 👉😳👊
Vídeo 2:
Fase de crecimiento completa y algunos días de floración en 2 minutos
Foto 3:
Aditivos usados el día 5 excepto Iguana
Vídeo 13:
Vídeo general de las Gorilas y las Moneys
Foto 14:
Nutrientes y Aditivos usados el día 9, de nuevo todos menos Iguana
-----SUMARIO SEMANAL-----
Finalmente he decidido cambiar a 12/12 el primer día de esta semana y al final de la semana dejaré fina la red de SCROG, como veréis no es realmente un SCROG pues la planta con Man-Lining tiene colas más largas que las demás y todas son un poco desiguales entre si. Por otro lado estoy muy contento en como se están distribuyendo las plantas después de haberles quitado las estructuras de entrenamiento, las he quitado para quitarlas stress ya que han tenido un entrenamiento duro y quiero dejarlas respirar e ir por si solas a partir de aquí.
También podéis observar como tienen mucha vegetación que casi cubre el 85-90% de la superficie del armario, a mitad de semana 3 de floración les haré una defoliación masiva dejándolas peladas.
Esta semana ya puedo observar cómo la Gorilla con man-lining está creando colas más definidas y largas que el resto de las plantas, veremos a ver en unas semanas como evolucionan.
Por último esta semana también aplicaré el último riego foliar para ayudarlas un poco con el cambio de estado y el stress recibido.
-----CALENDARIO DE RIEGO-----
05/04/19 - 1.250 ml con todos los nutrientes semanales excepto -(Foliars, Bloom Stimulator & Bloom Nutrition) @ 1.1 E.C. PH6.4
- Aplicación foliar de 250 ml de agua con (Foliar Nutrition & Plant Vitality+) para las 4 plantas
09/04/19 - 1.250 ml con (Sensizym, Bloom Stimulator, Bloom Nutrition & bud Ignitor) @ 1.4 E.C PH6.4

Likes
9
Share
@dubmantiqeur
Follow
Week 5 28-35days was all smooth. Room is starting to smell alot more now

Likes
5
Share
@Deltatigrou0169
Follow
Bonsoir à tous
Je suis trop content de mes fifilles elles poussent vraiment bien elles grandissent tout les jours, je les mesure tout les 2 où 3 jours.
Elles grandissent de 2cm environ par jour je les trouve magnifique mes fifilles. J'ai deux de mes mutantes qui me font quatre branches principales( on n'y voit sur les photos) je suis refait 😊😊😊 je pense qu'elles vont bien donner.
Je vous dit bonne soirée à tous les amis 👍👍👍
