
Likes
Comments
Share


@MrGrowthSpurt
Follow
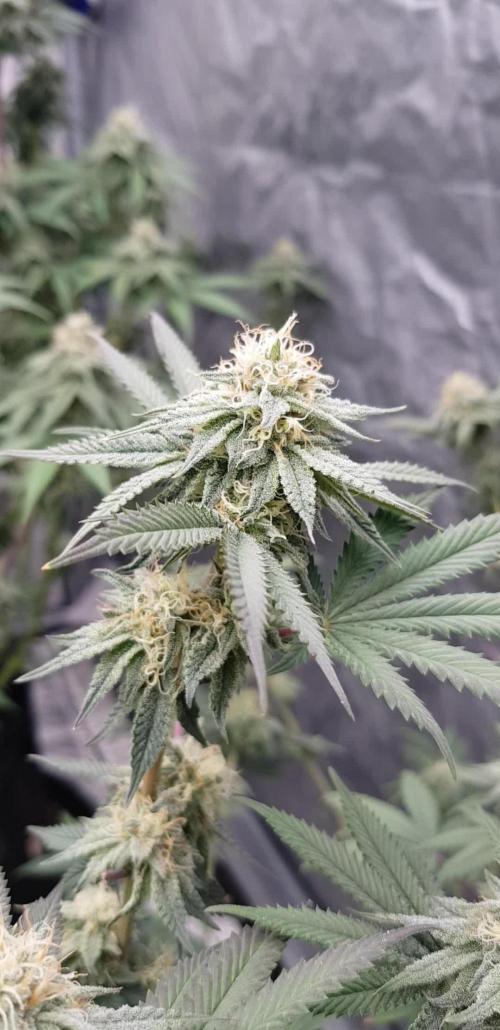
What's up Growmies 🤟🏽
Welcome back to another week #10 overall and #3 flowering.
She is doing well and continue to stack on buds, I continue to fed her the same schedule and dosage of nutes, it seems to be working well.
Everything seems to be going well so far nothing new to report, until next week my friends Happy growing and may the grow goddesses bless you all with a bountiful harvest!

Processing
Likes
22
Share


@DankBudz
Follow
Well a few weeks left and they are starting to fall over.
Gonna be interesting holding then up for another few weeks.
LoL

Likes
7
Share


@Generalbudz
Follow
First day of week 6, i have to say these ladies are FASTTT! VPD 1.15-1.23 lights on VPD 0.97-1.05 lights off. The 70x70 area is 101% covered although id say 72x72cm because i added some self made growbox wall extenders i have started thinking adding the trellis net now or some days later to tilt the colas alittle just slightly for better light absorbtion for lower buds under the main shoots isnt a bad idea,under canopy view is magazine cover worthy MAN :D as you can see they are on fabric pots above plastic draining pot holders, the runoff is collected downthere and each of the pot holder has a plastic tube glued with water resistant superglue so after every water all the runoff water is collected from a pump with just a push of a button, the irrigation watering system is also connected and works pretty nice i have been giving them the water also by a simple push of a button with irrigation seem to love it (its not a automatic feeder connected to a reservuar i have two waterpumps one for watering one for collecting runoff i simply put the water intake plastic tube in my water bucket & press the button manualy, worth mentioning all of them have been reciving the same nutrient solution and same water although pheno#1 have been streching 4-6cm more than her sisters and she developed abit of blueish leafs even the soil in all 4 pots was from the same 2 soil bags and mixed very well before filling them so soil manifacturer excess nitrogen mistake is also not possible, i feel it is the phenotype but just to make sure there will be no excess nitrogen in the end i watered her with the exact same water amount as her sisters but 260ppm less for her this time just to make sure the blue is gone soon.she will be fine and emerald in few days. From today the UV FROST is ON from now too. Oh i forgot to mention thrueout the diary they where never topped only trained with these red clips besides the pheno3 that came topped "from god" since sprout and i wouldnt recommend topping autos (btw pheno 3 is a monster and smells wayy more LOUDA than the siblings.) although the pheno1 remains the main subject further on she got fuel to shoot for the stars and we rlly dont want that in this compact mini research area dont curse me for the substrate choice :D this stuff translates a bit of that earthy taste to the buds and way less attention than coco.

Likes
5
Share

@GERGrowDesigns
Follow
Welcome to Flower Week 5 of Sensi Seeds Karate Kid
I'm excited to share my grow journey with you from my
Sensi Seeds Project . It's going to be an incredible ride, full of learning, growing, and connecting with fellow growers from all around the world!
Karate Kid got a Hard Start and also a lot of Problems After transplanting in her 16litre pot as the only Strain from this Round
For this Project , I’ve chosen the Feminized Photo Strain Karate Kid :
Here’s what I’m working with:
• 🌱 Tent: 120x60x80
• 🧑🌾 Breeder Company: Sensi Seeds
• 💧Strain Info : 25-33%
• ⏳ Flowering Time: 8-10weeks


Likes
2
Share


Likes
20
Share


@DaddyPrime2
Follow
6/11 day 55 day 56. Officially 2 months of growth. Somehow I've kept an auto flower in the vegetative stage for quite a bit of time. They are flowering and have stretched a ton. I will get actual measurements for each plant this
Pheno #1 looks more indica (they all are) than the others. The pistils are shorter but more of them and the node spacing is a tighter than the others and she's stayed the shortest(least amount of stretch) and has thicker leaves(maple leaf style) her pistils started white and now have a pink tone to them and on closer inspection, some of the sugar leaves are purpling. This one could be expressing it more so because of environment. This week we've had lows and rains and cloudy weather. The other night it was in the low 40s, so in hindsight it might be environmentally expressed.
Pheno #2 is the one that's been the most well rounded the whole time. Popped quick and has always been steady and not too tall and not too short. Her pistils are bright white like roots or an initial taproot. But the calyx are a deep deep purple. I believe this purple expression to be a genetic phenotypical expression rather than environment. The purple clashes with the white so beautifully. They just makes it all pop with the green. It honestly looks like a purple clover flower 😄
Likes
21
Share


@Brick_Bazuha
Follow
Неделя прошла спокойно и тянулась конечно долго, сегодня исполняется девочке 100 дней) но скажу что пару дней назад начала уже потихоньку усиливать запах и он такой классный и так влечёт уже зарубить всё, но я хочу постараться дождатся янтарных трихом, когда будет эффект на максимум) трихом стало очень и очень много, засыпали всё только нужное, на лишних листочках как спецом и не вылазили, такие сахарные кажутся, что хочется облизать их)) по шишкам скажу что пока чутка не понимаю, разделились на два фронта, одни очень крепкие и сильно не сожмёшь их, а другие трухлявые очень, усыхаются больше чем на 70% вот это реально конечно печально, но времени ещё предостаточно и надеюсь всё будет в огнях)

Likes
15
Share


@greenhousegrowgirl
Follow
Mar 7 (day 78): Start of week 12.
Mar 11 (day 82): Chopped plant.
Likes
19
Share


@Gruenerfinger85
Follow
6 Blütewoche:
In der 6 Blütewoche habe ich bei zwei meiner Ladys Cal-Mag Mangelerscheinungen festgestellt, die ich mit jeweils 1.25 ml cal-mag Lösung in 1l Wasser gegeben habe.
Ansonsten wachsen und gedeihen die hübschen, die Buds fangen an frostig zu werden, ich hoffe das in den letzten 2 Wochen der Blüte die Buds noch an Größe zunehmen.
Ansonsten bin ich sehr gespannt wie sich die Ladys noch entwickeln werden.
Ich werde euch auf den laufenden halten, viel Dank an euer Interesse.
Bis next Week
Likes
10
Share


@Martymar021208
Follow
The smells are becoming very strong in my house and truthfully I am still pretty pleased with trichome production although I definitely can tell the wish i had calmag 3 weeks earlier but better late then never about 3 weeks from harvest can't wait for this one been long road but a rewarding one.


Likes
24
Share


@Grey_Wolf
Follow
Eva Seeds High Level 27th Jan 2020
Welcome back, This should be the last week of vegetation for the main plant (number1) as she is in full stretch mode and has lots of early preflowers on her.
She is really starting to show her Sativa genetics , with the long branches climbing in an unruly manner all over the place. Luckily for me I have tie points above the plants to
hopefully contain their growth. She is a pretty big girl at about 2 meters high and well over a meter wide .
Plant number 2 never attained the vigor the other seemed to have and Didn't really take off that much after the container transplant lke I thought she would.
Not to worry tho as this is the plant I intend to play around with by pollinating buds with feminised pollen from other strains.
All in all I'm fairly happy with the way things are progressing and I should get a few ounces off the big girl when she's done .
Both plants were given 1 cup each of the bud n bloom soil amendment plus some High tea that I had brewed up for 24 hours .
Thankyou for stopping by I'll be back next week with another update 👍

Likes
10
Share


@Monks_Garden
Follow
Made itnto the main part everyone wants to get to... chop day. Wish i had a scale to get a wet weight but for the next harvest of the closet ill have a scale big enough.. loves growing these strains pretty deficiency resistant. Gave them 48hr dark period to see if i can notice a difference. Any questions feel free to ask.


Likes
12
Share


@Luke_Lee
Follow
-15.08.2024
The light intensity has been reduced so that the ppfd value is below 1000.
The soil still felt moist, the plants were not watered.
Yellow leaf tips are still there, even turning white.
Continue to observe, do not fertilize and research.
-16.08.2024
Did nothing
-17.08.2024
Visual Control
Soil was dry, Both plants get watered with 500ml water per plant (no nutriens)
-18.08.2024 - 20.08.2024
Did nothing, just Visual Control
-21.08.2024
Soil was dry, Both plants got 1Liter Water per Plant.
(1ml BioGrow, 2ml BioBloom, 2ml TopMax - 1L Water)

Likes
8
Share


@Herbangardener671
Follow
Last day chopping at 56 days of flower. Gonna trim some of the leaves then set in the dry tent

Likes
53
Share


@Roberts
Follow
Merlin's Mintz Autoflower has come to a harvest day. She is a sweet fruity kush smell. She has some nice colors and is super frosty. I will be back for the smoke report in a month or 2 once I get her dried, Cured, and trimmed up. Everything went well. Thank you Spider Farmer, Athena, and Aeque Genetics. 🤜🏻🤛🏻🌱❄️🌱
Thank you grow diaries community for the 👇likes👇, follows, comments, and subscriptions on my YouTube channel👇. ❄️🌱🍻
Happy Growing 🌱🌱🌱
https://youtube.com/channel/UCAhN7yRzWLpcaRHhMIQ7X4g
Likes
50
Share


@gottagrowsometime
Follow
Week 11, D71 Flower Day 41. She's super frosty. And very sticky and sticky. Smells of fresh cut strawberries and a light musky sweet earthy smell. Not a whole lot of bud, but what's there is tops by the looks of it. I'm hoping this is going to be the A grade bud I've been looking for.
Plant has been thrown into soft flush. Been given terra powers finisher. 1ml/L 150 ppm and ph + adjusted to 6.7.
Should of just let it grow normal. Lessons learnt.
But overall I'm very happy with the results, all a bit lacking but frosty and smells stawlishes.
COUPON CODE FOR MARS!!
Use Code GGS to get a small discount at any marshydro site.
Thanks to everyone who followed and commented. It's been a fun grow. Little bit of light nutrient burn other than that, I've had 0 problems. Not 1 def, standing tall since she's in the ground. Even though she wasn't let grow o'natural I've seen what I can get, 1 main top cola and smaller colas on the side instead of 50-70cm small plants. Hopefully I'll get 50-70cm nodes with a big ass frosty cola on my next run, and then I'll be able to say for sure, that topping isn't the way to go with autos. As I've topped every single 1 I've grown and the tallest plant I could get was 90cm. Either it's the topping or not grown to its peak performance.
HARVEST DAY. She's frosty. I've seen more frosty SG but I'm happy with this with how I crippled her growth. But in stunning her height I do think I've made for some A grade Bud up top. There is some airy bud at the very end. But she's the most potent FB have, so I'm expecting 🔥.
Thanks for reading, be sure to drop a like so I can visit your grows my friends. Either way, thanks for dropping by.
gottagrowsometime
Likes
13
Share


@Robeeriegenetics
Follow
Chugging along week six licking my wounds and biding my time all is well though I ain’t mad leasons learned no reason to cry over spilt milk