


Likes
Comments
Share


@LittleBigTrees
Follow
After locking them out for close to a week , I managed to get them going again.
Just waiting for some Amber trichomes to show up now.


Likes
59
Share


@AsNoriu
Follow
Day 59. She starts to stink or smell ;))))) I have flue, getting a bit better and still could smell her today, means she stinks ;)))
That's good, bad that it's air, except top bud - rest is worthless ;))) I am starting to doubt that I'll beat 1g/W , need to do around 15 ;))) All looks closer to 5 ....
She has time till 24th , then I go for holiday and I chop her ...
150ml 6.3 water in !
Happy Growing !!!


Likes
12
Share


@Bread_n_Buds
Follow
Our Purple Urkle by Zamnesia has reached 16 buds. I'm growing it a little more to make sure it doesn't go into flowering with small brunches but now we're there, a few days and it will go into flowering and it will be very exciting you can bet on it.
The Topping worked very very well the plant at the moment of topping went into overfertilization due to the obvious slowdown in growth, so I slowed down the fertilizer for growth but it was about to go into crisis, so we are starting to give fertilizer again. When topping is a delicate moment it is probably better to do what I explain below.
The ideal when topping is probably to start with a gradual release fertilized soil or start preparing the soil for a period that is at least enough for the vegetative phase at most by adding a bit of alga grow which by itself I must admit gives me some problems at least in this case if the plant grows straight much less or rather nothing.
We are always using soil, feeding and all the recommended additives from Plagron 100% organic, we have only lowered the amount of grow in this topping phase for the reasons mentioned above.
---- Decide on the right soil and calculate your fertilizer sheet based on the soil on the official website.
-- www.plagron.com
Try a seed of this strain that drives us crazy..
---- https://www.zamnesia.io/en/11168-zamnesia-seeds-purple-urkle.html
Zamnesia Description // A direct descendant of a Mendocino Purps phenotype, Purple Urkle is a high-performance cultivar from Zamnesia Seeds. This feminized, indica-dominant strain is sure to win over any cannabis grower. With a THC content of 20%, Purple Urkle has a lot to offer from seed to harvest and beyond. A grape-flavored adventure, Suitable for indoors, outdoors or in the greenhouse, Purple Urkle is a very resilient strain. Growers will be impressed by how easy this cultivar can be managed. Purple Urkle can reach 120cm indoors and 160cm outdoors, but if you want more control over the height you can use the LST technique.
Purple Urkle has fantastic flavors and aromas that intensify during the flowering phase. Regardless of the method of consumption, Purple Urkle offers tangy, fruity flavors that lean towards notes of grapes, berries and plums. The effects of this strain are soothing and relaxing, with uplifting sensations that make the experience suitable for any occasion, whether in a social setting or alone.
All the best that mother nature can offer is on ---- www.zamnesia.com
Likes
9
Share


@CandyFarm
Follow
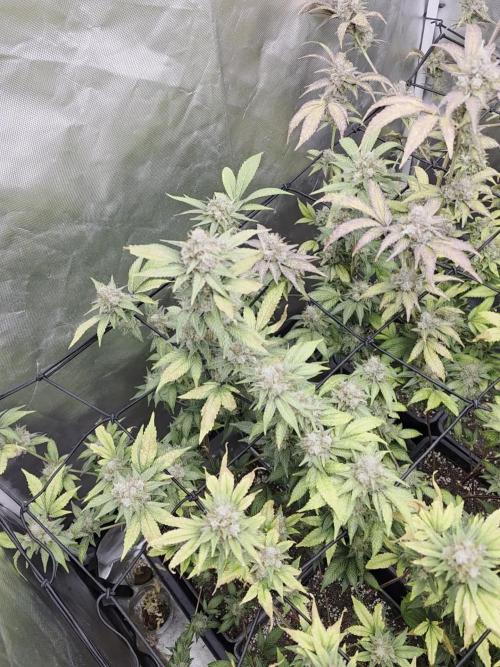
in general, the week was simple, I slowly stretched them over the grid. now we have it, the flowering stage begins







Likes
35
Share


@JamMAKEcan
Follow
OFFICALLY BANNED FROM COMMENTING..GROW DIARIES NEED TO CHECK THERE JEALOUS 3RD PARTY EMPLOYEES MR RO-@#×! GO FUCK YOURSELF PUNK
Im convinced they are people so jealous of my progression .. 20 diaries with 41.000 likes.. Its called interacting . helping when possible. I have no secrets with growing.. Anything i do i love when others do it also.. Unlike people who guards there technique 😂🤣😂🤣.. Well everyone can grow beautiful buds THERE is no secrets... If u have secrets then YOU ARE a cheater..grow diaries refuse to inform me why im blocked.. So i would LOVE to take this time to brag in his fucking face ahh ah ah 41.000+ punk..
MY FRIENDS i cant reply to your questions.. Thank you all again for your awesome support. It really means a lot to me

Likes
21
Share


@Bak2Blk
Follow
Yall see the yellowing of the leaves closest to the top? I've since switched my nutes over to Tiger Bloom and I've thrown in some Cal-mag into the mix. They'd gotten kinda droopy but since I changed their nutes up a bit, they've been perky af even tonight as it's getting close to lights out. I switched them over to flower on Sunday. They're already starting to stretch in just a few days which tells me that they're feeling much better. My last video... even though it's not loaded correctly is from tonight. It's 11pm, lights are out in an hour and they're still perky. Love it!! 😍😍😍
4/6/23: Yall.... the plant in the back right hermied!!! OMFG. The 2 tallest branches had seeds on them... just popped up because they weren't there yesterday or at least I didn't notice. The seeds were concentrated at the top, I didn't find any on the rest of the plant but with as bushy as they are, there may be more. I cut those 2 tallest branches down to below where the seeds were but I will be watching that plant and the rest like a hawk for more seeds. I didn't find any on the other 3 plants but still I'm saddened. Unsure of why this one plant is hermie'ing. Smh


Likes
55
Share


@Ultraviolet
Follow
2nd net is up. Early bud formations are promising. holding up to the extremes pretty well, some leaves taking minor damage, but overall, she is holding up, gave her 1 night at 50F see how she would react, stressful. Not advised as it messes with her metabolism, but I want to see if it triggers any anthocyanin response. Love to see her purp up but no signs yet. Remember, For every molecule of glucose produced during photosynthesis, a plant needs to split six molecules of water. This process provides the hydrogen needed for synthesizing glucose and other organic compounds, while oxygen is released as a byproduct.
Homework.
If Rubisco activity is impaired and it cannot properly function or regenerate its substrate, the plant's leaves are likely to turn a pale green or lime green, a condition known as chlorosis. Essentially, Rubisco activity is highly regulated and susceptible to various environmental and metabolic factors that can cause it to become inhibited, leading to an apparent failure in RuBP regeneration due to a lack of consumption.
Rubisco regeneration is intrinsically linked to nitrogen supply because Rubisco is a major sink for nitrogen in plants, typically accounting for 15% to over 25% of total leaf nitrogen. The regeneration phase itself consumes nitrogen through the synthesis of the Rubisco enzyme and associated proteins (like Rubisco activase), and overall nitrogen status heavily influences the efficiency of RuBP regeneration. RuBisCO is a very large enzyme that constitutes a significant proportion (up to 50%) of leaf soluble protein and requires large investments in nitrogen. Insufficient nitrogen supply limits the plant's ability to produce adequate amounts of RuBisCO, thereby limiting the overall capacity for photosynthesis and carbon fixation. Maintaining the optimal, slightly alkaline pH is crucial for the proper function and regeneration of Rubisco. Deviations in either direction (too high or too low) disrupt the enzyme's structure, activation state, and interaction with its substrates, leading to decreased activity and impaired RuBP regeneration. (Lime/yellowing)
Structural Component: Nitrogen is an essential building block for all proteins, and the sheer abundance of the Rubisco protein makes it the single largest storage of nitrogen in the leaf.
Synthesis and Activity: Adequate nitrogen supply is crucial for the synthesis and maintenance of sufficient Rubisco enzyme and Rubisco activase (Rca), the regulatory protein responsible for maintaining Rubisco's active state. Nitrogen deficiency leads to a decrease in the content and activity of both Rubisco and Rca, which in turn limits the maximum carboxylation rate, Vmax, and the rate of RuBP regeneration Jmax, thus reducing overall photosynthetic capacity.
Nitrogen Storage and Remobilization: Rubisco can act as a temporary nitrogen storage protein, which is degraded to remobilize nitrogen to other growing parts of the plant, especially under conditions of nitrogen deficiency or senescence.
Nitrogen Use Efficiency (NUE): The allocation of nitrogen to Rubisco is a key determinant of a plant's photosynthetic nitrogen use efficiency (PNUE). In high-nitrogen conditions, plants may accumulate a surplus of Rubisco, which may not be fully activated, leading to a lower PNUE. Optimizing the amount and activity of Rubisco relative to nitrogen availability is a target for improving crop NUE.
Photorespiration and Nitrogen Metabolism: Nitrogen metabolism is also linked to the photorespiration pathway (which competes with carboxylation at the Rubisco active site), particularly in the reassimilation of ammonia released during the process.
To increase RuBisCO regeneration, which refers to the process of forming the CO2 acceptor molecule Ribulose-1,5-bisphosphate (RuBP) during photosynthesis, the primary methods involve optimizing the levels and activity of Rubisco activase (Rca) and enhancing the performance of other Calvin-Benson-Bassham (CBB) cycle enzymes.
Biochemical and Environmental Approaches:
Optimize Rubisco Activase (Rca) activity: Rca is a crucial chaperone protein that removes inhibitory sugar phosphates, such as CA1P (2-carboxy-D-arabinitol 1-phosphate), from the Rubisco active site, thus maintaining its catalytic competence.
•Ensure optimal light conditions: Rca is light-activated via the chloroplast's redox status. Adequate light intensity ensures Rca can effectively maintain Rubisco in its active, carbamylated state.
•Maintain optimal temperature: Rca is highly temperature-sensitive and can become unstable at moderately high temperatures (e.g., above 35°C/95F° in many C3 plants), which decreases its ability to activate Rubisco. Maintaining temperatures within the optimal range for a specific plant species is important.
•Optimize Mg2+ concentration: Mg2+ is a key cofactor for both Rubisco carbamylation and Rca activity. In the light, Mg2+ concentration in the chloroplast stroma increases, promoting activation.
•Manage ATP/ADP ratio: Rca activity depends on ATP hydrolysis and is inhibited by ADP. Conditions that maintain a high ATP/ADP ratio in the chloroplast stroma favor Rca activity.
Enhance Calvin-Benson-Bassham (CBB) cycle enzyme activity: The overall rate of RuBP regeneration can be limited by other enzymes in the cycle.
•Increase SBPase activity: Sedoheptulose-1,7-bisphosphatase (SBPase) is a key regulatory enzyme in the regeneration pathway, and increasing its activity can enhance RuBP regeneration and overall photosynthesis.
•Optimize other enzymes: Overexpression of other CBB cycle enzymes such as fructose-1,6-bisphosphate aldolase (FBA) and triose phosphate isomerase (TPI) can also help to balance the metabolic flux and improve RuBP regeneration capacity.
Magnesium ions, Mg2+, are specifically required for Rubisco activation because the cation plays a critical structural and chemical role in forming the active site: A specific lysine residue in the active site must be carbamylated by a CO2 molecule to activate the enzyme. The resulting negatively charged carbamyl group then facilitates the binding of the positively charged Mg2+ion. While other divalent metal ions like Mn2+ can bind to Rubisco, they alter the enzyme's substrate specificity and lead to dramatically lower activity or a higher rate of the non-productive oxygenation reaction compared to Mg2+, making them biologically unfavorable in the context of efficient carbon fixation. The concentration of Mg2+ in the chloroplast stroma naturally increases in the light due to ion potential balancing during ATP synthesis, providing a physiological mechanism to ensure the enzyme is activated when photosynthesis is possible. At the center of the porphyrin ring, nestled within its nitrogen atoms, is a Magnesium ion (Mg2+). This magnesium ion is crucial for the function of chlorophyll, and without it, the pigment cannot effectively capture and transfer light energy.
Mg acts as a cofactor: Mg2+ binds to Rubisco after an activator CO2 molecule, forming a catalytically competent complex (Enzyme-CO2-Mg2+). High light + CO2) increases demand: Under high light (60 DLI is a very high intensity, potentially saturating) and high CO2, the plant's capacity for photosynthesis is high, and thus the demand for activated Rubisco and the necessary Mg2+ cofactor increases. Mg deficiency becomes limiting: If Mg2+ is deficient under these conditions, the higher levels of Rubisco and Rubisco activase produced cannot be fully activated, leading to lower photosynthetic rates and potential photo-oxidative damage.
Optimal range: Studies show that adequate Mg2+ application can enhance Rubisco activation and stabilize net photosynthetic rates under stress conditions, but the required concentration is specific to the experimental setup.
Monitoring is key: The most effective approach in a controlled environment is to monitor the plant's physiological responses e.g., leaf Mg2+ concentration, photosynthetic rate, Rubisco activation state, and adjust the nutrient solution/fertilizer to maintain adequate levels, rather than supplementing a fixed "extra" amount.
In practice, this means ensuring that Mg2+ is not a limiting factor in the plant's standard nutrient solution when pushing the limits with high light and CO2.
Applying Mg2+ through foliar spray is beneficial to Rubisco regeneration, particularly in alleviating the negative effects of magnesium (Mg) deficiency and high-temperature stress (HTS). While Mg can be leached from soil, within the plant it is considered a mobile nutrient, particularly in the phloem. Foliar-applied Mg is quickly absorbed by the leaves and can be translocate to other plant parts, including new growth and sink organs.
Foliar application of: NATURES VERY OWN MgSO4 @ 15.0g L-1 in a spray bottle. For those high-intensity workouts when 1 meal a day is just not enough!
Foliar sprays are often recommended as a rapid rescue measure for existing deficiencies or as a supplement during critical growth stages, when demand for Mg is high. Application in the early morning or late evening can improve absorption and prevent leaf burn. The plant was getting a little limey yellow in the centre. Shortly thereafter, she was back in business, green mostly regenerated. The starting point [of creativity] is curiosity: pondering why the default exists in the first place. We’re driven to question defaults when we experience vuja de, the opposite of déjà vu. Déjà vu occurs when we encounter something new, but it feels as if we’ve seen it before. Vuja de is the reverse—we face something familiar, but we see it with a fresh perspective that enables us to gain new insights into old problems.
Confidence is evidence... nothing more. You are confident because you have driven 10,000 times, you are confident because you have spoken 10,000 times. People think confidence is a feeling, but it's not. If you want more confidence, then you need to create evidence, take more shots, collect more data, build more experiences, take more risks; fail, confidence doesn't come first; it is the reward you get for doing the work. no one else wants to do.
Likes
34
Share


@Canna96
Follow
Hey now, hope everyone is well, this week went pretty good, both Glueberry OG Autos sprouted, and look good for a week in. They are currently in Pro-Mix seedling starter mixed with perlite but will be transferred to Coco Coir/Perlite as soon as their roots fill up the solo cups. I have grown seedlings in Coco Coir many times but I prefer to start them in ProMix because as there are no nutes in coco, you have to start with tiny quantities of nutes and work them up each feeding, and seedlings can be very finicky to EC/PH etc., and some strains can even be much more so than others. With Pro Mix, there is enough nutes for the first several weeks so I just give them water with a plastic syringe every 2nd or 3rd day. I have found that starting seedlings in Coir doesn't really produce a big advantage (at least for me) but her time in Coir will come.
A couple things I also do is make sure to go by container weight above all else to know when to water. It is very easy to overwater seedlings and drown them, as I did when I first started. The other thing is I just lightly water around the very edge of the cup, to prevent drowning the roots, and also to force them to work their way out to the edges of the container instead of straight to the bottom.
I started prepping a few bricks coco for this grow last night, I am re-using the coir from my last grow. I flushed it down to .4 EC and I currently have it soaking in a Cal Mag solution of 2.0 EC. I will let it soak for a few days then flush it again back down to around .4 EC. This is important to prevent cal mag deficiency down the road. To flush I just use a garden hose and a couple of saw horses with a 2X4 running through the handles of some fabric pots filled with my coir. It makes it easy to flush, and also easy to catch runoff underneath and measure the EC. I inspected and tested 2 of my drainage system this afternoon as I always test them outside with a few gallons of water before I set them up in the tent. Not much to do this week but hand water them every couple days, and hopefully by next update one of them will be ready or damn near ready for her final home which will be a 5.4 Gallon Airpot. I will be giving the other away to a friend to see what he can do with it. Once in her final home she will get fed 4x per day, and the runoff will go to my tomatoe plants outside which will also be in coir.
I am super excited to crank this Medic Grow Spectrum X up and see what she can do. I am currently running her at 30% which is about 230 watts. I will be adding more seedlings to the tent here shortly to try and fill her up, but I started with the longest autoflowers and am trying to time them so they are all ripe within a relatively close time frame. Thanks for stopping by, stay safe, and Blaze On! 💪
Website: https://medicgrow.com/
https://growdiaries.com/grower/medicgrowled

Likes
12
Share


@BrMarijuana
Follow
Primeiro mês de floração, ótimas plantas, super saudável, fertilização ok, folhas com. Um verde bonito, rega e alimentação todos os dias. Plantas satisfeitas.

Likes
27
Share


@GrammaGriller
Follow
Делали маникюр 5 часов в 6 рук, все липкое
Вкусно пахнет, много фиолетовых оттенков
Много листвы сахарной и вторичного продукта

Likes
24
Share


@Hashy
Follow
Notes.
Week 18 (week 11 flower)
Light settings
12/12 on at 9.00am off at 9.00pm
Viparspectra
Light power= 75% 165w
VPD aim 1.0-1.2
DLI aim 35
Extractor settings
temperature 23c with 0c steps
Humidity 30% with 0% steps
Max speed 10
Min speed 4
Monday 17/7/23 Day 120 (day 74 flower)
Looking good.
Tuesday 18/7/23 Day 121 (day 75 flower)
Defoliate
Wednesday 19/7/23 Day 122 (day 76 flower)
Harvest
#5 393g
Hung to dry.
Extractor settings
temperature 20c with 0c steps
Humidity 50% with 0% steps
Max speed 10
Min speed 2
Thursday 20/7/23 Day 123 (day 1 dry)
Removed some fan leaves.
Friday 28/7/23 Day 132 (day 9 dry)
#5 Pink Rozay, dry 38g. Larf 6g.
Saturday 29/7/23 Day 133 (day 1 cure)
Saturday 5/8/23 Day 140 (day 8 cure)
Put humidity packs in the jars.
Friday 11/8/23 Day 146 (day 14 cure)
Stop using auto burping system now and burp less frequently for a bit.
Saturday 12/8/23 Day 147 (day 15 cure)
Sunday 27/8/23 Day 162 (day 30 cure)
Sampled
Stats for the grow
#1 377g
#3 338g
#4 276g
#5 393g
#6 312g
Total wet weight =1696g
#1 FBPHP12, dry 40g. Larf 4g.
#3 FBPHP14, dry 38g. Larf 4g.
#4 runtz, dry 29g. Larf 2g. Rot 5g.
#5 Pink Rozay, dry 38g. Larf 6g.
#6 Candy Rain, dry 34g. Larf 0g.
Total dry weight. 179g
Total dry larf weight 16g
Loads of trim so going run some hash.
Likes
16
Share


@eldruida_lamota
Follow
Familia, estoy de vuelta y actualizo la cuarta semana de estas Blueberry Cheese de Zambezaseeds.
Tienen alguna carencia que próximamente a de ser solucionada 💪 espero la próxima semana se solvente.
Por lo demás fenómeno las flores ya están formando tricomas y me encanta.
Aparte de que siguen formándose progresivamente todas sus flores.
Agrobeta:
https://www.agrobeta.com/agrobetatiendaonline/36-abonos-canamo
Mars hydro:
Code discount: EL420
https://www.mars-hydro.com/
Las maximas de temperatura no superan los 26 grados y las mínimas no bajan 20, así que no me puedo quejar.
Los niveles de humedad también son los correctos van entre 50%/65% de humedad relativa.
Por supuesto el Ph lo estamos dejando alrededor de 6.
Hasta aquí es todo, buenos humos 💨💨💨.

Processing
Likes
29
Share


@ChiefGrowAutoflowers
Follow
Humidity has been the biggest struggle. The dehumidifier I bought was complete useless only moved RH 1% down.
Tried a couple different things to try to combat the excessively high RH (75+%) openings up extra flaps in the tent didn’t work so I decided to turn on my carbon Filter fan. Which seems to be maintaining it at 55%, however prior to me being able to start my fan I had to clear the water out of my exhaust ducting. It had accumulated at least 1/4 gal of water, this to me was a clear indication of my humidity problem.
Another thing I want to rant about is PH pens I haven’t been able to find a pen worth a damn and yes I have been properly handling them. My first one died on a watering day and I didn’t have a back up so I ordered two more off amazon which don’t seem to be working well either. I ended up doing it the old school way with the drops and shaking it in a tester.
Oh I also gave nutrition a break past two feedings I had a slight burn on the tips will probably do one more plain water then put her back on nutrition.
Went back to nutrition early then I intend due to a slight nitrogen deficiency I don’t thing it’s gonna be a big issue just gonna continue to monitor.
Processing
Likes
12
Share


@GanjaFarmerGrow
Follow
She is Going GREAT!!
BIG Seedbank gave us a BIG auto plant...
the branches are bending and i have to hold them up...
feeding is very minimal as I said this is a BIO grow...
hope she goes good until the end...
fingers crossed...🙏

Likes
6
Share


@Burneracct
Follow
Mine stretched pretty severely and never recovered so I pulled it.
My dads seems to be doing very well though! A bit overwatered but 🤷♂️🏼


