The Grow Awards 2026 🏆 


Likes
Comments
Share
@RDWCGrowing
Follow
5/23/2023
Week 7- Day 1 of Flower (Day 110 overall) (Day 49 of Flower)
There was a couple of small super small sucker buds on the lower stocks that needed to be cleaned off but that was it. Just watching them Flower!!
5/24/2023
Week 7- Day 2 of Flower (Day 111 overall)
Tucked a few fan leaves below lower buds but didn't see any blatant offenders that needed to be removed. I typically do start my checks in Week 8 but since this is a new strain I decided to go ahead and do a Trichome check just to see what was what.. Just as I thought nothing but clear glassy Trichomes. I will check again in one week....
5/25/2023
Week 7- Day 3 of Flower (Day 112 overall)
Just letting them grow today!! Smell is getting stronger I would say it is a hint of Pine and a heavier fruity smell.
5/26/2023
Week 7- Day 4 of Flower (Day 113 overall)
I did Nothing but took some pics and I enjoyed it!!!! It is nice to be able to just sit back and watch them on auto pilot.. :-) Tomorrow Water Change Day!!
5/27/2023
Week 7- Day 5 of Flower (Day 114 overall)
I admit it.. I had to defoliate a little bit.. I looked in while changing the water today and there were just a couple blatant offenders blocking the light from lower bud sites and those leaves they just had to go. Other than that I changed the water and this week is where I drop everything and start preparing them for this last phase of the grow. Loving a few of these buds they are starting to beef out very nicely.
I added 36 gallons
Mammoth Silica = .5Mil/Gal= 18Mil
Root DRIP = 1Mil/Gal= 36Mil
CalMag= .5Mil/Gal= 18Mil
FloraMicro = 3.8Mil/Gal= 137Mil
FloraGro= 2.8Mil/Gal= 100Mil
FLoraBloom= 4.6Mil/Gal= 166Mil
LiquidKoolBloom= 2.5Mil/Gal= 90Mil
TPS SIGNAL= 4.0Mil/Gal= 144Mil
ORCA = .5Mil/Gal= 18Mil
Water Temp= 70.1
Tent Temp= 76
Humidity =64 ** I have two dehumidifiers running on Ink bird controllers to try and keep the humidity down, In late in flower I like to keep the humidity above 45 but below 60.
5/28/2023
Week 7- Day 6 of Flower (Day 115 overall)
Opened the back of the tent today and boy did she need some defoliation love in the back. Other than that I took off a few little sucker buds trying to form. I did start to setup my Dry space as well as did a Trichome Check today and the brown tips are coming in nicely.
5/29/2023
Week 7- Day 7 of Flower (Day 116 overall)
Found a few baby sucker buds trying to form so I removed them. Other than that I am enjoying watching her mature.
I also started my Reverse of the Clone I took 6 weeks ago in Apr from #3. I am uploading footage of the reversing process for your viewing pleasure.

Likes
1
Share
@BruWeed
Follow
Esta semana ya realice la poda. Se encuentra en estos momentos en etapa de secado dentro de una caja especial para secados de flores que uso siempre y nunca me falla.
En humedo hay 195g y utilice una lampara led de 150w en todas sus etapas.
Próximamente estaré publicando cuando este en curado.


Likes
109
Share
@Wackytabacky_420
Follow
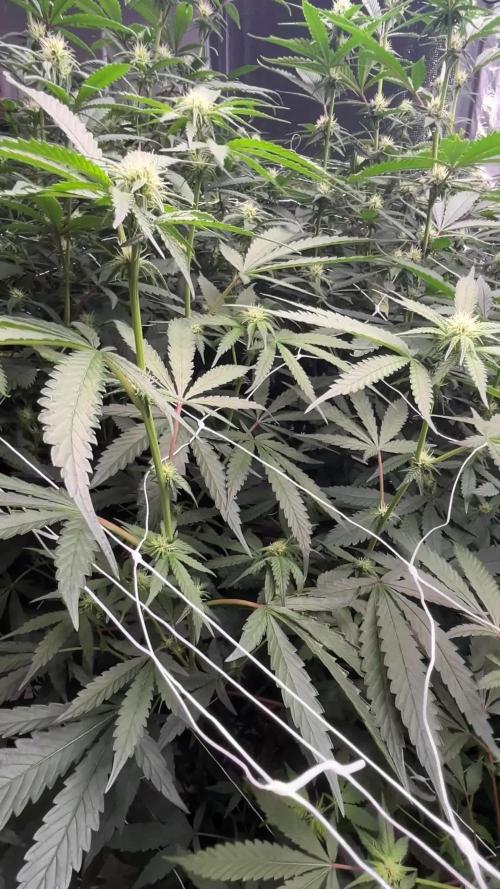
What's up fellow growers another week in the books!!! So after my last update I installed my Scrog net and everything was going along amazing until lastnight! I was doing some final tucking and Lst training trying to get the girls looking pretty for pictures today for u guys and pop goes the weasel!(Branch Snaps 😒🤕) at first I was concerned but after some good tips and reassurance from this great growing community I did a tape repair on the girl but she still looked wilty last night but boom got up this morning and the leaves were standing and the bud sight was rising back to the light. I'm not out the woods for a few days and possibly a week of stress but I'm confident she will recover and drive on. We'll until next week fellow growers Happy Growing😎💚🌱💪💪
Critical purple #1- is my slowest grower but is still vegging so I have faith that she will out produce Critical purple #2.
Critical purple #2- I haven't noticed much growth in this plant since going into flower at just a day or two over three weeks old. But I have noticed growth in buds and pistols..
Pineapple auto #1- This girl was really coming along this week! I was so excited to show u guys/gals her progress so did some last minute tucking lastnight before bed and snapped a branch:(. Today she seems to be doing ok so hopeful she will not stress out and back track me a week but u live and u learn.
Pineapple auto #2- Guys this is my 🌟 she is doing amazing and loving the scrog as you can see from the photos. With a fabric tape I measured her out to be 19 7/8 inches. This is my best growing plant of both grows I have going now.


Likes
10
Share
@soloczek
Follow
Smells incredible
Blue Zushi very dense and Long buds. Dry harvest 80g
Naranja Biscotti smells like danish buttercookies with oranges

Processing
Likes
17
Share

Likes
6
Share
@Flower420
Follow
4/15- Her bud sites are becoming very big and the white pistils are REALLY coming out. I hope she’s done stretching 🤞🏻
Had to move the lighting all the way to the top bar of the tent. She’s now 12 inches from the light. Seeing those spots again on some leaves. I gave her 4ml of calmag instead of 3.13. I’m hoping the calmag will help and the plant enzymes.
Gave her a little hair cut ✂️

Likes
13
Share
@IQuSX
Follow
Hi, topman!
Now at after 11 day and 10 week, because couldn’t added report- media and over last report.
We have problem with leaf-yellow! WTF-may be, because system worked in ones every time…
Check next, and thank you for your time!

Likes
13
Share
@Weedig_Weedigson
Follow
Heute gingen die kleinen zum keimen. Ich bin gespannt wie die neue Anzuchtstation ist. Diesmal werde ich 6 Pflanzen mit Plagron Bio und 3 Pflanzen mit BioTabs, alles ganz nach schema düngen. Als Blütekammer kommt wieder die Homebox R120. Man darf gespannt sein. 😊
Leider ist eine Gorilla Zkittlez nicht gekeimt. Die hab ich durch eine Alienz von Greenhouse ersetzt


Likes
49
Share
@masterofsmeagol
Follow
7/4 SUN was poking out a little bit. Plants loved that little feeding and seen to he noticeable larger this morning. I'm considering starting the nutes. At least the organic ones as well as upping the water intake I've been scared to water with all this rain and my experience last time. I plan on applying BT this afternoon and doing some work on the bottoms of the plants. I also saw a chipmunk in my cage so I have some spots in my fence that need to be patched. I know I can't compare this year to orher years as these are seeds and all the other years were clones. I CAN say for certain that my plants are healthiest they've been out of any of my journals. Previous plants were much larger but I was fighting numerous fungal, pathogens and pests at the sane time. Ear wigs would've lollipopped most buddies by now but I've seen no sign of them. I'm going to apply more poison where they were and add some rat traps inside the cage for the chipmunks. Once I fix the cage I think I'll be good.
UPDATE: Went back over and fixed the holes on my cage from high winds. I found an old wire trap or cage and just cut sections and ziptied them to the existing wire and to the structure thus covering any open holes. I'll need to put lathes aroubdvtge outside because if a rodent REALLY wanted in they could get in. My belt had been wearing thin but I use shit until it breaks (yesterday the heal came off my shoe lol) so I was working hard sweating my nuts off and my belt gives out totally. At least ive got the major stuff done. I took a few videos too. I'm imagining it was this little bit of sun that gave these plants that boost of growth but I'm wondering if the added nutes had anything to do with it. Bags weren't light and I could feel moisture in the soil so I didn't water. I'll check again tomorrow morning. Since I didn't see many plants or even leaves for that matter with damage I decided to hold off ob the BT and the plant doctor. Only time will tell if that was the right decision.
7/5 Plants look fantastic. I see a few more holes in leaves sporadically amd I'm hoping it's pillars. I've seen lots of lightning bugs on my camera though and grasshoppers are abundant. Not one growth shoot has been chewed (knock on wood) which is what the earwigs had always done. I watched a video from last year and by nowcthey had lollipopped all lower leaves. It may not be the best weather growing season wise but despite the rh consistently in the 90's I still don't have pm or fungal pathogens. Need to get the BT out. Didn't water as we've had all that rain. I'll water either tonight or tomorrow morning. Sunny high in the 90s low is 66. Tomorrow looks good too.
UPDATE WENT BACK OVER AROUND FIVE. IT WAS 88 DEGREES SO I WANTED TO CHECK THE GROW BAGS. THE POTS ARE FINE. IT WAS HUMID AS HELL. ONE PLANT WAS SLIGHTLY DROOPY BUT VERY LIGHT AND DRY. I FOUND TWO OTHERS THAT SEEMED LIGHTER THAN THE REST BUT HADNT DROOPED. I MIXED TWO GALLONS OF WATER WITH 1TSP KANGOROOTS AMD PHED IT CLOSE TO 6. I FED THE 3 PLANTS THAT WERE SUPER DRY LIKE A HALF GALLON AND SPRED THE REST OVER THE OTHER EIGHT PLANTS. THEY WERENT DROOPING BUT THEY WERE VERY DRY. I PLAN ON A FULL WATER TOMORROW. I WOULDVE DONE IT TODAY IF THE TEMPS WERENT SO HIGH. ITS RAINED A MONTH STRAIGHT SO I HAVENT HAD TO WATER. I MADE A COUPLE VIDEOS BUT I'LL HAVE TO UPLOAD TOMORROW.
7/6 Another super hot day. I hefted the pots and they still had some weight but I could tell they were dry. This rain has messed up my watering schedule. Well it made it so I didn't NEED to water. These are big plants now. I need to get a schedule to stick too. They're going to probably need a gallon a piece at least. I'm still nervous watering. Right now I'm just reading the plants. I added .5tsp kelp me/you to 1 gallon of water to help with heat stress. I fed an additional two gallons to the garden this morning including the two container plants in the back. They were dry on top too but I know they have water deeper down. Next watering I'll be more consistent and try to give them there 10%. It's great having the bags elevated. I can finally see when I start getting run off. I could even measure the ph of it instead of relying on that meter. Ill check the ph when I go back over. Still a few 🐛 holes but they are few and far between. I really don't want to spray for such a small problem but if I cant find them at night that's what I'll do.
UPDATE: Another 90 degree day. I went back over and gave the garden a gallon of water as they were dry and it didn't rain. Tried to use a soil ph meter to check ph. First couple were 6.4, 6.5 then I got 7.3 and I accidently dropped it. Then I got somethings that were high eights and even one 9! Obviously the Meter shit the bed. I'll lower the ph of the water slightly when I fully water tomorrow and I'm going to measure the runoff.
7/8 I must've messed up the journal again as the dates are off. GAVE PLANTS A FULL WATERING. Each girl got a gallon. I couldn't upload my videos this morning as I had to break up a fight. 3 on 1. Didn't give me a chance to put the videos up. I'll take some stills then I can upload them. I took stills and they all uploaded but didn't fucking save. I'm nit going to keep trying to upload if it's not going to. Noticed a few more holes in leaves and one skeletinized leaf so I need to either spray the bt or something more versatile. I'm putting more poison around the cage and de between the bags. I'll go check things out tonight. Sick of writing a book and uploading to just hace them disappear
7/9 Did a quick video today. Noticed the bags were fairly light despite the plants being soaked amd the pallets wet. I was pressed for time. I gave two gallons to the entire garden. I hope that will hold them over until tomorrow. I'll need to up how much water I give them. Going with a gallon and a half next time. I see more pillar spots and a moth took off when I shook the plants this morning. So I'm gonna have too apply the BT. I figure if I go over before dark tonight I might be able to see aju nocturnal insects around. Luckily my dad feeds the birds and they are always there. I think they help with pests.
UPDATE IT WAS A LITTLE COOLER TODAY BUT MICH MORE HUMID. I WENT AROUND SIX TO MAKE SURE THE GIRLS WERE OK WITH WATER AND TO GIVE THEM A TREATMENT OF BT. I WENT THROUGH THE GARDEN ANDCGOUND THREE LEQVES TO DEFOLIATE AND LITERALLY A COUPLE LEAVES ON TWO PLANTS WITH PILLAR HILESM WHEN I ARRIVED TWO BIRDS FLEW OUT. A HORNET CAME IN WHILE I WAS THERE. THIS DO LESS APPROACH SEEMS TO BE REALLY WORKING. I DODNT SEE NEARLT ENOUGH DAMAGE TO WARRANT SPRAY8NG MY EXTREMELY HEALTHY GIROS WITH ANYTHING. ILL KEEP AN EYE ON THEM AND CLEAN THEM UP A BIT. I DO NEED TO INSTALL THE VERY8CAL TRELLIS FOR SUPPORT. THEYRE PRETTY HEALTHY THOUGH. ONE PLANT IS ABOUT AS WIDE AS IT IS TALL. STILL......PLANTS ARE EXPLODING AND ITS GETTING TIGHT IN THERE. I NEED TO GET THE TRELLIS UP THOUGH.
7/10 I went over and was planning to water. Plants were wet and it's raining. Top of the medium was moist but the bags were light. ONE bag was super light but seeing that we are having showers all day and an additional half inch of rain coming tonight so I didn't water them. Especially since they looked great. Decided to to spray BT yet as the damage is so small and i think the birds have been taking care of the pillars for me. Now I'm wondering if I should've gave that ONE plant a little bit of water but it will be find. Did a video. I'm being careful not to over water. Last year this is when all my buddies were devoured by earwigs. And no senescence like the years before. I think it was hust those earwigs. I haven't lost shot for leaves. Even the stalks are bright green and look amazing.

Likes
6
Share
@Mr_nugs_lover_David
Follow
This lady is developing awesome! Beautiful leaves, looks happy and strong and ready to give her best this 2021 outdoor season, I really hope to see top quality buds on her when the time is right, let's see what terpene profile we can find in this strain!


Processing
Likes
43
Share
@biggreens420
Follow
Got some better shots without light and a little video my cam is a bit shit got a video of trichs also in there girls seem to be flushing well started flushing the quick one later than the others as wasn't as developed. Took the 2 tester buds of very bottom under the plants on the first day of flush to try estimate how long to flush for........last pic and vid before harvest next uploads will be harvest hopefully

Likes
1
Share
@SolitudeCorners
Follow
Week 3 Flower (Bloom Week 3) – Daily Tasks
Evening (Lights On)
Check environment (temp 24–27°C, RH 55–60%).
Inspect leaves and buds for pests, mold, or deficiencies.
Water/feed (depending on medium): balanced bloom nutrients with slightly higher P and K.
Ensure good airflow (oscillating fans).
Adjust plant training (light defoliation if leaves block bud sites).
Check for early signs of stretch finishing.
Evening (Before Lights Off)
Ensure irrigation is not too late in the cycle to avoid wet medium during dark period.
👉 In Week 3 bloom, the plants are finishing their stretch and starting to put more energy into forming bud sites.
Main job is: Setting Scrog net 2layers ,Control environment (VPD, airflow) ,Support the plant with bloom nutrients.
Processing
Likes
47
Share
@rhodes68
Follow
12/3 Week 10
Brandy being harvested in the AM
Layla and Maggie got a PK 0-10-7 booster in 6.5 water @1 gal each still plenty of nuets in the pot just getting them all I can
12/4 Harvested Brandy numbers and pics also be in harvest week when others are done.
Not bad for a little plant we did not give much hope of producing. Trics look good - Into the dry box as the tent is full.
206 Grams Wet
*****UPDATE***** 12/8 78g dry
*****UPDATE***** 12/10 tested 0.5g after decarb and yep all we could have wanted, sativa-ish with good legs. More later
12/5 Fed Maggie and Layla 1 gal each at 6.5PH 12.5ml/gal Soul Peak PK booster, foliar of full cal-mag at lights out just to be sure.
Later
Just as I hoped it sparked new hair growth, they standing up nice and pretty New plants in tent
Quick foliar feed on Maggie, Cal-Mag 1 ml/qt
12/7
Last defoliation on Layla and Maggie just taking off the excess baggage and opening the air and light paths.
Layla is definitely ripening but I think one more dose of PK perhaps if not just water. Decide tomorrow
Maggie still aggressively building buds so she is absolutely getting more PK, remember there is Dr Earth in the pot so its not like she is being starved for other nuets.
I think Maggie, being a sativa pheno, may go another two weeks. Layla has to stay until the drying tent is empty, not using the boxes unless I must.
12/8
0.75 gal ea @6.4 Peak PK 12.5ml/gal
12/10 Looking good still finishing off pics at lights out
Tried to fix the nuet list , anything I dont use any longer or dry put to 0.01 dose.
Want to be able to say some things about some of this stuff at harvest.
Likes
55
Share
@Xpie77
Follow
Almost the end of her cycle!
Thanks to Luuk from Seeds Genetics Co. For the support and good communication. Really nice genetics they have. Give them a try. The results you can see here.
Just a few words from me: i love to grow plants, i dont care if its marijuana or garden plants. I know a bit in what stage the plant needs. So im not this guy that is constant working with meters and science and showing this or that. The plants speaks for themselves. The plant needs her building block and i try my best to deliver this to lovely Marie Jane. So people do what you want to do, i do it my way and i only care about the end result.
On this Diary there are some haters, im not going to give their names, but luckily they are the minority. For the rest, i really love this growers diaries, it really brings this community together and also its a big playground for the breeders, now we can see the results real life!
With my grow, i have 2 phenotype. One with red in the buds, this one smells more punchy. The phenotype with some red leafs and more green buds have a more sweet smell. Both is packed with trychromes, really good for making bubble hash or Rosin...
The buds are super big and dense. Mould resistance is very good! The buds are super sticky and she smells very like candy and red fruits. Im not a wine drinking person, so dont hold me on that one. She is easy to grow and will get big fast, so one week of 18/6 light is good enough for 60/80 cm plants🌿💚🍀 i have 3 gallon (11L) baskets
Nutrition: im not a person who precisely mesures the food for the plants. As long the pH is correct, also im reading the plants. I always give les then is asked on the bottles. I also give weeks in advance the nutrition they need in the cycle, because plants need this to start.
Smell: plant already have a nice smell, very punchy, forest fruits and sweet wood.
Health: nice strong plants, will grow big and flower fast!
-----------Red Wine--------
Red Wine was created by crossing Rozay F2 with Jet A. They are 2 very powerful aromatic Cali hybrids. This exclusive new Cali strain is a very strong and fast flowering indica-dominant strain. It has an aromatic, intoxicating and relaxing effect. That is comparable to enjoying a good glass of wine.
Red Wine has an average flowering time of about 7-8 weeks when grown indoors. Outdoors it is ready fairly early, usually around the end of September.
The yield is very good. Indoors she has an average yield of 450-650 gr/m². When growing outdoors, 600-800 grams can easily be achieved per plant.
Red Wine has an aromatic scent that can be compared to a full red wine. Her full, purple-green buds are very compact with few leaves. This is very convenient when cutting the plants and saves a lot of time. Smoking this weed gives you a nice high with relaxing properties. The taste of Red Wine is very fruity sweet with an aroma of red grapes.
Flowering time: 7 – 8 weeks
Genetics: Rozay F2 x Jet A
30% Sativa, 70% Indica
Plant height outside: 100 – 180 cm
Outdoor harvest month: from June to October
Yield indoors: 450 – 650 gr/m²
Yield outdoors: 200 – 800 gr / plant
THC: 25%
Red Wine from Seeds Genetics Co.
Link:
https://seedsgenetics.nl/product/red-wine-gefeminiseerd/

Likes
27
Share
@Bluemels
Follow
Die 3 Damen sehen ganz hervorragend aus. Die Harzproduktion ist im vollen gange und bedecken sogar nach und nach die Sonnensegel.
Sie riechen fruchtig süß, aromatisch.
Processing
Likes
Comments
Share
@Isle_of_dank
Follow
Flicked to flower 21th June under two 600watts LEDs in bloom humidity 47to53 temperature 20c to 25c will update with pictures on 26th June

Likes
10
Share
@Stacy_smokez
Follow
Everything is moving smooth with all of the plant except lots o bear by fox genetics it popped and just never grew so I’m planting the 3rd seed and if it doesn’t work I’m going to sub for purple punch auto
