
Likes
Comments
Share


@Dictator
Follow
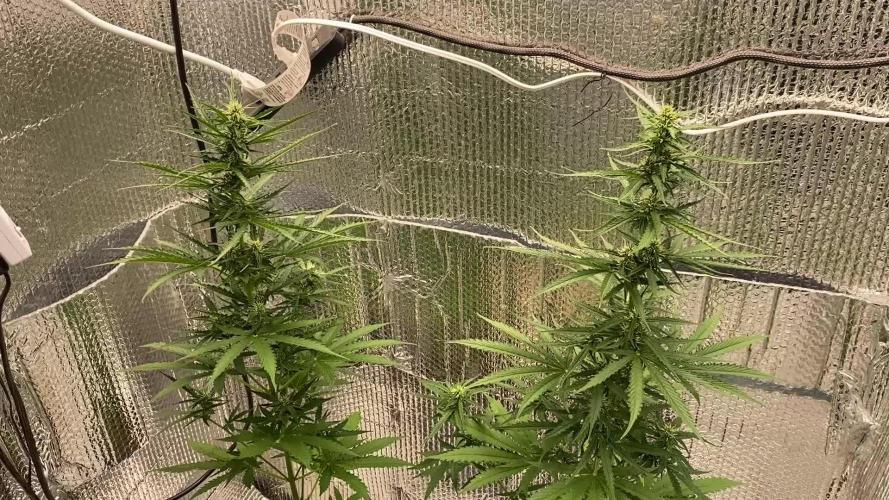
This beautiful girl has started flowering, she is a real monster, she is feeling good, I will report the flowering fertilizer in a week

Processing
Likes
5
Share


@Ensign420
Follow
Week 02 Introduction
This week has been a bit of a struggle. Had my first experience dealing with slime and brown algae. But I think adding enzymes and increasing the beneficial bacteria helped to fix the issue. Also experienced nutrient burn for the first time. My nutrient solution strength got as high as 671 PPMs. So backed it down to about 430 PPMs during the end-of-week reservoir change. Also cut Hydroguard (expired?), CaliMagic, and Superthrive from this grow. Now she's still stunted, but is starting to recover. Hopefully...
[START OF WEEK 02]
Day 01 - Monday - 08/10/20 - Total Days: 008
-----------------------------------
- [0830]: Still looks a bit yellow. But getting larger!
--- Solution strength was at 248 PPMs.
--- Just topped off with a bit of distilled water
--- PH went up to 6.1 so PH'd down to 5.8
--- Ran the top feed for a bit to wet the hydroton.
- [2130]: She's looking even more yellow now.
--- Even the new leaves are really yellow.
--- Decided to add more base nutes.
--- Added 4ml of Sensi A
--- Added 4ml of Sensi B
--- Now at about
--- Solution Strength went up to 304 PPM.
--- PH was at 6,
--- Also raised the water level a bit more.
--- I really hope it's a nutrient deficiency and not an over-watering issue.
--- Please live!
Day 02 - Tuesday - 08/11/20 - Total Days: 009
-----------------------------------
- [0830]: Looking less droopy. But still yellow.
--- Decided to do a reservoir change.
--- 4.5gal of distilled water
--- 8ml of Sensi Grow A
--- 8ml of Sensi Grow B
--- 8ml of Voodoo Juice
--- 4ml of B-52
--- 4ml of CaliMagic
--- 4ml of Hydroguard
--- 4 drops of Superthrive
--- PH'd down to 5.8
--- Solution strength: 302 PPM
--- Since I didn't want to risk over-watering the rockwool, I did not to do a top feed, may do one tonight after the sleep cycle (lights are still set to go off at 10am and back on at 4pm).
--- As I was doing a reservoir change, I noticed that the tubes and bucket were a bit slimy. Didn't really stink or anything. Is this normal? Maybe due to the Hydroguard and Voodoo Juice?
--- I hope she gets better soon!
- [2215]: Getting larger! But still yellow.
--- Also can see a root growing through the net pot! Tiny little thing but it's there! Will have to start dropping water once more appear.
--- After looking over a few DWC diaries using AN nutes, seems like my solution strength is still too low. Most around this stage average around 500 PPMs with about 4ml per gallon.
--- Top fed for a minute to wet the top of the hydroton.
--- Solution strength went down to 263 PPM.
--- Added 8ml more of Sensi A
--- Added 8ml more of Sensi B
--- Now base nutes are at 16ml for 4.5 gal of water.
--- PPMs went up to 411.
--- Still lower than 500 PPMs, but that's okay.
--- PH was at 6. Not sure if I should adjust PH using AN nutes. So going to not ajdust unless PH goes above 6.1.
Day 03 - Wednesday - 08/12/20 - Total Days: 010
-----------------------------------
- [0830]: Looks like more root growth!
--- She still looks yellow. But leaves are perky.
--- PH was at 6.2 so lowered down to 5.8.
--- Solution strength was at 394 PPMs
--- Since roots are still growing, I decide to lower the water level a bit. Now water level is a bit below the net pot.
- [2200]: Root is getting longer!
--- Slime is returning. Not sure why.
--- Solution strength: 357 PPMs
--- PH: 6.1
--- Decided to add an enzyme along with more beneficial bacteria to hopefully cure the slime.
--- Added 16ml of Sensizym
--- Added 5ml of Hydroguard
--- Added 8ml of Voodoo Juice
--- New solution strength: 430 PPMs
--- New PH: 6.1
--- Top fed for a minute.
--- This slimy residue is really freaking me out! I hope the added enzymes will help eliminate the slime.
--- Going to do a full reservoir sterilization/nutrient change over the weekend. Please survive until then girl!
Day 04 - Thursday - 08/13/20 - Total Days: 011
-----------------------------------
- [0930]: I think the enzymes worked! There is little to no slime now!
--- Although I think the root was also dissolved in the process. It's now just a little stub sticking just below the net pot. The enzyme is also suppose to dissolved dead roots too but guess that root was too weak? Not sure what happened there. But I think the slime is cured!
--- Solution strength went down to 395 PPMs. Decided to add more base nutrients.
--- Added 8ml of Sensi A
--- Added 8ml of Sensi B
--- Added 4ml of B-52
--- Solution strength went up to 598 PPMs.
--- PH was at 6.1
--- As long as the PH is between 5.5 and 6.3, I'm not going to use PH Up or Down. But still will monitor PH levels.
- [1715]: Checked up on her after her nap and shes looking alive but stunted. But no slime!
--- Decided to add some sugars to help maintain the enzymes and beneficial bacteria.
--- Solution strength was at 587 PPMs.
--- PH was at 6.2
--- Added 8ml of Bud Candy
--- Solution strength went up to 671 PPMs.
--- PH also went up to 6.3
--- Lowered water level a bit to hopefully promote more root growth.
--- Top fed for a minute.
--- She is getting bigger, but still looks yellow.
Day 05 - Friday - 08/14/20 - Total Days: 012
-----------------------------------
- [0915]: Leaves look a little burnt on the tips. Still no slime.
--- Going to back off on the PPMs to hopefully fix the nutrient toxicity.
--- Solution strength was at 632 PPMs
--- PH was at 6.3
--- Added/Removed water until PPMs were at 536.
--- PH was still at 6.3
--- Raised water up a bit, then top fed for a minute.
- [2200]: Looking better. Still yellow though.
--- Solution strength: 514 PPMs
--- PH: 6.5
--- Added PH down.
--- New solution strength: 518 PPMs
--- New PH: 5.2
--- PH was kind of high. So decided to PH down. Had to use quite a bit to bring it down. But eventually got it to drop down to 5.3. A little low, but so far, the PH has always gone up so wanted to start it really low.
--- Ran the top feed for a minute to re-saturate the top of the hydroton.
Day 06 - Saturday - 08/15/20 - Total Days: 013
-----------------------------------
- [0830]: She looks stunted. leaves are still yellow.
--- Solution strength: 514 PPMs
--- PH: 5.6
--- Top fed for a minute.
--- Not sure what to do at this point. Going to do another reservoir change soon. Hoping she lives until then.
- [2145]: Looking pretty much the same.
--- A bit of slime has returned. Since I've been diluting the nutrient solution, the enzyme ratio has dropped. So I guess this is expected.
--- Also noticed that slime build up was on the air-stones. Never really checked the stones so not sure how long that has been there. Looks brown too, which can't be good.
--- Going to do an H202 sterilization of the system (minus the net pot) tomorrow so did not add anything.
--- Lowered the water level to below the net pot.
--- Then top fed for a minute.
Day 07 - Sunday - 08/16/20 - Total Days: 014
-----------------------------------
- [0900]: STERILIZATION DAY!
--- Decided to skip today's night cycle for a deep clean.
--- I'm hoping that skipping a night cycle won't be too stressful.
--- Temporarily moved her to a new bucket.
--- Used about a half of gallon of straight distilled water to flush out the net pot.
--- Drained the system and wiped up all the brown sludge. Also removed the air stones and cleaned up all the goo.
--- Filled the system with 2 gallons of distilled water and at least 30ml of food grade hydrogen peroxide (35% strength).
--- Yea its a lot, but since I'm not going to sterilize the system overnight, I went with a really high doseage. Basically I kept adding until I started to see little bubbles start to form.
--- Then I ran the water pump.
- [0915]: Boiled the air stones in tap water for about 10 min. Then reconnected them to the airlines.
--- I let the air stones and hose soak in the sterilization solution for about 5 minutes so the peroxide can absorb into the stones. Then ran the air stone to help mix and agitate the solution.
--- Occasionally, I'd repeat the process of turning the air pump off for a few minutes to let the stones soak.
- [1000]: Covered the top two row of holes of the net pot with some aluminum tape. Hopefully this solves the light leaking in through the hydroton.
- [1200]: Used an old toothbrush and scrubbed the pump clean. Then drained the system.
--- Refilled with more distilled water and peroxide. Again added a lot.
--- Ran system again to sterilize even more.
- [1530]: Drained the system and refilled with distilled water to rinse.
--- Ran the system for a few minutes, then drained and rinsed again.
--- Did this a few more times over about an hour.
- [1630]: Added 4 gallons of fresh distilled water.
--- Added 15ml Sensi Grow A
--- Added 15ml Sensi Grow B
--- Added 12ml of B-52
--- Added 16ml of Voodoo Juice
--- Added 16ml Sensizym
--- Solution strength was at 430 PPMs
--- PH was at 5.6
--- I was going to add Hydroguard, but I think the bottle is expired. Since 2017 or 2018!? I think Hydroguard is good for up to 2 years from the date on the bottle or 6 months after opening. So not going to use from now on. I wonder if this could have contributed to the slime build up.
--- Also removed the CaliMagic and Superthrive too. Going to only use AN products to eliminate the chance of incompatible nutrients.
--- Placed her back in the bucket and top fed for a minute.
--- Here's hoping for the best. Going to let it ride until morning! Please feel better!
[END OF WEEK 02]

Likes
15
Share


@GYOweed
Follow
Not doin very well. Foliared it with GH synthetic and gave it calmag 2 days ago. The fim didnt take so i topped it.
Growing slow not sure what else is there other plants in solos i got look greener.
Removed then affected fan leaves.
@Seedsman CBD CNC is doin killer.
I picked 1/2 fem moms. Other ill grow on window sill for fun.

Likes
19
Share


@Comfrey
Follow
Tropicana had to go back indoor because the temperature outside is the opposite of tropical. I took off two leafs and gave her time to relax after.
Everything is fine and I can already smell something when I‘m near to her. 🤭☺️
Where is the sun? Preparing for sun storm!

Likes
9
Share

@GYOweed
Follow
Flipping today 12 12 9/15.
Finally will be flowering at proper temps.
Did some defol and bending, took last cuts.
All these ladies good my diy immune boosters and triggers.
They also of course got natural growth stims i have researched seems to work making them huge.
Gonna hittem with more cytokinins aftern eylthylene foliar which will self prune it and control some stretch too.

Likes
22
Share


@Phinolagreen
Follow
10. Woche dauert nicht mehr lange, dann ist Ernte Zeit, sie kriegen jetzt nur noch Wasser
Likes
5
Share


@RobsCoastalGrower4
Follow
Nice healthy growth. Starting to push up the nutrients slowly. First time using multi bottle system why not learn under pressure in a competition haha.

Likes
14
Share

@Guero666
Follow
8-22-25. 6 weeks today. Plants are growing well as they transition into flower. They have put on a lot of height the last few weeks but I suspect that that will slow down soon. Starting Monday they will get their first flower nutrients. Looks like they made it through the hottest part of the summer so hopefully we turn a corner and get cooler temperatures. I appreciate all the feedback and interest from everyone. Happy growing !! 8-23. Found some space age style plastic plates at the local 2nd hand store. Wasn’t trying to go stylish but seem to match the decor. Hope they aren’t too gaudy 😂 8-25. Got fed cn veg and flower today. Seems to be taking everything well. Being that they get sun then grow light 24/7 they are very thirty. I will give big bloom and some molasses in a few days. I’ll also do a top dressing of bonemeal. Starting smell a little but so far so good. 8-26 plants been thirsty but it’s 94 outside so that to be expected. Gave a light top dressing of bonemeal with saved rain water. Still warm in grow room at night but little by little it’s cooling down at night. Shorter days help too


Likes
7
Share


@Tazard
Follow
I increased the PK again this week. She is developing nicely I don’t think I’m ready to start flushing her yet going to keep pumping the PK in for another week or so until she’s closer to ripening.

Likes
216
Share


@Ju_Bps
Follow
Hello growmies 👩🌾👨🌾🌲🌲,
👋 Nothing Special to say,
Buds keep coming along and more and more frosty, some leaves turn to purple, others to yellow, Need to follow that the, next days.
💧 Give water each 2/3 days.
1,5l Water + Easy Plus
1,5l Water + RQS Bio Flo Pack + Sugar Royal
PH @6
- Easy plus tabs
1 tabs/6l water
- Bio Flowering Booster Pack
Thicker Flowers 1 ml/l
Bigger Flowers 1 ml/l
Sweeter Flower 0.7 ml/l
💡Mars Hydro - SP 3000
100% 46 cm.
🔥 Thanks community for follow, likes, comments, always a pleasure 👩🌾👨🌾💚🌲.
Mars Hydro - SP 3000 💡💡
https://www.mars-hydro.com/sp-3000-samsung-lm301b-greenhouse-led-grow-light
Zamnesia - Gelato Auto🌲🌲
Discount code -20% with GROWITGD code 🔥🔥
https://www.zamnesia.com/7688-zamnesia-seeds-gelato-automatic.html

Likes
48
Share


@MANIIAKSINDUBS
Follow
She's starting to smell up nice upped her bloom n top max up tied down 3 more branches
Likes
175
Share


@love_2_grow
Follow
Day 29 Flower (Day 71)
Woohoo! First day of week five of flower and an easy day at that. I just gave the right girl 3 liters of pH 6.2 water and took some pics.
I'm still experimenting with bud photography. This time with a tripod but still no additional lights. I also need to take the pics when the lights are off as the flowers look funky under the LEDs.
The right girl is slowly starting to bulk up, but the left girl is lagging. That is no wonder, though, considering that she has had much less light due to those space issues.
Also, there's a huge quality difference between the lights in each tent. So I'm looking forward to comparing the bud quality that each tent will generate.
Day 30 Flower (Day 72)
It slipped my mind, but it's been over two weeks since I gave the girls nematodes to get rid of the gnats. As always, the nemos did their job quickly and effectively, and I haven't seen any gnats since. However, to ensure that they stayed gone, I did a second treatment today, mixed up 10 million nemos into 6 liters of water, and gave each girl half at pH 6.6.
Day 31 Flower (Day 73)
Chill day. I just gave the right girl 3 liters of pH 6.5 water and cut some clones from her.
She is deep in flower so I'll try to monster-crop her. Never tried that before but have heard that it creates some really bushy plants. As she already is bushy I'm curious to see how bushy a monster-cropped clone of her will be. She had a few low branches that I left during lollipopping for this reason and I cut four of them with a sterile razor blade, then scraped the lower part of the stem and dipped them in Clonex. They're now sitting in the window with a small LED spot to make sure that they have enough light to re-veg.
Day 32 Flower (Day 74)
I know that I got a new tent for my left girl only a few days ago, but I decided to upgrade to give her a bit more space.
I went to my local grow store today and picked up a tent made by the same company as my main tent (UndrCovrLab).
This new tent is also made specifically for my wardrobe, maximizing the available space. I went from a tiny 40x40 cm tent to a "massive" 75x45 cm tent. Still very small but almost 2x bigger. Woohoo!
The left girl was squeezed into the 40x40 tent for so long that I had to use some LST to spread her out and increase light penetration now when she has some more breathing room.
Speaking of lights, my small ViparSpectra is a bit underpowered now in this larger space, so now I have to consider upgrading that as well. The simplest solution would be to get another ViparSpectra, and while this little light has been performing well, it lacks UV diodes. I'll look around for options.
We have gotten hit by a heatwave here, so now my tents are sweltering. The main tent reached 36 degrees C today at one point :/
Oh well, I cannot do much about it except hope that the heat doesn't stress out the girls too severely.
The girls are very thirsty in this heat though, and I gave each 4.5 liters of pH 6.5 water.
Day 33 Flower (Day 75)
All I did today was to give the right girl 3 liters of pH 5.9 water. A bit low as I used too much pH down and then was too lazy to fix it.
Day 34 Flower (Day 76)
No idea what happened, but an army of fungus gnats invaded my right girl. It's only four days ago since I watered her with Nematodes against gnats, and there were no gnats at all then. A few days later, it is gnat central in my main tent (the left girl in the other tent has no gnats). It's almost like I didn't give nemos to the plant but instead gave her gnats. Weird as the nemos have always worked great in the past. Now I need to start fighting these annoying little shits. Sigh. I'll give nemos another go, and if they don't work, then I'll use some sand. Worst case scenario, I'll use Neem oil, but I really don't want to go that far.
I gave each girl 3 liters of pH 6.5 water, and that was it for today.
Day 35 Flower (Day 77)
The last day of the fifth week of flower and all is (pretty well) well in the tents.
The left girl is 103 cm tall (6 cm increase in a week), and she is lagging quite a bit behind the right girl. She is healthy and quite sticky to the touch, but the flowers still have a lot of fattening up to do. I hope that will speed up now when she has a bit more room to spread out so the light can penetrate the canopy deeper. Getting a more powerful light would also help. When in doubt, add more photons!
Someone who doesn't need more photons, though, is the right girl. The top bud has been burnt slightly, and there's light bleaching on a couple of colas as well as on a few fan leaves. I removed the driver from one of the lights and raised the light a bit higher. Every centimeter counts when you're running out of space! The right girl increased another 3 cm this week and is now 123 cm tall. I hope that is it as I'm now completely out of room.
The gnat army in my main tent is still going strong. So strong that they have now sent out a small expeditionary force to my small tent and started to colonize the area. Sigh. I Will hit the girls in a day or two with nemos, but today I just put up some yellow sticky traps and gave the right girl 3 liters of pH 6.5 water.
Likes
1
Share

@Skynets_Growing
Follow
Little Elsa my Ice princess Start in her 3 week and you can see she grow every day more and more with her leaves. Until day 20 i give her a light LST for 2 Leaves. The plan to do nothing to her except watering is blowing away … That will be not the only thing…you will see the next weeks. ^^
Likes
34
Share


@KnightRider
Follow
Hey Cannafam happy weekend,
Its been another mixed week for my gal, firstly i cocked up a bit by uping her feed on the PK side which shes had twice and ive given hercsome nute burn.
Shes started maturing fast this week and reckon shes got about 2 weeks to go, so im just gonna lay off now and let her use upvwhats left in the soil.
Her calyxs have been swelling nicely and shes now really frosty all over, i havent had the chance to but il try n do some good trich pics during the next week 😊
Environment wise ive had difficulty controlling humidity this week, shes at a VPD of 0.87 and the dehumidifiers been on 24/7. DLI remains at 45 but with light the same 62%(68 watts) but im going to reduce this also as she is lookin a little light stressed also.
All in all shes looking solid in the buds department and really happy with her progress.
Thats all from me this week, thanks for stopping by 😊✌️
Likes
16
Share


@Ultraviolet
Follow
A cutting requires roots to uptake water, we must create an environment so humid the plant can absorb moisture through its one set of leaves, 70+RH% but also a good supply of fresh air and full temperature control. Once I see light lime green it will signify new growth of the plant, I will know it has started to re-root.


Likes
6
Share


@PatriciaGant
Follow
and another week in flowering stage now very visible in flowering stage. all nutrients are in ger section if not other mentioned all by manufactures instructions.

Likes
92
Share


@CachimboDaPaz
Follow
Day 50..they really look small and already fattening the buds.
i don't know what to expect because i've seen some diaries and my plants look too small.
i hope to see some more stretch over the next week or so.

Likes
6
Share


@Ciscohash
Follow
Esta semana fue genial las plantas crecieron todas muy parejas..teniendo por ahora mucha homogeneidad en el tamaño y forma de las plantas

Likes
10
Share


@reirrac1
Follow
This is my first time topping a plant... and it ended up being the tallest I’ve ever grown lol. Tried to clean up the lower half of the plant pretty well. Ended up with a few stretchy stalks, but for the most part they stacked evenly and pretty close. Rubbing the stem smells like pungent clementine and cheese, excited to see what terpenes this one will produce.


