Check the winners The Grow Awards 2026 🏆 


Likes
Comments
Share
@Simpatetique
Follow
La planta crece muy sana. Decido hacer poda apical en meristemos laterales, en 4 nudos. Al ser pequeños no sé si será apical o FIM. También un poco de LST en inferiores para que busquen mejor el sol. Estoy haciendo pruebas a ver como reacciona. Si veo que sigue en altura doblare un poco la a punta. Me planteo malla scrog. El riego continua siendo lluvia, una pasada los días de sol con pequeños momentos de lluvia.

Likes
Comments
Share
@Jbcultivates
Follow
Sticky and loud is all I can say! Hopefully whatever damage and burn I have doesn’t hurt my buds too much l! But otherwise they’re stacking up well! Couple more weeks to go!


Likes
17
Share
@SolitudeCorners
Follow
Can't wait to blazeeee
Feeding💪
10/17 Water30L+Cleanse80ml+calmag@190ppm
Ph6.3
Ebb 10.42/11.32/12.26/13
Clone 11.35/12.21/13.05/14
Average runoff ec1.5
Keeper 300ml per pot
10/18 Water26L+Flawless90ml+calmag@300ppm
Ph6.3
Ebb 11.38/12.24/13.17
Average runoff ec1.2 ph6.5
Clone 12.38/13.56/15.20/16.10
Average runoff ec1.5 ppm750
10/19 Water26L+Cleanse80ml+calmag@200ppm
Ph6.3
Ebb 11.12/11.48/12.24
Average runoff ec1.4
Clone 11.50/12.12/12.37/13.37/14.40
Average runoff ec1.3 ph6.6
10/20 Water30L+Cleanse30ml+Calmag@190ppm
Ph6.4
Ebb11.42/12.22/13.20/14
Clone 12.40/13.20/14.20/14.45/15.15
Average runoff 1.2ec ph6.4-6.7
10/22 last light day
10/23 2 Pm Cut and hang
Plan 21day at 23temp 55rh
Likes
12
Share
@RookieGrowerTH
Follow
Get back on track since I was busy.
Now I flip them to 12/12 this weekend
18/06/23
I got report from my friend who grew the Dante and OSDxPablo from the same package of mine that half of them turn to Hermies
I am thinking to cut some of the out soon as the show the sex if some of them in my grow tent be hermie
Likes
15
Share
@GERGrowDesigns
Follow
Welcome to Flower Week 4 of Kannabia Clementine Slush BioBoost Edition
Need a Fail-Safe Germination and Express Flowering?Kannabia Makes It Easy with BioBoost, Sproutly and Its Fast Genetics . More informations to find at The Kannabia Blog on GrowDiaries.
Check out Kannabia Seeds with my link [https://www.kannabia.com/de?ref=61966] and grab the germination device or the strains I used . Trust me – it’s worth it for sure !
Get another 20% Discount at all products using the code [GGD] at the checkout
For this Project , I’ve chosen the Feminized Photo Strain Clementine Slush BioBoost :
Here’s what I’m working with:
• 🌱 Tent: 225x150x150
• 🧑🌾 Breeder Company: Kannabia Seeds
• 💧 Humidity Range: 50
• ⏳ Flowering Time: 65 Days
• Strain Info: 21%THC
• 🌡️ Temperature: 26
• 🍵 Pot Size: 20
• Nutrient Brand: Hy-Pro
• ⚡ Lights : 600W x 2
A huge thank you to Kannabia Seeds for allowing me to try my Best with this amazing collection from Photo Strains they managed to Sponsore . Big thanks for supporting the grower community worldwide! Your genetics and passion speak for themselves!
Let’s grow together – and don’t forget to stop by again to see the latest updates!
Happy growing!
Stay lifted and stay curious!
Peace & Buds!


Likes
15
Share
@BushDoctor740
Follow
Day 28 I’ve been training the girls branches this week and they are filling out nicely.Watered with recharge and ph 6.5 they still are not drinking heavy but watering when pots are dry.I increased the light intensity to 50 percent power and they are taking it well.Ive noticed signs of flower development so i will top dress with 50/50 Gaia green power bloom/gaia green 4,4,4 and water with recharge.

Likes
5
Share
@StoneyMelony
Follow
Overview of my grow:
Tent: Secret Jardin DS120 4 x 4 (120 cm by 120 cm)
Lights: 2 x 120 Watt CTlite c4 clusterled
Climat: Trotec Dehumidifyer 240 watt- 10L/24h
Filter: Prima Klima carbon filter PK2600
fan: 2 x Secret Jardin 20watt osc. fan
Pots: Gronest 4 x 11 liter airpots
Water : automated water system
PH: bluelab
Nutrients: Plagron cocos A + B
Plagron PK 13/14
ATA cal/mag
Epsom salt
Week 9 She is doing great the buds are really becomming big. The smell is really amazing this is the real deal, this plant smells like candy for real. i cannot stop smelling it when i come in the room. i almost don't believe it so good it smells. I'm really looking forward to this one 😀

Likes
6
Share
@rvabudman
Follow
Performed another round of topping as the auto on the right is still doing its thing. Also did some more super cropping on the new growth. Canopy growth has made it through the screen.

Likes
8
Share
@Froggman
Follow
The ICE is almost done; the NL doesn’t even seem close. Interesting since ICE sprouted a day later than the NL.
Likes
20
Share
@420DeepGrow
Follow
Gracias al equipo de Royal Queen Seeds, Marshydro, XpertNutrients y Trolmaster sin ellos esto no sería posible.
💐🍁Punch Pie:
Un híbrido monstruoso con un 90% de dominancia índica, ocupa uno de los primeros puestos de la lista de favoritas de Kid Dynamite.
La Punch Pie desciende de la Cherry Punch Pie de Tyson 2.0 y contiene la genética de dos índicas galardonadas: la Purple Punch y la Purple Kush.
Punch Pie tu paladar se impregnará con ricas notas de pastel de frutos rojos, repostería caramelizada y tierra. Luego, pocos minutos después de la primera calada, sentirás todo el poder de este portento. La Punch Pie proporciona un combo 1-2 que se manifiesta justo en medio de los ojos y derrite todo el cuerpo, dejándote en un estado somnoliento, hambriento y apacible.
Produce plantas compactas que alcanzan una altura de 80-110cm en interior y hasta 120-150cm en exterior. Tras 9 semanas de floración, esta señorita robusta crece con fuerza para soportar el peso de sus densas flores, y da cosechas de hasta 600g/m² en interior y 750g por planta en exterior bajo el sol.
💡TS-3000 + TS-1000: se usaran dos de las lámparas de la serie TS de Marshydro, para cubrir todas las necesidades de las plantas durante el ciclo de cultivo, uso las dos lámparas en floracion para llegar a toda la carpa de 1.50 x 1.50 x 1.80.
https://marshydro.eu/products/mars-hydro-ts-3000-led-grow-light/
🏠 : Marshydro 1.50 x 1.50 x 1.80, carpa 100% estanca con ventanas laterales para llegar a todos los lugares durante el grow
https://marshydro.eu/products/diy-150x150x200cm-grow-tent-kit
🌬️💨 Marshydro 6inch + filtro carbon para evitar olores indeseables.
https://marshydro.eu/products/ifresh-smart-6inch-filter-kits/
💻 Trolmaster Tent-X TCS-1 como controlador de luz, optimiza tu cultivo con la última tecnología del mercado, desde donde puedes controlar todos los parametros.
https://www.trolmaster.com/Products/Details/TCS-
📆 Semana 3:
Ha sido una buena semana, ella ha dado un gran cambio en su lugar definitivo 😎.
Se le ha aplicado un tratamiento insecticida con agua + tierra de diatomeas ( 1 cucharadita por litro de agua), también se le aplica un tratamiento fungicida con una infusión de cola de caballo para evitar futuro moho.
A partir de ahora se riega manualmente con las dosis recomendadas por el fabricante.


Likes
57
Share
@TheBudWhisperer
Follow
Week 8 of flower is in the books and this show is quickly coming to an end. I said last week we had about 7-10 days and I was spot on at the 10 day mark. I was only wrong about the order. The cheese is ready to chop before the rest and the gorilla cookies, cherry Bomb and lemon haze will follow in due course. The cheese is a beast and it’ll take a little time to get it all run through the bowl trimmer. At least the big one goes first. Her tallest colas have foxtailed like mar, despite the late supercrop. You can tell where the sweet spot for the light is at about 10” distance from the canopy. Any closer than that and the tails begin to show prominently. It’s a good example of just how close you can get to these fixtures with a little bit of prior experience. It’s been noted for the next run😎👍😎. The res. is on an h2o2 only flush for the remainder until the rest are ready to come down. Not a moment too soon either - the pollen chucking project has stalled out waiting for these girls to finish and now that we’ll have a little extra room, we can start running our cuts in the aerocloner🤟. Not long at all now folks. Thanks for tagging along through all this. Learned a bunch about this system and we’re back to hardware mode to make some serious improvements for the next run🤙😎. I love hardware mode😉.
Background/Repetitive Nonsense
The strain line up on this grow is look’n quite saucy 😈. We’ve got 2 FB strains this time around - Gorilla Cookies (seems we always have some GSC cross in the works). Mainly because the colours look stellar and remind me of a sugar breathe we did last year that was 🔥. The other FB is their original Cheese strain... because we already smoked all our cheese... and we really like our cheese...😉. Emerald triangle was kind enough to include a freebie of Lemon Haze. Wasn’t really big on the list but we haven’t done a haze strain to write home about yet so worth a go👍. The last is a Cherry auto from Bomb seeds that we’ve been trying to get to for months. Let’s just hope that she’s not a dud like the last bean.
The new digs for this run are courtesy MarsHydro👊. Their 2x4 single grow tent, paired with a shiny new 240w QB courtesy ViparSpectra.
These folks were kind enough to discuss a collaboration and as a result, here we are to test out the gear with an inaugural run of autos. Each week, we’ll try to expand on some of the benefits of each, as well as any limiting factors or considerations that need attention when pondering purchase.
Already I can say that both are high quality products in terms of overall craftsmanship.
MarsHydro 2x4 Grow Tent:
Excellent construction in terms of durability. Reinforced stitching on the zippers and corners ensures zero tearing. Conveniently placed screen vents and intake/exhaust ports. The ceiling exhaust port only exists on the right side. Perfect for me but not great if you’re running exhaust from the top on the left side (left side wall port makes up for this however). The aluminum frame is rigid enough to support the weight of the lights and accessories. Once you have some weight in the tent, she’s go’n nowhere and you can assemble and break it down in record time if moving or stashing the grow op.
Only limiting factors I’ve noticed is that temp. Control will be an issue for a tent. It just doesn’t have the same insulating ability as a wood cabinet or other permanent enclosed space. No worries, this is offset by a small desktop heater and keeps the environment exactly where desired. The other issue was a production problem - the ceiling vent was accidentally stitched into the corner seams on the assembly line. Again, no real issue - just pulled it out with no damage or fraying to the tent or port👍.
Website link here:
https://www.mars-hydro.com/grow-tent/buy-mars-hydro-grow-tent-24x48x70-2-x-4-cabinet-closet-grow-box-upgraded-diamond-1680d-mylar-for-sale
ViparSpectra 240w Quantum Board:
This thing is sleek and slick in terms of design. Closest comparable to it that I’ve seen would be spiderfarmers line of qbs. They feature the same top-o-the-line components and roughly similar spectrums. Where VS takes the advantage is in the convenience of the dimmer nob which is easily accessible and works great at 50% with no strobing👍. The heat sink is also larger which contributes to lower temps. That’s not a good thing in my case but beneficial for most folks.
I can already say that this will be a great fixture through all stages of growth. Where I know this light will excel will be in the veg. Stage for sure. Dimming function gives seedlings a much better chance of success with the ability to use lower lighting levels early on and the coverage area on a 240w is great. The average grower will find this panel suitable and fitting to their needs in a 2x4 grow space although I’d suggest 2 units if going any larger than that. The total output in this space equates to about 30w/sq.ft. Which is a decent amount of coverage based on power vs. Growprint. Ideal for veg. Certainly but, in flower - I tend to run closer to 50-60w/sq.ft to achieve higher yields. Again, similar fixtures have performed admirably in the past and while this wouldn’t be considered an “entry-level” fixture, I’d recommend that any grower new to the game not skimp on lighting and start with one of these. The price points are a great value for quality LED tech. These days, so there’s little reason to even consider a lesser fixture👍.
I have no detail on limiting factors for this light as yet but have heard that stock branded fixtures don’t necessarily incorporate enough red diodes. I’ve seen no issue myself but confess - I’m no lighting guru.
Website link:
https://www.viparspectra.com/collections/xs-series/products/xs-series-xs2000
***8% discount when using code: “ItBudWhisper”***
Happy to have you along for the ride if you made it this far through my opening rant!!😎🤟😎🤟😎


Processing
Likes
4
Share
@CarpediemOK
Follow
From 3 leads i cut due to yellow spots, grows better and trying to reach up

Likes
9
Share
@Antifame
Follow
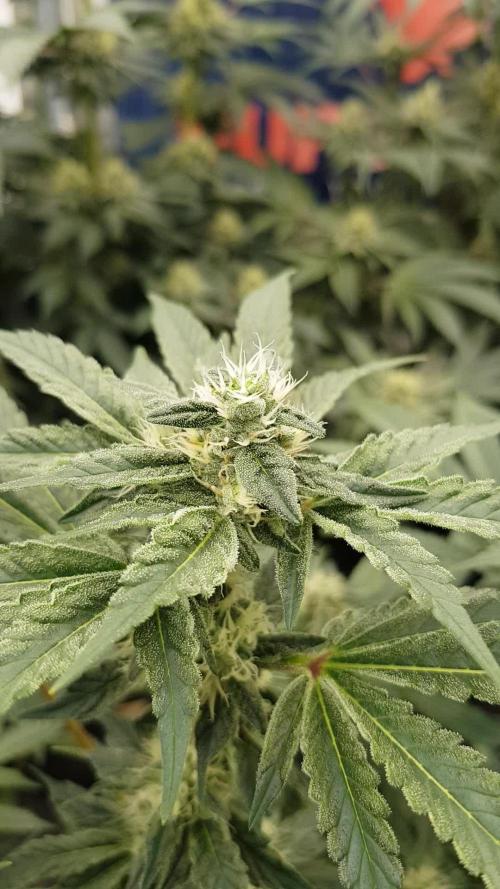
They are healthy and smelly as usual, very nice recovery from the dry period they've gone trough. 😈
Likes
86
Share
@Ageddd
Follow
Switched from Bio Grow.NPK(4-3-6) to Top Veg.NPK(9-4-8), as it is more concentrated, and im using all Top Crop products
She keeps growing like a monster, it is the kind of plant that would be perfect as mother... But that is not possible at the moment, maybe next years when i have my own property...
Good Vibezzzzz