


Likes
23
Share


@BedroomGrower
Follow
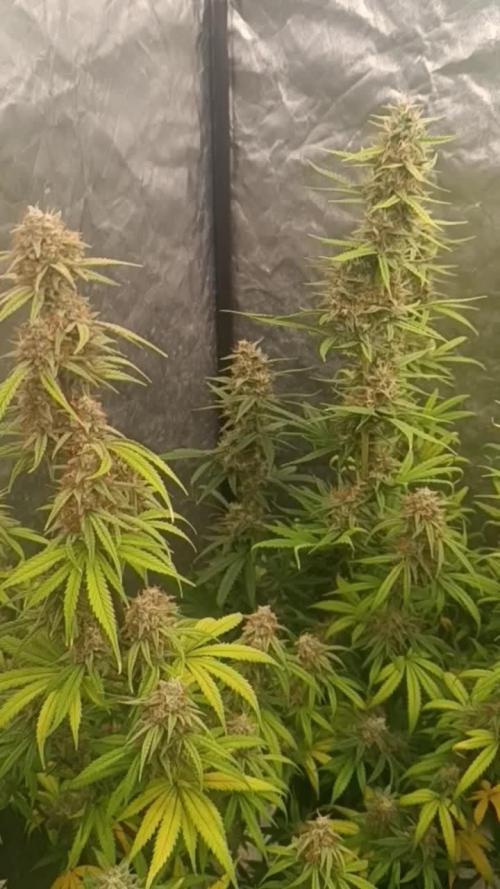
Day 59: There is little left to my first harvest in 2019. As buds continue to swell and resin starts to see some orange pistil. I think that in order to complete the cycle of these six Gorillas, there are only a couple of weeks to get to the standard eleven weeks. The smell of the resin is very strong and I have to ventilate the room several times during the day. Given the approach of the first harvest I put some other seeds in the soil. 😄
P.S. If you want to listen to some music while reading the posts on this fantastic site I'm creating a musical playlist with my rework dedicated to ganja, of course both listening and downloading are free 😉
This is the link: https://www.orfium.com/playlist/767069/420-ganjatimemusic-c4in0/
As I wrote earlier I had to speed up the times of the first harvest because this Saturday is my birthday. I chose one of the predominantly indica plants for the first taste. This plant has received only water for the last five days instead of the usual 10/12 and although I would have to wait another 10/15 days before it is completely dry, this Saturday I will break some buds smaller and I will smoke it 😋 Once the first plant has dried, and the crop is tasted, I will add more data such as flavor and real definitive weight. For the remaining five plants I will follow all my standards without breaking basic rules and I will make a progressive crop. For the 2 plants that showed a photoperiodic predominance, I will open a separate diary once the harvest is over.
P.S. I posted some sexy photos to take part in the Naked Buds contest. The girl portrayed in the pictures is called Laura and is a friend of mine who likes to smoke, pics are from webcam because she lives in other country by now. Although right now I'm single, like all men I have lots of videos and photos in the company of girls and given the fact that I am a chronic marijuana smoker in many of these it often appears as a joint or a bong. For the moment I do not intend to share anything without having first received the consent of the girls portrayed, I'm not a piece of shit. My friend sent me the photos knowing that I would share them, she saw them and wrote to me that I will send others in the future.
For Laura: Thank you baby! 😘
Day 66: As written above I must hasten the times and to do so I have to break some rules for perfect cultivation. After choosing and cutting the smaller plant and having made it stand upside down in the shade for two days I dissected all the buds and put them to dry in my cage. At a first estimate I should have gotten between fifty and seventy grams of buds, I will be more precise in a couple of days. With the smaller buds and sugar leaves I will subject them to decarbosillation and I will make some good butter 😋 while with the small branches covered with trichomes I want to flavor some bottles of vodka, I put aside even the largest leaves and branches and when I have also dried out the waste from the next crops I'll do a bit 'of ice-olator hashish using the bubble bags system...I thank everyone and I apologize for my approximate English and any errors, but as you may have already guessed it is not my language.
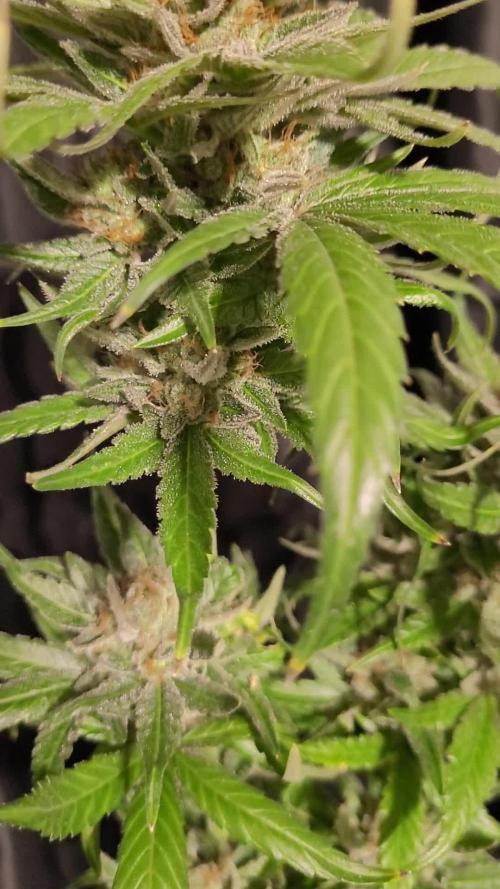
March 10, Day 69: Final taste and effect ratio for the first plant. The exact weight of dried buds, excluding the wads, sugar leaves and small branches is 58 grams. Even having pushed all the final procedures to the limit, the product is fantastic. No chemical taste despite the short flushing. Yesterday was my birthday and I got to smoke a lot (about 45 grams) in the company of twenty friends, everyone appreciated the taste and power of the effect perhaps amplified by some beer, but still very strong. No one has coughed, the smoke goes down smooth and clean and the effect is practically immediate. The terpenes of limonene and pinene dominate every flavor. The aftertaste is fresh and sweet and smoking a lot at the end the limonene prevails. For a final consideration on the edible taste I will have to wait to have made some butter to make biscuits or brownies. As I wrote the effect is very strong, salt immediately and at the beginning seems energizing, but shortly after passing the joint hits you with a baseball bat to the back of the neck 😵 After the fifth joint you are now on a psychedelic journey and you will continue to laugh for hours. At the moment I do not have a THC analyzer (object I want to buy in the future) but based on my personal experience I think it is well over 20%. Stimulates appetite, thirst (excellent if combined with a double malt blond beer) and can be used to effectively fight insomnia. 👊

Likes
6
Share


@Dengued
Follow
Day 56....buds developing nicely....laid off any nutrients for the last week and considering just one more spirulina feeding, then just well-water for the rest of the grow, with no flush....pollution/haze levels high which might effect the plants

Likes
19
Share


@Poleeg1986
Follow
I used this supplement 4th time. All was good but we need use 150-200% of recommended dose as i sad for better results. So the day 71 was harvest day) the buds really frosted and dense.. . Thanks "fastbuds" for good marijuana genetics... they did good work. Thanks guys for this. During season I hadn't any serious problem. Thank for all followers and friends who watched my grow and I wish you all have a good harvest brothers! When buds will be treated I add results) see you later;)
Hi friends!) So 7 days took for drying buds. And we have not bad results -255 grams dry buds from two plants. 130.5 from one and 124.5 from another. Good quality and taste. I put them in my fridg for next 4 weeks for treating) so see you soon in my next grow;)

Likes
27
Share


@GODSGIFT_2005_JM
Follow
🥊
🍼Greenhouse Feeding BioGrow & Bio Enhancer
⛺️MARSHYDRO
The ⛺️ has a small door 🚪 on the sides which is useful for mid section groom room work. 🤩
☀️ MARSHYDRO FC 3000 LED 300W
☀️Also special thanks to VIPERSPECTRA P2000 (200W) & XS2000(240w) LED growlights
🌱 FASTBUDS 420
Processing
Likes
2
Share


@vilahaze
Follow
entre el biento y los mordiscos le pega el gato ala planta madremia lo que esta teniendo que aguantar la pobre
Likes
148
Share


@Natrona
Follow
Frostbanger Plants 1-6
First thank you if you actually look at all these pictures that I photobomb with each week. Documenting six plants on a tester strain to provide ample information regarding the new strain characteristics takes a lot of time, work, and effort. I am so frustrated with Grow Diaries system doesn’t load pics or videos without error.
When I load pictures, I am systematic and load every picture on that plant together, each video that I load first on the pictures identifies the plant pictures that follows.
However, Grow Diaries puts the videos first, moving the picture out of order. I know which pictures of plant parts go with each plant, but with GD shuffling my pictures around good luck everybody else. This week I had so many errors uploading simple pictures that I had to go back and reload them. You may see multiple duplicate pics this time due to these system errors. Sorry about that but at least they are there.
I will not do this level of photographs and diary support again.
Week 11 June 1-7 FLOWER 6
Nutrients : 3 gal
GH Micro 7,5ml
GH Gro 0ml
GH Bloom 23ml
CalMag 7.5 ml
Elm Bloom 15ml
6/1 PH 6.62 PPM 646, temp 67 2 ltr each
6/3 PH 6.6, PPM 493, temp 68 2ltr each
6/5 PH 5,84, PPM 580, temp 68.5 2ltr
6/3 Defoliation
6/4 weekly pics & vid
As aways, thanks for visiting, for the likes and most of all growers’ love and support because I surely haven’t gotten any from @Fast_Buds on this grow.
Stay green, growers love 💚🌿my friends.
💫Natrona💫
Likes
6
Share


@Krissci
Follow
Day 1 -another key week of LST training to Maz each node that grow
Day 6- Gc1 appears to be overwatered.
Now going to begin using organic molasses aswell


Likes
51
Share


@kansasscott725
Follow
Well, this is it. Wish I had bigger buds. Everything was moving in the right direction until the end. I switched the Mars Hydro 3000 out with two HLG 300s, so I could maintain the PAR just under 1000, but perhaps it wasn't enough.
G13 is definitely not ready, and could benefit for a couple more weeks, but like a store liquidation, THEY ALL MUST GO NOW
All in all, Learned a lot. No seeds, reveg, or signs of mold, so hopefully I'll make up for quantity with quality.
Only Dry Time will Tell...


Likes
8
Share


@FairyFarm
Follow
Oops!
Well, the two days in the 80s and nights in the 70s sent my girls into high desert flower!
That and two out of season rain days and BOOM!
We are now a flower farm!
To be honest, I wasn’t sure at first- then, yesterday morning, three bees bee lined and flew to each of the bud sites. My hand wringing (was it or wasn’t it flowers?) was answered - by Mother Nature herself without muss or fuss.
No more salad! Flowers!
Also, a shock to no one, I bought a ruler yesterday, and while I listed my plants as 29 inches, I sadly have no idea what 12 inches really is. They are about 18 after supercropping. Needless to say other measurements were, sadly reconsidered….
7/31 transferred banana mango to a 30 Gallon pot 💪


Likes
7
Share


@DisTentAint4Campin
Follow
This was my favorite plant out the gate and through veg but flower I dunno wuts up with her always having calcium and manganese issues through flower she doing the 3 leaf thing might be when I switched her to this big tent with a bigger light I dunno she's the only one out of the 3 that is growing wonky out of this test


Likes
10
Share


@CanarianGrow92
Follow
Week 5 for the Green Papayas from super sativa seeds club.
Some of the lower leaves are letting us know that the mother plant need a lot more food. we added additional PK booster to her. The clones seems to go a lot better, these buds are bigger also, but happy in general. I still need to get used to all this organic nutrients. Lots of things to learn and a long way to go, always happy to learn new methods of growing!
For the rest, as always just water!
Likes
4
Share


@SuperGluedGrow
Follow
These photos were taking yesterday and I meant to post than but here we are. They seem to be doing well, growth seems to be picking up a bit but I've noticed slight burns and I think I just started nutrients a little bit too early. A new addition to the tent is a 4th seed I planted today, I'm goign to breed the best female and male, hopefully I get two females and one male but well see.