
Likes
Comments
Share


@GrowPassionItalyChris
Follow
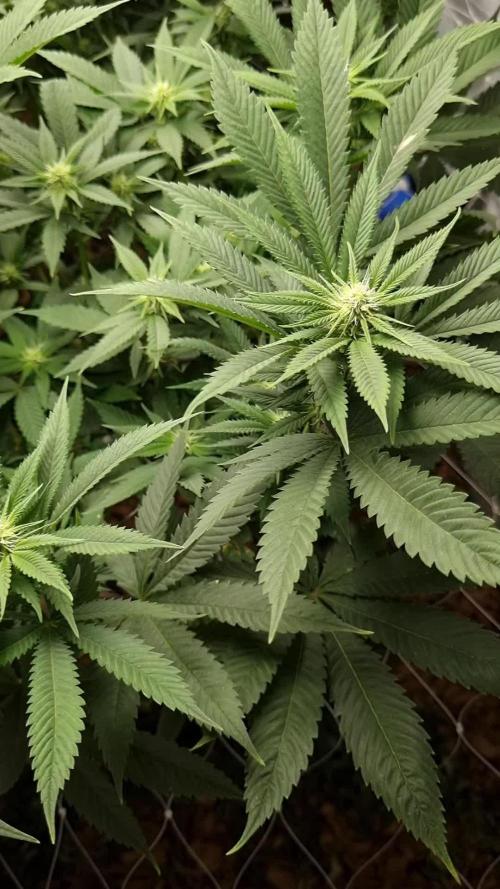
Bellissime,abbondanti e cariche di infiorescenze resinose e profumate! Dimensioni grandi e qualità altissima! È stata una settimana bella e calda e ormai siamo in estate quindi continuano a riempirsi di infiorescenze molto resinose e dure. Ogni varietà è una vera soddisfazione! Grazie a tutte le banche dei semi che hanno creato queste varietà magnifiche! Per alcune manca poco alla raccolta mentre altre ci vuole più di una settimana di attesa anche due settimane. Sono felice, bravissimi tutti.


Likes
11
Share


@Mo_Powers
Follow
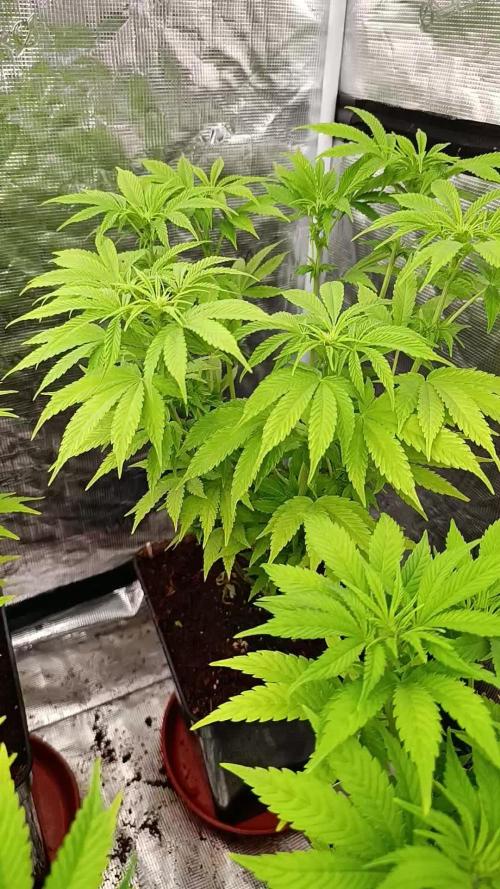
summer is slowly coming to germany. this beautiful plant is growing tall and bushy. unfortunately, it is not yet showing any signs of flowering. harvest is planned for the end of october or mid november. so there is still plenty of time for her to grow. she is vigorous and healthy.💪😋

Likes
7
Share


@Sunstonedgrows
Follow
Going onto week 2 of flower! These were taken dec28, so day 8 of flower. So far looking fine though a bit dehydrated. This one definitely is water hungry now and needs to be watered every other day now. We'll see how she comes along into the next few weeks.
D6 of this week (d13 of flower), and we can start to see flowers coming in a teensy bit. We are still watering every 2 -3 days. On D7 we did a slightly premature feed of the flower girl fertilizer.
Cheers
-Dj Sunstone

Likes
2
Share


@Not_a_tutorial1990
Follow
She's doing great, recover well on each training. Struggling with tent rotation lol, so She's still in the veg tent, one week left in flower tent for current crop but I want change my lights on/off time so waiting on flower tent to be free..
Training has kept her relatively small though.
She topped herself 2 times after I topped her once. Only wanted 6tops currently have 8.. no complaints just worried about maintaining image through flower..
Happy growing everyone
Likes
12
Share


@Lushbloomz
Follow
After a comeback, the train is in the station! Even though I broke the main stem, she was an easy grow. I just basically let her do her with great results. Buds are thick and dense. Time for the drying and curing.
Likes
3
Share

@MandaleApical
Follow
Bueno me tomé mi tiempo para subir esto van dos semanas de flora las plantas se pueden observar estiraron bastante. Bueno solo queda esperar. Hice una pequeña exfoliación esta semana para darle entrada a la luz en la primer semana de flora regué con bioinsumos de @cogolit busquenlos. La segunda con agua.
La próxima semana nos vamos a la expo cannabis y vamos a adquirir nuevas variedades de este banco y vamos a adquirir Barney fans también. Vamos a ir por variedades frutales y vamos a ir por variedades de pastel y crema.

Likes
7
Share

@420DeepGrow
Follow
📆 Semana 3
Tras el exceso previo de EC, la planta se centra en recuperar el equilibrio del medio. La respuesta es progresiva: mejora la turgencia y se estabiliza la absorción mientras el pH vuelve a rango funcional.
La defoliación permite mejor luz y aireación, y la estructura se mantiene ordenada, aún en transición. El verde sigue en tono lima con leve desgaste en hojas grandes, coherente con la recuperación.
Aún no hay “erizos”; el estiramiento acompaña suave mientras el sistema radicular se reajusta.
Primero equilibrar, luego formar.
Seguimos creciendo fuerte 💪!

Likes
21
Share


@Grow4Releaf
Follow
Week 9 started so far they are looking great to me.
1 plant started almost exactly 1 week ahead of the other 2 (the plant with yellow pipe cleaner on some branches is the 1 plant that started to preflower ahead of the other 2 plants. )
it's really smelling great aswell. Pretty exciting to watch these autoflowers. Over night u get to see some crazy growth ..
Been learning alot with this first attempt with autoflowers.. we're going to be starting up some more hopefully .
But will update more photos during the week as they fill out . Getting closer , but no rush on these girls , their looking and smelling AMAZING .

Processing
Likes
32
Share


@Ganjagrandaddy
Follow
Day 64 : FLIP THE LIGHTS DAY.
It is time now to flip these beasts. if I allow them to get any bigger , I will have to knock a hole in my roof to fit them at harvest.
I am so impressed with them from planting till now. They have not missed a beat during their toppings and bends . Their recovery times have been hardly noticable after each session and theybhave rewarded me with a great shaped canopy to get working on as they stretch. I am not counting the transition weeks as flowering until I see actual flowers forming.
FFT1 has remained smaller than the rest and I don't think she is a record breaker . looks ok but doesn't have the size and thickness of her cousins. FFT5 is a beauty of a plant with a lot of thick stems to keep the buds upright hopefully.The same with FfT7. They are full of new mains to get working on and the stacking below decks is a good indication of some baseball bat colas. They are doing brilliant in the 2and run of the L.O.S soil and show no signs of that changing at all. I did top dress with Life-cycle tongue them a little boost for their stretch periods. They are taking a lot of water between them every 4 days now. Approx 25L before any minimum run off occurs. All told a great week in the room. Excellent genetics Fast Buds , Thanks Hayley.

Likes
8
Share


@Cali_Rayy
Follow
Did a defol on the covered budsites; feeding straight h20 at 6.0 this week I may have pushed the nutes a bit but that’s okay atleast I know he’s eating. Next few weeks I hope to get some smells coming off for an update 🤟
Likes
11
Share


@GreenHarvest_Official
Follow
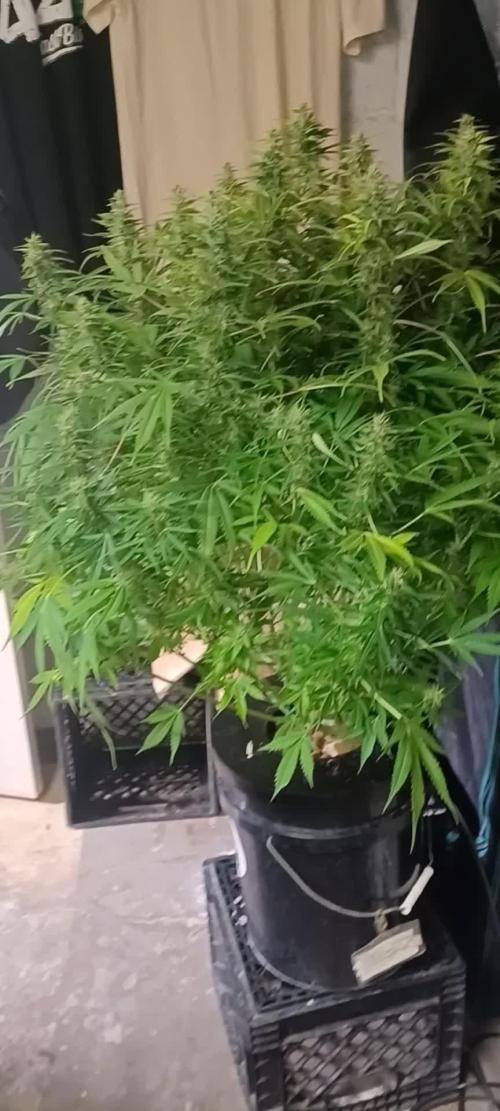
Harvest week coming up. Plant looks really good and Colas have gotten really heavy
Likes
5
Share


@pzwags420
Follow
I started the GSC seeds from HSC by soaking in a glass of water overnight then planted in coco coir under a humidity dome in my veg tent. I will plant them in flower box in a couple weeks when they can handle the feed that my BB clone is on right now. On day 5 my 2 other Gsc seeds rotted perhaps too wet but I have one good remaining for this run. I started White widow seeds and will run 2 phenos. Gsc is looking good so far.


Likes
43
Share


@TheCannaProphet
Follow
~ FastBuds PAPAYA SHERBET Photoperiod~
Well here we go on another journey together through 'Canna-land' and this one's kinda special... forget that, it's VERY special because this is FastBuds newest surprise for the community, a FEMINIZED PHOTOPERIOD STRAIN!🤯
I was fortunate enough to score these seeds, of which only 1000 were available and can't wait to see what this strain can do! This Papaya Sherbet, according to FastBuds, is a hybrid with a 9-10 weeks flowering period. For a more detailed and accurate description of this strain the following from FastBuds says it best:
"Combining the massive stature of Papaya (Oni Selection) with the strength and resilience of one of our best keeper cuts (Sunset Sherbet), this strain develops into a big, expansive bush adorned with numerous bud sites that later transform into a generous harvest of medium-sized buds. Papaya Sherbet flowers deliver a signature flavor of premium cannabis with subtle citrus undertones that emerge upon inhaling. During growth, her aroma makes for a sweet yet pleasantly bitter fragrance, giving you an idea of what the smoke will taste like. Notably stress-resistant, Papaya Sherbet is a great choice for growers working in challenging environments. She is very forgiving and rebounds quickly from any adversity, allowing growers the freedom to experiment with confidence that she will take everything like a champion she is. This strain embodies resilience, flavor, and abundant yields in every grow cycle."
Sounds like an epic strain and I personally cannot wait for this lady to strut her stuff!😍
________________________________________________________________________________________________________________________________________________________________________________________________________________________________________________________________________________________________________________________
The Setup:
This is going to be an outdoor grow, but I have started the Papaya Sherbet photoperiod indoors as our weather is still a bit too chilly to put a newly sprouted seedling outside (nighttime temp's dipping regularly into the 40's℉).
The plan is simple... let her grow inside under a 19/5 light schedule until the nighttime temperatures are in the mid 50's℉, which shouldn't be long. After which, she'll be moved outside and transplanted into the soil which I have already setup and inoculated with beneficial microbes from BioTabs and slow release dry amendments from Gaia Green. Once she's established herself outside she'll be given periodic top dressings of Gaia Green 4-4-4 and 2-8-4 along with worm castings and Compost Tea's. Her grow area is approx. 5'x5' and I have posts and a trellis net set up already for when she gets bigger to aid in training her. Let the fun begin!🤪💚
________________________________________________________________________________________________________________________________________________________________________________________________________________________________________________________________________________________________________________________
Weekly Updates:
5/23- Week three from seed and the second week of veg for the FastBuds Papaya Sherbet photoperiod and she's doing surprisingly well considering the crappy weather, and being eaten like a salad by slugs and a rabbit!
5/25- The diatomaceous earth that I spread around her seems to have lessened the attacks on her leaves. I've also been spraying her down every other day with Neem Oil, and every three days with an organic insecticidal soap that I'm sure has helped as well.
I watered the Papaya Sherbet today via garden hose and began to train her branches a bit as well.
5/27- The FastBuds Papaya Sherbet continues to do exceptionally well with great color and vigor, putting out new growth it seems daily.
5/29- There's three weeks on the books for this little lady and I'm looking forward to see what she'll look like in the coming weeks! I will have to top dress her soon, probably in the next few days. I haven't added any dry amendments to her since I initially amended her soil and she's a hungry girl... Hope to see you next week, stay Blessed!
Thank you for checking out my diary, your positive comments and support make it all worthwhile! 💚Growers Love!💚😎🙏
Likes
8
Share


@Kirsten
Follow
26.12.24:
I have noticed light stress on my plants. I had moved the lights further away and increased the light intensity to 70%. Unfortunately that created some issues. Namely severe palour of the leaves.
To try and rectify the situation, I've dimmed the lights to about 30%, staying at the same distance, about 30 inches away. I measured the par levels, after I did this. They should a reading of anywhere between 40 and 150, at the canopy of the plants. They are all different sizes. This seems to have improved the colouring on all plants.
After this evenings watering, I will monitor recovery and increase lighting intensity again slowly. I am also using the light cycle of 21/3, so the plants have many hours more light to absorb, than for example 12/12 or 18/6.
I am pleased with the progress, considering all of my mistakes!
29.12.24:
So I finally gave LST a shot, it's probably a bit too late, however I really want to get the most of the triploid pheno, and I went a little crazy and LST'd all plants except 2, as they're too small.
I did that late last night, this afternoon I was amazed to see the plants turn their leaves back to the light source. I'm glad I overcame my fear of trying it. I'm very excited to see them adapt and progress! 😁 there are videos above with before and after of my LST process.
Thanks for checking out my diary 🍃 ✌️
Likes
5
Share


@sinfantas
Follow
Lindo crecimiento 3 semana de floracion
debo comentar que tienen muy poco olor creo que se fue perdiendo porque estoy seguro en la semana 5 vegetacion era un olor muy fuerte no se si es uno de los fertilizantes que bajo el olor
comienzo a usar PK de B.A.C

Processing
Likes
11
Share


@Microsun
Follow
Flowering is going amazing, this candy cane is growing some very fast weight and caking up with Trichome’s. The sweet and slightly minty berry smell is growing in power day by day, and I’m very happy with how the size of the buds are developing since adding the increase of 2-8-4 and fish bone meal, just a little bit, not too much at all and she’s reacting great, knowing that the candy cane is a larger auto in size makes me a bit sad with the total size of this plant, but in its young age as my very first auto I believe I probably stunted it, but after all this and how she looks now Im more than happy with the growth, yield and quality of it, just speaking now as I do not obviously know how much I Will revive from it, I’m guessing about a ounce. No small bud sites other than maybe one on a lower branch that already has a main top cola on it. The main cola is massive and packing on a lot of size. I’ve switched the light to a hour less now as I am growing 2 photo indica L.A grape and with the season change I am having to fix my temp and humidity more for the photos, so changing to a 17-7 schedule has actually helped quite a lot and also has helped my other autos veg slightly better. But all in all I’m very exited!

Likes
8
Share


@Wackytabacky_420
Follow
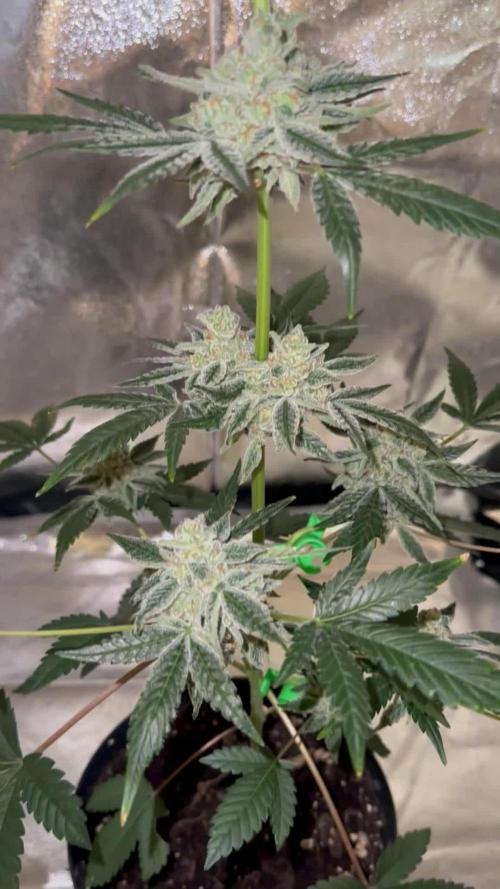
🚨 Durbin Thai/Cinderella 99 week 17 update 🚨
🚨 120 days old!! 🚨
🌸 Day 29 of Flower 🌸
So this is a clone I received on Jan 31st. She has been transplanted from a solo cup 2 a 5 gal pot. She had 2 be topped in her second week of rooting do 2 the top frying from to much light in young clone stage. Since the topping this lady has come 2 life!! She has been defoliated 4 times! Most recent defoliation 3/24! She spent her first month feeding just off nutrients in fox farm soil. On 3/2/22 I gave her her first Gaia Green trio feeding!! She has exploded with growth since!! She was defoliated on 3/27 again. She was given her second feeding of @gaiagreenorganics on 4/02. This lady was defoliated on 4/10 and 4/19 and 5/1. She received a all purpose/bloom feed of Gaia green on 5/2. She was also flipped to 12/12 light cycle on 5/2. She received a heavy defoliation on 5/29. This is what she looks like today!!
💡 Grow Sponsor💡
@marshydroled__amazon
@marshydronnier
#marshydro
#TSW2000
Marshydro equipment--
Marshydro- 4x4 grow tent
Marshydro- Tsw2000
Marshydro- 6" inline exhaust fan with digital temp and humidity sensor
Marshydro- 6" carbon filter
Marshydro- 6" Black duct line
Other companies in this grow-
@foxfarmsoilandfertilizer - 100% ffof
@gaiagreenorganics
@inkbirdofficial - WiFi temp control
@madmanplant- 6" Tent shelves
#rvagrown ,#rvagrower , #cannabisgrower , #homegrown , #hightimes , #weed4ptsd , #weed4veterans , #veterangrown , #tricomes , #ledgrown , #weedstrains , #indoorgrow , #indoorgrown , #tentgrown , #supportlocal , #growlocal , #letsgrowrva , #weedismedicine , #420 , #veterangrower , #clonegrown
Likes
6
Share
@in_a_few_weeks
Follow
Ready to harvest 👌🏼👶🏻👌🏼 2 Days without light than i cut them off. The mother is on 12/12 again.
This will be hopefully an endless Grow Diarie. Clones and revegge from Punch Pie 🥊👶🏻👌🏼
Likes
18
Share

@Roberts
Follow
Blue Dream Auto is doing good. She has about 2 weeks left. Everything is looking good. Thank you Spliff Seeds, Medic Grow, and Athena nutrition. 🤜🏻🤛🏻🌱🌱🌱
Thank you grow diaries community for the 👇likes👇, follows, comments, and subscriptions on my YouTube channel👇.
❄️🌱🍻 Happy Growing 🌱🌱🌱
https://youtube.com/channel/UCAhN7yRzWLpcaRHhMIQ7X4g.


Likes
5
Share


@Jabberwolky
Follow
ok so i totally forget to keep track of the dates for this website..lol the plant is well on its way to being done.
buds are taking forever to get any weight to them ... but the smell is wonderful.
i dont know if its the light that is not lettin them get as fat as i want or not ...
we shall see