
Likes
Comments
Share


@alexb420
Follow
So instead of chopping and losing anywhere from 4-8 ounces, I decided to just let them do their thing outside. I know it’s controversial to have a male outside and even more controversial to have a hermed female outside, but fuck it. I haven’t seen huge pollen deposits on leaves, and only a few open sacs, close to dropping. I pick em off if I see them.
I am using small doseds of Lost Coast Plant Therapy for my IPM. It’s an all natural, “minimal risk” pesticide made using soap, soybean oil, peppermint oil, 70% iso alcohol, Sodium Citrate, Citric Acid, and water. Smells super good, does leave a slight film on the leaves because of the soap but does easily come off.
I’m planning on doing 2 rounds of budwashing. Budwashing consists of:
5% hydrogen peroxide
lemon juice
Baking soda
Water
3 five gal buckets.
Fill one bucket with water and the ingredients, and then the last 2 with just water. Swish the plant matter in the first solution for 30-45 seconds, and rinse in the second two buckets of water, 20 for the first bucket and 30 for the second. Then take plant material and hang dry with a fan pointed directly on the hanging material for 2 days, and then resume normal drying conditions.
Should leave no taste or residue behind and have no effect on terps or potency. I will update around august 4th-10th with finished bud pictures and the hanging plants.
ALSO PICTURED:
my 4 plant Webber grill turned grow container. Will show them off more once they start getting decent buds on them.
Shown are: 2 Black Cherry Truffle X 41gs females, and in the 2 tin cans on top of grills soil is Slammer Skunk and Ego Death (both regs) from Terp_fi3nd. Will be watching those for males. Hoping they’re both female. All have been outside since like week 3 of sprouting them.
The stalk picture is one of the Black Cherry Truffle X 41gs.
Will post updates soon. Thanks for reading.


Likes
112
Share


@Tropicannibis_Todd
Follow
ALRIGHTY THEN GROWMIES 😎
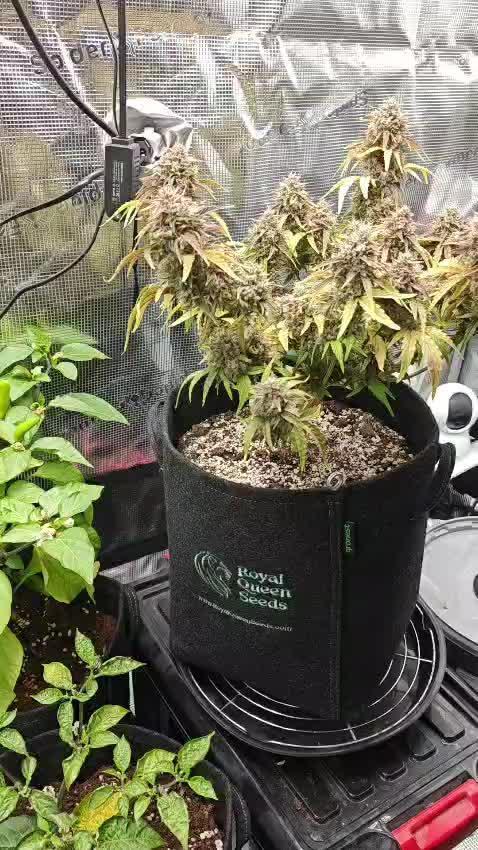
👉SHES PRETTY MUCH A BEAST , FROSTY AS HELL AND CANT WAIT TO CURE THEM UP AND GET SMOKEN 👈
👉I would recommend Shes the Mother of all Indicas 👈
Was a blast to grow thanks for hanging in there and following me on my journey👊
I GOT MULTIPLE DIARIES ON THE GO 😱 please check them out 😎
👉THANKS FOR TAKING THE TIME TO GO OVER MY DIARIES 👈
👉NutriNPK NUTRIENTS USED FOR FEEDING 👈
👉www.nutrinpk.com right now get 10% off using SPRING2022 👈

Likes
2
Share


@Comfrey
Follow
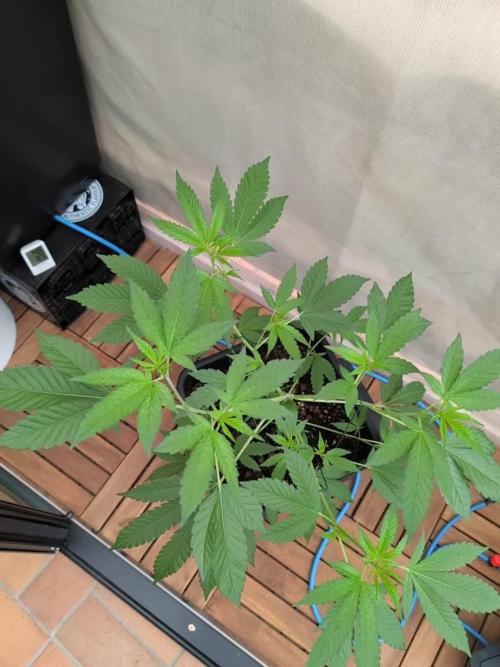
Diese Woche musste ich am Ball bleiben, ein krasser Stretch machte ein fast tägliches LST und eine dezente Entlaubung notwendig. Um einen schönen Ertag für zwei zu generieren, habe ich mich aufgrund der Lage unseres Balkons entschieden, alle Pflanzen kräftig runterzubinden. Zwei Ziele habe ich dabei verfolgt. Zum Einen haben wir hier maximal sieben Stunden mit direkter Sonneneinstrahlung. Durch LST erhoffe ich mir eine gleichmäßige Blütenbildung und Konzentration von Terpenen. Zum Anderen liegen wir mit unserem Balkon mitten im Dorfzentrum mit regem „Publikumsverkehr“. Das deutsche Cannabis Gesetz sieht vor, dass der Anbau nicht öffentlich einsehbar sein darf. Ohne das herunter Binden könnte man die Damen allerdings sehen. Die Anordnung der Pflanzen ist auch so vorgenommen worden, das sich eine Art Sonnenfalle bildet. Jede Pflanze und insbesondere die Blüten bekommen das maximal Mögliche an Sonneneinstrahlung. 🌞
Gegossen wird nun morgens und abends nach Gefühl.
Purple Punch Auto fühlt sich ganz wohl hier. Die Vorblüte sieht vielversprechend aus.

Likes
7
Share

@Green_Zyphoria
Follow
It was a pretty mixed week weather-wise. We had some beautiful sunshine, but also quite a few cloudy days—today, it's actually super cloudy.
At the beginning of the week, I paused the Autopot system to give the lady two specific top feeds:
First Feed: A fresh dose of nematodes to nipped any potential fungus gnat issues.
Second Feed (2 days later): A light snack of 2.5ml Orgatrex to feed the microbials and give the soil some extra sugars.
Yesterday, I finally restarted the Autopot system, so she is officially running on autopilot again! I also adjusted the LST a little bit further to keep her flat and wide, and now I’m just waiting for that explosive, bushy growth.
I’ve also included a picture of the whole setup today! The greenhouse is completely open in the back, but I’ve installed a fine insect screen there.
On the right side next to the GM, you can see a Orange Sherbet Auto, which is currently stretching and heading right into flower!
Likes
98
Share

@Tropicannibis_Todd
Follow
💩Holy Crap We Are Back At It And Loving It💩
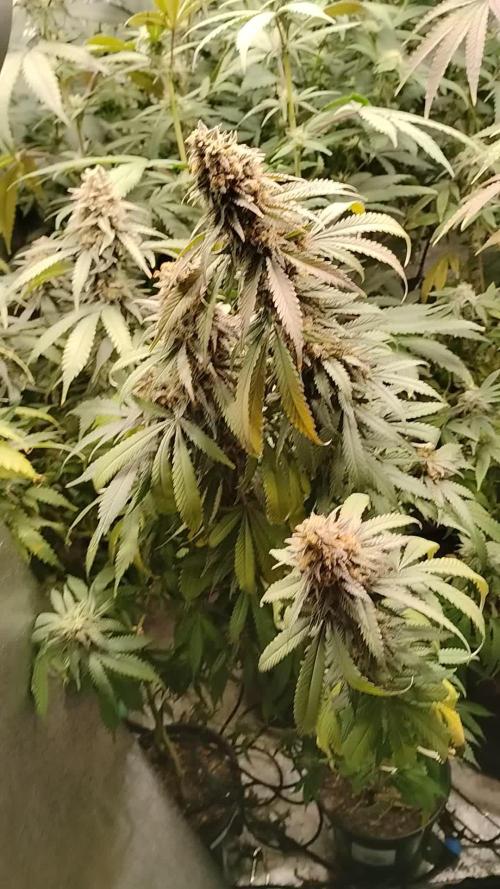
Growmies we are at DAY 42 and she's just killing💀it👌 The Smell has kicked in and is wonderful 😀
👉We are in full out flowering 💐 and its looking great 👈
So Shit , I gave them just a tad to much nutes on the first few feedings 👈 But I have since fixed it
So I'm helping out with some low stress training 🙃 and some defolation 😳
Lights being readjusted and chart updated .........👍rain water to be used entire growth👈
👉I used NutriNPK for nutrients for my grows and welcome anyone to give them a try .👈
👉 www.nutrinpk.com 👈
NutriNPK Cal MAG 14-0-14
NutriNPK Grow 28-14-14
NutriNPK Bloom 8-20-30
NutriNPK Bloom Booster 0-52-34
I GOT MULTIPLE DIARIES ON THE GO 😱 please check them out 😎
👉THANKS FOR TAKING THE TIME TO GO OVER MY DIARIES 👈
Likes
69
Share


@nonick123
Follow
Día 80 (19/08) Riego 500 ml H2O pH 6,55
Día 81 (20/08) Riego 250 ml H2O pH 6,55
Día 82 (21/08) Riego 500 ml H2O pH 6,55
Día 83 (22/08) 💥Comienza la floración! 💥
No riego. Día nublado y de bajas temperaturas
Día 84 (23/08) Riego 500 ml H2O pH 6,55
Día 85 (24/08) No riego. Día nublado y de bajas temperaturas
Día 86 (25/08) Riego con 1 Litro de Té Floración de Lurpe Solutions. Preparación: 24 horas con bomba de aire (oxigenación) con ingredientes:
Healthy Harvest 8 ml/L + Insect Frass 16 ml/L + Hummus Lombriz 8 ml/L + Melaza 1 ml/L + Kelp Hidrolizado 0,25 g/L
💦Nutrients by Lurpe Solutions - www.lurpenaturalsolutions.com
🌱Substrate PRO-MIX HP BACILLUS + MYCORRHIZAE - www.pthorticulture.com/en/products/pro-mix-hp-biostimulant-plus-mycorrhizae
Likes
31
Share


@AccidentalB
Follow
During a beautiful spring evening somewhere in May, the idea came to me to choose for a new hobby. And because I enjoy gardening very much and also like to smoke a joint, I decided that night to try to grow my own weed. And I also wanted to challenge myself to grow the best weed I possibly can. That's when I started to read up on all the facets of growing cannabis. From materials to technique, from strains to the anatomy of the plant, I prepared myself for at least 2 months before even one seed went into the soil. And partly because of this thorough preparation, I can now say to myself afterwards that this is the maximum I managed to get out of it. And the great thing about all this is that after these past 4 months I have learned so much more! Therefore I already know for sure that my next grow will be even better. Below some tips for my fellow newbies, they might help you during your own grow...
Material
In addition to the lamp, the tent and the right nutrients, which I commented on above, I have benefited a lot from a humidifier and dehumidifier over the past 4 months. Especially in the first weeks of growth, a humidifier is very useful so that you can keep the humidity around 60% (or what the VPD chart tells you depending on the temperature). During the flowering phase it is very useful to use a dehumidifier so that the humidity remains below 50% and at the end of the growth even close to 40%. That way you also exclude the risk of mold and bud rot. It is also useful to use these devices during the drying process so that you can keep the humidity around 60% and dry your weed slowly (at a temperature of around 15.5 Celsius, drying takes about 14 days). Drying slowly and coolly definitely benefits the smell and taste!
What's also really a must are an EC and pH meter, without these 2 instruments it is actually not possible to realize a perfect grow. Make sure you use a reputable brand like Apera, they are a bit more expensive but always deliver spot on.
In total I invested about 1500 euros in material on my first grow. This is also because I wanted to do it perfectly and therefore only went for quality products. But all in all I think I earn back my investment within 2 runs, taking into account that both my friends and I will never run out of a joint 😊
Seeds
Good genes are important to ultimately achieve a good end result. Therefore, do not save on the seeds and buy them from a reputable breeder. That way you can be sure that you will grow strong and healthy plants that can withstand pests and other negative influences. Well begun is half done and this is especially true when growing cannabis.
Technique
Of all the training techniques I have used, I would like to specifically mention one that surprised me the most: Supercropping!
Because I did this grow using the ScrOG method, I wanted to create as even a canopy as possible. The type of lamp I use is also most suitable for this method. But no matter how well you train your plants, they will eventually stretch unevenly during the first weeks of flower. I therefore snapped about 8 stems using Supercropping, which made my canopy nice and even again in a way that each branch gets the same amount of light. And the colas on those branches turned out SUPER nice! Also the nuggets beneath were growing bigger because they too got more light. I will certainly use this technique even more in my next grow!
Will
I will definitely use a diary again
I will definitely use VPD charts again
I will definitely use a feeding schedule again
I will definitely turn my light on during the day and off during nighttime again
I will definitely use the ScrOG method again
I will definitely choose a feminized American strain again
I will definitely use a webcam again (Wyze Cam)
I will definitely defoliate even more during the 4th week of flowering
I will definitely go higher on lollypopping
I will definitely Supercrop more
I will definitely dry my plants slowly and cool again (15 days at 60% RH and 15,5 C)
I will definitely continue to learn more and prepare myself even better for my next grow again 👊
Won't
I will certainly not water my seedlings too much again 😅
I will certainly not go for 3 plants again, but instead for 4 plants per m2
I will certainly not hesitate to ask experienced growmies for help again 🙏
(next week I'll comment on the bud dry weight and give my final smoke experience)

Likes
106
Share

@RockoCalenberg
Follow
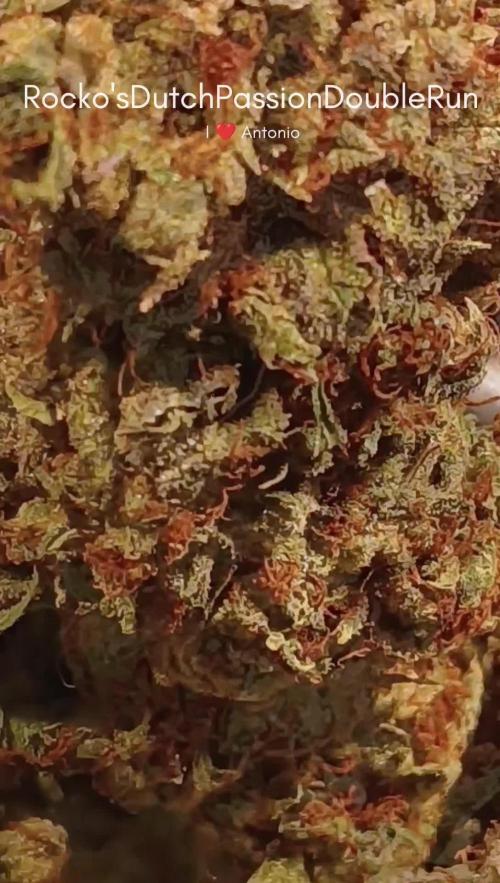
Letzte Tage vor der Ernte
Auch hier in den letzten Tagen kaum noch Entwicklung.
Die Pflanze stand optisch fertig,
hat aber nicht mehr wirklich weitergereift.
Foxtailing lief weiter auf bereits entwickelten Buds,
ohne dass sich die Reife sichtbar nach vorne bewegt hat.
Der Chop erfolgte ebenfalls aus praktischen Gründen,
da ein weiteres Warten keinen klaren Mehrwert gezeigt hätte.
👉 Optisch fertig, aber ohne echten Abschluss.
Kurzfazit:
👉 Unruhiger Finish-Verlauf ohne klaren Reifepunkt.
Grow on 🌱
Last Days Before Harvest
Again, very little development in the final days.
The plant looked finished,
but did not continue ripening in a meaningful way.
Foxtailing continued on developed buds,
without real progress in maturity.
Chopped as well for practical reasons,
since waiting longer showed no clear benefit.
👉 Looks done, but never fully completed.
Quick summary:
👉 Unstable finish without a clearly defined ripening point.
Grow on 🌱

Processing
Likes
13
Share


@GrowGuy97
Follow
Going great so far except the 2 Gorilla Zkittles are still a little far behind but they are starting to bounce back!
Day 18 everything finally transplanted in 5 gallon pots except the hulk berry is in the 3 gallon, hopefully the 1 small gorilla zkittles hits a growth spurt soon🤞🏼


Likes
13
Share


@balansa
Follow
Hello growers!!!
My ladys are near to harvest. I think in a week i will chop them as you see in microscope photos there are about:
70% milky trichoms
25% clear trichoms
5% amber trichoms
I will check again next week
So we have news for this week i added my favorit nutrition dry koolbloom
And next week i will use rippen aswell sooo......
I am excited :)
Likes
1
Share

@ChubbyBudBros
Follow
-
Day 71
I increased the height from the lamp a bit further trying to get about 600-700 ppfd across the canopy, just to help her finish and prevent trichomes from degrading into CBD too fast. Hopefully She will be ready to cut down this week.
Day 72
Still seeing a lot of clear trichomes, think we gonna be waiting for a while still. 😅 There's quite a few white pistils node still as well, which makes me believe she is still not done swelling.
Likes
4
Share


@Organic473
Follow
I defoliated the lower branches and added some more top layer soil for her continued growth in veg...no feeding for her this week await her spoil to dry out after 2 weeks of non stop rain glad she pulled through without showing sighs of drowning.

Likes
33
Share


@burnerac
Follow
Day 78: Nothing to report
Day 79: Nothing to report
Day 80: Added one gallon water with nutrients
Day 81: Nothing to report
Day 82: Nothing to report
Day 83: Nothing to report
Day 84: Nothing to report

Likes
3
Share


@Ryno1990
Follow
This big girl here Grapes an Cream from Atlas seed has been doing outstanding thriving at every point growing some nice frosty buds an smelling so good can't wait for this girl to finish up
Likes
12
Share


@Tobagardenboy
Follow
The 3rd and final girl has been trimmed, weighed and placed into curing jars! She added another 78grams making the total come to 219grams! I'm fairly happy with the result of my first grow!
Id like to thank the community here on growdiaries. Without the hours I've spent looking through diaries, getting ideas, and learning, I've found this site invaluable! I hope my fellow growers keep on taking pics and sharing their experiences!
Being my first grow and having to deal with manitoba flood humidity during late flower i believe i ended up with a decent harvest sitting in my jars. I really look forward to growing another photo strain in the future and perfecting my results but I think I'll be doing a run of autos first so I'll be back 😎😎
Post cure edit: These frosty buds matured into a dream to smoke. They really kick your ass and leave you breathless in a nice indica daze. Would not recommend for medical use for anyone with lung issues or super old smokers... but if you got some young lungs and wanna get fucked up, some good old OG kush will get it done boy! Happy growing if you check this strain out! I really would like to thank Quebec Cannabis Seeds for giving out such quality freebie photo seeds. All germed, all were female! Hope you have the same luck!

Likes
16
Share

@AestheticGenetix
Follow
Since this will probably be her last week. I may upload the end of the week as well into this. As of today 10/16 she is day 56 or 8 weeks of flowering total

Likes
19
Share


@HeavyHead
Follow
First week of flower :)
Did some final touches on some LST and a very light de leaf of some shading leaves. Pulling down the room temp slightly and will add some pre flowering nutrients towards the end of this week or early next week.
Likes
20
Share


@Inhomerhizome
Follow
Pretty happy with the grow and the harvest, the drying went well also!
Each grow highlights changes for the next and this has been no different! I'll be making more training adjustments in the next runs to try and refine the vertical scrog and get to the point where it's a wall 1 bud thick! I know it will get there in the end it's just like relearning how to do a horizontal scrog! I just need to predict the way the plant will respond when the light is from the sides! Bravery and brutality during pruning I think is the key! 😂✌️💚
Likes
14
Share


@Chubbs
Follow
What up grow Fam. These ladies did amazing this week, especially since where having our first heat wave with temps getting into the high 90's. I did switch to Bloom nutes and a pk booster this week. Also did a mild defoliation taking off the bigger fan leafs on the main stalk. All in all Happy Growing