
Likes
Comments
Share


@TheStaffedition
Follow
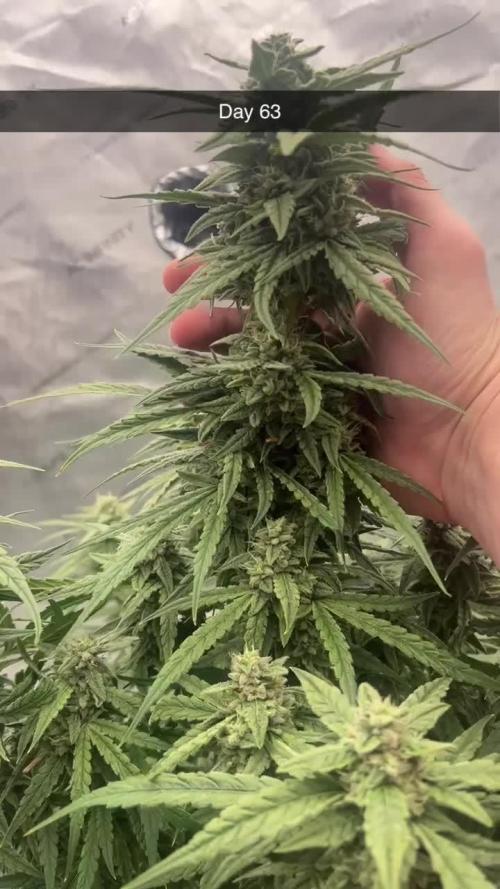
Сорт очень понравился!
На второй недели я его начал растягивать. Тянул каждые два/три дня.
Ни разу не стрессанул, в связи сэтим и качество итогого продукта на высоте.
Советую новичкам, кто хочет попробовать свои сылы грове!
Всем мира и хороших урожаев!

Likes
87
Share


@Roberts
Follow
Banana kush autoflower was a okay grow. She was very hungry and threw my ph off several times. So she had some leaf damage through flowering. She had more potential then I got out of her. Still a good grow and lots of sweet flower. Thank you Medic Grow, and Athena nutrition. 🤜🏻🤛🏻🌱🌱🌱
Thank you grow diaries community for the 👇likes👇, follows, comments, and subscriptions on my YouTube channel👇. ❄️🌱🍻
Happy Growing 🌱🌱🌱
https://youtube.com/channel/UCAhN7yRzWLpcaRHhMIQ7X4g

Likes
100
Share


Processing
Likes
Comments
Share


@Hexus
Follow
Days 78-84 - Been lax in updates, but I still log every week to completion. Back injury in addition to The Nineteen, Rona Style, has been a bit of a pain in the posterior. (That means ass) Plants are gigantic and sassy. Had Dangergirl come out and defoliate/lollipop the bottoms out of the girls, saving me painful labor and increasing my yields, so yay for her! Plants are happy, pompoms are getting thick, and everything looks good. Switched FF01 to flower on day 84.


Likes
7
Share


@Bakeryguy420
Follow
really easy to grow mines came out
smelling like pine Barrens mixed with lemon balm , while my wives smelled like complete skittles chem gas like. Similar to mephisto white chem tbh. Yeild awesome some nice beautiful nuggets. If you notice on mines was super leafy so I ended up using the trimbag. I used it for not even 15 seconds and results show. Stuff like this investing into products like the trimbag and my herbsnow dryer has been saving my ass and time for many grows now. End product shows everytime. Will have and updated smoke report in matter of weeks. Can easily see me growing this one again but in a bigger pot ^_^. But for 1.5s gals ill take it really happy.
Likes
3
Share


@Doobster42
Follow
She is looking GREAT and the Smell is Citrus and Cola and she continues to packing on the frost along with bulking buds! I guessing 2 more weeks until harvest.
Processing
Likes
24
Share


@ElChicoDelaWeed
Follow
14 días desde EASY START.(4 semillas,1 venía solo la cáscara de un lado)
Maceta RQS 10L.
-EASY BOST ORGANIC NUTRITION.(preparación del suelo con 50g en 10 litros de sustrato con perlita)
-EASY COMBO BOOSTER PACK.
-En la 2ª semana riego las 4 plantas con agua mezclada con la pastilla EASY GROW BOOSTER (la dividí en 4 trozos para la semana 2,3,4 y 5 diluyendo en 1L. de agua la mezcla).
-Las 3 que están en vaso de plástico para la próxima semana le voy añadir al vaso uno granos del EASY BOOST ORGANIC que no le mezclé cuando las planté).
👌

Likes
407
Share


@LegacyMarketFarm
Follow
APRIL 18TH 2024 - The 3rd batch of clones was taken yesterday and mother plants stripped back aggressively now that focus will be going toward the beds and clones. The generation 2 mom's are going to be vegged up and ready to produce our second harvest's set of clones. We have taken 3 batches of clones kept them in half gallon bags in each of the beds so we can pick the absolute best of each to transplant into the beds & proceed into the grow with. Next update will be of each individual diary! We got @Seedsman Purple Ghost Candy in this cycle by splitting the Exotic Animal bed half Purple Ghost Candy !
On the Kitty cat front, Barns finally got the courage to approach us over a few days, Maybe a week. We where finally able to pick her up and bring her inside, She has been a happy new member of the family ever since, Making that another successful rescue animal adopted from outside.
FOLLOW US ON X for EXCLUSIVE UPDATES : https://twitter.com/LegacyMrketFarm
MAKE SURE TO CHECK OUT OUR YOUTUBE CHANNEL FOR IN DEPTH TUTORIALS : https://www.youtube.com/@LegacyMarketFarm
SUBSCRIBE TO OUR GAMING CHANNEL TO JOIN OUR AWESOME COMMUNITY & GAME WITH US : https://www.youtube.com/@LegacyRadioGaming
AND MOST IMPORTANTLY DON'T FORGET TO TAKE ADVANTAGE OF OUR PROMO CODES FOR EACH OF OUR GREAT SPONSORS !
PROMO CODE GREEN PLANET : LEGACY
PROMO CODE MARS HYDRO : LEGACY
PROMO CODE SEEDSMAN : LEGACY10

Strawberry Cookies · Super Sativa Seed Club

Exotic Animal · Exotic Seed

Jungle Lava · Original Sensible Seeds

GG4 Sherbet FF · Fast Buds
Stinkin' Bishop · Original Sensible Seeds

Lamb Chops · Thug Pug Genetics

Purple Ghost Candy · Seedsman
Fuel DOG · Seedsman
Peyote Zkittlez · Seedsman
RudeBoi OG L.E. · Seedsman
Banana Jealousy · Seedsman

Sugar Cane · In House Genetics
Likes
67
Share

@Roberts
Follow
Been flowering very well. I backed off nutrition a little. Minor nute burn on tips. Beside that it took to lst training great. Flowers are looking dense and potent. Will see in a few more week. Thanks again for likes and follows. Support means a lot. Happy growing

Likes
9
Share


@pzwags420
Follow
On day 1 I adjusted the PH from 6.6 to 6.2. The tallest cola is 13.75" away from light.
On day 2 I adjusted the PH from 6.4 to 6.2. The tallest cola is 12.5" away from light.
On day 3 the PH is 6.2. The tallest cola is 11.5" from the light.
On day 4 I didn't take data points long day...
On day 5 the rez PH is 6.2. the tallest cola is 10" from the light.
On day 6 the rez PH is 6.0. The tallest cola is 9.5" from the light. I defoliated heavily to bring in more light and airflow.
On day 7 The tallest cola is 9" from the light. I mixed up a new rez.
Likes
6
Share


@GoldenWeedGrower
Follow
Legend
Timestamp: 📅
EC - pH: ⚗️
Temp - Hum: 🌡️
Water: 🌊
Food: 🍗
pH Correction: 💧
Actions: 💼
Thoughts: 🧠
Events: 🚀
Media: 🎬
D: DAY, G: GERMINATION, V: VEGETATIVE, B: BLOOMING, R: RIPENING, D: DRYING, C: CURING
______________
📅 D22/V18 - 07/05/24
⚗️ EC: 0.7 pH: 5.3
🌡️ T: 22 °C H: 50%
🌊
🍗
💧
💼
🧠
🚀
🎬 1 TL video
______________
📅 D23/V19 - 08/05/24
⚗️ EC: 0.7 pH: 5.3
🌡️ T: 22 °C H: 50%
🌊
🍗
💧
💼 Topping and LST
🧠
🚀
🎬 1 TL video of grow and one of the topping
______________
📅 D24/V20 - 09/05/24
⚗️ EC: 0.9 pH: 5.4
🌡️ T: 19 °C H: 50%
🌊
🍗
💧
💼
🧠
🚀
🎬 1 TL video
______________
📅 D25/V21 - 10/05/24
⚗️ EC: 0.9 pH: 5.4
🌡️ T: 19 °C H: 50%
🌊 12 L
🍗 Calmag, Grow A-B, B52, Hydroguard, Rhino Skin, Bud Candy
💧
💼
🧠
🚀
🎬 1 TL video
______________
📅 D26/V22 - 11/05/24
⚗️ EC: 0.9 pH: 5.4
🌡️ T: 19 °C H: 50%
🌊
🍗
💧
💼
🧠
🚀 Out of Home
🎬 1 TL video
______________
📅 D27/V23 - 12/05/24
⚗️ EC: 1.0 pH: 5.3
🌡️ T: 20°C H: 50%
🌊
🍗
💧
💼
🧠
🚀 Out of Home
🎬 1 TL video
______________
📅 D28/V24 - 13/05/24
⚗️ EC: 1.0 pH: 5.2
🌡️ T: 20°C H: 50%
🌊
🍗
💧
💼
🧠
🚀 Out of Home
🎬

Likes
14
Share


@MRTHC
Follow
First few days of flower so nothing much happening. The stretch is in effect and she's going for it. Just a little of the bottom leaves removed for better air flow. Nothing major. Having issues keeping the R.H around 60%· Observed slight water condensation on leaves at lights on. Need to sort that out

Likes
20
Share


@a1Andrew
Follow
Love the strain. There was heat stress, and for such much light 2x2 tent would be better. After curing: Tasty as hell grape "cold" flavour, body tranqulizing high, after few hits from the bong its a good idea to chill and watch a movie. Absolutley love the smoke in the end, from bag appeal to high :)0
Likes
6
Share


@Jack_Greenstalk
Follow
smell is strong now. sour 76 has a range of citrus, number 1 is lemon dominated with fuel scent underneath. number 2 has a smell super similar to tangie! seeing sour 76 parent is cali sour d (cali orange x sour d x mexican sativa) cross to 76 afghan it makes sense to me it has reminiscent smell to tangie (cali orange x skunk 1 [mexican sativa x afghan indica x colombian sativa]) very similar parent lineages there! havin smoke test both, sour 76 is much more heavy handed high! plants finish at 66 days this run. at this point I gave last main feeds before tapering nutes back lower for week 8 and then flush week 9
Likes
21
Share


@420DeepGrow
Follow
Este sueño es posible gracias a Royal Queen Seeds, Marshydro, XpertNutrients y Trolmaster, sin ellos esto no se podria cumplir .
💐🍁 Dynamite Diesel:
Royal Queen Seeds se ha asociado con Tyson 2.0 para ofrecer la genética desarrollada por este campeón en forma de semillas.
La Dynamite Diesel recibe su nombre en honor al apodo de Mike Tyson al inicio de su carrera, Kid Dynamite. Es un cruce entre dos variedades míticas, la Sour Diesel y la Skywalker OG, que son conocidas por sus intensos sabores y sus efectos estimulantes,tiene un 22% de THC, lo que la sitúa en la categoría de peso crucero.
En interior, esta variedad crece a alturas de 100-150cm y produce hasta 550g/m² tras una fase de floración de unas 9 semanas. Al aire libre, puede alcanzar hasta 2m de altura y produce una cosecha máxima de 675g por planta.
🚀 Consigue aqui tus semillas:
https://www.royalqueenseeds.es/rqs-semillas-cannabis-tyson/664-dynamite-diesel.html
💡TS-3000 + TS-1000: se usaran dos de las lámparas de la serie TS de Marshydro, para cubrir todas las necesidades de las plantas durante el ciclo de cultivo, uso las dos lámparas en floracion para llegar a toda la carpa de 1.50 x 1.50 x 1.80.
https://marshydro.eu/products/mars-hydro-ts-3000-led-grow-light/
🏠 : Marshydro 1.50 x 1.50 x 1.80, carpa 100% estanca con ventanas laterales para llegar a todos los lugares durante el grow
https://marshydro.eu/products/diy-150x150x200cm-grow-tent-kit
🌬️💨 Marshydro 6inch + filtro carbon para evitar olores indeseables.
https://marshydro.eu/products/ifresh-smart-6inch-filter-kits/
💻 Trolmaster Tent-X TCS-1 como controlador de luz, optimiza tu cultivo con la última tecnología del mercado, desde donde puedes controlar todos los parametros.
https://www.trolmaster.com/Products/Details/TCS-1
🍣🍦🌴 Xpert Nutrients es una empresa especializada en la producción y comercialización de fertilizantes líquidos y tierras, que garantizan excelentes cosechas y un crecimiento activo para sus plantas durante todas las fases de cultivo.
Consigue aqui tus Nutrientes:
https://xpertnutrients.com/es/shop/
📆 Semana 3:
Muy buena semana, he aplicado un riego solamente con agua de manantial para reducir la cantidad de sales acumuladas en el sustrato y se ha notado una mejoria .
Tiene alguna decoloración en las hojas superiores debido a la proximidad de la lámpara, se ha solucionado incrementando la distancia entre el foco y la planta.
Creo que le quedan unas dos semanas por estirar, parece que va a ser una buena cosecha.
Se mantiene un buen control del cuarto de cultivo gracias a @marshydro y @trolmaster.
Mantengo las dosis de 1/3 de nutrientes recomendados por el fabricante.
Potencia del foco 80%
Likes
2
Share


@Grandillustrator
Follow
Starting to look really nice had to take it out the tent as I hate the yellow tinge from the bulb cannot see the correct colour of leaves or how frosty she looks leaves look a little dark gonna start flush next watering , giving just over 2l every seccond day if I was to do this again I’d use a bigger pot but I was expecting this to be an auto. Branch with fasciation split into 4 still gonna get some nice buds on it just not as much as I could of had I noticed earlier in the grow

Likes
13
Share


@Popothamio
Follow
Esta semana he empezado a regar solo con agua en teoría las plantas son de 55-60 días aproximadamente y el día 19 cumplen 60 días.. aunque los tricomas están 50% blancos y 50%
transparentes espero que maduren un poco más durante esta semana por que ya tienen bastantes signos de carencia en las hojas que les quedan por que se le han caído bastantes también
Likes
175
Share


@the_curious_grower
Follow
no signs of pests during the grow. only one time i had ants trying to infest one plant but easily got rid of them by using cinnamon around the stem. she grows easy and is fun to train, you don't have to be an expert.
in the late flowering i got some budrot in both plants and stalled the harvest by inspecting and cutting it away daily, haven't lost a lot due to it.
i would recommend this strain as she is a high trichome producer, big yielder and easy to grow plant that gives nice buds with a good smell and greath high.
she is a strain that makes you talkative, giggly and euphoric and is surely gonna give you a good sleep. be sure to go easy on her as she is a strong breed.
an amazing strain to grow. she creates colourfull purple buds filled with trichomes that is really good for the chilling occasions, be sure not to have to go somewhere as she will last long and prepare for a joyfull evening with lots of laughing and good talks. i'll post more pictures after the drying process!

Likes
7
Share


@eldruida_lamota
Follow
Que pasa familia, vamos con la septima semana de floración de estas Black muffin F1 de Sweetseeds.
Vamos al lío, me quede con 3 por espacio, siempre pongo alguna semilla de más por si no abriese alguna por no perder ese hueco del indoor.
También se trasplantaron a su maceta definitiva, en este caso de 7 litros y el trasplante se realizó correctamente.
El ph se controla en 6.2 , la temperatura la tenemos entre 20/22 grados y la humedad ronda el 50%.
Las jodidas han estirado bastante, ya veremos que ocurre como va todo.
Hasta aquí todo, Buenos humos 💨💨💨


