The Grow Awards 2026 🏆 


Likes
Comments
Share
@Big0zGrower420
Follow
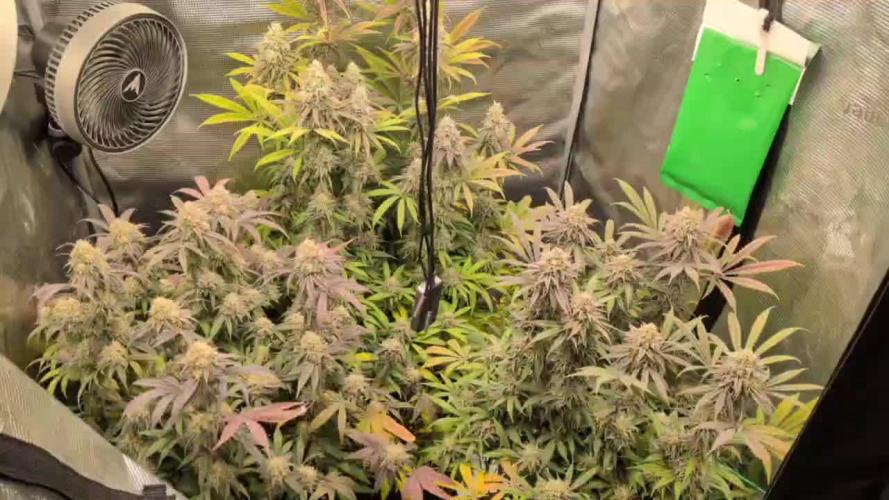
I made some mistakes early on but despite all of that she still grew and produced some nice flowers. Would love to run this one again because she would have been a monster had everything gone a little smoother.

Likes
6
Share
@Thedibber
Follow
Final few weeks left of the Bubba cheesecakes just tapwater from now on no microben 👌


Processing
Likes
37
Share
@organically
Follow
Week 5 - Day 2 - 11.12.2017
-
Hay lovers of Green, i will give you a big update.
While trying to fix the PH and Humidity issues last week, i've already found some nice root developments and decided to transplant to support the regeneration - 6.12.2017 -.
The Plants were unhealthy and shocked.
After 2 Days they started to reviltalize and stable - 08.12.2017 - and i found a suprise, the adjoining Auto Dinamex's start to Preflower.
-
Today the sweetys are healthy,vital,bushy and got nice stems, in height arround 18 cm
The BCC'S internod distances are longer and the stems are thinner as the ICED G's.
-
■ Blueberry Cheesecake [ Cheese x Blueberry Multiple Hybrid ]
■ ICED Grapefruit [ ICE [Skunk Special x White Widow x Blueberry] X Grapefruit [ C99 x Cinderella x Sativa ]
-
■ Timeline ■
Germination start [ 04.11.2017 - 17:15]
Germinated / into Coir Pellets [ 06.11.2017 ]
PreVegetative start [ 07.11.2017 ]
Transplanted into 1L Airpots [ 19.11.2017 ]
Vegetative start [ 26.11.2017 ]
Transplanted into 7L TeKu [ 06.12.2017 ]
-
PreFlowering start [ xx.xx.xxxx ]
-
Flowering start [ xx.xx.xxxx ]
Harvesting Part 1 [ xx.xx.xxxx ]
Harvesting Part 2 [ xx.xx.xxxx ]
-
■ Growroom ■
Size » 90x90x170 ~ 0,8 m²
-
PreVegetative Lightning
» 24 ▪️ LED ~ 33W - daylight - 3700lm
Vegetative Lightning
» 24 - 20/4 ▪️ HID ~ 250W - 5600K - 18.000lm
Flowering Lightning
» 12/12 ▪️ HID ~ 400W - 2100K - 56.500lm
-
Supply air ▪️ mesh window - negative pressure
Exhaust air fan ~ max.420m³/h ]
Circulating air fans ~ 3x16W max.2250 rpm
-
Pots ▪️ Coir Pellets --> 1 L Airpots --> 7 Liter TeKu.
Medium ▪️ Organic Soils!
Composition ▪️ bark humus,wood fibers,coconut fibers,coconut husks,compost,guano,hornmeal,clay minerals,trace elements,calcium carbonate,perlite.
-
■ Supported by ■
» Female Seeds - so easy !
» Cellmax - Organic Growing.
//////////////////////////////////////////////////////////////////
👋 Greetings your organically
» tried and true, since simple is the best! 👍


Likes
16
Share
@GreeneScene
Follow
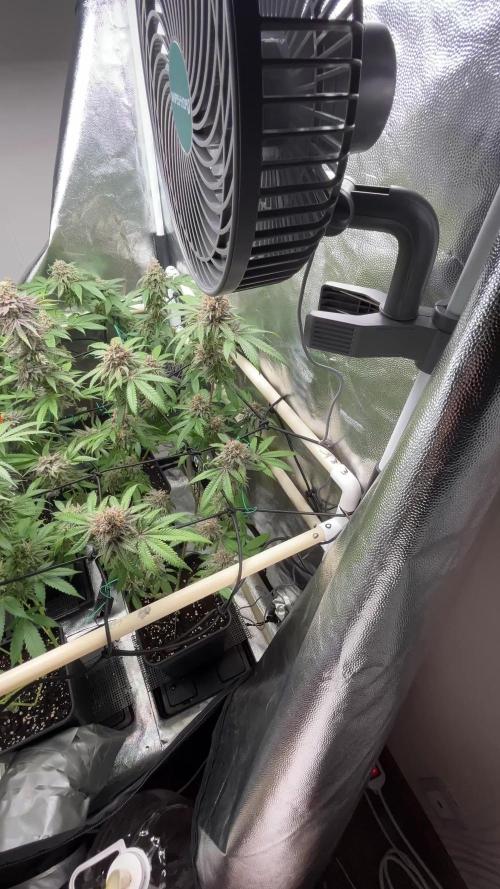
What to say about this week? For starters LST was started this week. Initially I used garden ties but soon after replaced them with 6” garden staples .
2 of the 6 girls began throwing pistals resulting from the LST starting around day 15 YIKES 😬.
The Zkittlez & the Runtz both from (Expert Seeds ) began giving the 5x5 its first smells .
The LST so far has been a pleasure no ooosy daisies so far & the girls are showing what they are made of . The secondary shoots have great potential to form a nice round bush that I can train out into an even-as-possible canopy .
Today is day 21 & day 20 for this bunch . They are only using Gaia Green dry amendments for feedings but I decided to take some advice given to another grower & supplement my girls with some compost tea . NO I DONT THINK THEY NEED ANYTHING ADDITIONALLY IM REALLY HAPPY SO FAR WITH MY NUTES bbbbuuuuuttttttt in the short chance that my ladies may take a liking to an occasional tea & reward my pampering with large , long , frosty, stacked cola’s . . Thennnn I’m supplementing , I consider this all “4-play” for my ladies Ik a giver 🤷♀️😭
My only concerns are racing against this clock to get as much size & solid structure before flowering sets in I’ve really got my heart set on a certain outcome & I’m one for a good challenge.
Finally , atleast as much as I can remember, I increased the dimmer knob on the light from 65% to about 78%. I won’t increase the watts any higher until bloom sets in fully & at that point I’ll be turning it to 100% raising it a maybe 6 inches & watching patiently for my girls to start praying 🙏 to it .
Week 3 in the books !

Likes
12
Share
@Jardin33ro
Follow
Buenas gente! Esta semana se nota tremendamente el engorde de los calices, y algunos comienzan a cerrar de a poco! Una maravilla en cuanto a terpenos!! Tuve el honor de cortar unas flores para analizar en la expocannabis uruguay, les dejo un video con esa info de una de los 4 fenos. Empezamos a lavarr, primer uso del flawless asi que nos ponemos con el lavaditooo!! Venimos bien de bien. Saludos Jardin33ro 🇺🇾


Likes
12
Share
@2Stones1Bird
Follow
Checkout my Instagram @smallbudz to see the Small budget grow setup for indoor use, low watt, low heat, low noise, step by step.
25/10/2019 - First feed I gave her 0.25ml on 250ml of water of Biobizz-Grow, with 6.5ph.
26/10/2019 - Leafs looking a bit crooked, and some pale spot lets hope its not fungus. (gave her 100ml of just PH 6.5 water)
27/10/2019 - Feeding day, gave her 250ml water with 0.25ml Biobizz Grow, 6.4PH (changed feeding to once every 2 days with a plain water interval)
28/10/2019 - Started LST
30/10/2019 - Feeding day, gave her 250ml water with 0.25ml of each Biobizz - Grow,Bloom and Max, 6.3PH, added carbon filter and it raised the temps to 29c
31/10/2019 - A tad too much of nuts, little burn tip. (Sensi Seeds warned me but I still goofed it)

Likes
26
Share
@Highgrade_Harvests
Follow
The 3 that are in the 5 gallon pots are the gorilla gas seeds and the one in the litte pot is the blueberry pie f1 fast and another grow off im involved in with seedsman. All of them are off to a great start in seedling starter mix. Just transplanted the gorilla gas seeds into their 5 gallon pots where they will remain for the rest of the grow. Right now I'm just feeding them 6.5.ph water. The coco I'm using is preamended with nutrients to last a couple weeks. Can't wait to watch these girls grow! I'm going to try to get a time lapse video of the grow if I can get my camera working right.
Likes
6
Share
@HomeGrown_Medicinal
Follow
End of week 4 and I have a bit more to report this week.
On day 22 I topped this girl and she was a little slow to react, turns out my thermometer was in a bad spot and the girls were getting hammered by the heater 🤦♂️ lesson learned. Since re-positioning the thermometer they have bounced back and happy as Larry again, thank goodness.
On day 27 i had brewed up my first compost tea and fed them a bit more than usual. The tea had a cup of Herbi's brew starter, a cup of work castings and a cup of organic compost. They loved it. I used the remains as a top dress afterwards.
Today, on day 28, I defoliated and started LST, she's praying to the lights right now and I'm stoked!
Hope you've all had a good week and thanks for checking in 🙏
Likes
17
Share


Likes
24
Share
@3lementa1
Follow
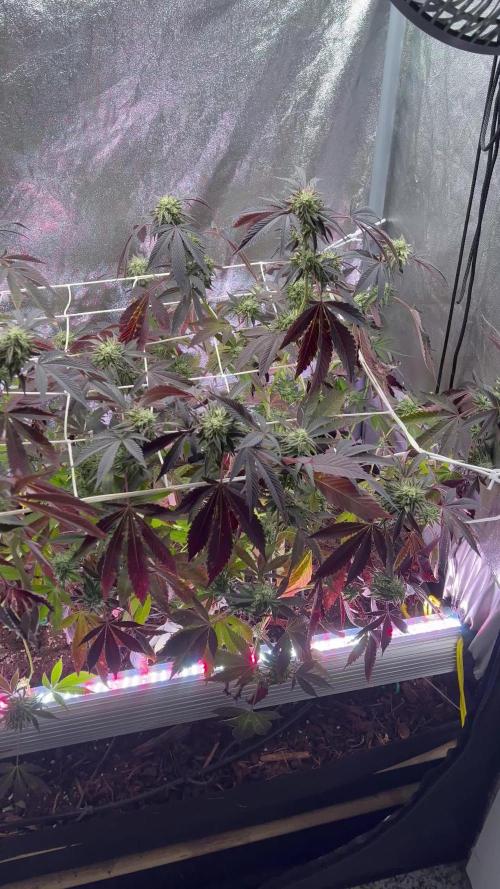
This is the 8th week. Thursday will be 9 weeks of 12/12. Some trichs are amber. They just added a good bunch of girth over the past few days, but most of the pistils are red now. The rest of them have been dropping leaves consistenly but the canopy remains full so they must be putting out more leaves.
I just flushed to 80% runoff and found out that I had 1200ppm. I just got an ec meter but my last reading said closer to 600 so idk what happened there.
I flushed until I had runoff ppm of about 150. Now they're back in the grow tent. I don't want to keep assaulting them with my microscope. I think they're ready. Just gonna let them settle another day or two to dry out a bit.
I took one small branch off the small Wedding Cake plant on Thursday and I've just been watching it dry on my counter. It's been 5 days and the stem snaps but still leaves a fiber connecting. I put it into a small jar with a 64RH thing. I just want to try it. It already smells amazing.
The leaves on the big CBD Blue Shark plant are going really yellow and some other colours are starting to come out as well.
The buds all fattened up and got more frosty again. I was worried they were foxtailing but they got more calyxes underneath the peaks and have been making more of a pyramid shape. They're really close to peak. Harvest day will be March 17 or 18.
March 17 1023pm chopped and hung after lights off all day. RH was 65% before I chopped and 50% after I closed the window and cut the plants off the saturated pots. I did a wet trim to prevent mold. The buds are sticky af. Gonna hang them to dry for 7-9 days before curing in jars :)
March 18 : checked the RH when I woke up and it's chilling at 45% 😎
March 19 : just checked to see how they were drying. There are seeds in every plant. RIP
I'll update when I put them in jars and again a few weeks later for final review. Overall it was a good grow despite the rocky start and a good introduction to the mainline technique and my new grow space. Next grow I should have everything pretty well dialed in.
March 23
They were hanging for 3 days. Rh was around 45, then spiked to 65 overnight when I forgot to turn the fans back on. Temp was high at around 26.they felt wet after 2 days, and bone dry after 4 days. The stems still didn't snap but I put them in jars anyway. A day later, jar RH was 50%. I burped all the jars and there was a smell from the new jars. I took all the weed out, washed out the jars, and did a dry trim on the weed.
One of the Wedding Cake plants must have gone hermie. I didn't see any bananas and didn't even realize there were seeds until the very end. The seed pods looked just like calyxes while the plants were growing. Many of the nugs are unusable. Under the sugar leaves are just layers and layers of seeds. Some weren't hit that badly. The CBD Blue Shark is much better off but still has some seeds.
I'm trying to stay positive. It's a bit of a shock though. I'm anxious to try the finished product. If the flowers at least taste good and have a good effect, all is not lost.


Likes
65
Share
@Roberts
Follow
Gold Sativa is doing well. I increased nutrition, and I may of been too strong. Been following the routine I been doing through grow with solution changes. She looks pretty happy, and the Spider Farmer SE5000 light is at a good sweet spot for her. She is in a New Level Hydro bucket. Thank you Spider Farmer, New Level Hydro, and Quebec Seeds 🤜🤛🌱🌱🌱
Thank you grow diaries community for the 👇likes👇, follows, comments, and subscriptions on my YouTube channel👇. ❄️🌱🍻 Happy Growing 🌱🌱🌱
https://youtube.com/channel/UCAhN7yRzWLpcaRHhMIQ7X4g
SE5000
https://amzn.to/3qFpAML
Spider Farmer Official Website Links:
US&Worldwide: https://www.spider-farmer.com
UK: https://spiderfarmer.co.uk
CA: https://spiderfarmer.ca
EU: https://spiderfarmer.eu
AU: https://spiderfarmer.com.au
Coupon Code: saveurcash
Www.newlevelhydro.com
Www.hygrozyme.com

Likes
1
Share
@Organic_G
Follow
Absolut ungewohnt das Zelt mit so abgemargerten Pflanzen zu sehen 🤣🤣🤣
Die Ladys von draußen sind endlich nach innen gezogen für den restlichen Blüte Schub.
Sehen wie Crackys aus im vergleich zu den den davor drin waren 🤣

Likes
92
Share
@DogDoctorOfficial
Follow
🌸 Week 4 Flower Report: Growth, Challenges & Big Changes! 🌸
Hey, Grow Diaries Fam! ✨
We’re here at Week 4 of Flower, and what a week it’s been—packed with challenges, adjustments, and exciting progress! Before diving into the details, let’s start with a note on my flowering timeline. While this is Week 4, I don’t start counting flower days the moment I flip to 12/12. Instead, I wait for the plants to show true signs of bloom. It’s a small but significant distinction that keeps things accurate and aligned with the plants’ development. 🌱
Defoliation: Timing is Everything!
Defoliation is a critical part of the flowering stage, and I typically wait until Day 21. However, this week, I tackled it earlier on Day 17 because:
1️⃣ The room was simply too full.
2️⃣ And most importantly—the Papaya Zoap had other plans!
She’s a fighter—determined, defiant, and constantly reaching for the moon. Despite intense training like super cropping, she’s still pushing upward, nearly outpacing the LED lights. Challenges like this remind us of a simple truth: gardening mirrors life. It’s about resilience, adaptation, and unwavering determination. 💪
This week, I added a second SCROG layer. While this net will support the flowering colas, it’s also there to strategically manage the Papaya Zoap. Why? Because experience has taught me that if she grows out of the LED’s range, she won’t finish properly—and that could disrupt the balance for every other plant in the tent. It’s all about teamwork, even in the garden. 🌟
Defoliation was intense, removing nearly all the leaves with stems to clear space and boost airflow. The tent now looks dramatically different! For the full before-and-after transformation, be sure to check out my YouTube channel—trust me, you’ll want to see this process up close! 🎥✨
Switching to Aptus Holland Minerals
A major milestone this week: I’ve transitioned entirely to Aptus Holland Minerals. 🌊 From now on, it’s just minerals—no more organic inputs. This marks the start of a new chapter, and I’m incredibly curious to see how the plants react to these changes. Here’s the current nutrient mix:
• System Clean: 0.5 ml/L
• Regulator: 0.15 ml/L
• RO Water Conditioner: 0.8 ml/L
• All-in-One Liquid: 2.1 ml/L
I’m keeping the pH at 6.1 and TDS at 556 ppm, and so far, the plants are thriving. This week also included a thorough system clean, ensuring everything runs smoothly as we enter the final flowering stages. 🌿
Bud Development: Pure Magic!
The bud formation across all the genetics is nothing short of incredible. Every plant is thriving, and the canopy is lush, vibrant, and full of potential. I’ve raised the PPFD to 750 for this stage, with temps steady at 25°C and RH at 63%—keeping the VPD dialed in at 1.11. The TrolMaster ecosystem, paired with the AutoPots, makes managing these precise conditions seamless. With more time to focus on the plants, I can give them the daily care they deserve. 💚
Shoutouts & Gratitude
A huge thank you to my sponsors and supporters: TrolMaster, Aptus Holland, Pro-Mix, Cannakan, and the amazing seed banks. Your incredible products and technology make this journey possible. 🌟
To the Grow Diaries community and all my followers—thank you for your energy, love, and even the challenges from the haters. It all fuels this incredible process, and I apprecilove every bit of it.
Special shoutout to Brother Daggadna—check him out on Instagram and show some love! 💚
The plants are heading into the next phase of bloom, and I can’t wait to share how this story unfolds. 🌸✨
As always, stay tuned, stay positive, and let’s keep growing strong together! 🙌
Growers’ love to all 💚
#TrolMaster #AptusHolland #GrowLife #CannabisCommunity #FlowerWeek4 #NeverGiveUp #GrowWithLove #IndoorHorticulture #Defoliation #PPFD #ControlledEnvironment #SCROGNet #DogDoctorOfficial
Discount Codes so you can save big on your next check out 💚💚💚
Kannabia - DOGDOCTOR 30% off
SeedsmanSeeds - DOGDOCTOR 10% off
CannaKan- DOGDOCTOR 15% off
terpyz.eu - DOCTOR 15% off
The Neutralizer - PORKIT5-DOG 15% off
As always thank you all for stopping by, for the love and for it all , this journey of mine wold just not be the same without you guys, the love and support is very much appreciated and i fell honored and so joyful with you all in my life 🙏
With true love comes happiness 💚🙏 Always believe in your self and always do things expecting nothing and with an open heart , be a giver and the universe will give back to you in ways you could not even imagine so 💚
Friendly reminder all you see here is pure research and for educational purposes only
Growers Love to you all 💚💚💚
P.S. – A Deep Dive into the ICL-300: Revolutionizing Under-Canopy Lighting
The ICL-300 isn’t just another LED—it’s a game-changer for under-canopy lighting. Unlike traditional LED systems that project light in a single direction, the ICL-300’s 300-degree design ensures even light distribution beneath the canopy. 🌟 This unique feature means that no part of your plant is left in shadow, creating a balanced environment for lower buds to thrive.
Key Tech Specs & Benefits:
• 300-Degree Light Distribution: This design fills the under-canopy space with optimal light, enhancing photosynthesis where it often gets neglected. 🌱
• Full Spectrum Output: Tailored to meet the specific needs of plants at every stage, ensuring quality growth from base to apex.
• Energy Efficiency: Advanced LED technology delivers maximum output with minimal energy usage, keeping costs down and sustainability up. 💡
• Durability & Heat Management: Built with high-quality materials, the ICL-300 stays cool and reliable, even in intense growing environments.
Why It Matters:
Under-canopy lighting is a game-changer for growers aiming to maximize yield and quality. Typically, lower buds receive less light, resulting in larfy or underdeveloped flowers. The ICL-300 changes that dynamic entirely by turning shadows into opportunity. 🌟 With light evenly dispersed across the entire plant, you’re not just growing; you’re sculpting a masterpiece.
For me, the ICL-300 is more than a tool—it’s a partner in innovation. It ensures that every plant in my grow room has equal opportunity to shine, from the top colas to the smallest buds at the base. When paired with a carefully managed ecosystem, like the one powered by TrolMaster, the potential for consistent, top-quality harvests reaches new heights.
This isn’t just about adding light—it’s about adding value, efficiency, and balance to the grow process. I’m beyond excited to see how the ICL-300 transforms the game in my tent, and I can’t wait to share the results with you all! 💚


Processing
Likes
34
Share
@LockDownGrow
Follow
My first time making alcohol tintcure
Using the c1 ,
Hold on tight gonna be a trip

Likes
7
Share
@fabialien
Follow
Así va estar London mint de batalla de Growers, lamentablemente no pudimos hacer mucho por el tiempo del concurso, pero satisfechos de seguir en el concurso