
Processing
Likes
Comments
Share


@jboog80
Follow
Got these girls transplanted this weekend. They are already thanking me. Also, they're loving the LED lighting.

Likes
Comments
Share

@Doncuero
Follow
Si bien la idea era hacer fertirriegos a lo largo de la semana en dosis separadas para lograr el objetivo, es bueno hacer una pausa para que las raices respiren, eso queda a gusto de cada cultivador, al usar sustrato y no coco. Es necesario degradar toda la comida y arrastrar sales y medir la decantación- Aquí fue con un ph de drenaje de unos 7.2 (siempre es un poco mas alto el excedente) . 3ML por litro para aprovechar en horas lo que con un riego con agua podria tardar semanas. Las enzimas son muy importantes a la hora de hacer que todo se equilibre, en el caso de no tenerlas, solo se recomienda que cada 3 fertirriegos, uno sea con agua lo mas liviana posible.
Processing
Likes
14
Share


@TheDankofScotland
Follow
Royal haze auto is in its 9th week from seeds 3 weeks into flower it really likes last and to be honest I would recommend it definitely it hasn't had one issue at all so far I'm giving it 3.5ml of coco ab per litre


Likes
285
Share


@Tropicannibis_Todd
Follow
👉Alrighty Then👈
So we are at DAY 28 with the Sugar Larry 👈 And she's doing fantastic 👍
Updated today DAY 32 , all is well so far 😀 decided to showcase pheno #2 , definitely has different traits then #1 very interesting 😀 thoe both are killing it 👈
Except for some slight watering , ive been doing some defolation as well as some LST manipulation to pull branches to the side 👌
👉I had to Top her during the middle of week 👍 she gonna be a tall girl with long legs 😛
👉WeeklyRoundup Video is finally posted 😕 😒 😪 😢 Happy Growing
👉Soil Provided by ProMix.ca
👉Nutrients Provided by Agrogardens
👉Lighting Provided by MarsHydro.ca
Thanks my friends for the great support over the years 🙏 Happy Growing

Likes
13
Share


@knicko
Follow
In Woche 4 der Blüte gebe ich den Ladys die zweite Ladung Greenhouse Feeding BioBloom je 2.5g/L vom Topf.
Dazu gebe ich per Gießwasser ab jetzt alle 2 Wochen 1g/L den BioEnhancer von Greenhouse Feeding und bei jedem Gießgang den Greenhouse Feeding Booster 0.2g/L.
Die Ladys wurden auch großzügig entlaubt. jetzt Konzentrieren sie sich auf die Produktion der Blüten.

Likes
12
Share


@GizaWRZ
Follow
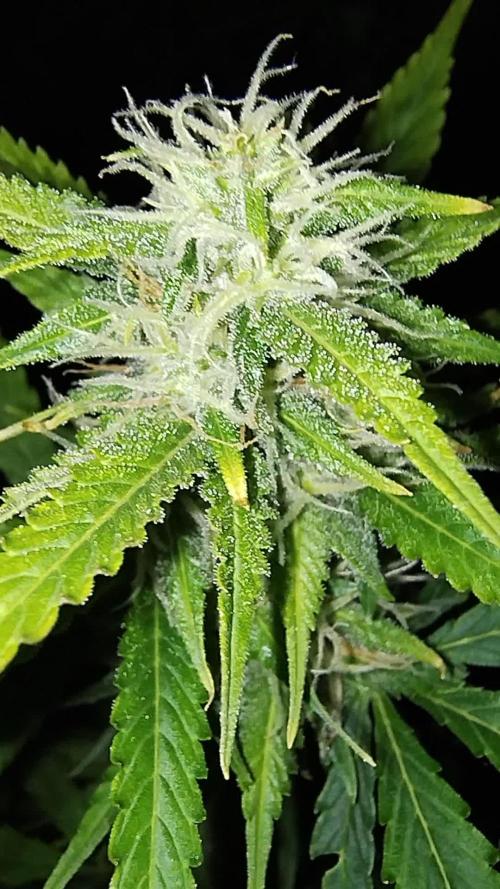
Girls start getting bigger :)
One of them it looks like will be finish soon 🤨 this week i will get microscope then i will check on her what trichomes are 🧐✌️


Likes
17
Share


@CanadianFillmore
Follow
Welcome back growfessors to another episode of growfessor theatre!
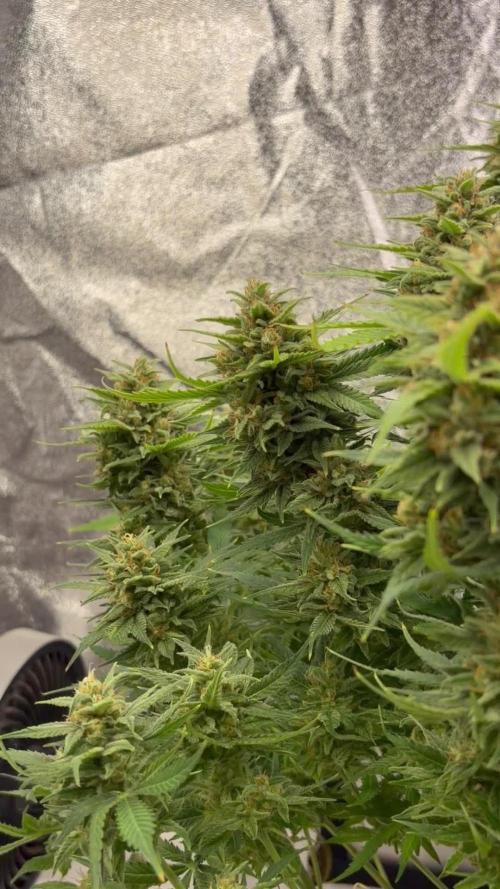
Week 6F begins for the ladies of the 4x8, they continue to bulk up, frost-up, sticky and they got that good stank! The ladies are hungry! Going from 4 liters of nutes + water per plant, to 6 liters per plant per week (extra feed started on week 5). They get 4 liters at the beginning of the week and then 2 more liters on day 5 of the week.
Well that's all for this week, I hope you enjoyed the show growfessors 👽🌳💚


Likes
20
Share

@MedicaL
Follow
Forbidden Candy X Runtz.
Kalifornská královna v plné parádě! 👑
Rychlý víkendový report z growu, protože tohle prostě nejde nesdílet. Forbidden Runtz Auto od Fast Buds se oficiálně stala absolutní Queen celého runu a King of Kings v boxu. Tahle holka se povedla ze všech jednoznačně nejvíc!
Má neskutečně silné, masivní boční větve, které bez problémů nesou tu obrovskou nálož. Hrozně dobře snáší Low Stress Training – krásně se roztáhla, snáší to a reaguje na každé ohnutí okamžitým růstem.
Už teď je jasné, že tam toho bude sakramensky hodně. Ta struktura, síla a prémiová Cali genetika dělají své. Tohle bude monstrózní auto


Likes
81
Share


@MrJones
Follow
I am very happy with the harvest @21% wet to dry that pretty strong for me, the buds were in the tent for 10 days, the long slow drying process has really paid off. The buds were solid and frosty, this strain was very easy to grow, and like I said Original Sensible Seeds do not disappoint, I have a few more strains by them and cant wait to get them started!


Likes
8
Share

@TrickzGrowz
Follow
Servus Moin!
Die Pinapple Slush XL hat sich wohl erstmal erholt. Diese Woche ist super Wetter und das nutze ich, sie gleich draußen hinzustellen.
Likes
7
Share


@StickyFingah420
Follow
Inicio de la sexta semana y así sigue el avance de la floración.
Ésta plata ha crecido a un ritmo impresionante y apesar de ser más pequeña en un inicio que su compañera de tienda, ha superado su tamaño notoriamente.
Todo sigue bien y sano como se esperaba.
Buenos humos! 👽
Likes
6
Share


@Hommero75
Follow
The 2nd week for @GG4 Sherbet was a little challenging due to her slow development . Sometimes I think to remove her, but then she push through. Hopefully for week 3 she decides to wake up..
Likes
109
Share


@Prototype0181
Follow
Did some defol and a little Lollipoping this week to get light to the lower budsites.
The Ethos cookies Rbx are my favorite's so far this run, they stacking up like crazy👌
The Rosso Corsa, so far so good not stacking as nice as the Cookies, but she a verry sweet smelling stinky one, can't wait on this one
Gorilla Breath, this is the one i did the most devol/lollipoping on, this little girl was bushy AF. ( excuse my French ) gonna keep a close eye on her this week deu to her Gorilla line-up ( Herm sensitive ) i might have went a bit to hard on her, time will tell.
Rock on Growmies 💚

Likes
14
Share


@pifflestikkz
Follow
Day 60
Day 25 Flower
Showing nice growth still, seeing her stretch now.
Healthy looking little one 😁
I'd be happy to see this Terp treez to the end seeing as I had 3 fails.
Feeding to tonight 23/04/24 will update pictures after.
Day 62
Day 27 Flower - was showing signs of early drying out, and lighter lower leaves so I have done a heavy feed today. 10% run off roughly.
She's very happy and healthy, and showing lovely colour potential already in the hues of the leaves. 😍

Likes
1
Share


@Pestitel
Follow
Amazing experience with the Mix Pack, I will try it again next summer for sure. Love the variety.
Likes
58
Share


@MadeInGermany
Follow
Flowering day 3 since time change to 12 / 12 h
Hey guys .
My cutting heating broke 3-4 weeks ago, which was fixed immediately and everything went wonderfully.
Now, 3 days ago, the central heating broke down in the entire room, so that at night I only have temperatures of around 13 degrees :-( .
One or the other lady is slowly starting to see a phosphorus blockage, as this can no longer be absorbed at temperatures below 15 degrees, like many other nutrients :-( .
A friend looked at the heating yesterday and came to the conclusion that a real company had to do it, which is by no means possible for a stranger to enter my room.
I quickly ordered heating mats for all the boxes so that the ladies could at least get warm feet.
That's all I have this winter full can do .
Let's hope everything will be fine 🙏🏻.
As soon as the heating mats are attached in the coming days, I will post them in the pictures.
Now for the update.
Despite the severe cold, the ladies are still doing well and have made good progres .
The ladies only had to be watered once this week, each time with 1 l, because it absorbs the water very slowly because of the cold and I don't want to overwater it.
I took every single plant in the pot to take a close look at their roots.
These are snow white and look very healthy 🙏🏻.
It was also the last time neem oil sprayed so that the last trips are finally gone.
Otherwise everything was checked and a lot of planning was done, like I do with the heating mats.
Since a friend had the same problem in one winter and the heating mats got 10 degrees plus on the pots, I am very confident that it will at least bring something for the last cold month 😃
🙏🏻.
I've started flowering even if some are still a bit small, but otherwise they'll get too wide from training and end up taking up space :-)
until then have fun and stay healthy 🙏🏻
👇🏼👇🏼👇🏼👇🏼👇🏼👇🏼👇🏼👇🏼👇🏼👇🏼👇🏼👇🏼
You can buy this Nutrients at :
https://greenbuzzliquids.com/en/shop/
With the discount code: Made_in_Germany you get a discount of 15% on all products from an order value of 100 euros.
👇🏼👇🏼👇🏼👇🏼👇🏼👇🏼👇🏼👇🏼👇🏼👇🏼👇🏼👇🏼
You can buy this strain at :
https://www.thegratefulseeds.com/shop/feminized-seeds/limited-edition/blue-javaz/
Water 💧 💧💧
Osmosis water mixed with normal water (24 hours stale that the chlorine evaporates) to 0.2 EC. Add Cal / Mag to 0.4 Ec Ph with Organic Ph - to 5.8 - 6.4
MadeInGermany

Likes
34
Share


@Southwest_budders21
Follow
Day 49 Flip day! Just flipped them to 12/12 took loads of leaves off. Let's see if I've guessed the sex right then 😏 I think I've got 3 fems but people still tell me I want know until I've flipped 🤷♂️🏼
Update: Day 50 and day 1 of flower looking very happy will give a nice feed when soil dries out. Lights are now maxed out and on Day 51, day 2 of flower I'm sure all 3 are definitely fems will keep eye on them next few days 👀
Update again: Day 53, Day 4 of flower and they looking beautiful 😍
Likes
17
Share


@Growdaddygrow
Follow
Natures living soil is literally the best soil, atleast for me, my plants look so good and smell amazing!!! Ran out of space on the gmo tho and had to upgrade my tent to 8 feet, it was my first grow and looking back I could see all the mistakes I made, it was a learning experience though, definitely prepared me for my next run....definitely got some gasssss tho 💯💯💯
Likes
3
Share


@Organic473
Follow
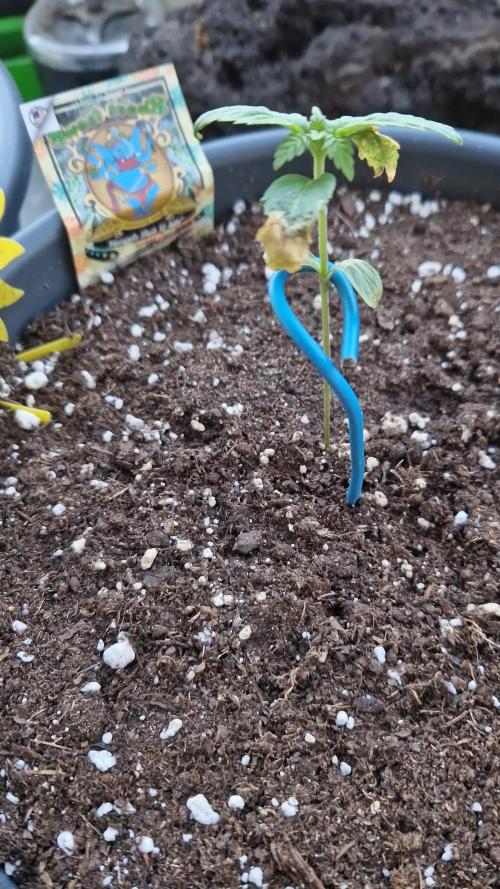
Love how she bounced back after being dug out by a pot hound dog and left for dead. I see signs of pre flowers which is always a good sign. She probably could have been taller but this plant is going straight to seed. Skunk pollen awaits.
