The Grow Awards 2026 🏆 


Likes
Comments
Share
@RosQuare
Follow
Some light mania has me itching for projects. I have tiny pots, a bunch of free seeds and no space. Could I grow them by the window under a desk lamp? I might be able to tuck them into the tent if they actually grow for me. I want to try out some LST for cute bonsai-style trees. I’m not confident that I will have much success but this is purely a learning experiment. Let’s see how much I can abuse these autos 😅
- Sept 22 AM: Popped 3 Cookie Dog autoflower seeds into a glass of bottled spring water for a pre-soak of 14 hours.
- Sept 22 PM: Put the seeds into folded paper towel, ceramic plate, more bottled spring water, uncovered in warm room.
- Sept 23 AM: One seed has started to pop after only 10 hours!
- Sept 23 PM: The seeds have all cracked but haven’t grown tap roots yet. I planted the 3 seeds into various small pots to finish germinating in seeding mix instead so I would stop checking on them in the paper 🙃
- Sept 24: nothing happening above ground. They are in the tent with lights 24/0 so I covered them with larger pots to give some darkness. Placed pots on a heating mat.
- Sept 25 AM: the 2 seeds in the smallest pots have emerged! The were touching the plastic wrap when I checked on them so I hope they are ok.
- Sept 27 PM: 1st seedling doing good, 2nd seedling still has her seed leaves closed so I’m misting her, and 3rd.. I accidentally flipped her pot over. She’s gone.
First Impressions:
Seeds germinated in soil after 36 hours, 72 hours from when I first left them to pre-soak and let the seeds crack in paper towel 24 hours.. that was 24-48 hours faster than the other test groups that used paper towel method until tap root formed and waiting for the germinated seed to emerge.. I might skip waiting for a tap root in paper towel going forward but I do like knowing the seed is viable before putting in soil so I know if it doesn’t grow it was something I did wrong.
End of week thoughts..
Well.. I fucked around with these seeds too much, exposed the roots to light, let them almost dry out, dropped them, had the temps too low, the heating mat too hot, kicked out over.. 😅😅 I didn’t really give them a chance and yet still somehow I got 2 contenders in pint sized pots 🤷♀️the experiment continues..
Likes
141
Share
@bioaccessory
Follow
На этой неделе произошло много событий: во-первых, когда гнул сломал основную магистраль "красной" растишки. Вроде и делал всё как обычно аккуратно, не поливал перед этим двое суток, и всё равно переломил, да еще и в проблемном месте, да еще и до хруста, ветка едва держалась на тоненькой кожице. Всё-таки склоняюсь к мысли, что гибкость и ломкость растения в том числе зависят от сорта, ведь это случилось не в первый раз в этом цикле. А вы как думаете? Я же смазал место перелома мёдом, и зафиксировал в нужном положении (как происходило восстановление см. на серии фото). Самое грустное, что я сломал её еще раз, уже когда ставил растение под ScrOG, и здесь мы переходим к еще одному событию конца этой недели(установку ScrOG см. на серии фото)
После всех манипуляций установил световой режим 12/12🔆 (на 42-й день от каски).
Начинается интересный период - выход растишек на цветение, заходите посмотреть.
Спасибо, что заглянули, и будьте здоровы! 🙏
Продолжение следует ...😶

Likes
28
Share
@Hawkbo
Follow
Everything is movin along some will be coming down this week a few need a little longer. I'll get some pics up a little later today
I have to retak these pics tmm they got deleted
Retook the pics on friday so they are a couple days late but wasnt much different than 2 days before

Likes
7
Share
@aizawa
Follow
This was my first cycle growing and I've learned so much.
I think the harvest gave a little quantity in grams and I've no idea why, but I'll try to do better in next cycle.
The quality of the buds are awesome.
Thats it folks, see you in next cycle.

Likes
19
Share
@adam_pawloski87
Follow
Let’s Go!! Today is day 31 from seed an these lil baby girls are shooting pistols an showing female productions!! Over the past couple weeks these girls been feasting up an building nice thick structures,building themselves up to get ready for pre flower pretty soon !! Everything is going just how we want it, everything is working properly, our air temp an humidity is stayin on point around 70-75 degrees trough the day and a humidity of 55 - 62% ! Always great! I hope you all enjoy an y’all have an amazing productive day! Peace , love an positive vibes to y’all Cheers 😶🌫️💨💨💨💨🤙🏻Keep them eyes peeled for next week !!🤘🏻🔥💯


Likes
14
Share
@GRow_M8s
Follow
* 20/24 lights (4h/day rest) for 3 days.after that we continued with 24/24.
* Add some extra advanced formulations from this week.
⚠️ Stay tuned 👇
🗓️🔜 week 7 --> we'll make a review to the progress of the different strains inside the tent with photos and vids.
Likes
11
Share
@adam_pawloski87
Follow
Pre98 Bubba , oh how I’ve missed you for so many years! These ones came out absolutely gorgeous! Loving the the purple phenos 😍 ! These ladies liked to stretch quite a bit so you’re gonna want to use some LST on em but I also recommend topping at least 6 times to get a better bang on your yield ! Expect nice tight purple buds with a tremendous amount of frost covering, some of the frostiest Bubba I’ve ever had! Over all I give it 10 stars an would definitely over an over run this strain!
Likes
6
Share
@eldruida_lamota
Follow
Vamos familia, actualizamos la octava semana de floración de estas Lemon Mandarin de Fastbuds.
La temperatura que estuvo entre los 24-26 grados y humedad dentro de los rangos correctos.
En cuanto a las plantas pues estas últimas semanas cogimos un poco de trips y pues ahí ando combatiendo con planchas pegajosas de color azul, estiraron bien y ensancharon bastante también.
Las flores se están llenando de tricomas y van hinchando, aún con la plaga, por el momento todo correcto, ya aportamos solo agua, queda nada, buenos humos.
- os dejo por aquí un CÓDIGO: Eldruida
Descuento para la tienda de MARS HYDRO.
https://www.mars-hydro.com
Hasta aquí todo, Buenos humos 💨💨💨
Likes
120
Share
@OrganicNature420
Follow
Germination date 🌱 02/12/2021
Day 45 19/01/2022
Strain 🍁 Barneys Farm Biscotti Mintz
(Biscotti x Mintz)
THC% • 30% 🤤
💡 Mars Hydro FC-E6500
• Power draw 650W + 5%
• Max coverage 5 x 5
• LED 3978 pcs high quality chips
• Max Yield 2.5g / watt
• Noise level 0 DB
• Removable Driver & Light bars
• Daisy chain
• Fast cool system
https://marshydroled.co.uk/ 🇬🇧
PROMO CODE • (organicnature420) DISCOUNT
https://www.mars-hydro.com/ 🇺🇲
PROMO CODE • (ORG420) DISCOUNT 👍🏻
⛺ Mars Hydro 150 x 150 x 200cm
📤📥 AC infinity 6inch
💧 10lt dehumidifier
❄️ 3.1kw air con system
💉 Nutrients GreenBuzzLiquids 🇩🇪
⭐⭐⭐⭐⭐
Organic Grow Liquid • 1-4ml until 2wk flower
Organic Bloom Liquid • 2-4ml flower stage
Organic More PK • 2-4ml +wk3 of flower
Organic Calmag • 1-2ml/lt whole grow
Fast Plants Spray • first 2wks at night lights off
More Roots • 2-5ml veg +2wks flower
Fast Buds • 5ml 12days before flower until wk1
Humic Acid Plus • 2-5ml whole grow
Growzyme • 2-5ml whole grow
Big Fruits • 2-5ml flower stage
Clean Fruits • 5ml flush 1wk
Ph powder
Root Gel
Living Organics
https://greenbuzzliquids.com/
PROMO CODE • organicnature420 15% off ✌️🏼
🥥 Growing Media • Coco Coir
Notes 📝
No complaints. Girls have a had a trim and all looking level under the net. Can't wait for results on these 2 girls. Tents going to be packed full Buds 💚✌️🏼🌱
Discount codes in bio for Mars and GreenBuzzLiquids 👍🏻 game changers 🏆
Likes
4
Share
@OlyGrower
Follow
Buds fattening up , Tropicana cookie is the star of the grow. Big buds, great smelling, … all 5 autoflowers doing fine. I would only grow the trop cookies again none of the others.
Oh yea, the purple lemonade that replaced The gorilla cookies is doing great. Just transplanted into DWC
Likes
17
Share
@aquicharles
Follow
2 Semana de crecimiento, hay bastante diferencia en el tamaño con alguna ZEPA similar en recipiente de 7L, menos capacidad más tamaño, sin embargo color amarillento el cual demuestra un desajuste, creo que es exceso de fertilización y/o riego. Por ello estoy sin regar 3 días viendo el peso de las macetas, a veces regamos demasiado olvidándonos de que la plata todavía no desarrollo suficientes raíces como para absorber tal magnitud. Parece que van recuperando su verde intenso, sinonimo de Salud & Bienestar


Processing
Likes
70
Share
@CBD_Sweden
Follow
@MephistoGenetics,
Hi all the happy people here in GrowDiaries.
This is my second cultivation ever and it will be fun to try a bigger space than my closet grow.
First, I'm just going to say I'm done with the construction of my new growroom.
The room is 2.14 meters by 1.7 meters and has a ceiling height of 2 meters.
It provides a floor area of 3.6 square meters.
I use a 54 Watt Lightwawe T5 for germination and 2 Pcs 400 Watt HPS lamps.
I have a channel fan that replaces the room air about 40 times an hour to get a comfortable environment in the room, the air enters a fresh air intake from the outside.
The air is purified through a carbon filter to then leave the room to the rest of the basement.
Then I use that heat to heat the rest of the basement.
I will use 10 pcs 15 liter Autopots to grow with and a 100 liter water tank that supplies the pots of water and nutrition.
I will grow completely organically in soil and will watercure my buds to get the best possible medicine for me.
But there are no cultivation rooms to be displayed here, so I continue with what is most important.
I am very excited to see how the new growroom will work and how this Illuminauto 21 - Sour Crinkle will turn out.
Illuminauto 21 - Sour Crinkle (Grape Crinkle x Sour Crack)
Two of our fastest and frostiest varieties collide to make a sweet and sour delight!
Expect super frosty, compact nugs that won't be a toke for novices.
Destined to be a great strain for extraction work too!
Plant size - Small - Medium
Cycle time - 60-65 days from sprout
Indica/Sativa - 80/20
Frost level - Extra Ridiculous
https://www.mephistogenetics.com/product-page/illuminauto-21-sour-crinkle
--------------------------------------------------------------------------------------------------------
2017-09-25. Week 5 starts. Added a video of the girls. Gave the girl water and nutrients. This girl is 27 cm high and have grown 7 cm in 7 days.
I flushed the girl yesterday with 40 liters of tap water. Im lowering the humidity in the room with a dehumidifier and try to have 50% air humidity.
----------------------------------------------------------------------------------------------------------------------------------
2017-09-29. Installation of the New light rail in the grow room. Its Advanced star light V 5.0. Added a video of it.

Likes
12
Share
@RayTheGrover
Follow
So, by the look of the trichomes I assume its a harvest time!
Weighting and taste review after drying and curing. For now I could that that despite all the mistakes I made the plant managed to live till the end, smell wonderful and looks tempting.

Likes
27
Share
@Gruenerfinger85
Follow
Die Blüte verläuft sehr gut.
Die Blüten wachsen und wachsen.
Ich entschuldige mich vielmals, weil ich die falschen Bilder hochgeladen hatte.
Diese sind jetzt aus der richtigen Woche.
Ich danke dir für deinen Besuch.
Du kannst gerne ein Like da und dir meine anderen Tagebücher Anschauen.
Oder komm mich auf Instergram besuchen.✌️🏼

Likes
14
Share
@Snickelfritters
Follow
10/8 - going along steady. I'll take few more glam shots later.
2 MONTHS. It may not look like much but I'm proud of these 3. This is probably the healthiest tent I've had since I started growing inside. I just want them to fill out the net a little better before I flip.
10/10 - trellis training is underway. Between topping and this, I should have a nice, full canopy this time around.
I've estimated about 72 squares in my net yet only about 35 or so colas forming. Wondering if I should really I push this one or quit while I'm ahead.
One thing is for certain, Moby dick is responding much faster to being topped than GZ. Every stem of Moby I've topped has grown lower shoots aggressively and quickly. Gz has been far slower to respond. Noted.
Can't wait to see these things bud. But patience is a virtue here. If the veg stage is any indicator, the buds going to be phenomenal.


Likes
2
Share
@Greenfox89
Follow
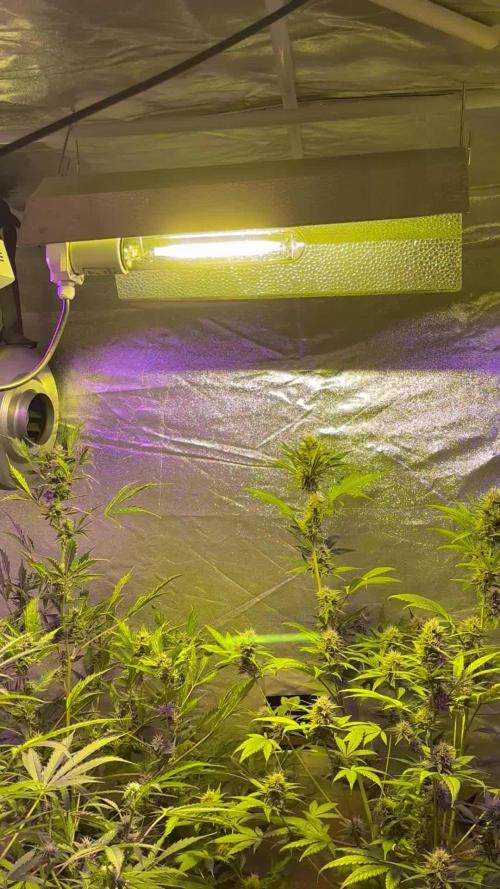
Hello dear readers, welcome to week # 10.
We are not far from the goal here. In the last 2 weeks the effect of the Lst has really been shown.
There are really good colas and they also look nice and frosty. At the beginning of the week I easily defoliated them, everything that was dead or yellow and shadowed was removed.
The plant has been rinsed since the beginning of the 8 weeks. The harvest will surely take place in the following day. The Fox🦊

Likes
27
Share
@Dunk_Junk
Follow
20cm vertical growth this week.
Going well into flowering.
Pretty much on autopilot 😎
Likes
167
Share
@StarLorr
Follow
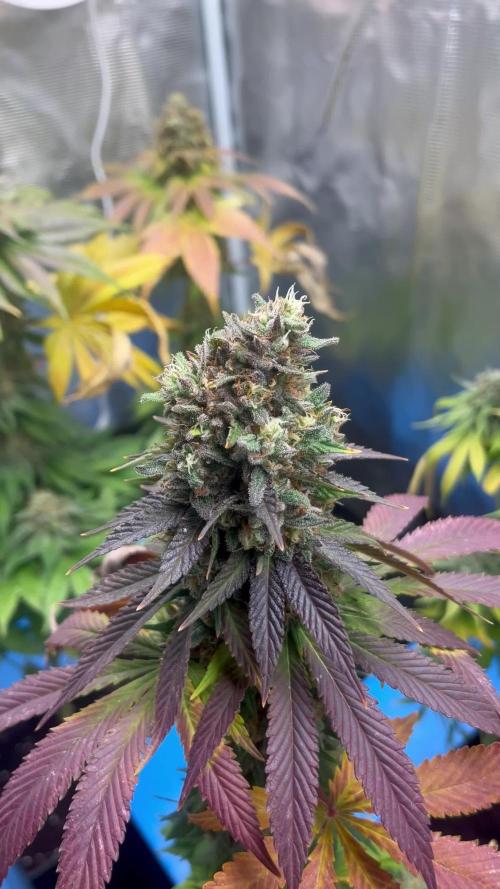
Welcome to my Lemon Mandarin 🍋🍊Diary.
In this Diary:
Seeds: Fast Buds (from contest)thanks
___________________________
Feeding:
Thu 24Apr: 3L Flawless Finish pH'd 6.5
Mon 28Apr: 3L Flawless Finish pH'd 6.5
___________________________
Final Lap🏁🏁🏁
Trichomes are milky with a few ambers,
By the end of this week, probably Friday the El Chopo will occur😋😋
_________________________
Strong citrus(orange) predominant smell.
_________________________
Thanks for stopping by, likes and comments are appreciated!👊🏻😎
Keep on growin!
Keep on tokin!!!
😙💨💨💨💨💨