


Likes
Comments
Share


@SoulGrownBotanicals
Follow
This was an awesome strain to grow. She was fairly quick , and solid. Stinky for a long time. I've only chopped the main cola so far. The side buds are similar in size to the main just a tad smaller. I can't wait to grow this strain again.

Likes
1
Share


@MJ_LIVINGSOIL
Follow
this week i topdressing with Fish bone meal 4-16-0 100g per plant and 4-9-4 100g 3-7-4 50g per plant
Avg. 250gram of craft organic fertilizer for plant
4-16-0 = 100g = 400-1600-0
4-9-4 = 100g = 400-900-400
3-7-4 = 50g = 150-350-200
950-2850-600 /100 = 9.5-28.5-6.0 g every 250g from fish bone and craft
So plant avg. got npk 9.5-28.5-6.0 per 1 plant from Topdressing
In next week we plan to take little N and more than K
Good phenotype it look like Berries Candy and syrup sugar

Likes
25
Share


@BJangles
Follow
12/4 first day of her 4th week. Nothing much changed.
12/6 LST bent her over to 90 degrees. 5 hrs later she pointed herself back at the light.
12/7 gave her first feed since the repot. TPS regimen for week three at 800 ml. Runoff 830 tds 7.1 ph
Likes
16
Share


@MadeInGermany
Follow
Flowering day 7
since time change
to 12/12 h.
Hey guys :-)
The flowering started last week because otherwise the space in the small tent would end up being too narrow :-)
Cuttings were taken from each phenotype beforehand.
To change the flower, I rinsed it very lightly with clean fruits.
With the next watering she gets a mix of grow liquid and bloom liquid before she only gets bloom.
The heating mat works perfectly in the small tent and the parameters are all in the optimal range 🙏🏻👍.
Now we hope that everything stays that way and that the cold days will slowly pass :-) .
Everything was cleaned and checked.
have fun and stay healthy 🙏🏻
👇🏼👇🏼👇🏼👇🏼👇🏼👇🏼👇🏼👇🏼👇🏼👇🏼👇🏼👇🏼
You can buy this Nutrients at :
https://greenbuzzliquids.com/en/shop/
With the discount code: Made_in_Germany you get a discount of 15% on all products from an order value of 100 euros.
👇🏼👇🏼👇🏼👇🏼👇🏼👇🏼👇🏼👇🏼👇🏼👇🏼👇🏼👇🏼
You can buy this strain at :
https://www.ripperseeds.com/en/feminized/kmintz-feminized-cannabis-seeds
Water 💧 💧💧
Osmosis water mixed with normal water (24 hours stale that the chlorine evaporates) to 0.2 EC. Add Cal / Mag to 0.4 Ec Ph with Organic Ph - to 5.8 - 6.5
MadeInGermany

Likes
5
Share


@LittleBigTrees
Follow
I've defoliated a few leaves, they are starting to show viable trichomes now.

Likes
39
Share


@Aedaone
Follow
These plants got huge. Two of the three were immune to powdery mildew. The third was highly resistant. Saying resistance was strong doesn't do them justice. I included one of the buckets of buds with weight. I had to do that 9 and 10 times depending on plant. Everything went smooth. We missed all the bad weather and got a good dry couple of days to finish harvest. These went a little longer than the 7 weeks. I believe that's because of the suns travel to the south. As it travelled these girls didn't get full sun until after 9:30 a.m. and until 4.20 p.m. They were definitely worth the wait.


Likes
15
Share


@Interalia666
Follow
Harvest Day.
Airpot has dried out nicely.
Trichomes are perfect and smell is glorious.
Large leaf and fan leaf removal prior to whole plant chop and then hang for a low/slow 7-10 day dry before final 2nd (dry) trim and jarring.
Will post a 'harvest' week to finish off this lovely, resilient plant once I have dry weights.
Thanks to all who viewed and supported, your encouragement and knowledge never fails to help. 👍

Likes
13
Share


@Dev_f1s
Follow
Will be growing again! This plant proved to be a moderate to heavy yielder considering I'm using only 230 - 250 watts. Very easy to train grow and smoke lol. Short stature created some massive dense buds did not mind trim jail at all for this hefty little lady
Stay tuned guys for new runs possibly new strains and remember to stay lifted and Happy growing✌️

Likes
78
Share


@Roberts
Follow
Pure Ice cream is growing great under the Spider Farmer G5000/UVR40 lights, in the Athena blended line nutrition. I think she started to get light stress or burn. So I kinda adjusted her to not be right under it so close. She has a sweet creamy smell. Cokas are looking good, and frosty. Just waiting on her to bulk more. Thank you Spider Farmer, Athena, and Pure Instinto Seeds. 🤜🏻🤛🏻🌱🌱🌱
Thank you grow diaries community for the 👇likes👇, follows, comments, and subscriptions on my YouTube channel👇. ❄️🌱🍻
Happy Growing 🌱🌱🌱
https://youtube.com/channel/UCAhN7yRzWLpcaRHhMIQ7X4g
Spider Farmer Official Website Links:
US&Worldwide: https://www.spider-farmer.com
CA: https://spiderfarmer.ca
UK: https://spiderfarmer.co.uk
EU: https://spiderfarmer.eu
AU: https://spiderfarmer.com.au
G5000 Light Amazon Link:
amzn.to/4643esa
UVR 40:
https://www.amazon.com/dp/B0BR7SGTHS
Discount code: saveurcash (Stackable)

Likes
12
Share


@DeepWaterCulture
Follow
Smell
Increased a lot this week and got that real sticky-icky-ickyness to the touch now it’s like glue :) and smells fire…
So fruity and sweet took a few more fans off possibly almost all apart from a few lol got a bit aggressive with her so she paid me back by giving me hives or whatever the bumps on my arms I always get are haha 😂 but yeah to allow the lighter green lower bits to get a little
More light for the last few weeks 💚🔥💪
Likes
137
Share


@MrJones
Follow
mrjones - Slurricane #7 S1
🌱Slurricane #7 S1
@inhousegenetics_official
👨🌾🏽GD Grower: MrJones
🔹🔹🔹🔹🔹🔹GOALS🔹🔹🔹🔹🔹🔹
🌞Environment - 75/80℉ and 60% Humidity Good Old Mother Nature
💧 Feeding - The Green Sunshine Company - Earth Dust All-Natural Plant Nutrients
⚗️Soil - 35% ProMix MP / 25% Ocean Forest / 20% Tupur Royal Gold / 10% lobster Compost / 10% Additional Perlite
🍃Training / So this girl was 60 Inches and spread her out under a 5x5 Trellis
🕷️ IPM - Will be using Green Cleaner" 1 OZ per Gallon, and CannControl from Mammoth alternating between product each month
🔹🔹🔹🔹🔹🔹🔹🔹🔹🔹🔹🔹🔹🔹🔹
📜 Rambling - Week 1 / So weeks are flying by, sorry for the slow updates, having unusual personal life struggles, but with that said, these outside plants are just doing great, thanks to my partner Mother Nature!!
🔹🔹🔹🔹🔹🔹🔹🔹🔹🔹🔹🔹🔹🔹🔹
▶️ Sunday - 06.06.21 / These plants are on autopilot with Mother Nature at the helm, we have been having gentile summer showers, plenty of sunlight and things are looking great!
▶️ Monday - 06.07.21 / These plants are on autopilot with Mother Nature at the helm, we have been having gentile summer showers, plenty of sunlight and things are looking great!
▶️ Tuesday - 06.08.21 / Finally got to water them today, they are just growing like crazy!
▶️ Wednesday - 06.09.21/ These plants are on autopilot with Mother Nature at the helm, we have been having gentile summer showers, plenty of sunlight and things are looking great!
▶️ Thursday - 06.10.21 / These plants are on autopilot with Mother Nature at the helm, we have been having gentile summer showers, plenty of sunlight and things are looking great!
▶️ Friday - 06.11.21 / These plants are on autopilot with Mother Nature at the helm, we have been having gentile summer showers, plenty of sunlight and things are looking great!
▶️ Saturday - 06.12.21 / These plants are on autopilot with Mother Nature at the helm, we have been having gentile summer showers, plenty of sunlight and things are looking great!
🔹🔹🔹🔹🔹🔹🔹🔹🔹🔹🔹🔹🔹🔹🔹
Earth Dust - DESCRIPTION
🔹Earth Dust is our all-natural plant nutrient designed for indoor and outdoor flowering plant growers. You can grow easily by “just adding water” to your soil for the entire growth cycle. It creates a “living soil” so your plants thrive from seedling all the way through flower and harvest. Earth Dust represents an organic dry amendment method of gardening, it’s made of a natural powder of ingredients.
🔹Because you only need to water your soil with Earth Dust, you can concentrate on caring for your plants and getting a healthy crop “on autopilot”. Now you can grow without spending hours of your life mixing chemical nutrients, and you can do it naturally. What’s more, is you will enjoy the cleanest, most aromatic, and flavorful harvest you’ve ever experienced when a plant grows in a rich, organic web of living soil.
Product Highlights
🔹All-Natural Ingredients – Mostly plant-based – Safe around children and pets.
🔹Packaged in kraft paper bags that are recyclable and compostable.
🔹Easy to Use – Just mix the powder into the soil 3 separate times – then water only.
🔹Packed full of rich microbe food & contains billions of beneficial fungi and bacteria! Creates a resilient, living soil that defends against pests and diseases.
🔹Rich in trace minerals and nutrients for full plant expression. Sourced from rock dust, sea-farmed kelp, and land-grown crops.
🔹Soil Conditioners help balance pH and make nutrients more available in the soil. Achieved with ingredients like bat guano, worm castings, limestone, molasses, and humic acid.
🔹The correct balance of N-P-K nutrients for each stage of growth:
🔹Earth Dust Base (3-1-2) contains key nutrients for sustained vegetative growth. High nitrogen (N), Low Phosphorous (P), and Medium Potassium (K).
🔹Earth Dust Boost (2-3-6) contains accelerated-release nutrients for powerful flowering growth. Low nitrogen (N), Medium Phosphorous (P), and High
Potassium (K).
🔹Re-use soil harvest after harvest by simply adding more Earth Dust Base to begin again. Create your own living soil that gets better every time it’s used.
🔹Go organic, save time, and get predictable, healthy harvests.
🔹🔹🔹🔹🔹🔹🔹🔹🔹🔹🔹🔹🔹🔹🔹
Compost Tea for Vegetative Stage
Water 4 Gallons
3 Cups Composr (Your Favorite Worm)
4 TBL Molasses
4 TBL Seaweed Extract
4 TBL Fish Fertilizer
Use air Stone o the tea for 24/3 hours 70/75F, use at full strength for establishing plants and a half strength for younger plants

Likes
3
Share


@growerplatinum
Follow
I think she is a beautiful strain, but man is it a pain in the ass to trim here and there, and to LST. Her stems were always very fragile no matter what i did, not to break but to bend. Stayed short, and grew bushy, I couldn't get them to strengthen up. But overall I would say its pretty to look at and grows densely and might be worth a try.


Likes
11
Share


@cadur
Follow
Some vertical growtg, about an inch.
Got more leaf burn so moved the lamp away.
Likes
1
Share
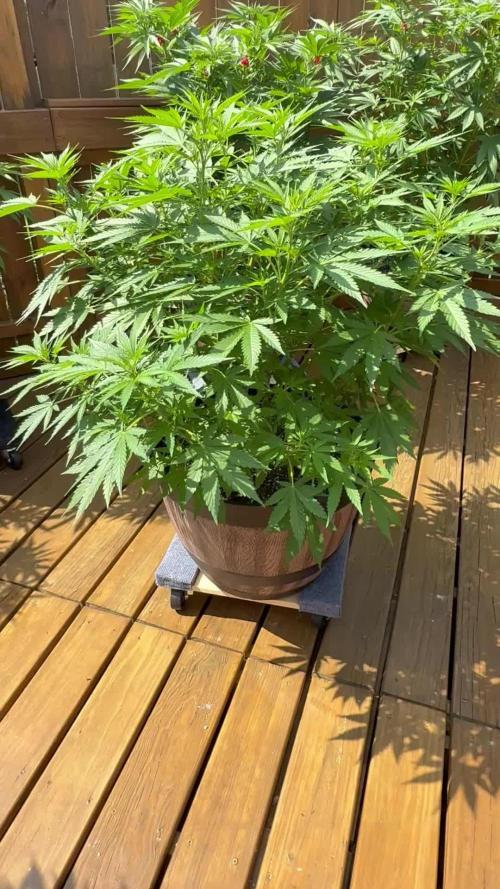

@CptnNugz
Follow
These genetics from Spliff seeds are seriously very nice! First time growing their seeds. If the flower turns out as well as the vegging of the plants I’m going to be very happy! The plant structure is very strong and they have turned into beautiful bushy plants with minimal work! I can’t wait to update when they are in flower and when it’s time to smoke it! We’re still running great off the bioflower nutrients/worm castings in the soil with very little Lotus nutrients added 1x a week with 5ml cal/mag 1x week per plant. They are happy girls!


Likes
68
Share


@deFharo
Follow
Bienvenidos cultivadores de marihuana clandestinos, y también, a los que tienen la fortuna de no serlo!🖐️👨🌾
20 semanas de vida de esta sativa africana pura, diez semanas desde el cambio a horario de floración 12/12h 🌲🧡
Los cogollos crecen teñidos de oscuro y con gran densidad, la planta bebe y come en abundancia, poco a poco las hojas van cayendo definiendo mejor la forma de las múltiples colas.
Esta y las otras plantas de la temporada, aunque hermosas todavía, no ocultan el paso del tiempo, son plantas veteranas que se resisten a envejecer por la espera desesperada a ser polinizadas un día.
- Para no morir de aburrimiento, he hecho un video donde hablo sobre las tareas que hago diariamente relacionadas con el modelado de las plantas en mi carpa de cultivo (60x120x178cm) con extra de luces laterales, espero que todo el mundo entienda, con esta técnica "democrática" de movimiento de macetas, doy las mismas oportunidades a todos los lados de las plantas en todos los lados de la carpa de cultivo, consiguiendo de este modo una morfología y crecimiento más equilibrados... todo por la causa!
Hasta la próxima...
SALUDOS Y SALUD A TODOS!!
================================
Info de la cepa Malawi Gold: https://anesiaseeds.com/es/product/malawi-gold-landraces/
"Malawi Gold procede de Malawi, un país del sudeste de África, y es una de las plantas más psicoactivas del mundo." Anesia Seeds
- Genética: Landrace africana
- Sativa pura: 100%
- Tiempo de Floración - 10-13 Semanas
- Rendimiento en interior: 600/650 g/m²
- THC Alto 20%
- Sabores: Floral y Limón
================================

Likes
1
Share


@tterpy
Follow
Girls are slowly recovering from being stunted from barely getting nutrients.. much more lateral growth and starting to fill out
Fed with Fox farm week 4: 10/19/26
Likes
29
Share


@GermanGrow182
Follow
Schwerer rückschlag: sciarid larvae (trauermückenlarven) haben die Hälfte der seedlings angefressen. Nur die Pötte, wo neue pflanzerde drin war, wurden verschont. Diese Mücken legen ihre Eier in feuchtes Substrat und die Larven fressen Keimlinge und junge wurzeltriebe... klassisch Pech gehabt.. tausche jetzt die Erde und setze das dritte mal an diese Saison. Das Zeitfenster für automatics ist noch groß genug 🙂 Aufgeben ist keine Option.
Likes
10
Share


@FrulaFrulaki
Follow
I wasn’t around much this week so there aren’t as many pictures. I regret not having much time as I had/have (not sure at the moment there are no more new white spots popping up) a thrips infection which I tried to correct with some organic insecticides and Neem oil which I always used in the past but completely neglected with this grow and am paying the price now. I haven’t encountered thrips or any other bug before but with a higher number of plants in one box and the fact that I was to lazy to clean my box after the last grow may be the cause of this now.

Likes
14
Share


@Kakui
Follow
11 Noviembre: Primer riego con 2.5EC y 5.9pH, runoff de 2.9EC y 6.2pH, en una semana más ya deberían estar recibiendo 3.0EC y seguir con esa concentración por todo el cultivo. Alturas están entre 15cm y 20cm.
13 Noviembre: Riego 2.5EC y 5.9pH, runoff de 3.3EC y 6.2pH. Hoy se removieron los primeros nodos de cada planta y se les hizo poda apical.
14 Noviembre: Riego 2.5EC y 5.9pH, runoff de 3.3EC y 6.2pH en la mañana. En la tarde se realizó transplante a maceteros definitivos de 5 litros con 4 litros de sustrato aprox. el cual fue pre cargado hasta la capacidad de campo, con 3.0EC y 5.8pH, desde este punto se debe esperar un par de días hasta que el dryback(secado) del sustrato sea de un 35-40%, lo cual vendría siendo el primer P3 del cultivo, una vez se alcance ese porcentaje de secado, se comenzará con los primeros riegos de precisión llamados P1.
