


Likes
Comments
Share


@SmokingTiki
Follow
4 plants out of 6 are growing quite well, I only need 3 so it's alright. The growth is a bit slower than during my previous Sensi Seeds grow (if interested, see here https://growdiaries.com/diaries/157797-grow-journal-by-smokingtiki/week/869197). In my previous grow I was using a 24h light schedule so that's maybe the reason. The roots continue to reach the bottom of the pots. I increased the light power again.
Plants heights at the end of the week :
-------------------------------------------
Blackberry Cake 1 : 3cm
Blackberry Cake 2 : 6,5cm
Jack Herer 1 : 10cm
Jack Herer 2 : 10cm
Cashew Kush 1 : 12cm
Cashew Kush 2 : 2,5cm


Likes
8
Share


@DivineBuds420
Follow
I cut the plants, remove the remaining fan leafs and hang the plants upside down inside the dark tent for 8 days.
After 8 days I trimmed the buds and put them into glass containers with boveda packs.
I burped the containers everyday for 10 minutes (first two weeks twice) for about 4-6 weeks.

Likes
6
Share


@SleepHuntMadScience
Follow
Plant has recovered from training a further defoliation. Topped the high branches as they are approaching the top of the greenhouse.


Likes
8
Share


@peterfly98
Follow
Day91: 72h of darkness and they all be chopped.
Harvested and jarred the experiment grow (the plant was rescued then topped) 21g total. Not bad all things considered. I think I can get 100g with the whole grow
Chop day: 31/8 day 96. Plants are drying in the tent at 25ºC and 61%RH

Likes
Comments
Share
@Wierie
Follow
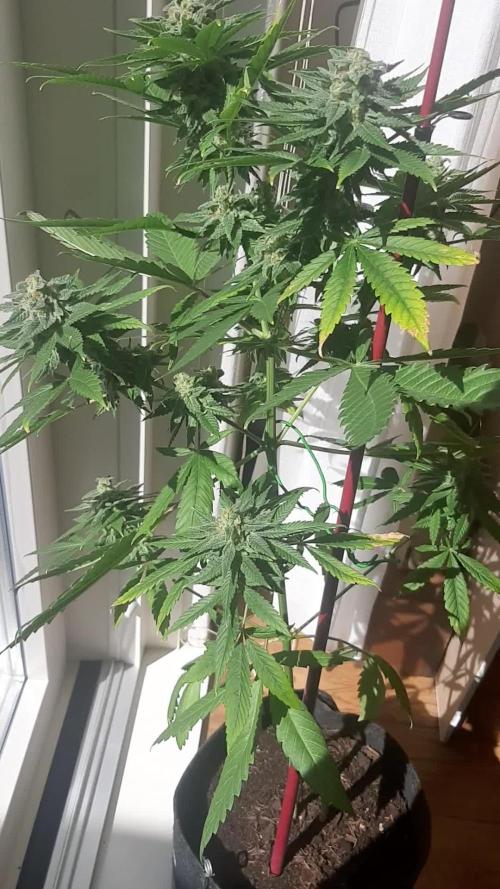
Day 52 of flowering
Good day friends...
We are lucky with a lot of sun these couple of days...
She has been puffin up realy nice..
Just giving her water with nutes and pk13/14
Chekout my outdoor plant.. also super lemon haze..
Same age as my other plant ... maybe a couple days younger... topped her for the second time on some branches ... just to see what will happen.. she has some spots here and there ..messed up with the water but she is doin fine...
Lets see what happens ..
Good day untill we meet again 🌴👍


Likes
13
Share


@Arkain_Jenetics
Follow
Everything is going good. Some are showing some sort of deficiency . Lowered lights a little bit. Going to start watering every other day. One of the critical thunder autos is like 8 inches tall lol definitely breeding her.


Likes
10
Share


Processing
Likes
4
Share


@Purkle
Follow
Things have been going well as I continued to train the stretching girls to the side of the pots, bending and adding ties where needed.
Pheno 1 started showing signs of over watering showing droopy leaves as well as what I think is either nitrogen, magnesium or iron deficiency. I'm leaning towards a iron deficiency since the yellowing is on the newest growth at the top.
I think this was caused from giving her too much top amendments in her last feed causing a pH imbalance.
What I would usually do is just give her a little flush if this is the case but instead I decided to repot her and the other Pheno into their last 19 litre/4 gallong pots as both were drinking pretty quick and I wanted to avoid over watering again.
The rootballs looked beautiful when I transplanted them so I was pretty happy with their progress!
This round I've ditched the coco as I had way too many issues with it in the past, including knats and PH issues. In this round I've gone with Biobizz light soil which I added some fish blood and bone, earthworm castings, bat guano and then watered with water and liquid seaweed. I love organic growing :).
I do intend on using Coco again but I'll need to do some research on some trusted brands. If anyone has any suggestions please let me know!
Pheno 2 is showing signs of recovery but I'd love the input from others about what the deficiency could be?
I got my new bubblebags today which is making me want to flip to flower so I can get to harvesting and making some bubble but I'm going to be super patient this round. I want these girls to fill up as much of my 4 x4 tent space as possible.
Until next week!
✌️

Likes
Comments
Share


@Olduffybastard88
Follow
Some are flowering here the others are a few weeks behind going to have all my diarys and plants better set out in more diarys for you
Likes
15
Share


@Aero710
Follow
Primeros signos de floración, encantado con la velocidad de este cultivo y con las vigorosas geneticas de Barneys Farm
Likes
8
Share


@MrBuenchico
Follow
Iniciamos la semana con un cambio de agua. 120 litros a 1.7mS EC y 6,2 Ph
12/09 Se añaden 20l con EC a 0.4. El PH sigue bajando hasta 5.6. Se cambia la bomba para que trabaje con ph+
15/09 Se añaden 20l con EC a 0.4 El EC 1.9 sube, beben mas que comen. El olor ha aumentado considerablemente
Likes
5
Share


@CannabisCultivate
Follow
We are pleased to report another great week has been had by all and there are not any issues to mention.
The top dress along with Bokashi was applied and they enjoyed a rain barrel treat mixed with Hygrozyme along with Hyshield once this week. A good spray of NForce helped with the aphids along with the stink bugs that were threatening to take over the gardens and Optic foliar spray was applied once a few days later, so far we are happily growing! We have been watering daily to keep things moist, on the hotter days it has both morning and night.
This beauty had a good clean up two days ago, a storm feels like it’s brewing now and she seems to be enjoying the wind!

Likes
97
Share


@AsNoriu
Follow
Day 30. Girls are starting to look very good !!!
No preflowers yet, but think transition will start this week.
Leaves are a bit too green, but I still will feed them this week.
Changed light cycle to 18/6
Day 33. Girls are happy and all looks very promising !!! Applied BioBizz Leaf Coat before this morning and girls finally loved the stuff !!! You get most with this product when plant is bigger and have loads of foliage, so perfect for last few weeks of veg period.
Happy Growing !!!

Likes
15
Share


@PiusWaxis
Follow
Here we are almost at the end of this incredible journey, the tenth week of flowering is over, the growth and progress of my plant shows no signs of slowing down. Every day brings new surprises and advancements that continue to amaze me.
The commitment to providing high-level care with Plagron's premium nutrients has proven instrumental in maintaining the plant's exceptional health and vigor.
The results speak for themselves, as the plant continues to flower and show robust development. 💪🌿✨
The buds have expanded further in size and density, yielding under their weight, and displaying an eye-catching layer of resin that highlights the vitality and overall well-being of the plant.
It's truly a sight to witness and a testament to the benefits of using high-quality nutrients throughout the growing process.
The TrollMaster "TENT-X" environmental control system remains an indispensable component of my grow setup, ensuring that the grow room maintains the optimal balance between temperature and humidity levels necessary for plants to thrive.
The system's precision control capabilities remain critical in creating an environment conducive to optimal plant growth. 😎💪
The 240W MEDIC GROW MINI-SUN 2 LED light continues to provide stellar lighting conditions, providing plants with a tailored spectrum that meets their specific growing needs. By carefully monitoring temperature, humidity and VPD data via control system graphs, I can make precise adjustments to optimize growing conditions and maximize plant health and productivity. 😍
I'm excited to share a video that captures this week's temperature, humidity, and VPD trends, offering a look at how these advanced technologies work together seamlessly to create the perfect growing environment for plants. It is truly amazing to see how these tools work in harmony to support the growth path of plants.
As each week unfolds, I am filled with anticipation for the new discoveries and obstacles that await us in the grow room.
With the unwavering support of Plagron nutrients, the continued reliability of the TrollMaster control system, and the exceptional lighting provided by MEDIC GROW LED, I am confident that the next week, as well as the last, will usher in further progress and triumphs in this cultivation journey.
Thank you for joining me on this exciting adventure of growing and exploring the wonders of growing plants! 💪👽🚀

Likes
26
Share


@Stash074
Follow
This week was good..the ladies are in better health overall. Did some defoliating throughout the week and also did a flush 3 days ago with florakleen.gave em a light feeding today.Just finished setting the timer. Will be flipping them into flower tomorrow at 8 am ..will keep yall updated in my next upload..Happy growing 😎


Likes
4
Share

@Randagio
Follow
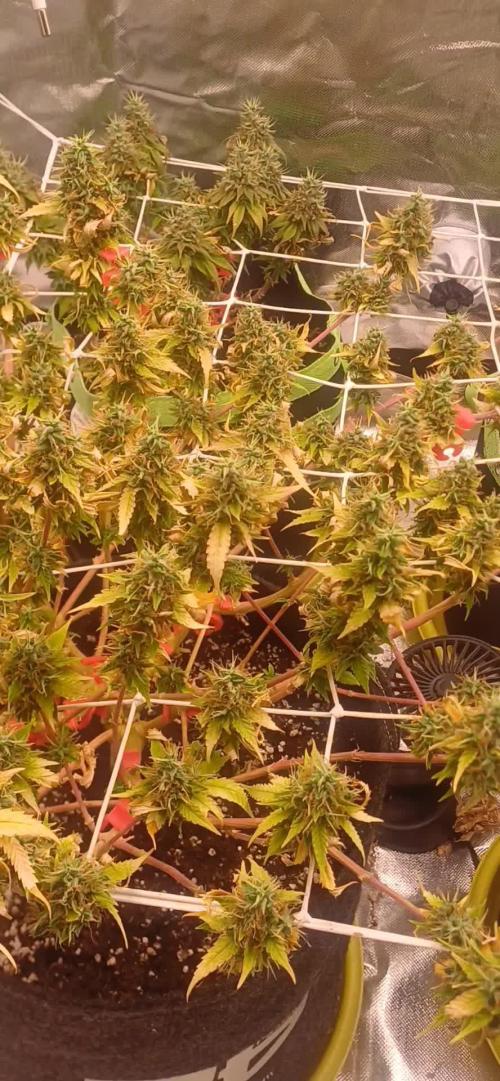
Aggiornamento 12/08/26
Volevo raccogliere cream caramel settimana scorsa ma sta continuando a ingrossarsi anche se il suo tempo sta per scadere
