
Likes
Comments
Share


Likes
45
Share


@OGBOBBYBUSH
Follow
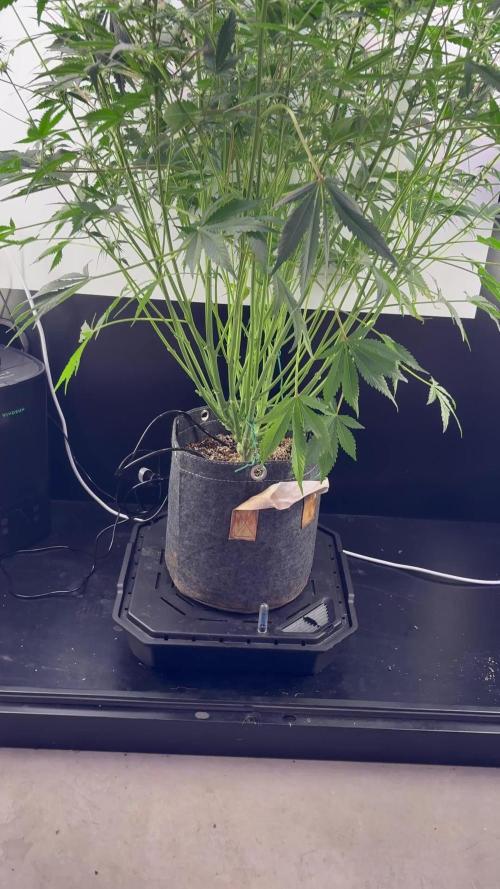
First week of flower is in the books. All 3 plants stretched about 6" and grew tons of new branched. Really starting to thicken out. Been battling a more problem with sns217 sprayed at beginning of night cycle. 1 confirmed female while it's still to early for the other 2 although they look female. Only problem now is I'm starting to run out of height so hopefully they don't have too much more stretch in them.
From here on I will be doing individual weekly updates on each plant they will be labeled AH1, AH2, and AH3
AH1 30"
topped once biggest and strongest plant
Female
AH2 26"
Kind of a boring one 1 main stem not much other growth
AH3 22"
The mutant! Probably On of the craziest plants I've grown. Has 3 main colas and a bunch of strange leaves with no training. Bushiest of the group
Had a 4th AH that was only about 18" and struggling confirmed male and chopped 10 days into flower

Likes
15
Share


@Thabs
Follow
Today is the start of week 3. Recap on week 2: everything went pretty smoothly. Both firls for nutrients this week and took well to them. As well as starting to feed, they also both entered their forever homes, and both seem very happy and healthy.
P2 is having some discoloration on her first true leaves, but all of the new growth looks good, so I'm going to write it off as she wasn't happy about no nutes for so long. All-in-all I think this week went well. P1 is showing promising signs of making a full recovery from her near drowning as a seedling, so that's great!

Likes
15
Share

@CCSAUTOGROW
Follow
Apple Strudel is a BEAST!!!💪
She is quite a large auto. Spent the first few weeks of flower growing in size. Hopefully I have raised the light for the last time. Finally starting to fill in & stack some flower. This girl is going produce something special! Already has some nice frost and is smelling yummy! Excited to see what she does in the next few weeks.


Processing
Likes
15
Share


@Messypies
Follow
Sorry for the lack of uploading !
These plants have been perfect from the start. Budding out nicely and haven't shown any signs if defficiency.
All training has been stopped and I have started cutting back on the nitrogen for the 2 autoflowers.
The peanut butter cookies is growing to be very bushy so I have done some light defoliation to help with light penetrative to the lower canopy of the plant


Likes
20
Share


@Frvncodeine
Follow
Días aún muy fríos, llovió un poco pero al fin los días están siendo más soleados :) volví a aplicar jabón potásico por riego foliar 3cc x 1 litro de agua.
Likes
2
Share

@JuiceboxTerps
Follow
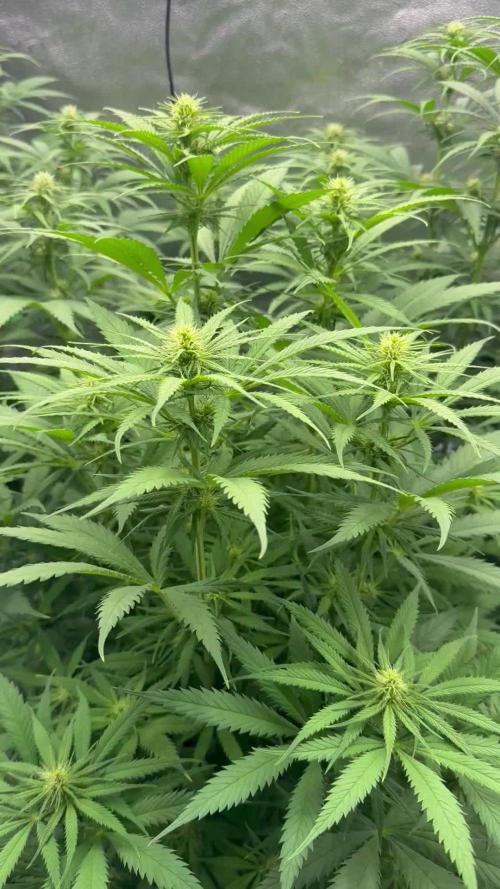
The stretch is finally over haha
Some good stacking going on so I switched over the blue supplemental light to red and turned on the under canopy lights - (40w full spectrum spider farmer). Worked ok in other grows
Tomorrow is day 21 so the girls will get a great clean up
Vpd - 1.25
Ppfd- 800-880


Likes
104
Share


@BudVision
Follow
Hi growers, the harvest is finally here!
And with that, this Purple Headies diary comes to an end. Thank you from the bottom of my heart to everyone who followed this journey, left a comment, dropped a like, or simply took a moment to stop by. Your support meant a lot to me throughout this entire grow. I truly hope you enjoyed this diary as much as I enjoyed sharing it with you. I already can't wait to see you all again in my future grow diaries.
------------------------------------------------------------------------------------------------------------------------------------------------
Sklizeň je konečně tady!
A tímto se uzavírá deník Purple Headies. Z celého srdce děkuji všem, kteří tuto cestu sledovali, napsali komentář, dali like nebo se jen na chvíli zastavili. Vaše podpora pro mě během celého pěstování opravdu hodně znamenala. Doufám, že vás tenhle deník bavil stejně jako mě bavilo ho sdílet. Už teď se těším, až se společně potkáme u dalších deníků.
Peace and happy growing ✌️
Likes
3
Share


@Bluemels
Follow
Tag 44: Wie von Zamnesia empfohlen fange ich jetzt schon an zu Spülen. Ein bisschen später als empfohlen jedenfalls. Weil die Pflanze schon so helle Blätter hat.

Likes
46
Share


@Merrymoosefamilyfarms
Follow
Hey hey everybody! We are back here this week at the beginning of week 13 and it is almost that time… time to flip?
….I wish…. No, no…. I am trying to be good but I think I came up with a plan that will give me a rough idea of when I will see that light at the end of the tunnel- or we’ll at least flip that light to 12/12 haha-
No no it is almost Christmas and things have been crazy over here. With the holiday madness upon us, I can’t tell all of you how much I have appreciated the relative silence (you know how it is, there are multiple fans running) time seems to slow down and it just us and the plants. Quite enjoyable.
So as you already know, we are going to be on coast until we fill out the rest of that 3x3 scrog net- however just today on my way into work, I came up with what might be my new definitive plan…
I have had a bit of trouble waiting, no doubt it will be worth the wait, but the wait has been difficult none the less… so here it is..
Here’s what I’m thinking- I have this going and I also have some fastbuds growing in the same area. What I am most likely going to do- is wait until it’s time for the fastbuds to come down to open up some space in the 5x5 and the rock candy cake can have all that space to herself- I will shift the scrog into the center of the tent and then flip the light schedule to 12/12 and let it run wild- it’s at this point I will most likely employ a more hands off approach so it can focus all of its energy on producing buds worthy of such a wait.
The canopy is getting pretty lush and I really need to get in there and defoliate- I really lucked out, today was the last day I had to work until after Christmas so you KNOW I will be in there tomorrow plucking away at leaves (strategically of course) half kidding I’m probably still a whirlwind compared to some, but I’ve noticed- especially when it comes to autos, that my leaf selection has become much more refined when defoliating. PROBABLY gonna see a BIT less of that tomorrow as I have to open up the canopy but I still plan on being careful.
Something else that was super cool who may not be following along with the other journal, happened oddly enough just the other day when I was doing dishes- I was scrubbing away with my phone all propped up so I could watch/listen to dude grows. And I heard the dude mention a contest on their website that I had entered… of course my ears perked up, I leaned in a little closer to take a look and was thinking to myself how cool it would be, even to see my picture in the background and sure enough there it was and they brought it up and commented on the submission and seemed to be genuinely enthused by it and let me tell you I am STILL riding high off that one!
One thing that was cool too was a rep at a nutrient company had seen that and congratulated me as well and it was again just so cool and I’m honored to have been on there! I listen to them practically everyday at work- yeah words are not doing it justice right now but I was stoked!!!
Other than that, the holidays are practically upon us so I’d imagine it’ll be a whole lot of family activity with a side of unintentional neglect that I plan on keeping to an absolute minimum because we are right around the corner from some excitement in that tent- that thing is going to be HUGE! So we have that to look forward to! And on that note, I just want to say that from our home to yours, I truly hope you all have a wonderful holiday season and I can’t wait to come back and get into the garden talk with all my growmies! Growers love everybody and happy holiday!! 💚🤙🌱🎅🏼🎁🎄
Processing
Likes
3
Share


@Dico29
Follow
Day 120
Smells good buds are fatter and looking better then I thought last week, I flushed but I think I may have caused nutrient burn or nitrogen since my stems have turned purple also along the buds and tips or ideas of what I should try thanks
Day 127 photos at the bottom


Likes
13
Share


@humblecrumble
Follow
Havnt actually fed any nuts for over a week. After I made the mistake of feeding way too much I decided to just give her water for a couple weeks which I havnt had to do much cause there has been a lot of rain. And havnt had much sun so it’s been taking a while for the soil to dry up. Going to feed her in a couple days probably. My nutrient mix is at about a 4.5 ph in RO water which is by itself around 7.4 . So I have to add a bit of ph up to bring the ph into the mid to high 6 range. Any thoughts on that ? She seems pretty healthy to me at this point just been growing pretty slow I’m guessing from the lack of sun and nutrient shock I gave it the first half of it’s life
Likes
92
Share


@DogDoctorOfficial
Follow
🌟 Welcome to the TrolMaster Chronicles: Seed to Harvest Adventure! 1st run🌟
Hey, Grow Fam! It’s DogDoctor here, and I’m thrilled to kick off this exciting new series with you. Today marks the beginning of our journey through the TrolMaster sponsorship, and we’re diving right into the heart of the action with germination and unboxing. 🌱✨
We’re starting strong with the Germination Station by @thecannakan, a game-changer for this process. I’ll be showing you all the details as we delve deep into every aspect of our grow adventure.
Here’s today’s lineup for the germination extravaganza:
1️⃣ Mandarin Squeeze - Terpyz Mutant Genetics. 🌈 One seed germinated.
2️⃣ Punch Pie RQS and Tyson 2.0 Genetics. 🍰 One seed germinated.
3️⃣ RS11 by Kannabia Seeds. 🚀 One seed germinated.
4️⃣ Green Papaya by Super Sativa Seed Club. 🍍 Tester unreleased seed, one germinated.
5️⃣ Gorilla Mellon by Fast Buds. 🍉 Two seeds, one germinated (the first one didn’t make it).
6️⃣ Tropical Smoothies - Tried all seeds from the pack, but unfortunately, none germinated. 🌴
We’re also using the complete organic mineral line from @aptusholland, which includes top-notch nutrients to ensure our plants get the best start possible. 🌿✨ Plus, we’ve got the new ProMix Mycorrhizae soil, which will help create a thriving root environment. 🌱
Throughout this journey, I’ll be breaking down every step, sharing tips, and keeping it real with both the successes and challenges. I’m excited to share this adventure with you, and there’s so much more to come!
For more in-depth coverage and exclusive content, make sure to check out my YouTube channel and subscribe—where you’ll find full video breakdowns, detailed insights, and more. 🌟🎥 Follow me on Instagram for additional exclusive updates and behind-the-scenes peeks that you won’t find anywhere else! 📸✨
Your support means the world to me, and I can’t wait to have you along for every step of this amazing journey. Let’s grow together and make some magic happen!
#TrolMasterChronicles #SeedToHarvest #GrowDiaries #GrowJourney #TrolMaster #TheCannakan #GrowLife #PlantAdventure #HighFrequency #PositiveVibes #GrowWithMe #SubscribeNow #ExclusiveContent #AptusHolland #ProMixMycorrhizae
P.S. 🌟💚 I want to take a moment to express just how honored and grateful I am to be the first TrolMaster Maverick. This opportunity is a dream come true, and I’m beyond excited to embark on this journey with all of you. Being a part of this incredible community and pushing the boundaries of indoor horticulture with TrolMaster and ThinkGrowLED is a privilege I don’t take lightly. 🙌
A massive shoutout and thank you to the entire TrolMaster and ThinkGrow team for believing in me and supporting this adventure. Your trust and support mean the world to me, and I promise to give it my all to make this journey as amazing as possible. 🌟🙏
Thank you, Grow Fam, for being here from the start. Your encouragement and enthusiasm fuel my passion and make every step of this journey worth it. Here’s to making magic happen together and to many more incredible milestones ahead. Let’s grow, learn, and shine! 🌱✨
With all my heart,Growers Love and thank you. 💚
#FirstMaverick #TrolMasterFamily #ThinkGrowLED #GratefulHeart #GrowTogether #MakingMagic
Lets Play a game , FB Gorilla Melon Jump in to the future, can you guess the week ? Let me know in the comments before we get there , this is just for fun Lets Grow 💚💚💚 Growers Love everyone 💚💚💚


Likes
21
Share

@High_And_Hydro
Follow
Endlich ist es geschafft und die Pflanzen sind abgeschnitten. Nächste Woche wird dann getrimmt.

Likes
10
Share


@Sundance
Follow
Leaves started to be more and more yellow. In fact, I don't know why. The nutrients I keep based on the Plagron table. I have few theories. Lack of Nitrogen, Lack of Calcium, End of the life cycle. Who knows. I will add a bit more nutrients.
Likes
12
Share


@Lysidious
Follow
WoW many crystals have formed overnight, almost as if she went out and partied hard and forgot to wipe her “nose” before she got back home...
No complaints at all, just watering daily with pH 6.4 water and adding compost tea.
Going to do a phosphorous boost on her this week since she is starting to pack on mass...
Thanks for reading.


