


Likes
226
Share


@HighTV
Follow
| 📅 Week 8 | Days 50 - 56
| 💡 750w 📏26' |
| ☔ 33%-45% |
| 🌡️️🌞 75 - 81 |
| 🌡️️🌑 70 - 75 |
12/28: I did a reservoir swap on all the plants and adjusted their PHs to 5.8. Humidity was getting really low So I added some containers with water and a towel dipped in to act like a wick to increase the RH. The smell has started to get noticeable so Ill have to be adding the carbon filter sooner.
12/29: Humidity has responded well and has increased to near desired levels. All reservoirs were topped off and had their PH's adjusted to 6 because they have been dropping low lately. Moved the SCROG placements a bit and adjusted the fans as well. Refilled the ambient containers of water for RH levels.
12/30: Reservoirs were topped and although only one needed a noticeable amount. All reservoirs have dropped low again and have been adjusted to 6 to compensate once more. The humidity has reached desired levels and is being stable thankfully!
02/31: I removed a few containers of water because the RH has become fairly stable. The reservoirs were of course topped off, but today they were adjusted to a PH of 5.8 instead of 6 like the last few days. Adjusted the SCROG a small amount. The plants are showing severe Mag deficiency and I will be doubling their nutrient schedule ASAP I just fear the Nitrogen toxicity, but at this points its way better than a this Cal/Mag def.
01/01: Happy New Years!! I have set up the Carbon filter because the smell is getting very noticeable. I swapped out the back right non-focus plants reservoir with the doubled nutrients and added great white mycorrhizae as well. The Focus plant and the other had their reservoirs topped of with tap water then PHed to 5.8.
01/02: I adjusted the PHs of all the plants to 5.8 after topping them off with tap water. I also adjusted the SCROG a slight bit and removed some old foliage. The RH levels are still in the acceptable rage for my setup so I will just refill the open containers and not add/remove any of them.
-
01/03: 2 of the plants including the focus plant had their reservoirs topped off. All of the plants had their reservoirs adjusted to 5.8PH. The RH dropped a slight bit, so I mixed some PHed tap water with CaliMagic to make foliar spray. Its not enough to compensate the lack of Mag in the Nutrient schedule. Tomorrow (Jan 4th) the plants will have their nutrients increased to resolve the issues. Unfortunately I didn't have enough time in the last week to do it sooner.
_____________________________________________________
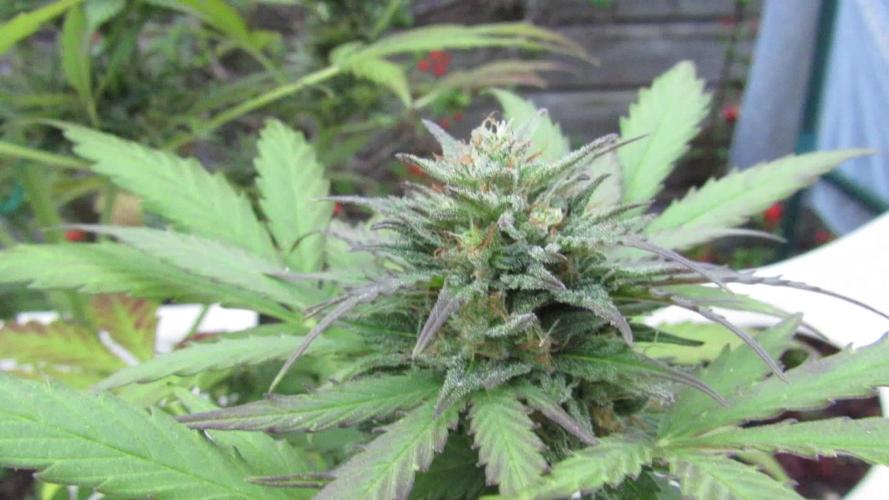
This marks the end of week 8! The nutrients will be increased tomorrow and I have a feeling the next few weeks are going to show the Focus Plants buds getting plump and dark much like its non-focus plant counterparts. The focus plant has undeniably shown its Purple phenotype at this point so that mystery has been resolved. The only questions now is how fast will these plants react to the increased nutrients and bounce? I have faith in these plants to put out a respectable harvest and i'm already looking forward to future runs with this strain now that I am more acquitted to it. All of the plants will be using Great White Mycorrhizae starting with their swaps tomorrow.
Feel free to leave comments/questions below or give me any feedback to improve my diaries. If you like this Diary follow along and check out my others as well 😎


Likes
9
Share


@sunshinegroww
Follow
Been defoliated for the last time me think
Looks super happy and very frosty stinks and very sticky very strong potent smell

Likes
2
Share


@Kirsten
Follow
26.1.25:
I have had a mistake 😕 i spilt some Fish Mix as I was experimenting with a syphon from some aquarium tubing I have. Unfortunately, I forgot to take the syphon out! Ugh 😣
However, it is fish emulsion and very thick consistency. Therefore, I was able to scrape it up with 2 of my business cards up off the counter. So added this extra into the next 2 ltr solution I mixed.
All plants were watered with at least 1ltr of dechlorinated water PH'd to 6.3.
Containing the following nutrients;-
♡ 3ml Seachem Seaweed
♡ 4ml Biobizz Fish Mix
♡ 4ml Biobizz Bio-Grow
♡ 3ml Biobizz Bloom
♡ 2ml Xpert Nutrients Bloom Booster
♡ 2ml Xpert Nutrients Cal-Mag
♡ .25g Ecothrive Biosys.
♡ 2.5g of Bicarbonate of Soda as PH UP.
Unfortunately I have broken my PH pen too. Accidentally submerged it under water, then the readings went crazy.
I'm leaving it to dry by standing it up but I'm most likely going to need a new one, which is extremely annoying 😑
I'm going start implementing the Scrog net probably some point next week if I let the plants that are in flower to just grow up now, as I do believe that I stunted Watermelon 🍉 by using too strenuous LST.
Hopefully the plants still are able to grow upwards at this stage during flower for all the Purple Punch P1, P2 and P3.
We will soon see!
28.1.25:
My PH pen has packed up 😣
I've got to wait to get another.
It's super annoying 😑 so I'm just judging by memory how to regulate it.
Unfortunately, that's my only choice! I'm also out of the dechlorinator 😕 things are not going very well this week so far 😅
I guess we will have to make do, until I can get replenished.
29.1.25:
I removed all the plants, hoovered, and disinfected the tent.
There were several accidents when watering, causing some debris and splashes.
I decided to just go ahead and get a few other things done. It's crazy how quickly things can become neglected! 😣
So I defoliated moderately on all plants except Gorilla Cookies seedling.
I have absolutely dropped the ball on my lighting situation!
My light was much further away than I thought!
I turned it up to 100% and dropped it down to just under 2 feet away.
After I reset the tent, I set up my scrog net. I removed 80% of all LST pegs. I am planning on letting the scrog net take over the training from here.
I really want to minimise the risk of mould, so I decided to start using my dehumidifier. It has raised up to 73% RH this week, so it's necessary.
Hopefully, I will be able to get my dechlorinator and PH pen soon! That's kind of essential to me.
It's been a little bit of a stressful day in the garden, to be honest 😅
30.1.25:
So I am expecting the arrival of my new PH pen today, as well as my new bottle of Ecothrive neutralise.
It is supposed to measure the TDS and EC in addition to the standard TEMP and PH, which I had previously. Obviously, time will tell if it's any good or not.
I realise, much too late now, that my lighting is very insufficient for this many plants. I need double the watts at least, and coverage is very poor.
I remembered I had an old LED floor lamp, which was in a corner being unused.
I decided to take the stand off, and Zip tied the pole onto the tent pole at the back left corner.
I have no idea what the wattage is, and it's quite pathetic 😅 but I mean, I might as well use it, being as I definitely cannot afford more lights! 😣
Next grow, I will probably only grow 2 plants, max 4, and just use larger 7-10 Gallon pots.
Being as I ran out of dechlorinator, I only watered some plants properly because I only had enough to make 6 litres. When my pen arrives, I will get everything properly watered.
31.1.25:
The leaves of several plants are showing signs of iron deficiency. This is likely due to my PH pen packing up earlier. I now have a new pen.
Due to this, I decided to use my Seachem Prime, which I use for my aquariums. As I wanted to get them watered properly, and my Ecothrive Neutralise hasn't arrived yet.
I watered each plant with 1ltr of dechlorinated water PH'd to 6.0. I added .25g Ecothrive Biosys to the water.
May give them a breather on the nutes and just use the Cal-Mag and Biosys.
Being as I've just topped dressed with rich fertilisers, I'm sure that will be OK for the next several waterings.
Bubble Kush

Likes
6
Share


@TheSurfBud
Follow
So heres my germination method.
Soak/shake seeds in 3% h202 solution for a few minutes and let sit until tiny bubbles form on seed coat.
Rinsed in clean rain water.
Then placed in HPO's GREEN-SUPREME used as seed soak solution. With a small amount of ANTI-MATTER for enzymes. Soaked 12hrs
(mostly I just soak a few hrs)
Straight into Gro-Dirt Super Starter soil.
Watered seeds in gently with diluted DARK-MATTER solution to get the mycorrhizal species attached as soon as possible.
Once they came up, 18-24hrs later, sprayed gently with a mix of GREEN-SUPREME & RHIZO-MOJO
Just a small pinch of both in a 1ltr spray bottle.
All this was done in a dark warm place on a heat mat. In a humidity dome.

Likes
9
Share


@pareto
Follow
She had her issues and is not a big yielder. But she makes up for it in beauty and aroma!
The trichomes look absolutely awesome!
--------------------------------------------------------------------------------------------------------------------------------------------------------------------------------
Set up cost (fixed costs)
-Lamp: 40€
-Timer: 3,5€
-Pot: 4€
-Total fixed costs: 47,5€
Given 5 years (or 15 grows) usage time translates to around 3,17€ per grow in materials.
Variable costs:
-Seeds: 6,33€
-Soil: 6€
-Fertilizer: 3,50€
-Power: 20,22€
-Total variable costs: 36,05€
-Total costs per grow: 39,22€
Likes
45
Share


@Psychonaut
Follow
The second week of flushing. Some of the leaves from the bottom of the plant are already yellow or light green. It seems that now she consumes the nutrient buildup from the bottom leaves.
Still milky trichomes, but I spotted a few amber.
Also, the buds gained a purple shade, looks awesome!
week 14

Processing
Likes
8
Share


@DaLawry
Follow
Cherry Punch just got her last feed this past week. The next 2 weeks will be full flushing for them. Garlic cookies, watermelon Skittlez, Mint cookies, cookies and cream, and wedding cake are going to be fed up to weeks 7-8. All the plants are finishing nicely! smells are getting a little more dank forsure!😎


Likes
92
Share


@Hou_Stone
Follow
Flowering begins.
I did defoliation on the lower tiers on day 4 of flowering
------------------------------------------------
Water: tap water at 300 PPM, I add 0.7G of Hybrid powder per liter to reach 800PPM and I adjust the PH to 5.8. Currently I water my pots with about 1.5L of water every 4 days
-Daytime temperature: 27°C
-Night temperature: 23°C
-Humidity: 45-65%
-Lamp: Mars Hydro FC3000. intensity 80% at 40cm from the top leaves
-Room: Mars Hydro 100x100x180cm
-Extractor: Mars hydro 402 CFM Max. power 2/10
-Substrate : 70% coco, 25% perlite, 5% vermiculite.
My instagram : https://www.instagram.com/p/CuMhQ_BsjRP/?utm_source=ig_web_copy_link&igshid=MzRlODBiNWFlZA==
Looking for MarsHydro equipment for your crop? 🔥
You can use my promo codes! 🙏😻
3% off with "houstone3" for: TS LED Grow Light, Tent, Ventilation
5% off with "houstone5" for: FC&FC-E&SP LED Grow Lights; Grow Tent Kits
https://www.mars-hydro.com/?acc=hou-stone

Likes
3
Share


@Seeds_growforgreen
Follow
Flowering time. To much PK on start. Now not nutrients. 1 week flushing.
Likes
8
Share


@farmerjim
Follow
Plant 1: This was the highly trained and defoliated plant. It stayed the shortest and doesn't have very dense nugs likely because of its distance from the lights given the height of plants 2 and 3. Ended up with 2.5oz after 9 days of hanging.
Plant 3: This was the second most highly trained plant. Not as much tying down so has some height. Nugs are more dense than plant 1. Ended up with 3.2oz after 10 days of hanging.
OMG!!! Plant 2: dried and jarred. Final weight... 10.6oz!!! that's a total of 16.4oz for 3 autos! I'm so pumped...🤯😍🤘🤓📉00


Likes
11
Share


@CeGrow
Follow
woche 10
nr.1: tag 68
blüte ist nur noch wenig dicker geworden, legt aber nicht mehr so viel zu
ca die Hälfte der Stempel sind braun
Trichome sind unter dem Mikroskop noch fast alle klar
nr.2:
tag 64
blüte ist nur noch wenig dicker geworden
viele Stempel sind schlagartig braun gewoden
Trichome sind fast alle noch klar
einige blattläuse , vorallem auf den langsam schwächer werdenden Fächerblättern
habe noch einige weggeschnitten
tag 69:
trichome klar, nur wenige milchig
Düngung:
nr.1
tag 64: 0,4 Liter Wasser + 1,2ml Mairol Blütenwunder
tag 69: 0,5 Liter Wasser + 1,2ml Mairol Blütenwunder
nr.2
tag 65: 0,4 liter Wasser+ 1,2 ml Mairol Blütenwunder

Processing
Likes
11
Share


@TheDankBankGC
Follow
What a fantastic week. Very impressed with the progress of the ladies. Still no nutes added to the Plagron soil mix, will probably start them on a light dosage of the Top Crop auto feed in the next few days if they look like they're calling for it. Wedding Cheesecake particularly vigorous. Amazingly, one of the Orange sherbert is popping pistils and all four smell surprisingly strongly of orange sweets at only 14 days old!! Can't wait for the next week.
Likes
44
Share


@PotCasso
Follow
Week 9:
Watering in at 700ml
Finishing beautifully. The smells are intense, fantastic senescence (fall colors),
Getting their swell on, trichomes are all cloudy.


Likes
67
Share


@AsNoriu
Follow
Day 63. She is going down, my fastest ever big healthy plant. Looking at first waves 3 numbers, I think it's not even 2 ounces plant, it's f@cking THREE !!! ;))))))))))))
Day 71. One to jars another for trim jail. Busy day ...
Day 72. After small delay, she went down ;)
Day 82. Straight to vacuum sacs, but she was really great !
Happy Growing !!!
Likes
17
Share


@Vio_La_Grow
Follow
Week 7 -
-Overdrive added
-Nugs are weighing the branches down even more - using support from sidewalls of tent
-Trichombs are about 20-30% cloudy right now - some browning
-Some slight nitro deficiency which was fixed by adding nutes
-500ish PPM
-5.6-6.2 PH
-Warm+Cold days in bay area. Tent is 75-88F. Out door temps are 55-75F
-Nugs are huge and almost the size of baseballs. Use a 1 GALLON bottle which seems small vs. nugs

Likes
43
Share


@TheBulldozerSicily
Follow
Pronti per iniziare un nuovo ciclo aspettando che queste siano pronte per fumarle... questa sera mi sentirò un po più solo, dato che non andrò a visitare le mie cucciole e non controllero ec e ph... Inizio al più presto.. la pianta é vita!
Likes
59
Share

@Hologram
Follow
Last update, ready or not!😎
Autumn is really starting to rear its ugly head, rain is starting to reighn..
now she only gets just water.. (love the irony😳)
Happy growing4all✊
***KISS! Growingtechnique: KeepItSimple,Stupid!😉
Likes
1
Share


@kauilmayel1996
Follow
So nice
Pero me faltó la maya
Looking good
No sé ni que crecí pero es bastante hermosa
