


Likes
9
Share


@Gdubgrows
Follow
Building the RDWC set up was quite the process. A couple minor leaks, but I was able to take care of them. I'm now 11/11 in rapid rooters so I won't suggest anything else. No pre germination. I prepared the rooters, put the seeds in, and 3 days later they came up. This is my 3rd run using the same batch of 50 rapid rooters. I freeze the extras and pull them out a day before use.
Thanks for stopping by! 😎

Likes
68
Share


@Roberts
Follow
Auto Northern Dragon Fuel is finishing up her bulking. Everything is looking good. She has a strong diesel smell with sour notes. Just letting her finish up. Thank you Medic Grow, and Super Sativa Seed Club. 🤜🏻🤛🏻🌱❄️🌱
Thank you grow diaries community for the 👇likes👇, follows, comments, and subscriptions on my YouTube channel👇. ❄️🌱🍻
Happy Growing 🌱🌱🌱
https://youtube.com/channel/UCAhN7yRzWLpcaRHhMIQ7X4g


Likes
5
Share


@Stickybudz420
Follow
Think this girl has taken a liking to her new home showing a couple more nodes this week, temperatures out now rising 🤩 sitting around 24-26c during the day! Drop seeds not 💣’s 🤓

Processing
Likes
6
Share


@Mr_nugs_lover_David
Follow
What a pleasure to see, to smell, and to grow, wonderful and magic strain, absolutely in love with the pure OG aroma, very strong, absolute gassy very powerful aroma, flowers completely covered in resin, super sticky, I just love tjis genetic man, always gotta have some OG in the garden this is the prove 💎❄️ peace guys ✌️💚

Likes
4
Share


@Maincard
Follow
Sometimes watered only with water, three plants were already ready in the seventh week from germination. A week of watering with only water and I cut them down

Likes
4
Share


@FrecheOma60
Follow
The plants are looking amazing. Iam happy that all effort i put into these plants got rewarded. The plants are from 2 mother plants some of them got very purpleish / black leafs some very dense buds all have purple touch in the buds. The sugar amount is insane they all look very beautiful altough the buds are not the biggest. Its around 1-2 weeks left till harvest . Today ive watered with clear rainwater to flush.

Likes
6
Share


@ForbiddenBotanist
Follow
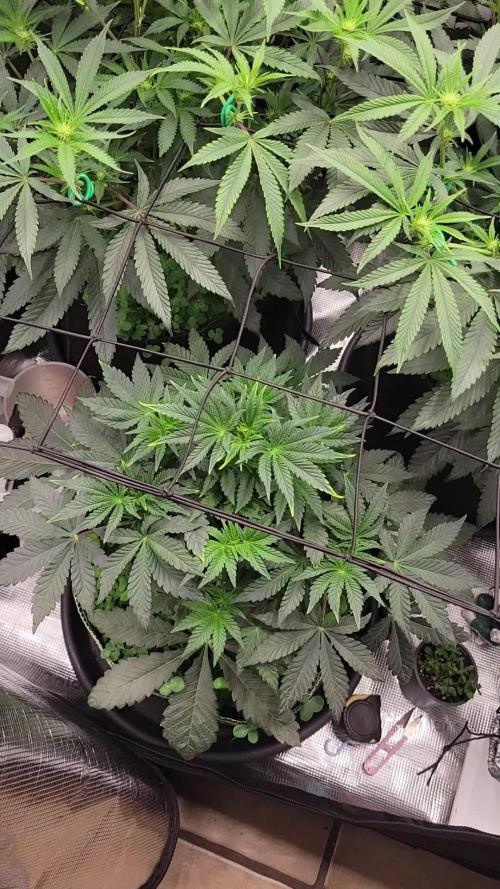
Removed a lot of stalks to point the plants energy where I want it.
Not a lot more to say
-

Likes
422
Share


@Crashoverite
Follow
Hi everyone 😁
Welcome back in another week update!
Thank you all for this amazing support on this bananas journey💚💚💚
Uploading and updating each week content on daily bassis so please revisit this diary if week not over yet.
So far all going great. Girls looking very healthy and happy. Due to my short trip had to leave my 🍌💜👊 girls unsupervised for 3 days. Was stunned when opened my cabinet on the Dec 5th. Athena stretched like crazy. Good 3 inches. She better slow down as not much roof space left for her. May tie some taller branches to netting if necessary. Introducing blooming nutes for the first time this week on December 6th at smaller dosage and on the second watering as listed.
Week 8
Dec 4 - Dec 10
Dec 5
Leaves tucking
Dec 6
Heavier selective defoliation on both girls. Athena fully lolipopped and Xena at 75%. Watered with 8 ltr beetwen both with perfect runoofs PH 6.4. Girls were very thirsty 🤤
Dec 7-8
Just enjoying how my girls developing. Frost has landed and they are start showing colours. All is looking great.
Dec 9
Second watering for this week 7 ltr beetwen both. Runoffs PH 6.4
Even with so much difrence in size of my 🍌💜👊 girls it seems that they are drinking my juice almost equally.
Dec 10
Applied selective defoliation and tied 3 tallest branches of Athena to netting to avoid any potential burns on these beautiful baby colas.
It's the end of the week!
Thank you all again for such a great support, all the likes, dm's, comments and follows 💚💜💚💜
Stay tuned for coming week update 😁✌️💚
Likes
27
Share


@Canadian_Bud
Follow
27-11-2021
Finally got the setup completed but still have a couple of minor leaks up top. She went into her new home without a hitch. Seems to be doing well and growing quickly. roots are already 12" in length and look like large centipedes. Under the bright lights it's a who;e new game. A few weeks and flip to flower unless I want monsters again lol. 😎
Likes
14
Share


@GoldenWeedGrower
Follow
D92/F48 - 01/07/23 - 👉👉👉 First Havest, I cutted the main buds and left the others for one more week. Now I'm going to put only the timelapse video and then all details in the next week
D93/F49 - 02/07/23 - Secondary grow with flushing
D94/F50 - 03/07/23 - Secondary grow with flushing
D95/F51 - 04/07/23 - Secondary grow with flushing
D96/F52 - 05/07/23 - Secondary grow with flushing
D97/F53 - 06/07/23 - Secondary grow with flushing
D98/F54 - 07/07/23 - Secondary grow with flushing
Likes
76
Share


@DogDoctorOfficial
Follow
🌸 Week 8 Flower – The Trichome Symphony Begins 🌸
Eternity Grow Cup
This week… it’s all about the frost. ❄️
We are diving deep into the universe of trichomes, those magical crystal-like structures that define potency, aroma, and visual beauty. Each pheno this week is presented with its own dedicated video — so everyone can witness the uniqueness and evolution of these genetics firsthand. The photos? Focused close and true on the trichomes and their stalks, the very essence of the plant’s protective and expressive language.
💎 What Are Trichomes?
Trichomes are tiny resin glands that cover the surface of cannabis flowers and sugar leaves. They’re responsible for producing and storing cannabinoids (like THC and CBD), terpenes, and flavonoids — the compounds that create the plant’s effects, scents, and flavors.
They act as the plant’s natural defense — from UV rays, pests, and environmental stress — and in return, they gift us with beauty, medicine, and art.
Why So Many Trichomes Here?
This room has turned into a crystal forest thanks to a harmonious mix of tech, care, and nature:
🔹 Spectrum Tunings:
Using the TrolMaster system, we’ve dialed in a spectrum rich in reds, far-reds, and UV at precise times to stimulate trichome production. The plants are responding in full.
🔹 Lighting:
The under-canopy power of the ICL 300s, combined with the canopy-level intensity of the Model 1s, is creating full-spectrum saturation from top to bottom. Buds are stacked, frosty, and glowing from every angle.
🔹 Nutrition Synergy:
The tag-team of Aptus Holland and Plagron has been flawless. The clean base, balanced micro and macro elements, and biostimulants have driven these girls into full expression mode. You can see the nutrition working in every crystal.
🌿 Where Are We Now?
We’re likely one week to ten days from harvest, but of course we’ll follow the plants’ signals. They’re still swelling and building — it’s the final stretch, and they’re sprinting.
Nerdy Note:
Trichomes can be bulbous, capitate-sessile, or capitate-stalked — and in this run, the capitate-stalked ones are standing tall and loaded. Expect a full cannabinoid and terpene profile when it’s time for analysis.( bro talk not lab hihihihi)
🌟 Let’s take a moment to recognize that we’re witnessing the peak of this cycle. This is living art, frozen in time by a camera lens but alive in scent and energy.
This Week’s Feeding Program
To support this explosive trichome production in Week 8 Flower, we’re feeding with precision and purpose. Every drop counts now, and here’s the clean, efficient mix we’re running:
• Aptus Holland – Regulator: 0.15 ml/L
• Aptus Holland – System Clean: 0.25 ml/L
• Aptus Holland – RO Water Condition: 0.8 ml/L
• Aptus Holland – All-In-One Liquid: 1.25 ml/L
• Plagron – Green Sensation: 1 ml/L
• pH set at 6.2
💧 We’re keeping it clean, clear, and consistent. No extra PK boosters or unnecessary additives. Just smart nutrition, tuned spectrum, and stable conditions to let the plants express themselves naturally. The synergy between Aptus Holland’s Clean Program and Plagron’s Green Sensation is clearly showing in every frosty bud.
This week, we’ve fine-tuned the spectrum to push the plants into full resin-production mode. I’ve reduced the white light intensity to 40% while keeping the reds and UVs running at 100%. This shift focuses energy on the wavelengths that directly stimulate secondary metabolite production—especially trichomes. Red light enhances flower development and density, while UV exposure encourages plants to produce protective compounds, like cannabinoids and terpenes, as a natural defense. This balance between lower photosynthetic pressure and high-spectrum stimulation is helping the girls finish strong, frosty, and full of character.
🙏 Massive thanks to all sponsors, followers, friends, and growers in the community. To the ones competing, to the ones just watching — THANK YOU. This is almost the end of the road, and every diary, every plant, every effort deserves respect.
💬 Don’t forget to follow the full 4K experience on YouTube, and for behind-the-scenes action and updates, join us on Instagram.
With Grower’s Love,
DD 🌱
Genetics - Runtz https://www.zamnesia.com/6000-zamnesia-seeds-runtz-feminized.html
Nutrients - Plagron https://plagron.com/en/hobby
- Aptus Holland https://aptus-holland.com/
Controls - Trol Master https://www.trolmaster.eu/
LED - https://www.futureofgrow.com/en
LED - https://www.thinkgrowled.com
Soil - https://www.promixgardening.com/en
Germination - Cannakan https://cannakan.com/?srsltid=AfmBOopXr-inLXajXu3QFgKXCXXos4F1oEvScjMKIB5MR5dk8-GJ-F49
DOGDOCTOR 15% off
Smoking Papers - https://ziggioriginal.com/
Terpene saver - https://grovebags.com/
As always thank you all for stopping by, for the love and for it all , this journey of mine wold just not be the same without you guys, the love and support is very much appreciloved and i fell honored with you all in my life
With true love comes happiness Always believe in your self and always do things expecting nothing and with an open heart , be a giver and the universe will give back to you in ways you could not even imagine so
As always, this is shared for educational purposes, aiming to spread understanding and appreciation for this plant. The journey with nature is one of discovery, creativity, and respect. Let’s celebrate it responsibly and continue to learn and grow together!
Growers Love To you All 💚
#EternityGrowCup #RuntzHunt #GrowersLove #CannabisCommunity #AptusHolland #ProMixSoil #TrolMaster #Zamnesia #Plagron #ZiggiPapers #Grovebags

Likes
10
Share


@Stork
Follow
Day 127 Mon
Add water
PH 5.8
EC 0.6
PPM 300
DLI
PPFD
Water 18
Day 128 Tue
Flushing
PH 6.0
EC 0.1
PPM 50
DLI
PPFD
Water 19c
Day 129 Wed
Add Ph Down
PH 6.3 - 5.9
EC 0.1
PPM 60 - 50
DLI
PPFD
Water 18c
Day 130 Thu
PH 5.9
EC 0.1
PPM 60
DLI
PPFD
Water 20
Likes
2
Share


@Ninjabuds
Follow
Man, it's been a crazy week. These past few days have been brutal – seriously cold with this crazy humidity. I don't know about you, but I'm sick of the chills and the way my skin feels all sticky. It's been a struggle, but I'm finally getting on top of things. I think I've figured out a good routine to dry things out around here, so hopefully, I'll be feeling a lot more comfortable soon.
My three Bubble OG plants are looking awesome. Two of them are super tall, and it's gonna be crazy when they're done. I can already tell they're going to have huge buds. The little one might be short, but it's so dense, it looks like it's just stacked with buds all the way down.
Processing
Likes
32
Share


@Vega0284
Follow
Hey Guys!
Super excited this week! I've really been wanting to try growing outdoors, so I built a cheap hoop house! Got most of this stuff for the frame from Lowes under 300$. All the soil products I got from GrowGreenMI. Some really cool people out there.
One thing I'm super worried about is drainage. Right now those holes are about 4 feet deep and they've got about 4 inches of water in them already. What's been cautioned is that, eventually, about 2 months in these plants roots will grow and reach the bottom and cause root rot to form. One of the biggest things I was trying to be wary of was causing root rot. This was also the biggest precautionary measure I took when mixing the soil. Adding the extra perlite, coco, and clay pebbles. Best advice right now is to build the soil up on the holes another 16 to 18 inches and possible stick a PVC pipe down to the lowest drainage point of the hole to allow some of that natural occurring water to evaporate.
Any advice anyone has on it is welcomed!
Making a compost tea for the soil outdoors, will probably put 2 cups in each RDWC bucket as well and let that do it's magic for a day or so before nutrient change. Raised the bed about 14 inches as well!
All the seeds sank! Off to a good start! Lol

Likes
9
Share


@DeepRootsGrowTrees
Follow
TRIPLE G by ROYAL QUEEN SEEDS
Week #20 Overall
Week #3 Flower
This week she's doing good buds are starting to get some trichomes on them she's dealing with the heat for the most part and I haven't had any other issues with her as far as pest go either!! Stay Growing!!
ROYAL QUEEN SEEDS
TRIPLE G
Likes
88
Share


@ILoVeThiSpLaNt
Follow
Fatto leggera defogliazione giorno 45.Tra qualche giorno giro a 12/12 👍🖐️

Likes
4
Share


@knnabisgrower
Follow
En la segunda semana de vegetación fertilizamos con un estimulante de crecimiento, aplicando 1.5ml / litro con p.h regulado en 5.8.

Likes
2
Share


Likes
17
Share


@NoLimitQ
Follow
23.02.22 4 день цветения. Опрыскиваю раствором Fulvic
24.02.22 5 день цветения. Вытащил проволоку, опрыскиваю раствором Fulvic. Делаем раствор на 4 литра воды: MGB=7,92/5,28/7,92 + Fulvic 8мл + Pro Bloom 0,8 мл.
25.02.22 6 день цветения. Опрыскиваю раствором Fulvic
26.02.22 7 день цветения. Опрыскиваю раствором Fulvic. Снял скрог и пообрывал нижние листья и ветки, немного перераспределил колы, заново повтыкав фиксирующую проволоку. Убрал немного верхних листьев, чтобы свет поступал к нижним веткам.
27.02.22 8 день цветения. Опрыскиваю раствором Fulvic.
28.02.22 9 день цветения. Опрыскиваю раствором Fulvic. Сегодня температура в дневное время была ~20 градусов, скачет напряжение в сети + забыл закрыть окно, а на улице - 5градусов. Полив талой водой 3 литра + 6 мл Fulvic + 0.6 мл ProBloom
1.03.22 10 день цветения. Опрыскиваю раствором Fulvic. Пообрывал немного листьев, освободив нижние ветки для доступа света. 6я неделя завершена - растем и развиваемся=)
