


Likes
Comments
Share


Likes
82
Share


@WhiteEdge
Follow
28.04.2024
Continue into week 9
Clean nutrient tank for the last time...This is last week of flowering for almost all girls.
Electrical Conductivity (EC): 0.8 for this week..
Wedding Cheesecake: one girl finish this week, two others probably in middle of 10 week. Massive plants, tons of yelled. Creamy undertones, sticky buds. Love it!
They starve whole grow, didn't have possibility for separate line just for them. Love odor and bud structure.
Tropicana Cookies: Second phenotype will be harvested within couple off days. Insane plant, so frosty. It getting more colorful every day
Purple Lemonade: First pheno is insane! Shape, size ,color, bud hardness, appearance, frostiness' all attributes to become photo model!
Beautiful and high odor in the room!
Lighting Parameters: PAR Map: Maximum PPFD is 800, minimum PPFD is 550.
VPD: Ranges from -0.1-1.1
Daytime Temperature (DT): 23-24°C.
Nighttime Temperature (NT): 19-20°C.
Leaf Temperature: 21-22°C.
Light Distance: 45-55 cm from the plants.
CO2 Levels: 700+ ppm.
HLG Scorpion Diablo: Set at 60%, positioned at a 45-55 cm distance.
Girls drink less water, so for this week and till the end of flowering new misting timing's
Daytime: ON for 50 seconds, followed by 30 minutes OFF.
Nighttime: OFF for 50 seconds, followed by 45 minutes OFF.
Nutrient Tank (NT):
pH: Maintained between 5.80 and 6.00. Stable PH, small drifting up and downs
EC: 0.87
Temperature: 19-21°C
01.05.2024
Cruse mode , observing girls, looking trichomes under phone microscope. Still have to wait.
Purple Lemonade is almost ready all three girls. This is last week for them for sure.
Second Tropicana Cookies will be harvested in day or two..
First and second Wedding Cheesecake are finishing this week. Third still need some time.. Almost all pistils still white, only clear with some milky trichomes
Lighting Parameters: PAR Map: Maximum PPFD is 800, minimum PPFD is 550.
VPD: Ranges from -0.1-1.1
Daytime Temperature (DT): 23-24°C.
Nighttime Temperature (NT): 19-20°C.
Leaf Temperature: 21-22°C.
Light Distance: 45-55 cm from the plants.
CO2 Levels: 700+ ppm.
HLG Scorpion Diablo: Set at 60%, positioned at a 45-55 cm distance.
Girls drink less water, so for this week and till the end of flowering new misting timing's
Daytime: ON for 50 seconds, followed by 30 minutes OFF.
Nighttime: OFF for 45 seconds, followed by 45 minutes OFF.
Nutrient Tank (NT):
pH: Maintained between 5.80 and 6.00. Stable PH, small drifting up and downs
EC: 0.89
Temperature: 19-21°C
04.05.2024
EC start to raise slowly and PH is dropping . Low water consumption, girls finishing
Tomorrow is harvest day for second Tropicana Cookies and all three Purple Lemonade.
Last day off this week is going to be last day for Weeding Cheesecake also.
Without AC unit I'm not able to additionally control temperatures.. For drying it will be little higher temps, but it is what it is..
Water keep cool for whole week, from 18c to 20c, This week watering routine is changed to 45s ON time and 45min Off time
Every day perform one long misting cycle, 2min ON...
Nutrient tank is top-up with pure RO water + Hypochlorous [email protected]
05.04.2024
Second harvest day.. Purple Lemonade all three girls, second Tropicana Cookies also is harvested.
Lots off hard buds on this girls, frosty, fat, insanely hard buds. Odor in the room is fantastic 😋
Tomorrow on last day off week 9 , Wedding Cheesecake harvest, first Girl No.3 , then day after girl No.2.
Third Weeding Cheesecake is wait for a couple off days or full week. This girl is so massive, its a pounder in yield I think!

Likes
12
Share


@Cannibalgardens
Follow
Well she is putting on the height and buds have been forming up nicely ... Good to see some buds again in my tent been to long . The smell is fruity to me and she shows no signs of slowing yet lol those bottom branches are reaching up as well. I love resilience of these plants she takes transplanting well and ph issues all my fault ... I'm still learning but getting better every week and so will she ... Till next week cheers family and grow on ...

Likes
22
Share


@Basementganja
Follow
I will be growing her again, as I feel like I let her down, by letting her PH drift so low..
Other than that, she grew beautifully, and fumes of potency as you gaze at her!
She yielded more than I expected! She's not that far below my previously lowest yielding plant! :)
Likes
23
Share

@Flavors
Follow
🌾 Week 27 Harvest Update 🎉✂️
Harvest week is finally here — and what a run this has been 🙌🌱.
Both plants were taken down right on schedule, with trichomes sitting in that sweet spot: mostly cloudy with just a touch of amber ❄️✨. The flush did exactly what it was supposed to do, and the fade coming into harvest was clean and natural.
Red Hot Violet finished strong 💜🔥 — dense, well-stacked buds with rich coloration and heavy frost. Structure held up beautifully all the way through chop, a clear payoff from the long veg and training.
Amaretto Sour was an absolute treat to harvest 😮💨🍋


Likes
48
Share

@CCSAUTOGROW
Follow
Oh yeah!!!! Apple Strudel is finishing strong 💪. Her buds have swollen up nicely, are a beautiful lime green & super frosty. She smells really potent! Started to flush her a couple days ago so she'll be getting the chop here in a few days. Excited to see how she taste after a dry & cure.


Likes
15
Share


@UDUDUDUDU
Follow
A little early I think to post.
This seed grew into a plant & broke soil 2 days ago.
Now to watch this beauty grow up into a full sized big slice of cheese :)

Likes
95
Share


@Roberts
Follow
Northern lights is looking good. She is growing very vigorously. She has had great growth over the last week. She will be going to her flowering tent in about a week. Everything is going great. Thank you Divine Seeds, and Medic Grow. 🤜🏻🤛🏻🌱🌱🌱
Thank you grow diaries community for the 👇likes👇, follows, comments, and subscriptions on my YouTube channel👇.
❄️🌱🍻 Happy Growing 🌱🌱🌱
https://youtube.com/channel/UCAhN7yRzWLpcaRHhMIQ7X4g

Likes
1
Share


@Fccfarms
Follow
Start of week 4, day 22. Flowers are producing very fast and thick. Slightly ahead of the last grow. And I have definitely got the excessive growth under control so far 🤞.

Likes
8
Share


@Elpicor
Follow
To get higher temperatures I placed the growbox near the radiator, dimmer still at 25%, boiled tap water also this week, this guaranteed me an ideal for the beginning, from now on I will use mountain water which will allow me to use less fertilizer.

Likes
24
Share

@SwissKush
Follow
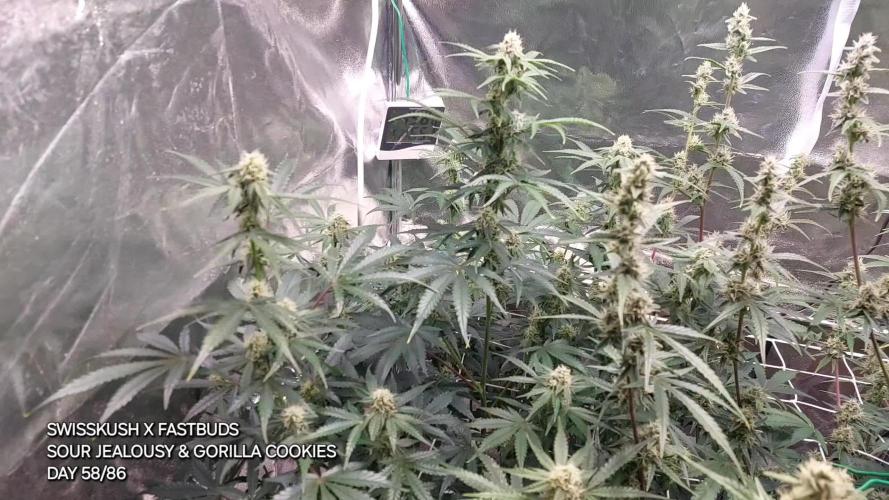
Day 57- doing well
2500ml heavy pre-flowering blend
Day 58 - Great!
5000ml - Flush with Plain water, getting ready for the Late Flower blend tomorrow
Uploaded a video
Day 59
3000ml Late Flower Blend - amazing foliar helath and bud development! We will have a great yield
Day 60
1500 plain water, then later in the day 1500ml Late Flower Blend, flowering is going very well, light at 100%
Day 61
1500ml Late Flower Blend, will folllow by 1500ml plain water
Day 62
1500ml Late Flower Blend, will folllow by 1500ml plain water
These are going to be super powerful buds!
Day 63
1500ml Late Flower Blend, will folllow by 1500ml plain water - growing very well!
Likes
15
Share


@JeyGanesha
Follow
Súper. Apple strudel.una delle tante varietà della fast buds.sapore intenso.profumo forte. ha dei fiori belli compatti.,belli da vedere e tanto più buoni da cremare SICURAMENTE 🤣😂


Likes
21
Share


@NSABND
Follow
Hi there start of week 11 today 😏
today (Day 78) the weather is cold and very high humidity because of rain 😲😩😕
Day 79 same shit weather then yesterday with very high humidity and rain 😵😲😵😲😵
Day 80 autumn has arrived 😱😨😰 cold with rain and high humidity 😲😵😭
Day 82 there are no Updates sorry 😵


Likes
6
Share

@_grower_rosinjuice
Follow
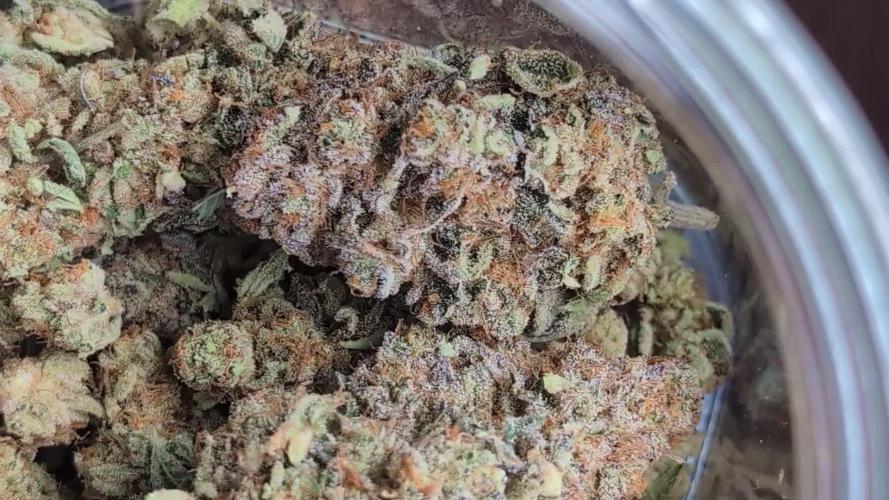
Smell likes Cherry with Gas🍒🍒🍒🍒⛽⛽⛽The cultivation of Arctic Cherry has been a complete success. The plants proved to be incredibly strong, stable, and resilient throughout the entire cycle in their 11L pots. The flower structure is impressive, with dense, rock-hard buds that show the elite quality of Perfect Tree genetics
Likes
9
Share


@masterofsmeagol
Follow
6/15 Everything was dry this morning but the bags STILL had some heft. Much lighter though so I decided to water. I didn't realize how cold the hose is so I'll have to usecthe water inside or premix it. I watered everything at least a half gallon. Things are going great. I'll update as I go.
UPDATE: IM GLAD I WATERED. ITS 73° OUT AND NICE AND SUNNY.
6/16 Foggy morning has turned into a sunny day! Plants are doing amazing. So glad I watered. I took a shit ton of pictures but they don't seem to be uploading. VERY FRUSTRATING TO TAKE THE TIME TO TAKE PICS AND VIDEO ONLY TO HAVE IT NOT UPLOAD.


Likes
25
Share


@Master_weeda
Follow
Stretch 10 centimètres
Jour52 légère defolliation et arrosage avec deux litres d'eau ph6.3
Petit rappel sur le meilleur cycle de lumière pour les autofloraisons
QUEL EST LE PLANNING LUMINEUX OPTIMAL ?
Le cannabis à autofloraison peut survivre avec à peine 5 heures de lumière du soleil par jour. Mais si vous voulez que vos plants s’épanouissent, atteignent le pic de leur puissance et produisent une lourde récolte, ils ont besoin d’au moins 18 heures de lumière par jour. Le planning optimal de lumière pour la culture en intérieur du cannabis à autofloraison est un 20-4 constant pendant tout le cycle de vie. Bien entendu, des plannings de 18-6, 20-2 et 24 heures non-stop ont tous leurs avantages, mais nous avons obtenu les meilleurs résultats avec le planning 20-4.
Les cultivateurs en extérieur peuvent potentiellement lancer la culture dès le printemps. Cependant, nous recommandons toujours de faire germer les graines et de cultiver les jeunes pousses en intérieur sous des lampes artificielles pendant une semaine ou deux pour obtenir les meilleurs résultats. Nous parlerons des options en extérieur plus en détail un peu plus bas.
LE CYCLE DE VIE DU CANNABIS À AUTOFLORAISON
La plus grande différence entre le cannabis à photopériode et à autofloraison est que l’horloge tourne pour une auto dès le moment où la coque de la graine s’ouvre. Le cycle de vie post-germination de la grande majorité des variétés à autofloraison modernes est de 8-12 semaines au total. Au contraire des variétés à photopériode, les autos n’ont pas besoin du planning lumineux courant 12-12 pour faire la transition vers la floraison. Une variété à autofloraison progressera dans son cycle de vie indifféremment du cycle jour-nuit.
CROISSANCE VÉGÉTATIVE ACCÉLÉRÉE
Il est presque impossible de délimiter la phase de la jeune pousse de la croissance végétale avec les variétés à autofloraison de nos jours. De plus, en 30 jours, la plupart exploseront soudainement en phase de floraison. Donner aux autos un bon départ, solide et sain est un facteur critique pour une culture réussie. Beaucoup de choses peuvent se passer pendant une semaine avec un hybride à autofloraison vigoureux en culture. Il n’y a pas non plus beaucoup de temps pour la transplantation. Nous recommandons d’utiliser notre kit de germination ou de planter directement dans les premiers et derniers récipients dès le début. Des pots/récipients en plastique de 10-20 L avec de nombreux trous de drainage au fond sont parfaits. Les Air-Pots sont encore mieux. Beaucoup de cultivateur découvrent à leurs dépens que les petits pots ne sont pas durables pour les hybrides autos modernes plus grands.
Préparez-vous à devoir ajuster quotidiennement votre lampe de culture pour éviter de brûler le feuillage. De plus, tout comme les variétés à photopériode, les conditions environnementales optimales pour les jeunes plants à autofloraison sont des températures entre 20 et 25 °C et une HR dans une fourchette de 50-70 %. En outre, les besoins en nutriments seront considérablement plus faibles que les variétés à photopériode. Il n’y a donc aucune bonne raison de ne pas cultiver bio. Généralement, les autos préfèrent avoir un milieu de culture légèrement fertilisé et bien aéré. Les terreaux légers et/ou le coco sont des substrats fortement recommandés.
La plupart des cultivateurs préfèrent des lampes CFL blanc chaud, LED et MH pour la courte période végétative. Cependant, les lampes HPS à double spectre sont tout aussi efficaces et probablement plus pratiques à utiliser.
FLORAISON RAPIDE ET FÉROCE
Dès que vous pouvez voir les pistils pousser à partir des premières fleurs, vous pouvez vous dire qu’en 45-60 jours, les plants finiront le cycle de floraison et seront prêts à la récolte. Que vous soyez prêt ou non. Mais vous serez prêt, car vous aurez fait les ajustements nécessaires en temps et en heure.
Les apports en engrais de croissance végétative à un dosage faible à moyen seront remplacés par des nutriments pour la floraison et des doses appropriés de compléments et boosters de floraison. Une fois de plus, un régime alimentaire spartiate est recommandé. Pas besoin de changer le planning des lampes, car vous allez suivre votre planning originel jusqu’à la récolte. Mais il faudra vous assurer que les températures ne dépassent pas les 28 °C et vous devez réduire votre HR vers une fourchette plus basse de 40-60 %. Les plants vont s’étirer à des degrés divers. Quoi qu’il en soit, vous devez faire attention et toujours maintenir une distance optimale entre la lampe et la canopée. Un ensemble de cordages ou de crochets réglables rendront la tâche bien plus aisée.
Ne vous imaginez pas que toutes les autos développeront une structure courte de buisson, à moins que le sélectionneur ne donne des données qui le suggèrent.
Naturellement, les deux dernières semaines de floraison devraient être réservées à un rinçage en profondeur du milieu. De l’eau pure, ou une solution de rinçage légère fonctionneront très bien. Quand la majorité des poils ou pistils sur les fleurs auront changé du blanc à l’orange/rouge, vous devriez passer au rinçage. Ne sautez pas cette étape finale critique. Vous méritez les fleurs les plus savoureuses, sans contamination.
COMMENT LES AUTOS RÉPONDRONT AUX TECHNIQUES DE TAILLE ET DE PALISSAGE ?
La réponse courte : très bien ! La plupart des variétés à autofloraison de nouvelle génération répondront très positivement au LST. Et tant que vous taillez tôt, l’étêtage et le fimming peuvent multiplier les tiges de têtes et en plus booster les rendements. De plus, la méthode ScrOG peut être combinée avec toutes ces techniques pour un rendement maximum. Cependant, la culture à grand volume utilisant la méthode SOG est probablement le style de culture le plus populaire à présent. Un nombre croissant de cultivateurs d’autos expérimentent avec les mêmes pratiques courantes de taille et de palissage à haut rendement que les cultivateurs de cannabis à photopériode utilisent.
Les cultivateurs débutants ne devraient probablement pas se lancer dans une taille ou un palissage intensif ou excessif avant d’avoir de l’expérience.
Cependant, plier un peu les pointes de croissance pour créer une canopée plus plate ne peut pas nuire aux rendements. De même, une défoliation minimale pour augmenter la pénétration lumineuse ne stressera probablement pas des plants en bonne santé, tant que vous vous limitez à l’élimination des grosses feuilles nourricières qui font de l’ombre aux sites de floraison.
May the force be with you 💪
Likes
8
Share


@Grow_for_Happiness
Follow
As we round the corner on this week the finish line is starting to come into sight! Ending the week on Day 68 from seed and these girls are really starting to shine! Front left is just a crystal packed beast with golf ball sized buds (or bigger) well spaced out along the stem, more like blueberry tends to grow. Front right is showing very similar traits, while back left and right are larger more connected buds, more like Slimer tends to grow. Cool to see the two different bud structures in the same grow, fun thing with autos you know they will be close but always some differences! Buds are just plumping and firming, getting ready for their big day on another few weeks.
Water intake has slowed as expected for this stage in life, 32L every four days instead of every three. Was an easy week work wise, just a light defoliation of mainly the back two plants, probably 20 or so leaves each. Back two are still seeming to be maybe a week behind front two, but they seem to be catching up fast. May have to get the second reservoir set up at the end of need to ween first two off the feed earlier than last two. Good thing is I have three full sets of AutoPots so not a problem, although I may have a problem with collecting grow gear hahaha. Can't help myself, I see stuff selling for super cheap used or clearance from stores closing and think "sure I could use another set of those". Got my last set of 15L pots in upgrade packs on clearance. Each pack came with the pot, the tray, and the 5.0 valve with all the fixings for just !!! Honestly how do you say no to that I don't know.
Lights 90% @ 16" @ 750-800umol/s
Water 32L every four days
UV lights one hour per day mid cycle
6" Exhaust 30%
4" Intake 50%
6" oscillating fan x2 50%
