


Likes
7
Share


@Grisly
Follow
Harvest 2024
Total Hash: 102g
Total Kief: 95g
Total Flower: 3868g/138oz/8.6lb
Total Yield: 4065g/145oz/9lb/4kilo
———-/-////////—vs———-/////————/
Sugar Diesel #1: 117g
Sugar Diesel #2: 313g
White widow Clone: 14g
Dual OG:
112g
LA Affie North Field: 248g
Granddaddy Purple N: 63g
Black Raspberry Kush N: 210g
————————————————-
Total North: 1077g/38oz/2.5lb
————————///——/—————-/
Fruity Pebbles: 184g
Granddaddy Purp S H2: 54g
Granddaddy Purp S H1: 275g
Granddaddy Purp Total: 329g/12oz
Black Rasp Kush S H1: 160g
Black RaspKush S H3: 70g
Black Rasp Kush S H2: 511g
Black Rasp Kush S H4: 17g
Black Rasp Kush S: 758g/27oz
Blue Cheese S H1: 281g
Blue Cheese S H3: 83g
Blue Cheese S H2: 285g
Blue Cheese Total: 649g/23oz
Dr Grinspoon S H1: 485g
—————————————————-
Total South: 2405g/85oz/5.3lb
————————///——/—————-/
North Popcorn: 148g
BC Popcorn: 100g
GP Popcorn: 73g
BRK Popcorn: 65g
—————————————————-
Total Popcorn : 386g/14oz/0.9lb
————————///——/—————-/
Trim: 8lb
—————————————————
————————///——/—————-/


Processing
Likes
14
Share


Processing
Likes
14
Share


@WooderIce
Follow
Great veg week. Its an increased nutrient week. Only issue was slightly high ph in soil, so I added a little more vinegar to my water. On previous grows, I would do my LST tie downs on approx day 31-33, but growth was really good, and over 10" on 7 of 9 plants, so tied down early on those 7, on day 28. Great color and stalk girth so far.
Likes
28
Share


@AlpAge_Cino
Follow
05/31/2024 : flowering week 8, almost done but BB isn't full yellow yet and there are still too much clear TC on flowers.
I may harvest main colas at the end of this week and let the rest for another week... or cut everything and make some bubble hash with lower parts.
Anyway, it smells very good now! 😁
06/03/2024 : as top buds were foxtailing, I cut everything that turned purple and got almost 240g wet material (now in dryer for about a week).
I reset LED to 30cm from new flat canopy, with DLI 36~45. There are still a lot of buds to come!😍


Likes
9
Share


@Warhead
Follow
Chopped down the large colas and threw the bottom buds in the freezer to be made into bubble hash this weekend. I will update more after drying.
Update: 💨Puffed a couple joints and MY MY that is a tasty treat! Notes of 🍍pineapple and 🌺lavender. The high is very heady and spacey feeling yet pretty mellow compared to other sativas I enjoy. Insatiable munchies as well. You’ll be grazing all day long. Fantastic personal strain for recreational use outdoors.

Likes
43
Share


@Esoteric_growing
Follow
Hung them to dry today, very happy to say I have found 3 very very good keeper phenos which doesn’t surprise me as I have grown many seeds of this before. The pictures and video tell more than words can say.
I have named my favourite pheno ‘john wayne’ as I have a convoy swagger about my walk every time I look at her😂 I lost this pheno a few months ago and so relieved to have her back plus two other great phenos.
Barneys absolutely provides some real fire genetics and I have been a fan since blue cheese and pineapple chunk were released many years ago.
Likes
17
Share


@FatalFarmer
Follow
Somewhat slacking with detailed photos from this week, been busy with the holidays/ family etc. hopefully should have a little more time to take some good ones for next week..
Not much to say, they are getting quite big! some more lower branches and leaves were removed and I've been watering every other day, about .5-.75 gal per plant until I see some run off and the top looks evenly moist.
End of week 1 of flower and there are Lots of white pistils, a pleasant smell (controlled by my filter/vent) and some major stretching happening on the strongest branches. Already raised the light by a few inches twice now too keep the distance over 12 inches from these stretchy ones! 😏
Also found a large healthy looking seed in my grinder that I've saved (Mac 1 supposedly, its good smoke)


Likes
20
Share


@ukterpdoc
Follow
LST DONE TODAY NEARLY ALL OF THEM 2 JUST SEEM POINTLESS TO PULL AROUND BUT

Likes
30
Share


@Mazgoth
Follow
We are close for 2 months,one
Month for harvest far,what do you think guys

Likes
35
Share


@Jacks_Pot
Follow
The 3th week of 12/12 is history and flowering has entered the grow room. 😋
I marked day 53 (day 17 of 12/12) as the first day of actual flowering.
Everyday I've checked if there were fungus gnats trapped on the yellow sticky traps and I've spotted a few. So not a total infestation.
I've also checked for signs of hermies and I haven't seen any.
I've had one a few years ago and it pretty much ruined the whole grow. Seeds everywhere. But that was another breeder and strain.
Under the screen I did some final pruning and above a minor defoilation.
The Runtz are stretching nicely and the screen is filled pretty much like I wanted it to.
Gonna leave them alone now, done with bending those shoots under the screen.
This weeks temperatures stayed between 20,6°C (69°F) and 24,2 °C (75,5°F) and humidity levels between 44 – 56 %
Light pressure was raised from 244 watt at 70cm (27 inch) to 260 watt at 63cm (25 inch).
Their diet consisted of ph adjusted tapwater (ph 6,38 – ec 0,49) most of the week.
They were barely fed for 1 day. Gonna keep it that way as long as I don't see any signals of shortages or surpluses.
Naturally, ec leves will rise next week but one day of feeding seems enough for now.
Smell is coming in slightly, but the CAN-lite carbon filter is doing it's job.
There's a 600m³ one hanging in the grow room connected to a 550m³ Airfan foam softbox that's dimmed at 40% since the start of this grow.
That was the most important info for this week. Up to next week's flowers!✋
Do you want to grow this strain?
👉 https://www.zamnesia.com/6000-zamnesia-seeds-runtz-feminized.html 👈

Likes
3
Share

@Nebuloso420
Follow
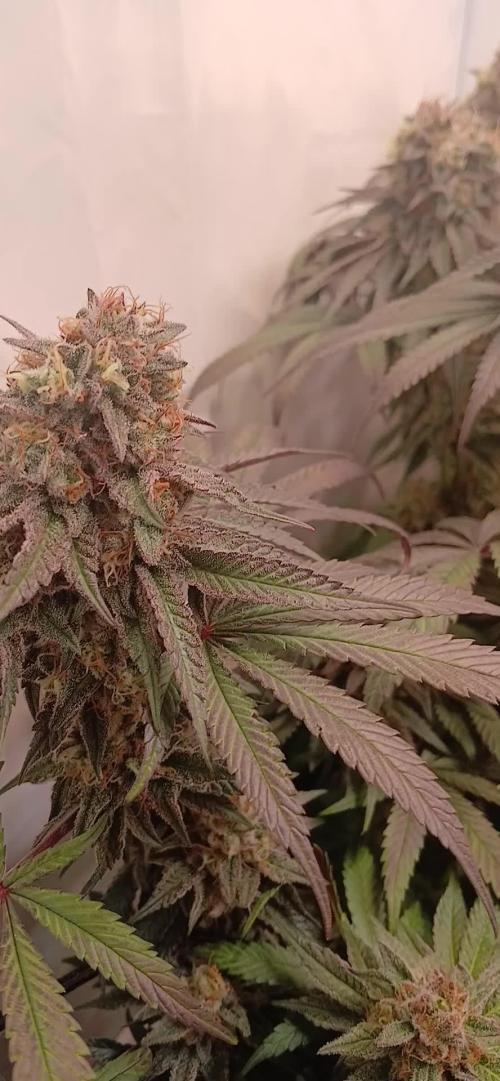
31.05.2026
End of week 8.
Temperatures were high this week.
During the day she had an average of 30 C.
Which is " a little hot" in this stage but fuck it. Terps will still be good.
Oldschool flavor.
Removed some of the bigger leaves.
But the air-humidity was low, mostly between 33-50%
This week she got about 1.5g of Compactor Boom( 0-0-60) once, on 2 liters of rainwater, which gave me an EC of 1.2
No more organic Hesi BioBloom.
Sometimes Liquid weight which is a blend of sugars to push microorganisms and soil life.
Today she only got 4ml of Matrix Enzyme on 2 liters of rainwater.
Fade is not visibly strong yet, she is still feeding from dry amendment.
Buds are very solid and hard like a rock.
And thats the plan for next week which should be her last week : only rainwater with Matrix Enzymes.
Coming week temperatures should go down a bit but air-humidity will be high.
Lets see....

Likes
2
Share


@velouria
Follow
It's happening! It's going to be a high of 32C/90F and so very sunny, so why not train them today? They're both 22 days from seed as of training start.
#2 got FIMmed: So I was planning on topping one but ended up choosing to FIM it instead because it's lower stress. I have no idea what will happen now. I've never done either before. I chose #2 because it seems to be having an easier time producing leaves so far. I have a video of the cut. I used a pair of bonsai shears. I was really second guessing that I actually had to cut the leaves? I missed one, and it just felt weird to go back in and cut healthy growth, even though I'd already took off most of the newest leaves. I am not convinced I did this correctly because I don't understand what happens with the tiny new node I didn't cut. We will see.
#1 got LST'd: With LST, I maybe should have done it sooner. The issue is the leaves are wide enough that they would be touching the soil if I really bent it like I was planning. I even undid it and tried the other direction just to see that it was even wider across. I propped a leaf on the tie and will have to adjust it again tomorrow once the crown has righted itself. I also read that it's not good to keep them in ties once they've gone into flower for autos because it stresses them, but with two plants I had LST'd, removing the ties just resulted in them eventually straightening the stems back out. So I'll not do that again for this one.
I'm also a bit obsessive about measuring my plants, and that's harder with LSTing. I have a ribbon tape measure I use to measure the main stem length instead of the actual height of the plant.
Likes
4
Share


@blaze_fpv
Follow
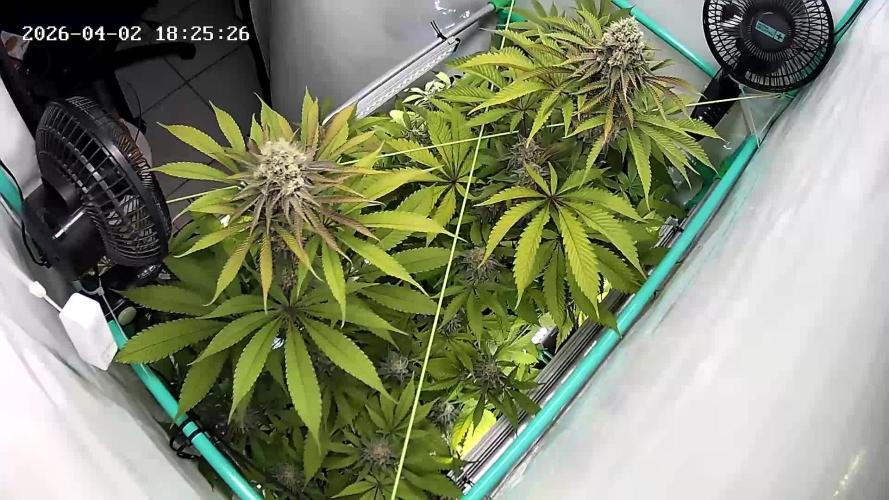
I came back to the fridge after 6 days and stretch was running massively.
They grew like 20cm in 6 days
I changed my climate to:
27° C 60% rlf in order to adapt to early flower
Day and Night same
45% light about 580ppfd
Still running the water in a circle.
Adjusted the scrog a bit in order to fill the space more
They eat like 1100ppm CO2 an hour 😎
__________________
Update: last 2 videos show day 8 of flower ,🤙🏼
Decided to give them a heavy defoliation due to it being a closed loop system and them emitting tons of humidity.
So far so nice 🏼

Likes
21
Share


@cal917
Follow
Did last defoliation besides maybe some leaf stripping. feeding plants mostly microbes. been feeding very light on the nutes. Havent had any problems with defeciencies.

Likes
24
Share


@Mr_Awesome_Badass
Follow
Training has started. I know it's early but this is gonna be a cannabonsi so it's time.
Going to be fun to mess with this thing.

Likes
4
Share

@Jabbamo
Follow
_______________________________________________________
Mi. 25.3.
- 3,5 Liter pro Pflanze gegossen (ca. 300ml Drain)
- Rainpoint Bewässerungssystem eingesetzt
- 1L auf 3 Pflanzen Nährlösung per Hand angegossen
- Programm: 3min. ON / 3min. PAUSE / 3min. ON
- 2L pro Zyklus.
- 1L klar spülen zur Systemreinigung
1,2 ml / Liter "Calmag"
1,5 ml / Liter "Bio Grow"
4,0 ml / Liter "Bio Bloom"
4,0 ml / Liter "Top Max"
Ph 6,2 / 790 ppm
_______________________________________________________
So. 29.3.
- 3,2 Liter pro Pflanze gegossen (ca. 200ml Drain)
- 1L Nährlösung per Hand angegossen
- 8L Nährlösung per Gießsystem
- 0,5L klar spülen zur Systemreinigung
1,2 ml / Liter "Calmag"
1,5 ml / Liter "Bio Grow"
4,0 ml / Liter "Bio Bloom"
4,0 ml / Liter "Top Max"
Ph 6,2 / 770 ppm
_______________________________________________________

Likes
7
Share


@Onlygrow99
Follow
Bien pues ya tenemos en marcha el 2º seguimiento del perfil...
Son 6 white truffles, 6 Apple&Bazzokies de GBSTRAINS y 5 GG4 de GBSEEDS que se empezaron a germinar el 15 de mayo por la tarde sobre las 19:00
Todas nutridas con BOOM nutrients jejeje
Todas las semanas iremos viendo los cambios y la evolución, los riegos y las flores que vendrán :)
El 16 de mayo del 23 sobre las 07:00 de la mañana pase las semillas del vaso con agua, a los tapers con servilleta. Ahí estuvieron 24 horas mas haciendo un total de 36 horas germinando para después,
pasarlas a las macetas de 1 litro.
22/05/23 actualizado, meto unas fotos mas de como van las semillas después de 7 días desde que se empezaron a germinar en el vaso de agua.
A día 22/05/23 llevamos 7 días desde que se empezaron a germinar.
ACTUALIZACION DE ESTADO:
30/05/23 Subo unas fotos después de 8 días.
Llevamos 15 días desde que se empezó a germinar las semillas en vaso de agua.
A partir de aquí, empiezo a contar semanas de crecimiento.
Trasplantaremos a maceta definitivas de 7L dentro de una semana o 2.
