
Likes
Comments
Share


@gr3g4l
Follow
Aunque dejaron de crecer a lo bestia como lo hicieron en preflora, 25-30 primeros dias a 12/12h. han seguido creciendo hasta ahora y esta semana me tocó volver a calzarlas todas para que estubieran a una misma altura.
Esta semana viene bién cargadita de nutrientes con tres riegos , dos o tres dias entre uno y otro, según veo o creo que lo necesitan.
Seguiré regando mitad mitad, agua de grifo / destilada . El primer riego de la semana 3 ml/L de top Candy y un pelin de ácido cítrico para bajar el PH. EC 1,03 , PH 7,00
El segundo riego con Bud y Bloom, 1,5ml/L y 3ml/L respectivamente más ácido cítrico para bajar PH. EC 1,30, PH 6,9
El tercero con Delta9 y callMag. 4ml/L. y 0,5ml/L respectivamente más ácido cítrico para baja PH.
última poda de hojas abanico, 2 o 4 de cada y poda de yemas para que no compitan con los apicales que reciben luz. También me tocó fijar mejor los troncos con alhambre de jardineria para que estos no se doblen por el peso y pierdan por aquí algo de energia.
No tengo claro si fuí capaz de disminuir el exceso de nutrientes por lo que durante toda esta semana y hasta final de flforación se mantiene una EC baja. mezclando mitad agua del grifo mitad destilada y así consigo mantener esa EC .
El haber regado en crecimiento y principio de flora con un agua tan dura y alcalina hizo que las plantas muestren el aspecto que muestran

Likes
25
Share


@Densko
Follow
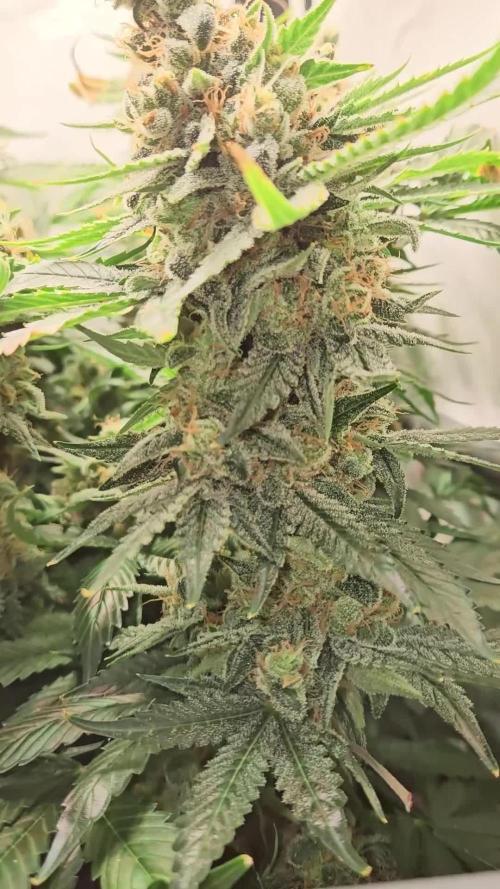
Boy oh boy, the final day of the first Medusa F1 Hybrid 1/5. Seed to harvest in 93 days.
The first medusa F1 grew super fast. Her vegetative period was very short, showing white pistils at day 18 already, but grew into a beautiful lady.
The first medusa was only subjected to LST and a little defoliation. The other Medusa plants from my diary (2/5 and 4/5),were topped and this definitely increased the amount of flower sites.
Nevertheless, she grew thick and fat with heavy buds smelling like a sweet petrol station.
The pistils turn bright orange and many calyxes are formed with hardly any leaves in between. I noticed after week 11 she started producing new calyxis with white pistils and therefore I waited a bit longer. I would recommend this and wait a bit longer to see if it happens for you too.
Some trichomes were starting to turn amber and I maybe could have waited a little longer, also for the lower part to develop more.
She was cut down on the 18th of July and was placed in my dark dry tent for 13 days at a temperature of 18 °C and a humidity of 60%. A long and slow dry is important to preserve terpenes.
After 13 days, on the 31st of July, the branches were making a cracking sound when bending, so I decided to take the branches out of the drying tent and trim them.
My 4 x 200W lights (on the box) only pull 50W from the wall so I think they are not super good.
I made pictures with a Nikon camera and a white background.
I smoked some and she tastes peppery with a sweet aftertaste. I will smoke more after a good long cure for at least 2-4 weeks in my jars.
Check the progress of my other medusa F1 diaries and see the full experiment if topping is beneficial for these F1's.
I would recommend trying out these amazing genetics and see for yourself.
Great job Royal Queen Seeds for breeding these cultivars.

Likes
13
Share


@Grownewgenetics
Follow
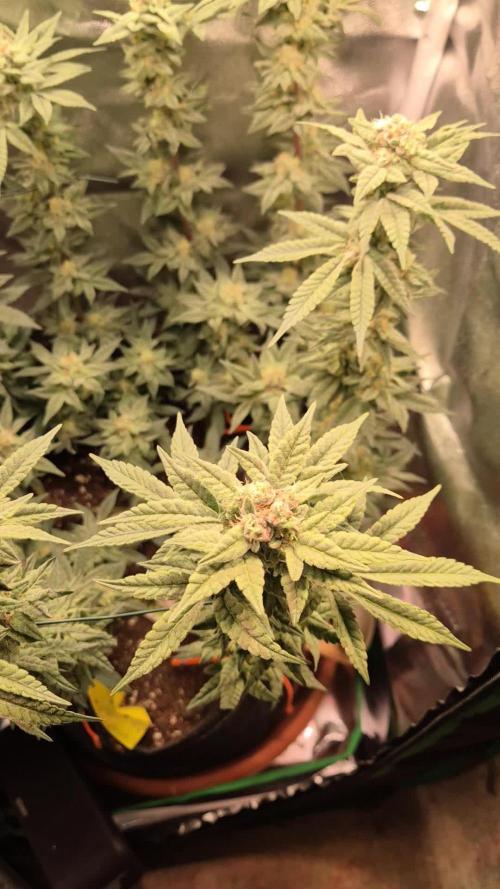
These week we see a big bud evolution, they're strong and healthy, i can not wait to tryout more strains from SweetseedS.
The p.p.m is also a little more higher than the last week because we add 2 ml. Of biobizz biobloom on our weekly feeding and all ready for the 3 week of flowers

Likes
119
Share


@DogDoctorOfficial
Follow
Greetings, fellow cultivators and botanical enthusiasts! Buckle up for the Week 6 Veg Report, where the saga of Jealousy unfolds with even more green grandeur. It's been an absolute thrill, a week of excitement, and a dash of horticultural finesse.
First things first, let's talk about the latest addition to the Jealousy fanfare – the installation of a Scrog net. Oh yes, my friends, we've entered the world of controlled chaos, guiding our leafy companion into a magnificent dance beneath the net. It's like creating a green tapestry of foliage, where each leaf has its own place in the botanical ballet.
This intricate web not only adds a visual spectacle to our growing sanctuary but also serves a practical purpose. It encourages the growth of an even canopy, ensuring that every bud site gets its fair share of light. It's like orchestrating a symphony of sunlight, allowing Jealousy to bask in the full glory of the grow room spotlight.
And speaking of spotlight, let's talk about a little nutrient boost I introduced to our plant banquet – CalMg. It's like giving our green diva a backstage pass to the nutrient extravaganza. Calcium and magnesium play crucial roles in plant health, contributing to cell structure, enzyme activation, and overall nutrient uptake. It's the secret sauce for ensuring our Jealousy is getting that extra touch of botanical TLC.
Now, let's dive into the art of bending and twisting. It's not a yoga class for our plant, but rather a strategic maneuver to shape and guide her growth. By gently bending and twisting the stems, we're encouraging an even distribution of energy and promoting the development of multiple bud sites. It's like teaching our green companion a choreographed routine, ensuring she takes center stage in the grand spectacle of growth.
As we revel in the green symphony of Week 6, let's extend our heartfelt thanks to Zamnesia and Plagron for being the guiding lights on this verdant journey. Their support is the cornerstone of our horticultural adventure.
A round of applause to the Grow Diaries community – your shared experiences and camaraderie continue to elevate our collective knowledge.
To my fellow contestants and growers, may your plants continue to thrive, and may the joy of cultivation be a constant companion. Here's to a week of Scrog magic, nutrient symphonies, and the artful dance of bending and twisting. Stay green, stay inspired, and keep cultivating those dreams!
As always, thank you all for stopping by, for the love and for it all. This journey of mine would just not be the same without you guys. The love and support are very much appreciated, and I feel honored and blessed with you all in my life !!!
With true love comes happiness. Always believe in yourself and always do things expecting nothing in return, with an open heart. Be a giver, and the universe will respond in ways you can’t even dream of .
Friendly reminder: all you see here is pure research and for educational purposes only.
Genetics - Jelousy @Zamnesia
Nutrients @Plagron
Light - @viparspectra P2000
Room size - 3x3 - 0,9x0,9

Processing
Likes
10
Share


@MichaelMan
Follow
Using 100w 6500k 25$ light for vegetation. Let’s see how well it does.
I’m going to build nice budget grow room from my old shelf. It’ll be ready next week.
Plants are looking very healthy


Likes
Comments
Share

@AlpenZilla
Follow
Strawberry AK – Current Status
At this stage of the grow, the Strawberry AK is progressing as expected without any major surprises.
Overall development remains stable and consistent.
There are currently no significant changes or issues to report. The plant continues to mature steadily, and intervention is kept to a minimum.
🌿 Current Routine
The grow is mostly on autopilot at the moment. Care is limited to watering roughly every four days while maintaining stable conditions in the tent.
🧠 Current Approach
The plan from here is simple: continue observing and give the plant the time it needs to fully finish before harvest. 🌿


Likes
14
Share

@Erik99
Follow
Esta semana como en la anterior se puede apreciar que las flores continúan aumentando de tamaño rápidamente,
De nutrientes solo le he subido un poco la proporción de el Acti-Vera, el olor ha aumentado bastante.
Likes
19
Share


@Adam420
Follow
May9th
The tallest one is almost 3ft tall and it’s just the beginning of this outdoor grow.
Last year I haven’t even started and ended with 3-4ft plants. So 3ft plants as a head start is a winner in my book


Likes
17
Share


@Grey_Wolf
Follow
Mexican Joker
Cannabiogen seeds Purple Mexican
21st August 2020
This is a seed that took ages to germinate , but looks quite healthy now 😎
I'll be growing it 12/12 from Seed and with my 100% Organic soil mix
I'm not expecting to get lots of weed, for me it's pretty much just a quick run to sample
the genetics before deciding what to grow this summer.
Also I'll be extremely busy moving Houses halfway across the state and all of my
grows may get neglected for a few days here and there whilst that happens.
Basically If I really like the strain after Ive finished growing it and the smoke is great then I will
Run it again in higher numbers to maybe find a keeper plant 👊
I named the Diary after the Hilarious South Park episode "Mexican Joker"
And I absolutely mean no offence to anybody from or living in mexico
I just couldnt resist after getting this strain and then I saw that episode 😆 Old Randy Marsh is the best Lol
As for the Purple Mexican Variety it's from an awesome mob called Cannabiogen &
Ive heard quite a few good reports regarding them and this variey in particular as it is created from a cross with an oaxaca Strain 👌
Anyway That's enough talk.. Lets Grow!!
Thankyou For Stopping By 👍


Likes
56
Share


@Aedaone
Follow
The temperatures, humidity, and watering volume(if measured) in grow conditions are all averaged for the week. The pH is soil pH. Any watering done by me is well water which is 7.6 pH and 50° F. Any listed nutrients are ml/gallon of soil.
Day 1 we had a high temperature of 90 with lots of sunshine. I gave them 2.5 gallons of water per pot.
Day 2 we had lots of sunshine and a high temperature of 91°F. I watered twice today about 2-2.5 gallons each time.
Day 3 we had high temperatures of 86°F and mostly sunny skies. I watered 2.5 gallons per pot.
Day 4 we had mostly sunny skies with a high temperature of 88°F. I watered about 2.5 gallons from the water hose. I added 50ml of Ferrous Sulfate top dressed to each pot. I topped these pots off with premixed soil like I used in the pots at planting Week 1.
Day 5 we had a high temperature of 88°F with mostly sunny skies. I watered 2-2.5 gallons once today.
Day 6 we had high temperature of 89 with mostly sunny skies. I watered 2.5-3 gallons per pot.
Day 7 we had high temperature of 91 with mostly sunny skies. I watered 2.5-3 gallons per pot.
This week was a success. The plant didn't gain much additional height this week. The tallest was 54". I added a little iron, and the soil I added had premixed nutrients. Next week I'll most likely add some blood meal to the watering to boost the veg. They're loving these hot summer days.
Likes
17
Share


@Lazuli
Follow
Week 3 flower (day 21)
I defoliated them a few days ago and now they dont need any more training
I keep the feeding at 500ppm
1:1 calmag/nova bloom
I will bump it to 650 once they start swelling

Likes
17
Share

Likes
1
Share

@Elron_mc_Bong
Follow
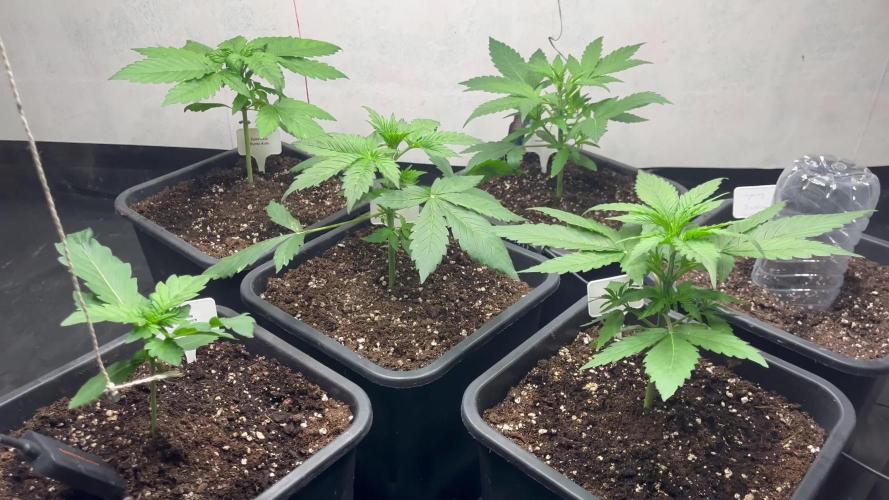
Woche 3 (4seit Keimung) – Vegetationsphase startet richtig durch
Die Mädels sind jetzt offiziell in Woche 4 angekommen und man merkt deutlich, dass sie langsam in die nächste Phase gehen. Das Wachstum hat in den letzten Tagen nochmal spürbar angezogen und die Struktur wird von Tag zu Tag stabiler.
Alle Pflanzen stehen aktuell in 15L Töpfen und entwickeln sich insgesamt sehr gleichmäßig, auch wenn man langsam erste Unterschiede zwischen den Strains erkennt.
⸻
Pflanzenentwicklung
Die meisten Pflanzen zeigen jetzt eine schöne, kompakte Struktur mit kurzen Internodien und kräftigen Stämmen. Besonders die GMO bleibt schön gedrungen, während z. B. Blueberry und teilweise Runtz etwas mehr nach oben wollen.
Die Blätter sind satt grün und vital, das neue Wachstum ist teilweise etwas heller, was aber bei dem Tempo absolut normal ist.
Insgesamt wirken alle Pflanzen gesund und stressfrei.
⸻
Licht & Setup
Die Lampe wird weiterhin schrittweise erhöht (aktuell moderat gefahren), was sich positiv auf den Wuchs auswirkt. Kein Stretch, keine Anzeichen von Lichtstress – genau so soll’s sein.
Momentan steht die SF3000 bei 50% Leistung mit einem Abstand von 45-50cm.
Der Abstand passt aktuell gut, ich werde die Intensität weiterhin in kleinen Schritten steigern.
⸻
Klima
Die Bedingungen sind aktuell ziemlich stabil:
• Temperatur: ~20–23°C
• Luftfeuchtigkeit: ~60–65%
• VPD: ~0.9 kPa
Damit liege ich ziemlich genau im optimalen Bereich für die Vegi.
⸻
Gießen
Gegossen wird weiterhin kontrolliert im äußeren Ring, um die Wurzeln nach außen zu ziehen. Die Bodenfeuchte liegt aktuell bei ~34%, was sich als sehr guter Wert herausgestellt hat.
Man merkt jetzt schon, dass der Wasserverbrauch langsam anzieht. Liege jetzt bei 500ml jeden 3. Tag.
⸻
Nährstoffe
Aktuell läuft noch alles über die vorgedüngte Erde.
Da jetzt Woche 4 gestartet ist, werde ich in den nächsten Tagen anfangen, den Green House Bio Bloom vorsichtig einzuarbeiten, damit die Nährstoffe rechtzeitig verfügbar sind, wenn die Vorblüte einsetzt.
⸻
Ausblick
In den nächsten Tagen wird sich entscheiden, wie stark ich eingreife.
Leichtes LST ist geplant – vor allem bei den etwas streckfreudigeren Pflanzen, um ein gleichmäßiges Canopy zu bekommen.
Ansonsten gilt weiterhin: beobachten, reagieren, nicht übertreiben.
⸻
Fazit
Ich bin aktuell echt zufrieden mit dem Stand.
Die Pflanzen sehen gesund aus, das Setup läuft stabil und alles entwickelt sich genau in die Richtung, die ich mir vorgestellt habe.
Vielen Dank fürs reinschauen meine growmis, Updates folgen 🏻
Likes
117
Share

@Growingdaddyo
Follow
7. Woche der Blütezeit und das letzte Drittel startet. Sie macht sich weiterhin wunderbar, die buds wachsen und es gibt keinerlei Probleme.
Weiter so gasige Lady..
Likes
14
Share


@Terpyboyz
Follow
So this grow came to a finshed but I had a. Few issues that’s held me up from finishing up the diary, but in due time I will reupload it all in order soon. But over all I will also update with a final weigh in of each strain produced so stay tuned 🤙🏻🔥


Likes
5
Share


@Godsgrace
Follow
👽We are continuing. I will not rush to transfer to flowering, I want to try to make the maximum circle (if there is enough space in the box).
💪🏻 I continue to give power root, pure zym, sugar royal. I will water more often, every 2 days.
🦈I will give Fish force 1 times a week.
😤Oops, we had a pickle on the 38th day. I neglected to constantly measure the PPM level, and he gave me 1100. I spilled 400ppm (150 calmag + A + B) on the entire volume of the pot. And immediately after that I gave him 750, as usual, with all additives except fish.
