The Grow Awards 2026 🏆
Likes
Comments
Share
Legend Timestamp: 📅 EC - pH: ⚗️ Temp - Hum: 🌡️ Water: 🌊 Food: 🍗 pH Correction: 💧 Actions: 💼 Thoughts: 🧠 Events: 🚀 Media: 🎬 D: DAY, G: GERMINATION, V: VEGETATIVE, B: BLOOMING, R: RIPENING, D: DRYING, C: CURING ________________________________ 📅 D105/R01 - 28/02/24 ⚗️ EC: 0.9 pH: 5.2 🌡️ T: 21-25 °C H: 50-65 % 🌊 🍗 💧 💼 🧠 Ripening starts 🚀 🎬 Added timelapse and screenshots and monthly rate of T-H and VPD 📈📈📈 from TrolMaster App Translate ________________________________ 📅 D106/R02 - 29/02/24 ⚗️ EC: 1.2 pH: 6.7 🌡️ T:21-24 °C H: 50-65 % 🌊 🍗 💧 Added pH+ 💼 
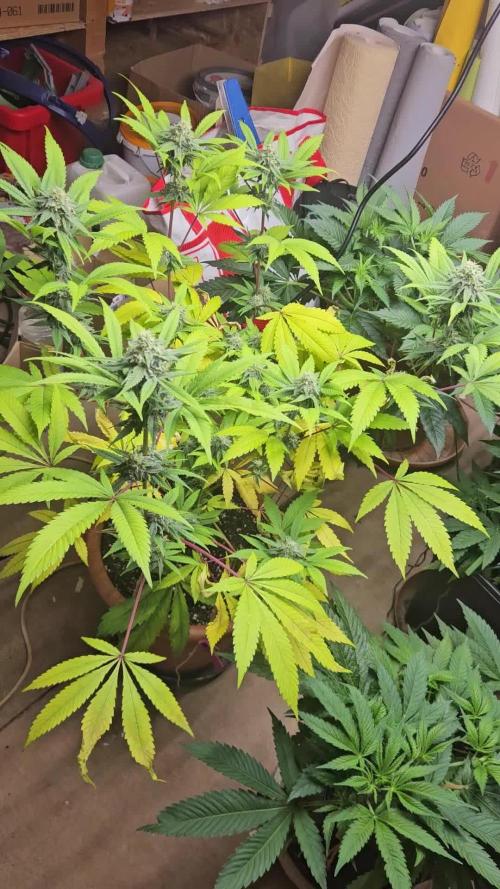
🧠 If someone who followed the diary from the beginning is asking himself what about mother plant "Mamma Aglio", here I posted some picture of her which demonstrate the difference between a bad and a good grow 🚀 🎬 Added pics of Nicole and pics of "Mamma Aglio" to show the difference between a bad and a good grow with sounds and TrolMaster logo. Added usual timelapse and screenshots. ________________________________ 📅 D107/R03 - 01/03/24 ⚗️ EC: 0.8 pH: 6.4 🌡️ T: 20-24 °C H: 45-65 % 🌊 2L 🍗 💧 💼 🧠 🚀 🎬 Added Timelapse and screenshots. 4 pics added ________________________________ 📅 D108/R04 - 02/03/24 ⚗️ EC: 0.8 pH: 6.7 🌡️ T: 20-25 °C H: 45-70 % 🌊 1L 🍗 💧 💼 🧠 🚀 🎬 Added Timelapse ________________________________ 📅 D109/R05 - 03/03/24 ⚗️ EC: 0.8 pH: 6.7 🌡️ T: 21-25 °C H: 45-65% 🌊 RES Changed 💦💦💦 🍗 💧 💼 
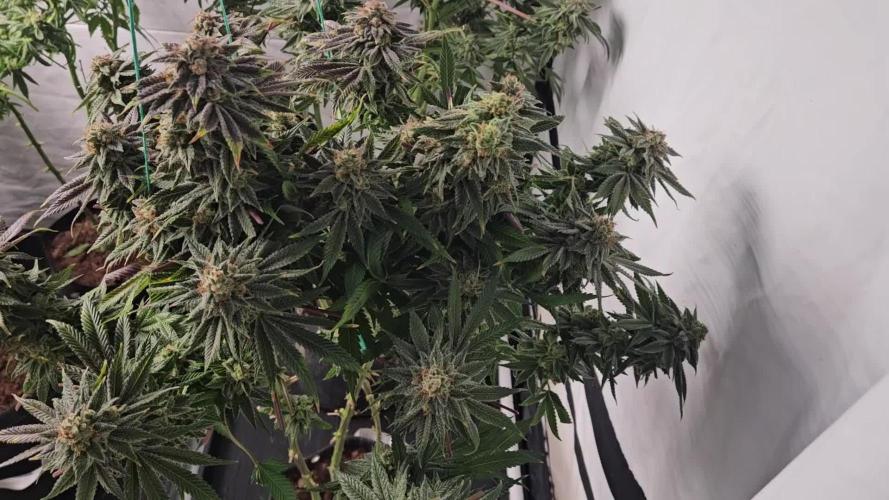
🧠 I'm starting the flush, as trichomes look milky and quite ready. In this last week the ripening will be complete and th girl would be ready for harvesting. 🚀 Flush started 🎬Added 8 pics of trichomes, Timelapse and sceenshots. Two pics and two videos of my "garden's pre-harvest magic" 😋😋😋 ________________________________ 📅 D110/R06 - 04/03/24 ⚗️ EC: 0.2 pH: 7.5 🌡️ T: 19-25 °C H: 55-65% 🌊 🍗 Flawless finish 💧 💼 🧠 1 day with pure water and now I added Flawless finish 🚀 Flushing 🎬Added Timelapse and sceenshots ________________________________ 📅 D111/R07 - 05/03/24 ⚗️ EC: 0.2 pH: 7.5 🌡️ T: 20-25 °C H: 55-65% 🌊 🍗 💧 💼 🧠 🚀 Flushing 
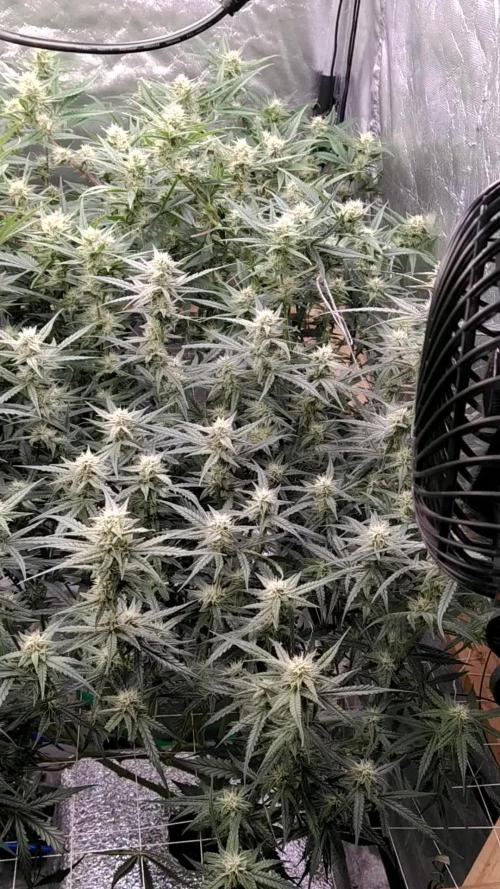
🎬Added 8 pics. Added timelapse and screenshots. I also prepared a timelapse of the entire week with some music 🎵🎵🎵 and weekly rate of T-H and VPD 📈📈📈
Likes
6
Share
@HappyOne
Follow
Very dynamic effect. Keep head clear and no stress. Crafty vaporiser effect is the best.
Likes
25
Share
Stretch 10 centimètres Jour52 légère defolliation et arrosage avec deux litres d'eau ph6.3 Petit rappel sur le meilleur cycle de lumière pour les autofloraisons QUEL EST LE PLANNING LUMINEUX OPTIMAL ? Le cannabis à autofloraison peut survivre avec à peine 5 heures de lumière du soleil par jour. Mais si vous voulez que vos plants s’épanouissent, atteignent le pic de leur puissance et produisent une lourde récolte, ils ont besoin d’au moins 18 heures de lumière par jour. Le planning optimal de lumière pour la culture en intérieur du cannabis à autofloraison est un 20-4 constant pendant tout le cycle de vie. Bien entendu, des plannings de 18-6, 20-2 et 24 heures non-stop ont tous leurs avantages, mais nous avons obtenu les meilleurs résultats avec le planning 20-4. Les cultivateurs en extérieur peuvent potentiellement lancer la culture dès le printemps. Cependant, nous recommandons toujours de faire germer les graines et de cultiver les jeunes pousses en intérieur sous des lampes artificielles pendant une semaine ou deux pour obtenir les meilleurs résultats. Nous parlerons des options en extérieur plus en détail un peu plus bas. LE CYCLE DE VIE DU CANNABIS À AUTOFLORAISON La plus grande différence entre le cannabis à photopériode et à autofloraison est que l’horloge tourne pour une auto dès le moment où la coque de la graine s’ouvre. Le cycle de vie post-germination de la grande majorité des variétés à autofloraison modernes est de 8-12 semaines au total. Au contraire des variétés à photopériode, les autos n’ont pas besoin du planning lumineux courant 12-12 pour faire la transition vers la floraison. Une variété à autofloraison progressera dans son cycle de vie indifféremment du cycle jour-nuit. CROISSANCE VÉGÉTATIVE ACCÉLÉRÉE Il est presque impossible de délimiter la phase de la jeune pousse de la croissance végétale avec les variétés à autofloraison de nos jours. De plus, en 30 jours, la plupart exploseront soudainement en phase de floraison. Donner aux autos un bon départ, solide et sain est un facteur critique pour une culture réussie. Beaucoup de choses peuvent se passer pendant une semaine avec un hybride à autofloraison vigoureux en culture. Il n’y a pas non plus beaucoup de temps pour la transplantation. Nous recommandons d’utiliser notre kit de germination ou de planter directement dans les premiers et derniers récipients dès le début. Des pots/récipients en plastique de 10-20 L avec de nombreux trous de drainage au fond sont parfaits. Les Air-Pots sont encore mieux. Beaucoup de cultivateur découvrent à leurs dépens que les petits pots ne sont pas durables pour les hybrides autos modernes plus grands. Préparez-vous à devoir ajuster quotidiennement votre lampe de culture pour éviter de brûler le feuillage. De plus, tout comme les variétés à photopériode, les conditions environnementales optimales pour les jeunes plants à autofloraison sont des températures entre 20 et 25 °C et une HR dans une fourchette de 50-70 %. En outre, les besoins en nutriments seront considérablement plus faibles que les variétés à photopériode. Il n’y a donc aucune bonne raison de ne pas cultiver bio. Généralement, les autos préfèrent avoir un milieu de culture légèrement fertilisé et bien aéré. Les terreaux légers et/ou le coco sont des substrats fortement recommandés. La plupart des cultivateurs préfèrent des lampes CFL blanc chaud, LED et MH pour la courte période végétative. Cependant, les lampes HPS à double spectre sont tout aussi efficaces et probablement plus pratiques à utiliser. FLORAISON RAPIDE ET FÉROCE Dès que vous pouvez voir les pistils pousser à partir des premières fleurs, vous pouvez vous dire qu’en 45-60 jours, les plants finiront le cycle de floraison et seront prêts à la récolte. Que vous soyez prêt ou non. Mais vous serez prêt, car vous aurez fait les ajustements nécessaires en temps et en heure. Les apports en engrais de croissance végétative à un dosage faible à moyen seront remplacés par des nutriments pour la floraison et des doses appropriés de compléments et boosters de floraison. Une fois de plus, un régime alimentaire spartiate est recommandé. Pas besoin de changer le planning des lampes, car vous allez suivre votre planning originel jusqu’à la récolte. Mais il faudra vous assurer que les températures ne dépassent pas les 28 °C et vous devez réduire votre HR vers une fourchette plus basse de 40-60 %. Les plants vont s’étirer à des degrés divers. Quoi qu’il en soit, vous devez faire attention et toujours maintenir une distance optimale entre la lampe et la canopée. Un ensemble de cordages ou de crochets réglables rendront la tâche bien plus aisée. Ne vous imaginez pas que toutes les autos développeront une structure courte de buisson, à moins que le sélectionneur ne donne des données qui le suggèrent. Naturellement, les deux dernières semaines de floraison devraient être réservées à un rinçage en profondeur du milieu. De l’eau pure, ou une solution de rinçage légère fonctionneront très bien. Quand la majorité des poils ou pistils sur les fleurs auront changé du blanc à l’orange/rouge, vous devriez passer au rinçage. Ne sautez pas cette étape finale critique. Vous méritez les fleurs les plus savoureuses, sans contamination. COMMENT LES AUTOS RÉPONDRONT AUX TECHNIQUES DE TAILLE ET DE PALISSAGE ? La réponse courte : très bien ! La plupart des variétés à autofloraison de nouvelle génération répondront très positivement au LST. Et tant que vous taillez tôt, l’étêtage et le fimming peuvent multiplier les tiges de têtes et en plus booster les rendements. De plus, la méthode ScrOG peut être combinée avec toutes ces techniques pour un rendement maximum. Cependant, la culture à grand volume utilisant la méthode SOG est probablement le style de culture le plus populaire à présent. Un nombre croissant de cultivateurs d’autos expérimentent avec les mêmes pratiques courantes de taille et de palissage à haut rendement que les cultivateurs de cannabis à photopériode utilisent. Les cultivateurs débutants ne devraient probablement pas se lancer dans une taille ou un palissage intensif ou excessif avant d’avoir de l’expérience. Cependant, plier un peu les pointes de croissance pour créer une canopée plus plate ne peut pas nuire aux rendements. De même, une défoliation minimale pour augmenter la pénétration lumineuse ne stressera probablement pas des plants en bonne santé, tant que vous vous limitez à l’élimination des grosses feuilles nourricières qui font de l’ombre aux sites de floraison. May the force be with you 💪
Likes
11
Share
@Pr3m_85
Follow
My #AlienZ 1 is an hermie.😮‍💨 Not many seed bag found on her so i don't cut it for the moment.
Likes
10
Share
Week 2 of Flower (Day 56 since sprouted) Just maintaining temps and adjusting light distance. Fed with 1/2 gallon of feed water PH 6.5 -TPS CalMag 1 mil -General Hydroponics Trio -TPS Signal 5 mil per 1 gallon Light defoliating
Likes
14
Share
I cannot believe how much weed I have got from this one auto plant also I had to cut four inches off one of the main bud sites because of bud rot I would definitely use Dutch passion again
Likes
7
Share
Bien pues ya tenemos en marcha el 2º seguimiento del perfil... Son 6 white truffles, 6 Apple&Bazzokies de GBSTRAINS y 5 GG4 de GBSEEDS que se empezaron a germinar el 15 de mayo por la tarde sobre las 19:00 Todas nutridas con BOOM nutrients jejeje Todas las semanas iremos viendo los cambios y la evolución, los riegos y las flores que vendrán :) El 16 de mayo del 23 sobre las 07:00 de la mañana pase las semillas del vaso con agua, a los tapers con servilleta. Ahí estuvieron 24 horas mas haciendo un total de 36 horas germinando para después, pasarlas a las macetas de 1 litro. 22/05/23 actualizado, meto unas fotos mas de como van las semillas después de 7 días desde que se empezaron a germinar en el vaso de agua. A día 22/05/23 llevamos 7 días desde que se empezaron a germinar. ACTUALIZACION DE ESTADO: 30/05/23 Subo unas fotos después de 8 días. Llevamos 15 días desde que se empezó a germinar las semillas en vaso de agua. A partir de aquí, empiezo a contar semanas de crecimiento. Trasplantaremos a maceta definitivas de 7L dentro de una semana o 2.
Likes
3
Share
El sabado 14/9 arranco una nueva semana de floracion. Se regó con 6 litros de agua con ph 6.3 Las plantas se ven sanas y las flores engordando. No se observan plagas, tampoco carencias ni excesos. 17/9 se rego con 8 litros de agua con ph 6.3
Likes
2
Share
Once again these girls don’t really need much just watering when dry but other than that we are on cruise mode. I have been checking trichomes for about a week now and man is she almost there I should be giving them lights out with in another week or two can’t wait
Likes
10
Share
Gracias al equipo de Zamnesia, Marshydro, XpertNutrients y Trolmaster sin ellos esto no sería posible. 💐🍁MAC 1: La MAC 1 es una variedad muy solicitada, creada originalmente por Capulator y distribuida solamente a determinados criadores y cultivadores. ¡Pero ahora ya puedes cultivar este tesoro en casa y disfrutar de sus cogollos densos, jugosos y potentes! Gracias a su densa copa y vigor, la MAC 1 es una opción ideal para LST, poda apical y otras técnicas de entrenamiento (incluido el lollipopping). Cuando entra en floración, las plantas de la MAC 1 se estiran bastante y una vez maduras pueden alcanzar una altura de 160cm en interior y más de 180cm en exterior. De media, las plantas feminizadas de la MAC 1 necesitan un total de 9-10 semanas para terminar la floración, momento en el que estarán repletas de cogollos índica pequeños y compactos. 🌻🚀 Consigue aqui tus semillas: https://www.zamnesia.es/10906-zamnesia-seeds-mac-1.html Código Descuento 20%: ZAMMIGD2023 💡TS-3000 + TS-1000: se usaran dos de las lámparas de la serie TS de Marshydro, para cubrir todas las necesidades de las plantas durante el ciclo de cultivo, uso las dos lámparas en floracion para llegar a toda la carpa de 1.50 x 1.50 x 1.80. https://marshydro.eu/products/mars-hydro-ts-3000-led-grow-light/ 🏠 : Marshydro 1.50 x 1.50 x 1.80, carpa 100% estanca con ventanas laterales para llegar a todos los lugares durante el grow https://marshydro.eu/products/diy-150x150x200cm-grow-tent-kit 🌬️💨 Marshydro 6inch + filtro carbon para evitar olores indeseables. https://marshydro.eu/products/ifresh-smart-6inch-filter-kits/ 💻 Trolmaster Tent-X TCS-1 como controlador de luz, optimiza tu cultivo con la última tecnología del mercado, desde donde puedes controlar todos los parametros. https://www.trolmaster.com/Products/Details/TCS-1 🍣🍦🌴 Xpert Nutrients es una empresa especializada en la producción y comercialización de fertilizantes líquidos y tierras, que garantizan excelentes cosechas y un crecimiento activo para sus plantas durante todas las fases de cultivo. Consigue aqui tus Nutrientes: https://xpertnutrients.com/es/shop/ 📆 Semana 2: Gran primera semana, ella ha dado un gran estiron estos días, si sigue así será una gran cosecha. Esta semana se practica defoliacion, poda de ramas bajas y se le agrega Sticky Fingers . La carpa está ocupada al 100%, sigue una floracion explosiva gracias a @Marshydro y @Xpertnutrients y @Trolmaster con esta gran genética 💪. Potencia de la lámpara: 70%
Likes
29
Share
Can't wait to blazeeee Feeding💪 10/17 Water30L+Cleanse80ml+calmag@190ppm Ph6.3 Ebb 10.42/11.32/12.26/13 Clone 11.35/12.21/13.05/14 Average runoff ec1.5 Keeper 300ml per pot 10/18 Water26L+Flawless90ml+calmag@300ppm Ph6.3 Ebb 11.38/12.24/13.17 Average runoff ec1.2 ph6.5 Clone 12.38/13.56/15.20/16.10 Average runoff ec1.5 ppm750 10/19 Water26L+Cleanse80ml+calmag@200ppm Ph6.3 Ebb 11.12/11.48/12.24 Average runoff ec1.4 Clone 11.50/12.12/12.37/13.37/14.40 Average runoff ec1.3 ph6.6 10/20 Water30L+Cleanse30ml+Calmag@190ppm Ph6.4 Ebb11.42/12.22/13.20/14 Clone 12.40/13.20/14.20/14.45/15.15 Average runoff 1.2ec ph6.4-6.7 10/22 last light day 10/23 2 Pm Cut and hang Plan 21day at 23temp 55rh
Likes
16
Share
Today marks the beginning of the last week of flowering for my cannabis plant. After months of care and patience, I can finally see the first amber trichomes starting to form. It's a sign that the plant is nearing the perfect time for harvest. The buds are dense and frosty, and the shift in trichome color is telling me that the plant is at its peak potency. In a couple of days, I'll move the plant out of the tent and into complete darkness for 48 hours. This process is supposed to help boost resin production and make the final buds even better. After that, it’ll be time to cut her down. It's exciting to be so close to the end, and I can't wait to see how the final product turns out!🌱🌱
Likes
49
Share
6/23 Due To The Two 8 Day weeks this week will only consist of five days to get me back on track. SEE LAST WEEK FOR DETAILS. I DID ANOTHER EIGHT DAY WEEK. I'LL DO THIS WEEK AS SIX DAYS. THAT WAY IM BACK ON SCHEDULE. WATERED 6/22. WENT BACK AT NIGHTCAND WATERED ANOTHER GALLON WITH 1/3 TSP Armor Si. I mixed the solution with kelp you kelp me but I dumped it out. I've mixed silica with other nutes before but I had read something earlier about bioavailability issues and I didn't want to risk it. My plants are the healthiest I've ever grown. I'm considering transplanting the large 10th planet that I'm light depping. I also need to develop my ipm and my nute schedule. Still gonna have to keep an eye onvthe water situation. Luckily I have a buddy in my corner that's co tinualkt Bern a great help. WENT BACK OVER AROUND NOON. BEAUTIFUL OUTSIDE AND THE PLANTS WERE LOVING THIS SUN. I DEFOLIATED SOME BURNED LEAVES AND MIXED A SOLUTION IF KELP ME KELP YOU THAT I PLAN TO FEED TO THE GARDEN TODAY. IM HAPPY WITH HOW THINGS ARE GOING. WE HAVE SOME RAIN AND THINDERSTORMS COMING. I NEED TO GET MY IPM UP AND RUNNING AND THE NUTES ONLINE. I ALSO NEED TO DECIDE IF IM GOING TO TRANSPLANT THE LIGHT DEP 10th PLANET. Went back over to put the girls to bed at six and if was still 90 degrees. The water from yesterday had dissipated. The tops were dust dry. I mixed two gallons of kelp you kelp me and fed it to the garden. Afterwards I pointed qbd found a couple plants that were more open to the wind were a little lighter. I know tomorrow will be very hot. Maybe quarter inch of rain. However after that it will rain (showers) off and on for days. I wanted to make sure the girls had what the needed to make it through tjis heat wave until they get that rain. I had another gallon mixed up and I'm thinking I should've given it to them. Oh well. I'd rather underwater than overwater any day. I did notice a burnt top on the plant furthest from the tarp that the sun JUST BARELY TOUCHES when the rest are in shade. I'll just raise the tarp a little. These are tiny problems. Can't upload video until tomorrow. 6/24 Good thing u gave the plants that water. I know it wasn't much but we didn't get any rain. Suppised to get a qtr in today and another qtr in tomorrow. Then rain a couple more days. It's working our really good for my watering schedule lol. Yesterday the girls got there first dose of a bottled nute. They got two gallons of kelp me kelp you (1/3 tsp per gallon) and another gallon of just phed water. I was going to do another gallon but held off due to the threat of syring rain. Didn't get it bur it looks like the plants loved the kelp. It had reached 90 yesterday. They look better today. It's 70 at 9 today. I LST the 10th planet in the 3 gallon. It's getting huge. I should start a separate diary for those three light dep plants. Its cool as hell watching this. One of the purple punches is flowering pretty good. I probably should start another diary for them. I'll be starting to feed my plants soon. Wondering if I should pinch plants again. TUCKED THE LITTLE GIRLS IN AT SIX AND SHOT A VIDEO AND TOOK SOME PUCTURES. PLANTS LOOKED PHENOMINAL! GOT HOME AND AROUND SEVEN IT JUST STARTED RORREBTIAL DOWNPOURS! THE TYPE OF RAIN THAT BREAKS STEMS. I SHOULDVE PUT MY OTHET TARP UP BUT I DIDNT. I WISH I HAD. IM A LITTLE NERVOUS. I KNOW THESE GIRLS ARE STRONG THOUGH! TOMORROW. ILL ROLL THE RARP UP AND SECURE THE BOTTOM FOR FAST ACCESS. IM ALSO GOING TO KOOK INTO FINDING A TOP FOR MY CAGE I CAN USE IN INCLIMENT WEATHER. 6/25 That little qtr in of rain we were supposed to get turned into torrential downpours and high winds. Luckily no REAL damage. If you watch the video you'll see what I mean. I'm going to havecto be cognizant moving forward. Noticed a few chunks from leaves butvplants are still healthy. I'm surprised how well these girls withstood this storm. They are certainly resilient. The 2 purple punch 1 10th planet that I'm light depping are flowering nicely now. They missed all the commotion from the storm as they were inside. It's smelling good. I'm happy. 6/26 It's what a friend would say is "maineing") out. That mistcthe plants love. I'm surprised the plants are doing as good as they have been considering the wind. Will be adding nutes soon. Need to add extra supports too. Light dep 6/27 Brief periods or torrential downpours. Light depped 3 gallon 0lants are under an overhanfcwhete the hatsxrain can't hurt them but they still get sun. They are really starting to flower now! I'm going to begin feeding with a base nute and a flower nute I think. I'm thinking about giving the light dep some open sesame or something similar. I need to set up a nute program soon but the plants ALL look so healthy! And it's been raining! I've only watered like once or twice since they've been in the big pots. I've seen zero pests aside from a chunk missing from a grasshopper. Usually by now I'd have battled half a dozen things and be battling another half dozen. However I was posing from clones. These are seeds and boy don't I see the difference!
Processing
Likes
8
Share
Likes
1
Share
7/22 Probably do some more defoliation this thing is bushy and seems to grow leafs as soon as I cut em besides that everyting is cool
Likes
19
Share
It was sometimes hard to understand her, and I feel like I failed a nutrition plan several times.
Likes
17
Share
Likes
38
Share
~FastBuds Californian Snow Auto~ The iciest queen from the Golden state! +The best from Cali. +A superb strain bred from exceptional Californian Sativas and FastBuds Autoflowering genetics. +Insanely resinous flowers. +The crazy trichome production shows its potency without even smelling it. +Just like biting an apple. The delicious mix of sweet candy and sour apples will leave you wanting more. +Sky-high. A very euphoric and long-lasting head rush, great for social scenarios. +Super frosty. Guess where this strain got the name from? The buds. -------------------------------------------------------------------------------------------------------------------- The Spec's: Taste: Sour apple, Candy, Sweet THC: Up to 23% CBD: < 1% Harvest EU Indoor: 400 – 550 gr/m2 Harvest US Indoor: 1.3 – 1.8 oz/ft2 Harvest EU Outdoor: 50 – 250 gr/plant Harvest US Outdoor: 2 – 9 oz/plant Size: XXL Height: 80 – 130 cm Height US: 31 – 51 inches Flowering: 9 – 10 weeks Room: Indoor/Outdoor Gender: Feminized Genes: Sativa 70%/Indica 30% Genetics: USA, Californian auto Autoflowering: Yes __________________________________________________________________________________________________________________________________________________________________________________________________________________________________________________________________________________________________________________________________________________________________________________________________________________________________________________ Strain Description: Californian Snow Auto is the result of a cross between a Cali’ Sativa and FastBuds Autoflowering genetics. The result is a snow-capped plant with a frosty main cola, 23% THC levels, and strong sweet and sour taste and fragrance. An easy-going Sativa that’d be great for beginners. Bud description: Frostbitten buds...These nugs will boast a rich green color that’ll be glazed in a thick layer of white crystals, showing its potency even before being smoked. Smoke report: High as a mountain. A very heady euphoric high. Uplifting and vitalizing, this strain is ideal for anyone looking to have great conversations at a social event or for some creative writing or drawing. Plant Appearance: Staying true to her Sativa heritage, this plant will grow tall with a large internodal spacing with plants attaining 1.3m in height. Cali' Snow develops a large main cola with some side branches, all densely frosty crystals, from the sugar leaves to the buds themselves. *The above Strain Information/Description courtesy of FastBuds __________________________________________________________________________________________________________________________________________________________________________________________________________________________________________________________________________________________________________________________________________________________________________________________________________________________________________________ THE SETUP: ~Planted into Jiffy Peat Pellets that were hydrated with de-chlorinated water with SuperThrive added then ph'd to 6.0 @ 80℉ ~Grown 100% organic in 10g fabric pots with Mother Earth 70/30 Coco/Perlite medium amended with 2tbs/g of Down To Earth 4-4-4 / 2 cups/g of Earthworm Castings / 1tbs/g of Dr. Earth Flower Girl 3-9-4, 1tbs/g of Dr. Earth Bat Guano, 3/4 cup of Down To Earth Azomite and 1 tsp/g Down To Earth Fish Bone Meal. ~24hr light cycle during Germination / 19/5 light cycle for Vegetation and 12/12 for Flower ~Straight water ph'd @ 6.2-6.8 when needed and weekly Compost Tea's. __________________________________________________________________________________________________________________________________________________________________________________________________________________________________________________________________________________________________________________________________________________________________________________________________________________________________________________ WEEKLY UPDATES: 9/6- Day 39 of flower and harvest time is fast approaching with her trichomes, which are now checked daily, maturing rapidly being 80% milky now with the remaining being clear. Daily watering's continue with 1g of straight de-chlorinated water ph'd to 6.7 @74℉ and also I'm turning her pot 1/4 turn daily as well. 9/8- Well, her trichomes are right about where I like them to be and she's ready for 48hrs. in the dark before I chop and hang her to dry for 10-12 days. I'm watering her with 1g of straight de-chlorinated water ph'd to 6.7 @74℉ and will continue to water her while she's in the dark (cannabis continues to carry on with it's growth processes even while in the dark) so that her medium doesn't completely dry out. Keeping her watered will also help to extend her drying time to that ideal 10-12 day target. This should be some epic smoke as her buds are absolutely crystalized with trichomes and her smell is AMAZING! 😛💚 9/10- Well she's been in the dark for 24hrs. now with 24 more to go. I'm keeping temperatures in the low to mid 60's℉ and the RH @ 45%. Tomorrow is 'Chop Day'! I'll be taking some pic's of her when she comes out of the dark and during harvest...Stay tuned, this is some 🔥! I am continuing to water while she's in the dark with 0.5g of straight de-chlorinated water ph'd to 6.8 @67℉ to keep her hydrated. 9/12- Well she's out of the dark where she spent roughly 60 hours. I kept the temp's @ 64℉ and the RH at 45%. After I brought her out I shot a few pictures of her, then plucked off all of the shade leaves. I then cut her off at her base and hung her whole. I'll keep the RH in the room @ 50% for the first 24hrs., then raise it to 55-60% for the remainder of the drying. I have the temperatures in the Dry Room at a constant 65℉ to help preserve the terpenes. Hopefully she'll take 10-12 days to dry to the point that she's ready to be trimmed and jarred! Stay tuned for the harvest of this phenomenal cultivar! 💚🔥 ~Thanks for stopping in! Things are wrapping up and harvest is right around the corner....Stay lifted and be Blessed! 😎🙏~
Likes
3
Share
@Mismatas
Follow
APROXIMADAMENTE CUARTA SEMANA EMPEZAMOS POR PRIMERA VEZ NUESTRO LST Y UNA LIGERA PODA DE BAJOS. SEGUIMOS CON EL CABLE DE CALOR PUESTO Y TAMBIÉN AÑADIMOS UN CALEFACTOR PARA MINIMIZAR LAS BAJAS TEMPERATURAS
Likes
6
Share