
Likes
Comments
Share


@Hou_Stone
Follow
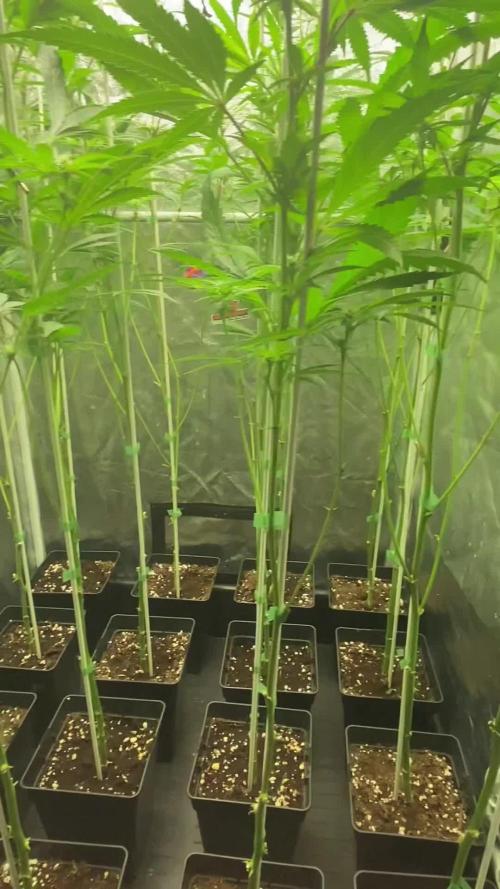
Day 61 / Flowering 28
Genetics = (Wedding Cake x Gelato #33) x Hawaiian Snow
They are getting big!
I made a HST on the main buds of 2 plants 👊
---------------------------------------------
💧Watering
On average I water each pot with:
Day 59 : 1 Liter
Day 63 : 1 Liter with 0.3 Gram of BoosterPK+
I alternate watering, one with booster in my water and the next without.
I add Bioenhancer once every 14 days +/-.
I add very few nutrients to my water because I have already placed Bio Nutrients directly in my soil 😉 (BioGrow & BioBloom added on week 1 & 5)
------------------------------------------------------------
🔥❄️Temperature of the week :
Day : 21-24°C (Humidity : 55-70%)
Night : 16-19°C
------------------------------------------------------------
🚀Equipment of the week ⭐️ :
Lamp Led 300W : power 95% at 35cm
Extractor+ carbon filter ON 24/24h
2 fans ON 12/24h
My oscillating fan stopped working this week😵 I replaced it with 2 normal fans
------------------------------------------------------------
📜Links :
USA x Landrace LE Seeds : (Seeds of this Limited Edition is in restocking)
https://shop.greenhouseseeds.nl/feminised-cannabis-seeds/usa-and-landrace-limited-edition/
Food for your plants 🔥🔥👍
https://www.greenhousefeeding.com/
👨🚀My Instagram 🌱❤️️:
https://www.instagram.com/hou_stone420/
------------------------------------------------------------
☮️Thanks for your visit💚☮️

Likes
3
Share


@MadBumbleBee
Follow
1 OG kush Shows Sings of Nitrogen Toxicity (cut most leafs off)
Soil PH: 5.7 - 6.8 (lowest and highest reading)
Flushed all plants with microrayza fungi
Watering with organic bio activated tea every 3 days (potassium = algae, bokashi = nitrogen, worm hummus and molasses)
Day 28 to 35
Day 32: Accidently cut off main stem of a very healthy OG kush plant, let´s see how it bounces back in a few days. Perhaps I just HST´d by accident
Day: 32: Some of my autoflower GSC already started to flower
Day 32: 3 OG kush plants are weak, one has a weak stem, second one had a problem since seedling (grew into the ground), third one i cut off main stem by accident
Day 34: OG kush plant was removed after many tries of getting it back to its feet

Likes
6
Share


@Shotter
Follow
Okay I'm sorry for the lack of updated I'm now in week 10 half way through the week. I started my flush at the end of week 8. These really put a lot of weight on over the past 2 weeks and there looking on point there due to come down with in next three to five days depending on my preference.
This strain is ripper new released strain lemon ice 2.0


Likes
12
Share


@ChitownCannaChica
Follow
Did a top dress of some grow powder dry nutes from botannicare. Just giving her rain water for now. Again—- temps, humidity, and clouds have been aalllllll over the place. One day it’s 86 and the next is 66 with nights in the 60s or 40s—- humidity and rain have been 100% down to 50%. All within a week.

Likes
9
Share


@pzwags420
Follow
On day 1 I adjusted the PH of the rez up to 6.2. I increased average ppfd to 972, with the highest ppfd on a top at 1500 ppfd lets see how she reacts and if she likes the intensity I will keep it steady till the end if not back to lower ppfd again.
On day 6 I changed out the rez and ph to 6.2. Buds are growing and putting on weight very compact buds.


Likes
111
Share


@DreamIT
Follow
🍋🥧🏎️ LEMON PIE AUTO BY FAST BUDS 🏎️🥧🍋
🍋 26.3...
🍋 27.3 ...
🍋 28.3 ...
🍋 29.3 ...
🍋 30.3 go on like this, yeah
🍋 31.3
🍋 1.4
Likes
23
Share


@SonomaSungrown
Follow
The girls just keep on cooking...and things are starting to get really bushy.
I'm hoping that we're close to finished on the vertical growth front.
Chem Brûlée just keeps getting bigger and bigger, but she seems to be spreading OUT faster than she is growing UP at this point (she's already 56" call).
Pineapple Meatball is just a straight up bush.
French Macaron is 62" tall and VERY thick on the vegetation front, but not as WIDE as the chem brûlée.
7/13
Sprayed with light neem/castille spray


Likes
6
Share


@mikheil007
Follow
Harvested Girl Scout cookies auto from Fast Buds! Very satisfied with result: 200gr. dry buds!. Thank You Fast Buds for consistently such a strong genetics!

Likes
15
Share


@XperencdGmanXG
Follow
This was an auto that was not an auto. However, Loved the dank lemon coming off the phenotype so decided to clone it and do a full run to ensure I have plenty of weed while I wait for the seasons outdoor crop to be ready.


Likes
65
Share


@squalino
Follow
📖 Chroniques de l'Oasis : La Marque Blanche
🐪 Chapitre 9 : La Séduction de la Sultane
Date : Mercredi 22 Avril 2026
Âge : J+63
Taille : 68 cm (Stable)
Le désert est vaste, mais mes yeux ne voient plus que l’Oasis. Au loin, à travers les voiles de chaleur, je commence enfin à distinguer ses formes avec une clarté nouvelle. La Sultane, figée à 68 cm, a cessé sa course vers le ciel pour se consacrer à l'essentiel : sa beauté.
Elle déploie désormais son charme avec une assurance royale, parée de ses plus beaux joyaux de cristal. Sous le soleil , elle met ses formes en avant, fière et conquérante. Elle semble vouloir capturer chaque regard, chaque rayon, afin qu'on ne remarque plus qu'elle dans toute l'immensité du sanctuaire. Ses pistils, encore d'un blanc immaculé, agissent comme des miroirs de lumière, m'aveuglant par leur pureté
🏜️ Le Climat du Sanctuaire
Chaleur : 25°C le jour / 21°C la nuit.
Humidité : 50%.
Lumière : Intensité 75%, à 55 cm de la couronne.
L'Élixir de vie (Nutrition)
pour le moment pas d'élixir , juste la pureté de l'attente :
Apport : Rien pour le moment.
Horizon : À la fin de cette semaine, elle recevra le PK 5-8, l'élixir qui viendra sceller le poids et la densité de ses trésors.
🔬 L'Analyse du Nomade
L'Éclat des Joyaux :
On observe une explosion de trichomes qui envahissent désormais les petites feuilles entourant les fleurs. C'est cette "poudre d'étoiles" qui donne à la Sultane son aspect argenté et brillant.
Le Sacre des Pistils :
La masse de pistils blancs est impressionnante. Ils sont droits et vigoureux, signe que la plante est en pleine santé et qu'elle a encore une marge de maturation importante.
Le Sacrifice Nourricier :
Le jaunissement des grandes feuilles du bas s'intensifie. C'est un signe classique à J+63 : la Sultane déplace toute son énergie et ses nutriments vers ses sommets pour maximiser la production de résine.
L'Armature de Soie :
Le filet scrog maintient parfaitement les branches, permettant aux têtes de s'épanouir sans risquer de ployer sous leur propre poids futur.
📜 L'Anecdote du Rif : Le Bouclier contre le Vent de Sable
je me demandais comment les anciens protégeaient leurs cultures des tempêtes de sable qui pourraient briser les tiges ou souiller la précieuse résine..
.
anecdote :
Dans les régions plus arides du Rif, le vent de sable est l'ennemi juré du cultivateur. Pour éviter que les fleurs ne deviennent "terreuses" et lourdes de poussière, les anciens utilisaient la technique de la Zriba de Roseaux. Ils tressaient des murs de cannes de Provence (roseaux) tout autour de leurs parcelles. Ces barrières n'étaient pas totalement opaques : elles laissaient filtrer un peu d'air pour éviter les moisissures, mais elles brisaient la vitesse du vent et faisaient tomber le sable au pied de la clôture.
Si malgré tout le sable s'invitait sur les plantes, ils utilisaient de grandes plumes d'outarde ou de fins plumeaux de laine pour "caresser" les fleurs tôt le matin, quand la résine est encore froide et peu collante, afin d'en extraire les grains sans abîmer les trichomes.
Note du Nomade : "Le filet est son trône, le cristal son voile. Elle ne grandit plus, mais elle s'épaissit, prête à transformer la lumière en trésor.. Aveuglé par cette reine qui refuse de partager la vedette avec les étoiles."
un grand merci a @Mia_BIOTABS et à toutes les personnes qui me suivent et me soutient dans cette aventure. je vous souhaite une agréable lecture et de très bonnes cultures.
MUSIQUE DIAPOSITIVE LORD-KOSSiTY HE SEXY WOW

Processing
Likes
2
Share


@KrudBuddysExotics
Follow
Hey good morning Growers hope all is well with everyone and their family and plants
Well there’s a lot going on over here at the 48219 Krud Buddy’s Grow House I found out when I transplanted my Wedding cake and Sherbertlato I put them into super soil I feed them twice lightly thank god cause I don’t have any burns or anything n their growing good to me everything is growing good to me way better than the auto flowers I started with but I did some cloning of my own and I’m loving how their taking on as well
So here’s what’s going on strain by strain
Gorilla Cookies & Peanutbutter Breath : as of Today April 25th they are on day 60 since I got them and have been sitting in the dark since last night for their 24hrs of darkness before flip to flower starting tomorrow morning thinking a good timing would b from 6/6 or 7/7 also I have them under my 600w budget led hanging 12’ above I can’t wait to see how they out and I have them under an scrog net I made
Wedding Cake & Peanutbutter Breath: on May 5th it’ll be 60 days since I’ve had them I pretty much told everything bout them at the beginning
Grape Pie & Girl Scout Cookies: it’s Been about 3 weeks And I must say they stretched fast their already 15’ tall the grape Pie is spreading faster any of the other clones I got I’m loving it
I recently got Cherry Pie & Guava Cake x Cookie it’s bout week one going on two weeks and I must say when I got them I was kinda skeptical about them because they were so weak looking and the cuts on them were terrible but they look like they might turn out into something amazing idk but the pictures show it all as well as the clones I cut myself in clear plastic cups ands their on their second week of life I noticed roots on the 10th and put into cups on the 11th if I’m not mistaken I’m not around my chart so I’m not for sure but everything is going swell over here to me

Likes
4
Share


@MyStery21
Follow
I think she's going to make it. but she need the proper feeding wich im in big doubt right now.
(Updated) 5/7/20
(SHES KILLING IT, NOW I HAVE THE CORONAVIRUS CURE :)👍💪😁

Processing
Likes
14
Share


@kevgrow
Follow
Hey Friends, end of Week 10 from seed
Colas are looking Very nice
Noticed some orange color on some leaf tips so I lowered the amount nutrition when feeding
I used a magnifier to have a closer look at the colas, trichomes used to looked like little crystals, now they are bigger and cloudy.
So far no amber coloring on trichomes
I need some advice as to when I should begin flushing and harvest
Smell is slowly getting stronger, like a muffin with a small touch of gas ⛽️
Looking Forward in seeing some bud growth in the following week, will keep you guys posted!
Likes
11
Share


@Telesforo
Follow
semana tranquila aumente de 2ml por litro a 3 ml por litro , bueno a controlar la humedad se viene el invierno...buena semana para todossssss

Likes
10
Share


@Exotixchasing
Follow
Day 32, I deleafed a couple days ago once I first seen flowering starting.
Processing
Likes
26
Share


@eldruida_lamota
Follow
Otra vez familia, estamos de vuelta con estas skunk de zambezaseeds, sin palabras de verdad fumetillas, son una cepa muy lograda las flores están formándose muy compactas , y empieza a engordar de verdad, ya me diréis cómo las veis? Yo las veo muy sanas 🙅♂️
