
Processing
Likes
Comments
Share


@Fullmeltalchemist
Follow
5.23 F60
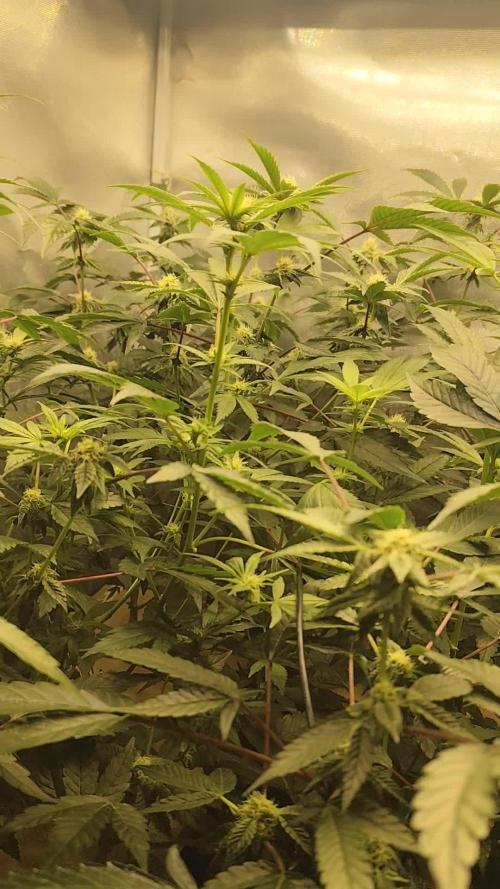
5.27 F65 - Everything has been going well this week. The plants went through a feed cycle that should carry them through flower no problemo. Started with the AACT Tea, then a bokashi drench with Fish Shit from Fishheadfarms and plain water from here on out. They are drinking quite a bit. 1.5-2 gallons a plant every 3ish days. The terps in my tents smell out of this world. The ScrOG and 3x3 are like a candy store. Passion Berry has mango/guava citrus terps while Deadstar v2 has strawberry watermelon terps. The 4x5 is much more varied, but in general the sweet pink dominates with it's grape candy terps and the dread bread cuts through with it stanky gassy lemon while the prayer pupil smells like moth balls and a bit of GMO. Very lucky to get to experience this much variety.
5.29 F67


Likes
18
Share


@Pokan187
Follow
This week went by well, I will start checking the trichomes on the Runtz at the end of this week. It should be ready for harvest in the next 2 to 3 weeks
The G13 is still smelling like magic, looking majestic.
The GDP buds are starting to put on weight

Likes
Comments
Share


@Dankmark420
Follow
Well we thought something was wrong with our white widow being that from one day to the other she was crooked and looking Ill.. so we cut her way before time.. BUT (bud hehe) after closer inspection it was a block of in the autopot.. so she prolly could have bounced back..


Likes
8
Share


@Comfrey
Follow
The week started with an of trichome production and smell, orange and mandarin peel. Really nice to smell on her. She is packed with flowers and looks quit healthy. I need to have an eye on nitrogen. My potting mixes were a bit too hot and Tangerine Dream maybe needs a flush. We‘ll see how she will looks tomorrow morning and the so decide.
Likes
11
Share


@New_Guy9000
Follow
Week 6 going strong - no slowing these plants down. Smell is pretty intense - even with 6 inch fan and carbon filter my entire house smells dank 😎😎😎


Likes
36
Share


@nonick123
Follow
Día 66 (05/08) Cerrado por vacaciones
Día 67 (06/08) Mi amigo viene a casa a hacer un riego con 1 Litro de H2O pH 6,5
Día 68 (07/08) Cerrado por vacaciones
Día 69 (08/08) Vuelta de vacaciones! A ver como están después de 5 días sin verlas... 😱
Riego con 1 litro. OnionOG con 1.5 L
Añado 3 cm de sustrato nuevo porque se ha compactado y se ven las raíces! 😢
Día 70 (09/08) Riego 500 ml H2O pH 6,55
Eliminación de algunas ramas bajas
Día 71 (10/08) OnionOG vuelvo a hacer topping a todas las ramas principales! 💥
Riego 500 ml H2O pH 6,55
Sesión de fotos semanal!
Día 72 (11/08) Riego con 1 Litro de Té Vegetativo de Lurpe Solutions. Preparación: 24 horas con bomba de aire (oxigenación) con ingredientes:
Green Sunrise 8 ml/L + Insect Frass 16 ml/L + Hummus Lombriz 8 ml/L + Melaza 1 ml/L + Kelp Hidrolizado 0,25 g/L
Aplicación foliar Kelp hidrolizado de Lurpe Solutions a 0,25 ml/l
💦Nutrients by Lurpe Solutions - www.lurpenaturalsolutions.com
🌱Substrate PRO-MIX HP BACILLUS + MYCORRHIZAE - www.pthorticulture.com/en/products/pro-mix-hp-biostimulant-plus-mycorrhizae


Likes
1
Share


@Black_Widow
Follow
Привет садоводы
Началась новая неделя
растения прошли начальную стадию роста и уже пересажены в свои горшки
растения чувствуют себя хорошо
в гидропонике раствор разведен на 600 ppm
в нем поддерживается ph 5.6
хочу еще немного подождать когда растения подрастут и начать их тренировать LST

Likes
23
Share


@Encephalopathy
Follow
1 week to go for nore mature plant, planned harvest on next saturday.
Yesterday conducted a big flush for both plants as lots of nutrients got locked up in root system,
Smaller plant has been defoliated a bit to let light get through all stems which are everywhere.
Can't wait for final result.
Processing
Likes
6
Share


@ganjaman24
Follow
Week 5 I believe and they’re doing great..topped them lil over a week ago. Thinking another week or two then flip to flower! 😎


Likes
152
Share


@EBxAH
Follow
Sunday, July first was the start of week 5. Having slight issues with the mothers but the clones are doing awesome! So even if they die I have 17 more tries, lol.
UPDATE: Saturday, July 10...final step in mainline. I was super excited to do this 😁 Here goes nothing, lol. Oh, and the clones are rooted and potted!!!

Likes
1
Share


Likes
48
Share


@xbrico
Follow
D71/FD43 - Nothing major to report on the SCP...all the story with the Red Hot Cookies this week!!!
Seen my 1st browning pistil - hopefully this thing starts to ripen up...under pressure now (Again, see Red Hot Cookies story)!!!
Dropping Silicon this week and changing to TNC bactor as out of Great White. Apart from that, nothing major with these 2 to report.
Happy Growing all!!! 💪

Likes
19
Share


@valiotoro
Follow
Hello everyone 😎
Week 5 of flower for the Banana Purple Punch auto from Fast Buds 🍌😈
She grew fast with a beautiful color,for the nutrient 4ml/L terra bloom & 1ml/L power buds & Green sensation 1ml/L from Plagron
Mars Hydro SP-6500 70%
Have a nice day 😋
Likes
13
Share


@frenchysmoker
Follow
It took more than 5 months to grow this lady.. Top quality budd but what a yield only 47 grams dry... Maybe its because the seeds were too old (5 years) but its still very nice terps and the profile of geno that I was hunting for 😊

Likes
42
Share


@DrLaggis
Follow
🌱 Day 22 - First Day of Week 4 🌱
Hello, friends! We've reached the fourth week of the growth phase, which is the final week of the auto growth phase. I'm super excited to see what happens in the coming weeks. 🌿✨
I'm very satisfied with my Fastberry plant. Let's see what happens next! 🍇🤞
Plan for the Fourth Growth Week:
Day 22:
Light: 60 cm, 70% intensity 💡
No watering 🚫💧
Humidity: 50-55% 💧
Day 23:
Light: 60 cm, 70% intensity 💡
Watering: 600 ml per plant, BioBizz Grow (2ml/L) 💧🌿
Humidity: 50-55% 💧
Day 24:
Light: 60 cm, 70% intensity 💡
No watering 🚫💧
Humidity: 50-55% 💧
Day 25:
Light: 60 cm, 70% intensity 💡
Watering: 600 ml per plant 💧🌿
Humidity: 50-55% 💧
Day 26:
Light: 60 cm, 70% intensity 💡
No watering 🚫💧
Humidity: 50-55% 💧
Day 27:
Light: 60 cm, 70% intensity 💡
Watering: 600 ml per plant, BioBizz Grow (2ml/L) 💧🌿
Humidity: 50-55% 💧
Day 28:
Light: 60 cm, 70% intensity 💡
No watering 🚫💧
Humidity: 50-55% 💧
Processing
Likes
10
Share


@The_Chef_420
Follow
No signs of flowering yet, maybe slight formation of calxys beginning. Been spraying with molasses, neem, cal mag and liquid kelp (bioweed) and superthrive just once to hopefully delay flowering to increase yield. P.S. if youre new at growing DO NOT try this unless you know what your doing with hormones etc. Theres a chance it can turn your girls hermie. Just be aware!
Likes
142
Share


@MadeInGermany
Follow
Hi people 🤗
A lot has happened this week 😄
The 3 Blue Cheese and 2 Kosher Tangie Kush which have been in the flowering tent for 1 week have become very bushy 👍
Unfortunately I just noticed that I completely forgot to take pictures of the Blue Cheese Phenotype # 3 🤦♂️🏻
The picture will be given later.
The rest of the Vegi tent is also progressing very well.
They are repotted in 11 liter pots this week, and then come to the flowering chamber die the following week
The next week there will be new pictures, until then I wish everyone a nice start into the new week 🙏🏻💪🏻
Let it grow 🍀🌱


