
Likes
Comments
Share


Likes
5
Share


@GODAXE
Follow
04.08.2024
high heat weave this week, we hit 38°c with 80% humity almost all day. But what a massive stretc almost tripple in size.
FastBerry still show leaf and node mutation but grow really well.
By the end of the day i find a masive egg invassion on one leaf of the fast berry, no idea whit it is, and dont really want to wait to see what have decide to turn my lady in a breading chamber. the leaf have been removed and throw away in the fire bin. The camber berry have been treat with my neighbor garden insecticide in prevention of further attack.


Processing
Likes
2
Share


@Mr_nugs_lover_David
Follow
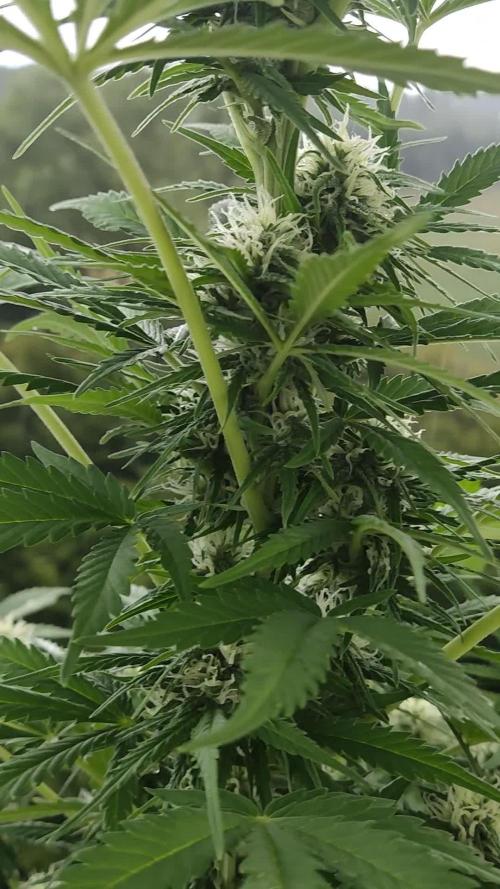
She looks suuper happy and healthy,wonderful strain to grow,she's starting to show the pistils so she'll be in full flower in no time! Let's see how this wonderful lady performs, she smells crazy on her 13th day of flower,she's producing massive resin so far,stinks,I cannot believe how this lady is getting full of cristales so early,can't wait to smoke this 🤤 100% organic and biological grown

Likes
10
Share


@Ultraviolet
Follow
Voltage, also known as electric pressure, electric tension, or (electric) potential difference, is the difference in electric potential between two points. In a static electric field, it corresponds to the work needed per unit of charge to move a test charge between the two points. In the International System of Units (SI), the derived unit for voltage is named volt.
The voltage between points can be caused by the build-up of electric charge (e.g., a capacitor), and from an electromotive force (e.g., electromagnetic induction in generators, inductors, and transformers). On a macroscopic scale, a potential difference can be caused by electrochemical processes (e.g., cells and batteries), the pressure-induced piezoelectric effect, and the thermoelectric effect. Since it is the difference in electric potential, it is a physical scalar quantity.
A voltmeter can be used to measure the voltage between two points in a system. Often a common reference potential such as the ground of the system is used as one of the points. A voltage can represent either a source of energy or the loss, dissipation, or storage of energy.
Dropping the temps will slightly raise the humidity, air holds less % water the colder it is. Lights on 25-35rh% the same water content will spike to 50rh% + at night just by dropping the temps.
At night all the juice photosynthesis has been storing up is mashed and mixed up to make all the goodies we need for bud, water is used to transport all these things everywhere, like little solvent transport devices, once a nutrient/protein has been delivered to destination the plant needs to get rid of all this excess water molecules it was using to transport. The only solution at night is to spit it back out into the air at night. During the peak of flower, this can catch a grower unaware, with a 4x4 full tent it can be a challenge to control all that moisture exhaust overnight especially if you're really pushing the limits.
We live in a water world, above or below, our misconception is we live on dry land, we don't live in less watery conditions than above or below. We fit into a very narrow band of moisture that just so happens to be full of lots of air and everything else required for life.
Got my first full whiff of the smell of purple lemonade, always surprises me how accurately the smell fits names, the dominant terpenes in the Purple Lemonade weed strain are carene, linalool, limonene, and myrcene. Carene gives this strain its sweet, citrus flavor and some woody notes, whereas the linalool I recognize so well from Granddaddy Purp. Myrcene has been shown to have sedative qualities while bringing musky, earthy elements to the flavor profile.
Trichome production started to ramp up, and the plant that grew taller/closer to UV showed noticeably thicker coatings. The taller plant shows slight yellowing of lower leaves, and the smaller plant is green and lush but the buds are slightly less progressed, interesting.
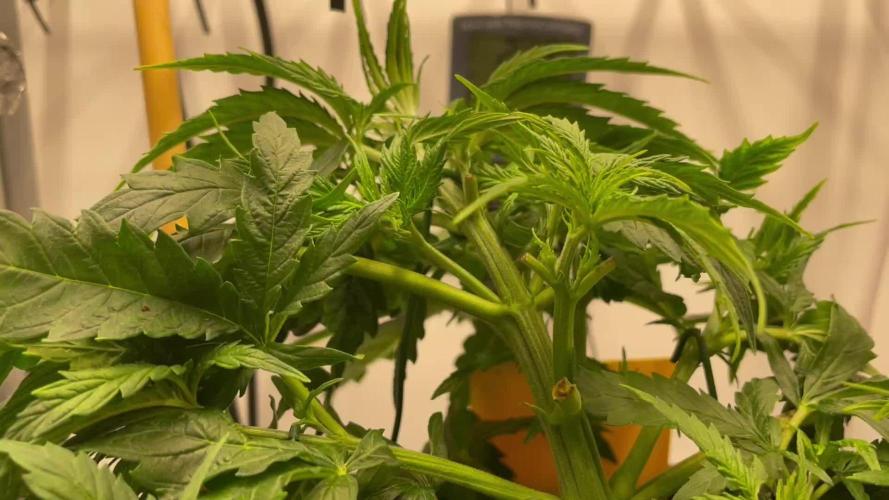
I super-cropped the main stem of the tall one just over a week ago (clean). I expected it to be the one slightly behind in development.
The plant has roughly 10-15% "Total resources" that it keeps in case emergencies arise. Reserves if you will.
My rationale behind breaking anything goes hand in hand with slowing things down as production is lost due to the time it takes to repair damage.
I recall watching a YouTube video, where a curly hair gentleman would super crop in a manner to damage but not disrupt using a twisting method, using fingers and thumbs placing them close together one goes clockwise other counter clock this varies a lot depending on the thickness of stem but what you wait for is a tiny snap, it may take several rolls to weaken if walls are tough I found. No snapping or bending of the stem, you want just to fracture it but not puncture this way the xylem and phloem channels remain flowing,the damage is repaired almost instantly and the 10-15% is dispatched with very little repair time. Everything in the general vicinity of the stress will now grow stronger so as to prevent further similar damage.
This is why I had expected the tall one to lag behind in development once I had cropped it but low and behold it worked and the tall one has slightly more developed buds.
The effects of birdsong on plant life may at first glance be far-fetched. Nigh on ten years ago an article appeared in Nexus Magazine on the discovery or invention of a method of growing plants using bird sounds. Christopher Bird and Peter Tompkins describe the development of Dan Carlson’s Sonic Bloom in their book The Secret Life of Plants. Many others have, it seems, recognized the role of birdsong in the growth of plants, and influenced or directly helped Carlson to develop his invention.
Dan Carlson’s desire to see that no one need be hungry through shortage of food sought to understand the optimum growth of plants. He discovered that plants also feed from ‘the top down’ as well as the roots. Underneath all leaves are pores called stomata which open to take in nutrients and moisture from the air. Carlson’s observation that the more bird life there is on the farm, the more abundant is plant life, has been echoed by farmers throughout history, except in modern times. Where there is little bird life, plants are stunted, and dwarfed. Nature has the birds sing at dawn and dusk, which dilates the stomata, and so feeds the plants. One can immediately see the importance of trees.
The development of Sonic Bloom was to create birdsong, which is played to the plants, while a foliar nutrient is sprayed onto the plants at the same time as they are being stimulated by the sound, to enhance their growth. This method produced fantastic results in the amount of abundantly nutritious produce from one plant, often in poor soils and in drought conditions. Carlson showed that the breathing leaves of plants are the source of the nutrient intake for growth. This of course is also true for humans—the breath is food. We shall discourse on this on another occasion. Plants transfer nutrients to the soil via this breathing, and Carlson showed that his plants improved the soil and helped earthworms proliferate.
The secret of Sonic Bloom was the development of the music of the same frequency as the dawn chorus of the birds. With the help of a Minneapolis music teacher, Michael Holtz, a cassette was prepared. It seems that both birds and plants found Indian melodies called ragas delightfully suitable. This is actually quite profound, although the American farmers, especially women, who had to endure this music whilst it was played to the plants, found it irritating. Holtz found the “Spring” movement of Vivaldi’s The Four Seasons appropriate and concludes: “I realized that Vivaldi, in his day, must have known all about birdsong, which he tried to imitate in his long violin passages.
Holtz, it is related by the authors Bird and Tompkins, also realized that the violin music dominant in “Spring” reflected Johann Sebastian Bach’s violin sonatas broadcast by the Ottawa University researchers to a wheat field, which had obtained remarkable crops with 66 percent greater yield than average, with larger and heavier seeds. Accordingly, Holtz selected Bach’s E-major concerto for violin for inclusion on the tape. “I chose that particular concerto,” explained Holtz, “because it has many repetitions but varying notes. Bach was such a musical genius he could change his harmonic rhythm at nearly every other beat, with his chords going from E to B to G-sharp and so on, whereas Vivaldi would frequently keep to one chord for as long as four measures. That is why Bach is considered the greatest composer that ever lived. I chose Bach’s string concerto, rather than his more popular organ music, because the timbre of the violin, and its harmonic structure, is far richer than that of the organ.
Birdsong has long been loved but also studied with reference to the musical scale and harmonics. As Holtz deepened his study he said, “I began to feel that God had created the birds for more than just freely flying about and warbling. Their very singing must somehow be intimately linked to the mysteries of seed germination and plant growth.
The spring season down on the farms is much more silent than ever before. DDT killed off many birds and others never seem to have taken their place. Who knows what magical effect a bird like the wood thrush might have on its environment, singing three separate notes all at the same time, warbling two of them and sustaining the others.
Tree and bird life are essential to Earth's existence, which Carlson, Holtz, and others have shown, but indeed others see and feel. “Plants”, says Steiner, “can only be understood when considered in connection with all that is circling, weaving, and living around them. In spring and autumn, when swallows produce vibrations as they flock in a body of air, causing currents with their wing beats, these and birdsong, have a powerful effect on the flowering and fruiting of plants. Remove the winged creatures, Steiner warns, and there would be stunting of vegetation. Nothing more needs to be added here.
It has been said that you cannot hurt the humblest creature or disturb the smallest pebble without your action having a reaction upon something else...You cannot think of an evil thought, no matter how private, without it having an effect upon somebody else. Whatsoever you do in life sets up some form of resonance.
When I say the morning chorus of the birds awakens the earth I mean that the characteristic song of the birds sets in motion a series of vibrations which react upon other forms of life. Remember, the soil of the earth is full of living microorganisms. The plants are also living organisms. You, yourselves, are living organisms. Now, this is the beauty and wonder of it all—when one aspect of nature has been moved into a state of resonance it immediately relays its vibrational motion to something else.
So when I say the dawn chorus awakens the earth I literally mean what I say. I do not suggest that the earth would come to a standstill without the bird song, but I do mean that life on earth would be sluggish and ineffectual without that first instigating outburst of vibrational power poured forth at just the right pitch and tone to set off a chain effect.
I know some of you will say, what happens in those parts of the world where there are no birds? Well, what does happen? Very little, I assure you. The hot deserts and the polar regions where there are few, if any, birds are not renowned for their wonders of nature. It is as though they are asleep. Nothing grows, few things live. Little resonates and there is a great stillness over everything.
You see, that outburst of sound just before dawn is like the little lever that works the bigger lever which turns the wheel which moves the machine…and so on. Never underestimate small things.
Animals are blessed with instantaneous and unthought-out wisdom. They are in direct contact with God and they act and live as though they are fully aware of it. Men are also in contact with God, but most of them act as though they have never heard of God because they are largely veiled from their divine center by their own thinking minds of which they are so proud.


Likes
Comments
Share


@Ecu_D_Monkey
Follow
Culture facile sans aucun soucis
belle plante tres esthétique
une merveille pour les amateurs de gout fruité


Processing
Likes
120
Share


@CBD_Sweden
Follow
Hi all the happy people here in GrowDiaries.
This is my second cultivation ever and it will be fun to try a bigger space than my closet grows
First, I'm just going to say I'm done with the construction of my new growroom.
I put some pictures on the construction here in week one.
The room is 2.14 meters by 1.7 meters and has a ceiling height of 2 meters.
It provides a floor area of 3.6 square meters.
I use a 54 Watt Lightwawe T5 for germination and 2 Pcs 400 Watt HPS lamps.
I have a channel fan that replaces the room air about 40 times an hour to get a comfortable theme in the room, the air enters a fresh air intake from the outside.
The air is purified through a carbon filter to then leave the room to the rest of the basement.
Then I use that heat to heat the rest of the basement.
I will use 8 pcs 15 liter Autopots to grow with and a 100 liter water tank that supplies the pots of water and nutrition.
I will grow completely organically in soil and will watercure my buds to get the best possible medicine for me.
But there are no cultivation rooms to be displayed here, so I continue with what is most important.
Today I have put my seeds in my moisture dome and hope the seeds have germinated within a few days.
I am very excited to see how the new growroom will work and how this CBD Fast Eddy plant from Royal queen seeds will turn out.
CBD Fast Eddy Automatic is combining Cheese x Juanita la Lagrimosa x Ruderalis, Fast Eddy is a rapid growing, flavourful, and CBD-rich auto strain that goes from seed to harvest in 8-9 weeks, produce generous yields, and induce a clear, mellow, and most importantly, functional high.
THC: 9%
CBD: High
Yield Indoor : 400 - 450 gr/m2
Yield Outdoor: 80 - 130 gr/plant
Height Indoor: 60 - 100 cm
Height Outdoor: 80 - 120 cm
Flowering: 6 - 7 weeks
Harvest month: 8-9 weeks after sprouting
Genetic Background: Cheese x Juanita la Lagrimosa x Ruderalis
Type: Sa 50% In 40% Ru 10%
Effect: Clear, Painrelief
Climate: Mild
..............................................................................................................................................................................................................................................................................................................................................
Update 2017-08-15. Both seeds have germinated and planted in small pots inside the humidity dome.
I'm so glad it worked so well and now it's just hoping they'll start growing and become 2 big healthy girls :)
...............................................................................................................................................................................................................................................................................................................................................
Update 2017-08-16. I have mixed my own soil today. Its 40% sieved peat harrow H2-H4 0-30 mm, 45% sieved peat harrow H4-H6 0-30 mm. 5% sand and 10% of compost soil. And i use 15% of perlite and mix it all together.
...............................................................................................................................................................................................................................................................................................................................................
Update 2017-08-20. These girls are much slower to germinate and to start growing than the other 6 girls I started at the same time.
One of the germinated seeds split in half, so I had to take a new seed and germinate it. It took 2 days.
It was just a smal taproots after germination with this strain as opposed to my Fastbuds cbd.
But I hope everything goes well from now and that they live up to their name, Fast Eddy.
................................................................................................................................................................................................................................................................................................................................................
Update 2017-08-21. New pics.
................................................................................................................................................................................................................................................................................................................................................
2017-08-22. Nr1 dident make it and died. Started germinate a new seed to get another Nr1.
..............................................................................................................................................................................................................................................................................................
2017-08-27. Nr 1 is in a small pot in humidity dome and i hope shes going to break the surface soon. Nr 2 is slow but doing fine.
---------------------------------------------------------------------------------------------------------------------------------------------------------------------------------------
2017-08-28. Nr2 is transplanted in 15 liter autopot.
---------------------------------------------------------------------------------------------------------------------------------------------------------------------
2017-08-29. New movie of the girls Nr2. Its no water for 3 days now so the roots develop more and match the plant above the soil. The temp controlled fan is awesome, its easy to set what temp you like to have in the room. Right now its 28 celcius. And humidity is 56%.
-----------------------------------------------------------------------------------------------------------------------------------------------------------------------------------------------
2017-08-29.
Hello to you who read my diary, I just want to say that I am pleased that you have chosen to check in with me and in my diary.
I just want to say that I do this for myself and for a steady flow of my medicine.
Everything you read and see in my diary is 100% honest and I will never distort or beautify anything here.
I document my crops so that I can learn from my mistakes and also to look back at those different crops.
I try to update with pictures every day and with text if something special has happened in the garden.
This is my strainhunt for the best medicine and the beginning of my journey with cannabis and the cultivation of it.
-----------------------------------------------------------------------------------------------------------------------------------------------------------------------
2017-08-30. Cleaned the room this morning, just vacuuming and cleaning with chlorine solution. Im testing the fan to control temp and humidity, it works great.
Added a movie. Everything is looking great right now.
------------------------------------------------------------------------------------------------------------------------------------------------------------------------
2017-08-31. 3 New pics.
------------------------------------------------------------------------------------------------------------------------
2017-09-01. New pics and a video of the grow room from today.
----------------------------------------------------------------------------------------------------------------------
2017-09-04. Week 2 starts now, new pics.
--------------------------------------------------------------------------
2017-09-05. KL 08.00. Cleaned the room this morning, just vacuuming and cleaning with chlorine solution.
KL 12.00. The girl got 2 liters of water with nutes in it, added a video.
-------------------------------------------------------------------------------------
2017-09-06. KL 08.00. The girls woke up after their beauty sleep, the leaves are always a bit down after 6 h of darkness, but they will stretch now when the HPS lamp starts.
Everything looks good and I keep trying to tuck the leaves so they get the maximum amount of light where needed. Added pics and video.
--------------------------------------------------------------------------------------------------------------------------------------------------------------------------------------------
2017-09-07. Day 17 from sprouting. I have never tested PH in my grows, when growing organic in soil iv learned that it adapt PH by it self. But im curious by nature so i had to test.
Kl 10.00 Tested PH in the soil, it was 6.9 and tested my tap water and it was 6.8. Added video of the girl.
Kl 22.30. New pics.
-----------------------------------------------------------------------------------------------------------
2017-09-08 KL 08.00. Good morning, added new video.
2017-09-08. Kl 23.50. Gave every girl 3 liters of water and nutes, added new video.
-----------------------------------------------------------------------------------------
2017-09-09. Kl 21.00. Defoliated a lot and added pics.
------------------------------------------------------------------------------------
2017-09-10. Kl 08.00. Last day of week 2. New video.
2017-09-10. Kl 23.00. 3 new videos.
--------------------------------------------------------------------------------------------------
Likes
6
Share

@Mr_nugs_lover_David
Follow
This wonderful plant is amazing man, I have fallen in love with this strain and the hard rocks nuggets she has produced, beutiful orange pistils, it's just pure fire. Very dense and compact nuggets guys, she's been 100% organic grown, she has been watered with pure water and beneficial bacteria all the way and also with guano liquid by guanokalong, the aromas are very complex is very gassy stinks like a skunk however it's got some piney in and kush aroma,definitely awesome man need to keep growing this strain many more times no doubt.


Processing
Likes
7
Share


@Chronnoisseur
Follow
Growing strong,very bushy lt gives off a nice skunky smell already. I didnt think she was gonna do really well and than all of a sudden boom your thick and bushy
Likes
27
Share


@adam_pawloski87
Follow
Let’s go day 43!!!! Week went real well , girls started preflower so sometime this week I will be switching up the nutrients for flowering! We are stable and looking super healthy! Can’t wait to see what these ladies do this week! Hope you all enjoy !
Likes
29
Share


@Fullmeltalchemist
Follow
D79/F32 - 12.7 - 👽 ❄️ ❄️ ❄️ ❄️ ❄️ ❄️ ❄️ ❄️ ❄️ ❄️ ❄️ ❄️ ❄️ ❄️ ❄️ ❄️ ❄️ ❄️ ❄️ ❄️ ❄️ ❄️ ❄️ ❄️ ❄️ ❄️ ❄️ ❄️ ❄️ ❄️ ❄️ ❄️ ❄️ ❄️ ❄️ ❄️ ❄️ ❄️ ❄️ ❄️ ❄️ ❄️ ❄️ ❄️ ❄️ ❄️ ❄️ ❄️ ❄️ ❄️ ❄️ ❄️ ❄️ ❄️ ❄️ ❄️ ❄️ ❄️ ❄️ ❄️ ❄️
D82/F35 - 12.10 - A picture paints a thousand words but the loudest one is PUUUUUUUUUUURP

Likes
20
Share


@SkunkyDog
Follow
Hallo zusammen 🤙.
Sie erhalten 25 Prozent Rabatt in unserem Shop
Mindestbestellwert beträgt 75 Euro
https://greenbuzzliquids.com/en/shop/
Code: GD42025
Likes
7
Share


@Pjm70
Follow
She seems to be budding nicely. However in the past few days all her lower leaves are turning yellow. I know this plant is a heavy feeder and I thought I was feeding enough. She is not growing anymore, but she looks like she has a nitrogen deficiency.
I do use the same water which has a low 6 ph. Today I gave her water with a 7.0 ph. Just to get her out the constant ph zone she has been in.
9/17 fed 15 MLS of foxfarm Tiger Bloom
9/19 fed 15 MLS of Tiger Bloom.
9/21 fed 4 tablespoons Foxfarm Big Bloom, 1/2 Teaspoon Foxfarm Beasti Bloom and 12 MLS of Foxfarm Grow Big. Per 2 gallons. Day 98
She has a lot of yellow lower leaves. So I hit her up with a little grow big. From what I read, she still needs some nitrogen.
Lower leaves turning yellow. Think it's a little too early for that. She is a big eater and it looks like she has not been getting enough base nutrients.
Her pot is very heavy, so now I'm going to hold back water until she drys a little.
Getting cold out at night. Every morning I go out and she was drenched in dew. This plant I'm counting on giving me bud until at least spring. So now I have been sneaking her in the garage at night with 47 percent humidity. She seems to be very happy about this. Right now 9 pm 60 degrees, humidity 71. Humidity is way too high for her to be sitting outside.
Her buds are fattening up. Some time last week I gave her a feeding of just Foxfarm Beasti Bloom. Beasti has no nitrogen and she was not happy about that. A lot of lower leaves turned yellow. So I gave her Foxfarm Tiger Bloom and that seemed to make her happy again. Will not make that mistake again.
Likes
8
Share


@MrAutogrow
Follow
Got an ounce from her. Not too much as far as yield but the dense bud structure and purple hues made it all worth while. Pressing it for rosin and it is perfect.

Processing
Likes
9
Share


@shabazz411
Follow
Last week was the last feed week we will be flushing the plants for the last two weeks of this grow flushing with kleens by cyco and a touch of molasses to finish of this grow of the year harvest in two weeks

Likes
14
Share


@Dieselnutz
Follow
Just started 3rd week of flowering. Everything is goin smooth, plants stacking nice and drinking almost a gallon a day.