
Likes
Comments
Share


@nerdz
Follow
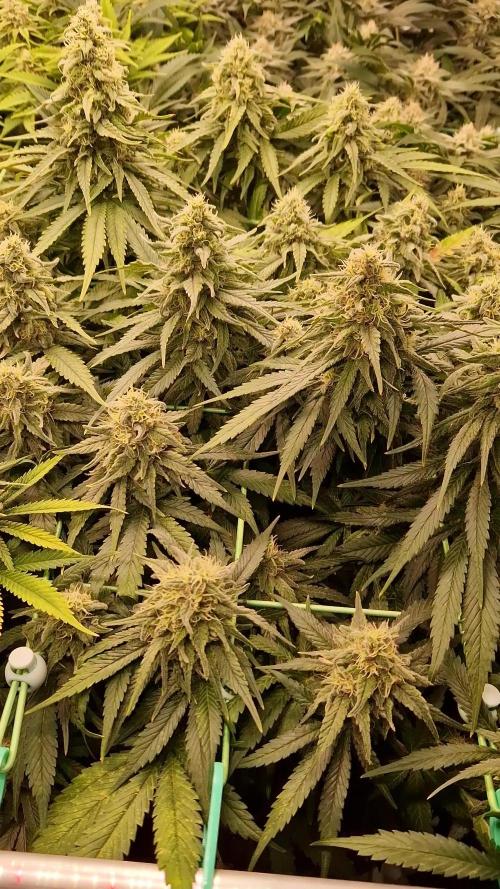
The strains I'm here for.
Wish I could have left that back left roast a few more days but it would have probably put the other 3 plants past the sweet spot. Dense regardless. The second apex in the back right was very pretty and colorful. Fruity smells coming off them.
From the 4 plants I'll estimate 700-750g dried.

Likes
28
Share

@TrickzGrowz
Follow
Mit Abstand die dicksten Buds von meinen aktuellen 4 Ladys. Bin echt erstaunt wie die Genetik performt!

Likes
15
Share


@GreenTop_pharms
Follow
First week of flower done and starting to see little white hairs already on the amniesa kush and the big bang. TheIncredible bulk is stretching nicely. autos are doing amazing, check out my 420 fast bud diary for that one.

Likes
24
Share


@Captensmokey
Follow
An accident happened with the most beautiful large one while putting the main top inside was broken off. I have also had a lot to do with leaf miners. That's why there are some leaves off... This one is still slow so far, but I don't think that's crazy if it also has to recover from removing the leaves. The weather is also on the cold side. Wish me success. for a few more weeks. I be very kind for these ladies😁

Likes
17
Share


@Mroizo
Follow
Last Thursday was the start of the fourth week. I didn't update earlier because I was away on vacation. I asked a trusted friend to take care of the girl. As you can see, in the fourth week of the girl's life, it started to bloom.
I continue without giving any nutrients. I have biobloom and top max from biobizz at home.
Do you think I should use nutrients or should I let it go until the end without nutrients?

Likes
11
Share


@TechDCo
Follow
Happy Xmas 😊
No better day to lay them down!
"We're Off to the races" 🏁
Greyhound's at the ready!
"I feel like; we're in for a speed run Martina"
•HydroSol Grow + H202•
#Peanut Butter OGKB - Sensible Seeds
#Peyote Wi-Fi CBD - Seedsman.
#Monkey SlapZ - PreyBird Farms.
#The Future - DC Seeds
"Sprayed SEEDS with weak 3% solution of hydrogen peroxide foodgrade. Placed on mineral wool inside of a glass food container in a propagandist! 😉 on a heat mat at 24c.
26/12/2024
Peanut Butter OGKB has sprouted her tap!
27/12/2024
Peyote Wi-Fi CBD (PW) is ready for the light as well with The Future (TF)
28/11/2024
All have germinated!
Peeled back the shell 🐚 on peanut butter OGKB (PB) being a good Santa's little helper.
Will introduce HydroSol water soluble feed in the morning. They should have enough in there tap root until morning.
"Its only been 3days since I laid them down 👀 and it's been 1 day from seed sprouting tap root" mathematical genius i am.
Midday: Apllied a very weak feed of HydroSol at ratio of 1ml/L.
DLI: 20 (c) Little above average!
Lights Off!
Sprayed propagator with HP 6% all round avoiding direct touch!
About week 3 will up the dose spray to 12% "avoiding direct touch" this is bleach strength.
But hopefully being introduced early will stop the micro-organisms "ever" building up in the plants cells ever.
May have to do a laboratory grow next to get the results i want that are projected in my minds eye! If the hydrogen keeps reacting with micro organisms; it could by the very definition rip atoms and form mutations of its own kind!
Hence these are "Experiments" Because i think every grow is an experiment (leave it to the professionals: I hear you!
Would; could; should but the world is full of lies and deceptions; from knowledge; technology; history and Morden-day! Well Morden day academics 'to me. Personally is all bs!
Take it as it is, just my opinions and a cloud of thought sprawling and spiraling out over these digital diaries.
I hwar ya too. A huge still box would be needed or properly designing a room for a labradory grow.
I don't know! I would need zero interferences from "out of space" where the nasties come from in our world. The space between me and you; consists of everything we know in that "gap" for we are forever shinning from our own island! Hard to explain.
Lights Off:
147watts wall draw with DLI at 20!
Light Shedule: 3-9pm
Monkey SlapZ (MS) hasnt cracked her shell yet. I may have to do it tomorrow morning (may die otherwise)
29/11/2024
Lights On!
(MS removed shell and accidently snapped its tap toot)
PW tap as got snap accidentally as well as I re perisione it. This happened before and MS recovered from the snapped tap root. I made the MS joke 😃
Anyways...let it be!
30/12/2024
I'll update agai😗n next week: i think this talk for the first few days has set the pace for myself!
Enter.the.Void.2009.DC.1080p.BluRay.DDP5.1.x265.10bit-GalaxyRG265
Just finshed watching it! for real i thought it was me! mint film to watch stoned
31/11/2024
Increased light: 293watts DLi 35
***Happy New Years 2025***
How did you smoke yaself in? Me; diy chemistry kit lol
"All the best brothers" ❤️ 💪
Keep it strong!
I can only hope this diary can bring HydroSol some limes 🍋 🙏 in the sunshine 🌞 water soluble feed. Zero residues "allegedly".
All I have heard is positive things about HydroSol water soluble feed.
I had a thot, " The HP 12% i am using for cosmetic reasons is basically "water" with an extra molecule.
H202 is basically water and is can be soluble with HydroSol feed.
I'll explain more on from my pervious grow diary by Segwaying in and out of this diary with quotations from It and continuing on.
02/01/2025
Dimmed light: 188 25DLi
Will update next week, these puppies need to stretch their roots. Nothing much happening!
Loads happening really. You know what i mean lol
" My little rusties i call them"
Free radicals have caused the leafs to have a faint ginger tint when it stole the Oxygen Atom, which released free radicals. Not to worry this will boost growth in the next two week.
04/01/2025
All seems okay. Monkey SlapZ lost a leaf 🍃 😳 but looks like shes recovering fine.
I introduced HydroSol way too early. Never mind you live and learn. They are all back in the propagator and I put some fresh seeds down to germinate/same strains.
11/01/2024
All fresh new seeds have sprouted.
MS is showing new baby leafs 🍃 recovering from losing a leaf and top. Fresh baby growth is now showing!
13/01/2024
MS n TF has sprouted! Old MS recovered
God burnt down Mel Gibsons house for making passion of the christ lol
18/01/2025
Its felt like a long start; experimenting with H202.
The 2nd load of seeds i introduced h202 2days after tap root sprouted and HydroSol on day 3.
This seems to of worked
20/01/2024
21/01/2024
TF and MS repotted into 5L jerry starter cans with 1.25ml/l
22/01/2024
All looks okay, will slowly 🐌 increase lights over the next week as they creep out of germination.
PW hasn't germinated yet, ive placed another PW seed down!
Midday Check ✔️
DLI: 28
Watts: 270
Canopy distance est: 35-40inches
MS is 3days old after sprouting! Maybe it's just me but she looks older and her colours and texture looks different!
Could it be the #HydroSol #H202?
Who knows? Will have to replicate the protocols to verify these results on indeed because of HydroSol + H202 (1.5ml/l)
23/07/2025
I put down to germinate Freaky Pablo TerpYz and Magic MarkerxZZTOP
26/07/2025
Lights
Rapid Growth has slowed 🐌 down.
#The HydroSol feed 6.5ml/5litre of water for germinating....1ml of 12% HP.
I think this is the ratio I am after.
Being water soluble feed it looks like just water ; well it is 98% water i suppose.
26/07/2025
Midday
It seems the HydroSol is working perfectly. It's been a rough sturdy journey to start off with but I've found a steady road to the right ratios.
1ml 12%HP to 5L 6.5ml HydroSol Feed for germinating.
Vegging I will slowly increase to double the amount as she 👀 sees fit.
It seems the HydroSol is working perfectly. It's been a rough sturdy journey to start off with but I've found a steady road to the right ratios.
1ml 12%HP to 5L 6.5ml HydroSol Feed for germinating.
Vegging I will slowly increase to double the amount as she 👀 sees fit.
Vegging begins tomorrow. It's been 2wks since TF & MS sprouted from seed.
Others are still germinating in the propagator.
2 in this tent.
1 in loft tent
1 in Sativa tent (loft)
thats the plan.
Midday: light increased to 310watts
DLi (c): 32

Likes
30
Share


@Green_Dream
Follow
It's been a pretty good week. I did quite a big defoliation, as things were getting crowded.
I switched to a more flowering dominant feeding, I decreased the Nitrogen and pumped up the phosphorus and potassium.
I will soon do a flush, as it looks like the nuts are starting to accumulate at the roots.
Likes
2
Share


@MO_Gardens
Follow
This plant has CRAZY stacking on it. It hasn't grown up as much as it has branched out. This is a strain I'm growing to treat symptoms of MS, so with the stacking it may turn into a mom plant for cloning, but we'll see.
It's received some feedings of liquid seaweed, black strap molasses, and URB in R/O water.

Likes
92
Share


@Hou_Stone
Follow
- Water: tap water at 300 PPM, I add 0.6g of Hybrid powder and 0.4g of booster PK+ per liter to reach 950PPM and I adjust the PH to 5.8. I watered daily until water drained from the pot (to release nutrients from previous waterings) and I take a 3-4 day watering break to let it dry out before resuming a daily watering schedule.
-Daytime temperature: 21-26°C
-Night temperature: 21-23°C
-Humidity: 55-80% :/ too high
-Lamp: Mars Hydro FC3000. intensity 90% at 35cm from the top leaves
-Room: Mars Hydro 100x100x180cm
-Extractor: Mars hydro 402 CFM Max. power 3/10
-Substrate : 70% coco, 25% perlite, 5% vermiculite.
My instagram : https://www.instagram.com/p/CuMhQ_BsjRP/?utm_source=ig_web_copy_link&igshid=MzRlODBiNWFlZA==
Looking for MarsHydro equipment for your crop? 🔥
You can use my promo codes! 🙏😻
3% off with "houstone3" for: TS LED Grow Light, Tent, Ventilation
5% off with "houstone5" for: FC&FC-E&SP LED Grow Lights; Grow Tent Kits
https://www.mars-hydro.com/?acc=hou-stone

Likes
5
Share


@High_like_Thai
Follow
As we can see I’on on my pre flowering need some advice if I should train them or just let’em grow ?
ตอนนี้ บางใบมีสีออกเขียวเเกมน้ำเงินทางปลายครับ คือ mimosa cake ส่วน forbbiden runtz เราก็เขียวดีสีไม่ตกครับผม

Likes
15
Share


@dank604
Follow
Both are growing strong, amazing the kind of growth my light creates, girls seem to be loving it! Hope to start LST on the older lady soon (Thelma). Happy growing y'all!


Likes
22
Share


@Basementganja
Follow
The final week!Just waiting for the trichomes to shift from milky/clear ---> milky/30% amber.
This girl was unfortunately nutrient locked since week 3 of flower, due to low ph (~4).
Yield suffered. Potency didn't!
Likes
9
Share


@TiRobotProds
Follow
Les pompoms commencent a se former belle structure de cette plante. Boit énormément. Les engrais se mettre en marche et cela fait une énorme différence.

Likes
5
Share


@Growjardin
Follow
She is doing her thing gave her a good defoliate again to open her up. She had 3 x half ml doses of pk on top of 3ml bloom over the coarse of the week. Pk dropped bloom kept at 3ml. Overall very impressed halfway through this week in the video and boom baby she’s getting there
Likes
58
Share


@nonick123
Follow
Bienvenidos a la semana #4
Día #25 (05/06)
Salir al exterior ha vuelto sedientas a todas las plantas (también hay mucha evaporación por la parte superior del substrato)
Se riega con 250 ml de agua con Bio-Grow, Bio-Bloom y Top Max de Biobizz, ya que todas las plantas han empezado la prefloración
Día #26 (06/06)
Las Orion F1 no están reaccionando bien al LST. El crecimiento está estancado. No se si he empezado demasiado pronto o esta strain no lo tolera bien.
Decido deshacerlo y dejarlas crecer libremente Tal vez retomarlo más tarde cuando empiecen a crecer las ramas laterales...
Decido añadir 2 cm de substrato "nuevo" en cada maceta porque el nivel ha bajado demasiado. Entiendo que esto también ayudará a la estabilidad ☺️
Dia #27 (07/06)
Todas las plantas han tenido que volver al interior por la inestabilidad meteorológica
Crystal Candy XL Auto está creciendo como un cohete! Hay que ajustar el LST todos los días. Ya empieza a parecer una araña!
Me encanta cuando veo estas configuraciones en los LST de los diarios y lo estoy consiguiendo 😁
Royal Bluematic también está creciendo muy rápido
Northern Lights está algo más lenta. Espero que despegue cuando llegue al stretch
Las Orion F1 han reaccionado bien al LST deshecho 😂
Día #29 (09/06)
Hace un día soleado y las plantas vuelven al exterior 😋
Ha hecho un día muy cálido y todas las plantas están "secas"
Se riegan todas con 250 ml de agua con ph ajustado excepto Northern Lights, que al estar en maceta de tela y más grande (15 litros), se riega con 500 ml de agua ph ajustada
El riego siempre alterno sólo agua ph ajustado y agua con es con Bio-Grow, Bio-Bloom y Top Max de Biobizz y ajuste de pH
Crystal Candy XL Auto y Royal Bluematic siguen creciendo rápido. Muy rápido en comparación con Orion F1 y Northern Lights que van más lentas...
Día #30 (10/06)
Hoy ha habido una sorpresa muy especial
Crystal Candy XL Auto se está volviendo morada / púrpura! 😍
Al principio pensé que lo había visto mal, porque no he visto ningún diario en que esta strain se vuelva púrpura, pero la mía lo está haciendo! 😁
Estoy muy contento porque siempre he querido cultivar una variedad morada! 😁
Además, ha entrado oficialmente en la etapa de floracion
Royal Bluematic sigue creciendo rápido y adaptandose estupendamente al LST
Orion F1 parece que está cogiendo algo de velocidad
Northern Lights sigue su crecimiento lento. A ver si se acelera!
Día #31 (11/06)
Esta ha sido la última semana de vegetativo.
A ver si las que van más lentas aumentan el tamaño con el stretch!
Esto es todo por esta semana
Gracias por leerme!

Likes
26
Share


@AsNoriu
Follow
Day 93. Second and third wave of chop has happened.
Girls are really crystally and airy, leafy, stretched, look more like sativa, but some of them are queens of oil and stickiness and one beuty was pure black currant, felt like you are eating jam, not smoking spliff ;))) But a lot of them went to bubble hash or butter production. Still, first wave of chop brought me 120 of smokabelish crap ;))
Royal Gorilla clone brought in from green house, 3 most interesting girls left for watch out ;))
Freak show goes on !!! ;))
Day 98. Girls are going good. Stinky and crystally, just VERY VERY airy ;))
RQS RG clone finally adapted to lights, leaves are praying again, she is happy.
That clone will go for a finish into dry room, i bought light, so its now veg, emergency flower and dry room .. 3in1 ;))
New tenants gave a visit, think they will movein in a week ;))
Thank You #SweetSeeds
Happy Growing !!!


Likes
22
Share


@Greenwolvesfarmer
Follow
Ha reaccionado bien a sus estímulos , agua , CO2 , luz y amor...
Esta semana le daré solo agüita para que descanse de los fertilizantes , de todas maneras , todo depende de la planta misma ...esperando no maissss
Likes
7
Share


@Sti_Cazz
Follow
So these 2 grew a little different, one from the other... They really thought me so much... Great growth all grow throughout and the low hight helped to avoid light burn, something I had trouble with last time.
Will chop the second one in a few days time and add more info...
Added some Bison pics

