
Likes
Comments
Share


Processing
Likes
31
Share


@FlavoursUk
Follow
Growth is super, despite having splitting and getting a break where I topped due to something falling on the plant. I quickly patched her up with some electrical tape and a cable tie and she recovered within a day! Super resilient plant. She's starting to smell and putting out a few pistils already at the end of week 1 flower!

Likes
7
Share


@BudLoveJohn
Follow
Plants sprouted in just three days after planting! First week for the seedlings was me learning to get the humidity and light the right distance. A little bit of stretching but not too big of a deal. Plants fixed themselves
Likes
11
Share

@World_Breeders
Follow
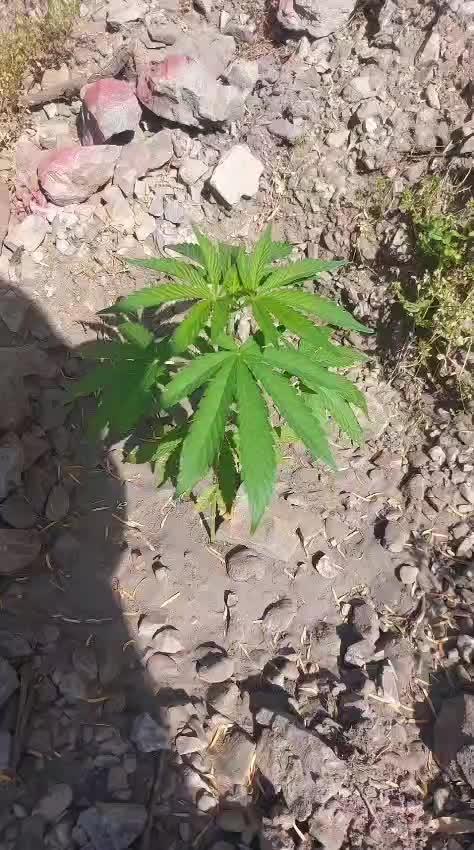
Hokuzai x Papaya continuing its outdoor development in Morocco 🇲🇦
The plant is settling in well after transplant and showing steady vegetative growth under natural sunlight. Despite its compact size, vigor remains strong and new growth is developing consistently across the plant.
Conditions remain stable, with the focus still on root establishment and building a healthy structure before the next stage of development ☀️🌱🔥
Likes
8
Share

@DansHampf
Follow
18JULY2025: Plant in the middle still is behind in flowering. See image with deficit visible on the sheets. Could be potassium. What do y´all think? My landloard is filtering the tabwater. Could this be the reason for a potassium deficit?
Likes
2
Share


@igrowcan
Follow
[Week 9 - Yellow Leaf Removal]
Some leaves may turn yellow as the plant directs nutrients to the buds. Within the minigrow box, we carefully remove these leaves to prioritize bud growth.
Likes
7
Share


@TINO14
Follow
Aún falta ... La paciencia es una virtud pero ,con estos buds cristalinos 😅.
Fenotipos sativas 2
Fenotipos indico 1
Al parecer el fenotipo indico ya decidió dar a conocer su fruto finalizado pero pasan los días y noto nuevos tricomas y cálizes , es como si hubiera vuelto a desarrollar buds hay pistilos obscuros y resinosos y otros tiernos y nuevos.
El día 30 de marzo empieza su séptima semana de floracion
Según en catálogo su floracion va desde 7 semanas a 9 pero sus tricomas dicen que les de algunos días extra.
Likes
8
Share


@Portnugs
Follow
Resin is increasing and looks like bud sites are ready to start putting on some bulk. Issue with low ph drift reaching 5.2 so I decreased 50ppm with distilled water without calmag to soften the water and counter the drift.
After decreasing ppm, ph drift continues, so I flushed for 2 days with distilled water and added back nutrients at half strength to increase to 800 ppm over time.


Likes
47
Share

@GERGrowDesigns
Follow
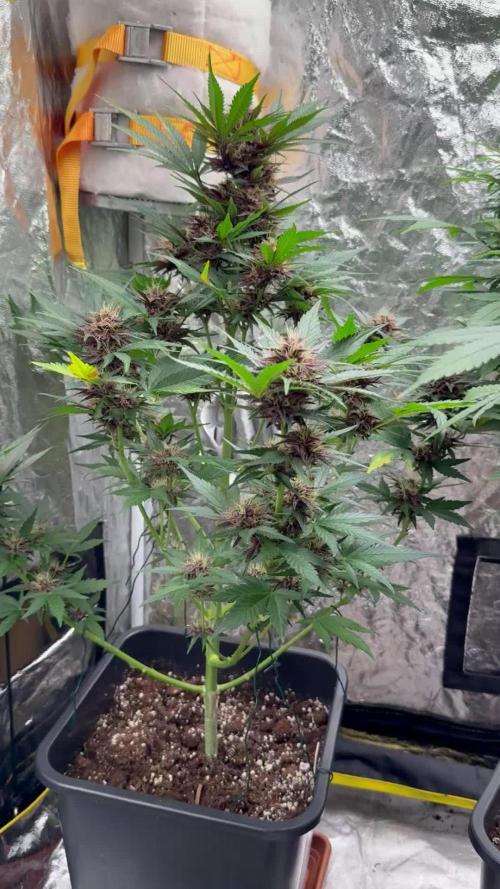
Welcome to my Dutch Passion Diaries Competition 2025 entry!
For this competition, I’ve chosen the Indoor Feminized strain: Ice Cream Haze
Media from Week 17 or Flower week 7-8 After Moving into the New Tent for the flower weeks. Stage.
Here’s what I’m working with for the Final Tent after Moving for the Flower time :
• 🌱 Tent: 220x150x150
• 🧑🌾 Breeder Company: Dutch Passion
• 💧 Humidity Range: 40
• ⏳ Flowering Time: 8W-10W
• Strain Info: 20-25%THC, Sativa
• 🌡️ Temperature: 26
• 🍵 Pot Size: 0.5l
• Nutrient Brand: Narcos
• ⚡ Lights : 720W x 2
Dimmed to 400w Each at the Moment. Because of Heatwave ⭐
A huge thank you to Dutch Passion for allowing me to be a part of this amazing competition and for supporting the grower community worldwide! Your genetics and passion speak for themselves!
Curious to try these strains for yourself?
You can check them out and support me at the same time through my personal link:
https://dutch-passion.com/?a_aid=GGD
I would truly appreciate every bit of feedback, help, questions, or discussions – and of course, your likes and interactions mean the world to me as I try to stand out in this exciting competition!
Let’s grow together – and don’t forget to stop by again to see the latest updates!
Happy growing!
Stay lifted and stay curious!
Peace & Buds!

Likes
29
Share

@KingSalomonsWeed
Follow
23.10. Day 53 of flower. The buds become flesh. Still wonderful sticky.
She really likes it moist.
Lifted the lamp and switched the white Light off. Just for a while. Because, i think she began to be grilled.
Just a little relax for her.
Switched to 16_8h light nightschedule.
And agaun with white light, FULL POWER.
With greetings from the unexpected colorful Trans Syberia..😛 💪

Likes
5
Share


@JuicyFruit
Follow
Day 60 - 09/02/20
Lovely smell coming from the blue cheese plant :) the buds have a very similar smell to the blueberry outdoor grown buds i smoked in spain a few years ago :) took me right back there mentally haha.
Ive added a good feed of calcium magnesium, nitrogen, potassium and phosphorus the last few days as these are big plants and a few leaves have been yellowing over the last couple of weeks.
Since these feedings everything is returning to normal and flowering is going fine.
This is my first time growing in biobizz light mix so i was bound to run into some problems.
Still i think im gonna get around an ounce from this plant.
I think harvest is still 2-3 weeks out for this one but as its a favourite of mine im really excited!
Take care until and happy growing until next week!
Likes
3
Share


@FarithAriasFajardo
Follow
Bueno, así terminamos esta primera semana de flora. Muy feliz con ambas plantas. Muy fuertes. Cargado de nuevas enseñanzas y cada vez más ansioso de llegar a la cosecha. Aunque aún falta la mitad del proceso y la en parte la más difícil por temas de humedad ya que ha estado lloviendo mucho en mi ciudad y he tenido picos nocturnos de 85% aunque en parte es normal ya que estás dos primeras semanas con el corte de bajos y chiquitaje que no producirá nada ellas transpiran un poco más. Esperemos que esta semana se nivele un poco o en últimas tendré que conseguir el deshumidificador para las últimas semanas y pues nada más que agregar. Gracias por llegar hasta aquí nos veremos en la próxima semana antes de empezar a dar engorde para estos cogollos!


Likes
9
Share


@SSKNFbyHAZE
Follow
** COST **
TO RUN
- Used previous ⛺️ setup : $0.00
- Monthly electricity : $36.73 <-- other ladies sharing ⛺️
- 3 Gallon Fabric pot : $0.15
- Bonsai wire : Apx. $0.03
- Reused soil from last run : $0.00
FOR NUTRIENTS
- Jadam Microbial Solution : $0.00
- Fermented Plant Juice : $0.00
APPLYING
- JMS : 30ml / 1 Litter
- FPJ : 30ml / 1 litter
TOTAL COST : $36.91
Throughout the week, I give compost tea, and fermented plant juice once each ^^
Hope you guys have a wonderful day today ^^v
*** Please Like, comment & share ***
Highly appreciated -----/-----<@

Likes
62
Share

@wolfvb
Follow
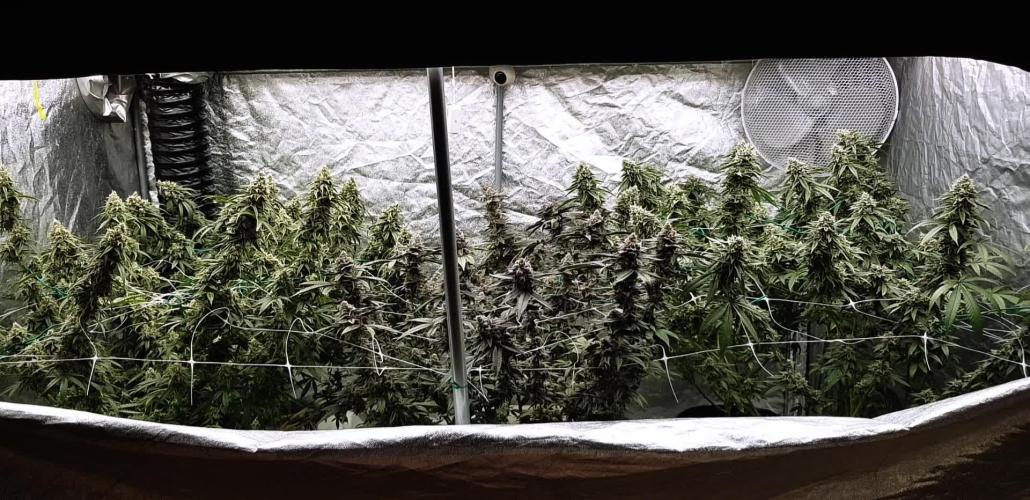
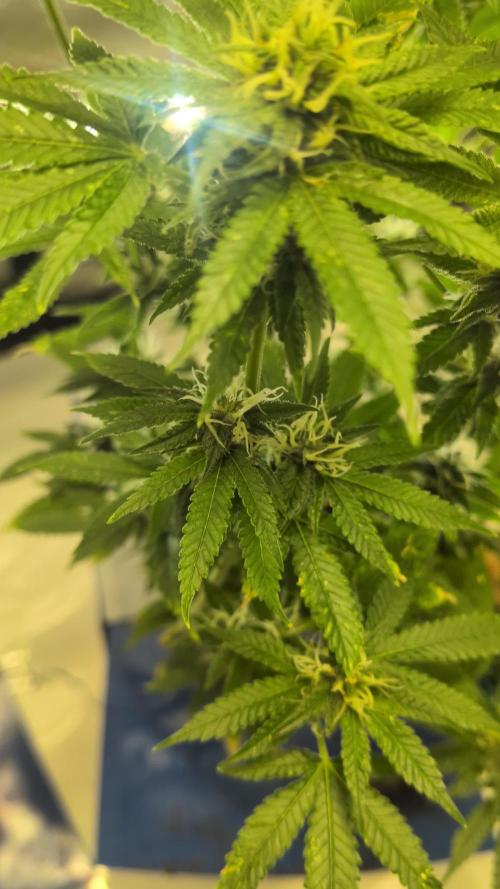
🌿 Devil Cookie - Bouncing Back and Frosting Up! ❄️🍪
Let's go! Welcome to the new week. Hopefully, she is fully recovering from the pest stress and the heavy defoliation from last week. Judging by how these buds are looking, I think it's safe to say she is on the mend and pushing hard toward the finish line! ❤️?
📈 The Details / Progress Report:
Resilience & Recovery: She took that massive haircut like an absolute champ. With all the old, damaged foliage out of the way, the airflow in the tent is perfect, and she is putting 100% of her energy right into those bud sites.
Trichome Explosion: Just look at those macro shots! The sugar leaves and calyxes are completely buried in a thick, sticky layer of frost. The resin production is going crazy as she matures. ✨
Maturing Pistils: We are seeing a lot of those white hairs starting to turn a beautiful, fiery orange and curl inward. The colas are getting dense, swelling up perfectly, and really starting to look like finished flowers. 🔥
Clean Canopy: The lollipopping from last week is doing its job beautifully. The lower section is clean, the baby head is still holding down the soil, and the top canopy is totally optimized for light penetration. 👶💡
💧 Next Steps:
The thrips seem to be a thing of the past, and she is recovering beautifully. The main goal right now is to keep the environment perfectly stable and start keeping a really close eye on those trichomes. We are getting into the late stages of flower, so it's all about coasting, letting her swell up even more, and waiting for that perfect harvest window.
Let's keep it growing! 🌱💨
Processing
Likes
21
Share


@LittleBigTrees
Follow
Plucked a few more leaves but other than that just feed them this week including bloom.
Also gave them some rice starch (from boiled rice water collection) on day 42 as a boost for the microbes 👍
Turned the IR off now and turned up to 34000lux
Likes
3
Share

@Grow_for_Happiness
Follow
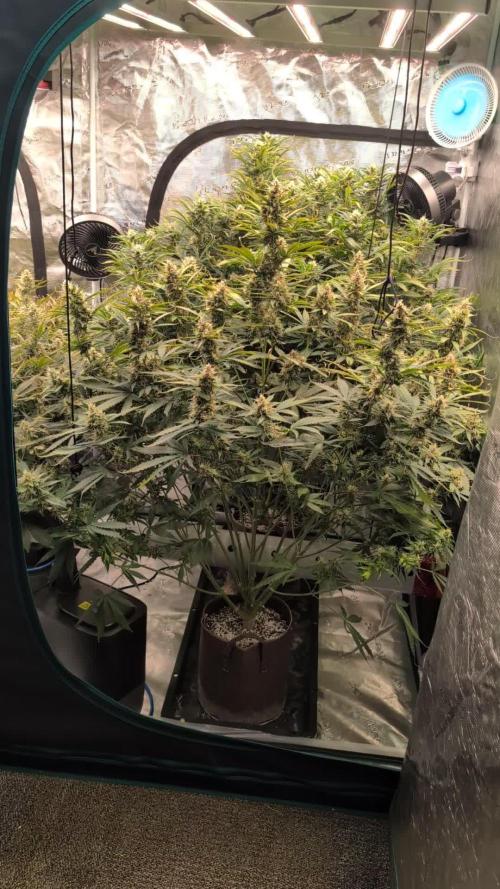
Wow these girls are big and beautiful! Just under four feet tall and about as wide, with nice even canopies packed full of developing buds. No work this week, just keeping the reservoir full .
When I opened the tent to take pictures today I was inspired to make this song parody hahaha.
🎶I like big plants and I can not lie
You other growers can't deny
When you open up your tent
And you see a big plant
That's full of fat ol' buds
You get sprung🎶
Anyways that's a glimpse into my mind after a long day of work and a puff of Slimer, until next week!
Likes
9
Share


@cannanova
Follow
D29: (Sunday 28 August). I'm not adding water today since I noticed Mario's leaves are dropping off. I will wait until tomorrow to water again and see if Mario gets better.
D30: (Monday 29/08/2022). I'm not adding any water today either. Mario's leaves still dropping off, let's see.
D31: (Tuesday 30/08/2022). Not any water today either.
D32: (Wednesday 31/08/2022). Not any water today.
D33: (01/09/2022) I added some water today, and Mario got a bit worst, I don't understand why since I waited for 5 days before watering again.
D34: (02/09/2022) Just observed both plants. Mario got worst. I will not water him again in at least 7 days to see what happens.
D35: (03/09/2022) Nothing new happened. Tomorrow I will add water only to Maria.

Likes
4
Share


@UnicornSparklehorn
Follow
Last week's topping turned out to be a FIMing. Not necessarily a bad thing, but I wasn't planning for it. I guess that makes it a true FIM. I tied a branch too tight during LST and it snapped while the plant was growing. Reminder to avoid training too tightly.
Processing
Likes
7
Share


@Cannibalgardens
Follow
Honestly the genetics are always good here from @fastbuds .. not much is changing just getting thicker colas cannot water till the end gets here ready to hard l


